The community is proud to announce the availability of Citrus 4.0.0!
Objectives
Citrus 4.0 is a major release mainly driven by the industry migrating from javax.* to jakarta.* APIs. The new version uses Java 17 and aligns with popular Java enterprise libraries such as Spring Boot and Quarkus. Citrus 4 uses updated versions of many dependency libraries (e.g. Spring 6, Apache Camel 4, Cucumber 7, Selenium 4, Jakarta EE and many more). The proper alignment with those libraries and the evolving of Java’s ecosystem in general is a key driver for Citrus 4.
Of course the new major version also addresses many improvements and fixes. That being said we try to keep breaking changes on a low-level in order to provide a smooth migration from former versions. Due to the breaking changes in the many javax APIs this might not always be possible though. People coming from Citrus 3.x should have a look at the 3.x migration guide.
Here are the main objectives we have with Citrus 4.0
Java 17
Move to groupId org.citrusframework
Update dependencies to latest major versions
Move from javax.* to jakarta.*
Polyglot test runner support (XML, Groovy and YAML)
QuarkusTest runtime support
Remove deprecated modules and code
Java 17
The Citrus 4.0 bits are compiled with Java 17 (was Java 11 for Citrus 3.x). This means you need to use Java 17 as a minimum to run Citrus.
We recommend to use the following setup:
Java 17+
Maven 3.9+
As runtime one of
JUnit Jupiter 5.10+
TestNG 7.8+
Cucumber 7.14+
JUnit 4.13+
Quarkus Test 3.4+
Of course this also means that you are able to use the full greatness of evolving Java features such as records, multiline text blocks and so many more.
Maven groupId “org.citrusframework”
Citrus is an Open Source project and promotes the idea of open code and community contributions. For over a decade Citrus has been using the groupId com.consol.citrus because the company ConSol Software GmbH and its employees have been a driving force in creating and maintaining the project since the very beginning.
Still ConSol plays a significant role in the success of Citrus by adapting and promoting the project in so many ways.
However, the list of new contributors emerges and Citrus benefits from many community contributions these days.
For the sake of strengthening the Open Source idea we decided to move the Citrus groupId from com.consol.citrus to a more generic org.citrusframework from Citrus 4.0 onwards.
With the move to org.citrusframework we decided to happily comply with the Open Source nature of the project because nowadays, the project receives valuable contributions from many companies.
Please update the groupId in your Maven pom.xml accordingly when updating to Citrus 4.0.
Since the groupId also represents the basic Java package used in Citrus the packages of all Citrus Java classes have also changed from com.consol.citrus to org.citrusframework so please replace all occurrences and imports accordingly as you update.
Please do not worry as it should be nothing more than a search-and-replace operation in your project codebase in order to use the new base package wherever it may be referenced.
Dependency update
Citrus depends on many fantastic libraries and projects. With the move to the Jakarta API many of them hava had major version releases in 2023. Citrus now aligns with the latest and greatest versions of these libraries.
The new library versions used in Citrus 4.0 are:
Library
Version
Library
Version
JUnit Jupiter
5.10.0
TestNG
7.8.0
Cucumber
7.14.0
Quarkus Test
3.4.2
Apache Camel
4.1.0
ActiveMQ Artemis
2.31.0
ActiveMQ
5.18.2
Jetty
11.0.17
HttpClient
5.2.1
Cucumber
7.14.0
Knative Client
6.9.0
Kubernetes Client
6.9.0
Netty
4.1.100.Final
SLF4J
2.0.9
SnakeYAML
2.2
Spring Framework
6.0.13
Spring WS
4.0.7
Spring Integration
6.1.4
Testcontainers
1.19.1
PostrgeSQL
42.6.0
GreenMail
2.0.0
Jakarta JMS API
3.1.0
Jakarta Validation
3.0.2
Jakarta Websocket API
2.1.1
Jakarta Servlet API
6.0.0
Saaj
3.0.3
JaxB
4.0.3
Kafka
3.6.0
SLF4J
2.0.9
Snakeyaml
2.2
Move to Jakarta API
Many libraries accomplish the switch from javax.* to jakarta.* APIs. The migration itself can be a tough task and the Citrus team is happy to have tackled this move with the new major version update.
For you as a user this move may not cause much trouble because the Citrus dependencies are all using the new Jakarta APIs already. In case you are using Citrus in combination with an older servlet container or with a library that still uses the javax APIs it may be time to also update these dependencies in your project.
Polyglot test runner support
Citrus provides many ways to write test cases. The most popular ones are using the Java DSL and the Spring bean XML syntax. In addition to that you can now choose to write Citrus tests in pure XML, YAML or Groovy. All of them share the same feature set, so you can adapt the test language to your individual requirements (not everybody is a Java expert and this is fine).
QuarkusTest runtime
Quarkus is an emerging enterprise Java stack that is keen to bring Java as a leading platform into the cloud-native application future. With Citrus 4 you can directly combine the test framework with the test capabilities of Quarkus. The Quarkus test framework provides awesome features such as dev services, auto configuration and first class integration with Testcontainers.
Citrus now provides a Quarkus extension that is able to hook into the QuarkusTest runtime so you can inject Citrus capabilities into your Quarkus test.
Sometimes it is the time to say goodbye and a new major version is always a good point to get rid of obsolete and outdated things. Some Citrus modules are declared “end of life” and are being discontinued, some modules will just be moved to a separate code repository.
These modules have been removed from the main Citrus project.
citrus-java-dsl deprecated Java domain specific language that was based on the TestDesigner interface
citrus-arquillian Arquillian integration to run Citrus as part of the Arquillian framework
citrus-jdbc JDBC server implementation that is able to simulate any JDBC driver and database
citrus-remote Run Citrus via remote Http tunnel on a foreign server
Removing the modules does not mean that these bits are completely gone forever though. Some modules have just been moved out of the Citrus project into new separate code repositories. This is mainly because these modules do have experimental status and updating to Jakarta EE and Java 17 has not been possible at the moment.
The experimental modules moved to separate repositories are:
The code and functionality of those modules stays the same. Also, the code has already received updates on the major releases such as Spring 6.
It is up to the community though to decide about the future maintenance and release cadence as these modules will not be released automatically with Citrus main project anymore.
Provide feedback and help
Please adapt to using Citrus 4 as soon as possible and give us feedback what is working and what may need more attention.
We would love to hear from you how you like Citrus 4! Also the documentation has not been fully updated yet. Any help is much appreciated! So in case you have something to improve of fix just open a PR we are more than happy to receive your contributions!
Thank you!
Let’s use this opportunity to thank everybody involved in making this Citrus 4 release happen. The Citrus community did a tremendous job to brings this all together! The Citrus team is very proud to have a new version of Citrus available that after 16+ years of development still is up-to-date with the latest and greatest software libraries out there! THANK YOU!
This post describes the steps to test a Camel K integration with YAKS both locally and on the Kubernetes platform.
What is YAKS?
YAKS is an Open Source test automation platform that leverages Behavior Driven
Development concepts for running tests locally and on Cloud infrastructure (e.g. Kubernetes or
OpenShift).
This means that the testing tool is able to run your tests both as local tests and natively on Kubernetes.
The framework is specifically designed to verify Serverless and Microservice applications and aims for integration testing
with the application under test up and running in a production-like environment.
A typical YAKS test uses the very same infrastructure as the application under test and exchanges data/events over different
messaging transports (e.g. Http REST, Knative eventing, Kafka, JMS and many more).
As YAKS itself is written in Java the runtime uses a Java virtual machine with build tools such as Maven and integrates with
well known Java testing frameworks such as JUnit, Cucumber and
Citrus to run the tests.
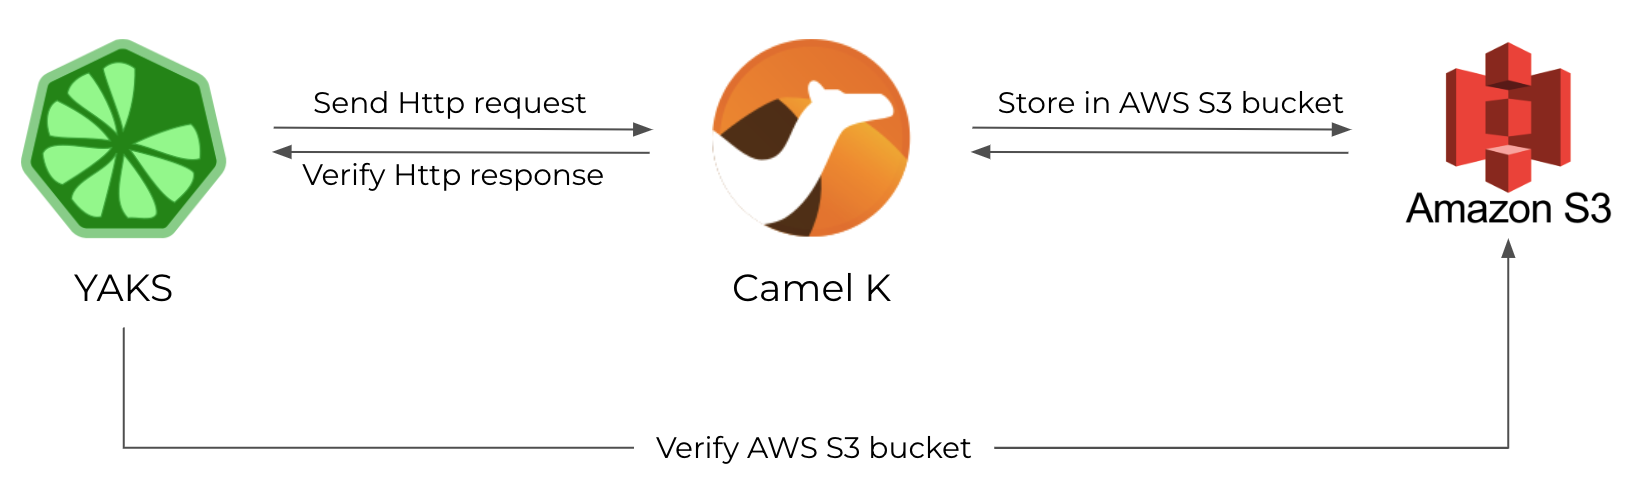
Understanding the Camel K example
First of all here is a small sample Camel K integration that we would like to test in the following.
The integration exposes a Http service to the user.
The service accepts client Http POST requests that add fruit model objects.
The Camel K route applies content based routing to store the fruits in different AWS S3 buckets.
In the test scenario YAKS is going to invoke the Camel K service and verify that the message content has been sent to the right AWS S3 bucket.
Here is a sample fruit model object that is subject to be stored in AWS S3:
The route uses content based routing EAP based on the nutrition sugar rating of a given fruit in order to send the fruits
to different AWS S3 buckets (low-sugar, medium-sugar, high-sugar).
In the following the test case for this integration needs to invoke the exposed service with different fruits and verify its outcome on AWS S3.
How to test locally with YAKS
In the beginning let’s just write the test and run it locally.
For now, we do not care how to deploy the application under test in the Cloud infrastructure as everything is running on
the local machine using JBang.
JBang is a fantastic way to just start coding and running Java code and also Camel K integrations.
YAKS as a framework brings a set of ready-to-use domain specific languages (XML, YAML, Groovy, BDD Cucumber steps) for writing
tests in order to verify your deployed services.
This post uses the Behavior Driven Development integration via Cucumber.
So the YAKS test is a single feature file that uses BDD Gherkin syntax like this:
Feature: Camel K Fruit Store
Background:Given URL:http://localhost:8080Scenario: Create infrastructure
# Start AWS S3 containerGiven Enable service S3
Given start LocalStack container
# Create Camel K integrationGiven Camel K integration property file aws-s3-credentials.properties
When load Camel K integration fruit-service.groovy
Then Camel K integration fruit-service should print Started route1 (platform-http:///fruits)Scenario: Verify fruit service
# Invoke Camel K serviceGiven HTTP request body:yaks:readFile('pineapple.json')And HTTP request header Content-Type="application/json"
When send POST /fruits
Then receive HTTP 200 OK
# Verify uploaded S3 fileGiven New global Camel context
Given load to Camel registry amazonS3Client.groovy
Given Camel exchange message header CamelAwsS3Key="fruit.json"
Given receive Camel exchange from("aws2-s3://medium-sugar?amazonS3Client=#amazonS3Client&deleteAfterRead=true") with body:yaks:readFile('pineapple.json')
Let’s walk through the test step by step.
First of all the feature file uses the usual Given-When-Then BDD syntax to give context, describe the actions and verify the outcome.
Each step calls a specific YAKS action that is provided out of the box by the framework.
The user is able to choose from a huge set of steps that
automatically perform actions like sending/receiving Http requests/responses, starting Testcontainers,
running Camel routes, connecting to a database, publishing events on Kafka or Knative brokers and many more.
In the first scenario the test automatically prepares some required infrastructure.
The YAKS test starts a Localstack Testcontainer to have an AWS S3 test instance running (Given start LocalStack container).
Then the test loads and starts the Camel K integration under test (When load Camel K integration fruit-service.groovy) and waits for it to properly start.
In local testing this step starts the Camel K integration using JBang.
Later the post will also run the test in a Kubernetes environment.
Now the infrastructure is up and running and the test is able to load the fruit model object as Http request body
(Given HTTP request body: yaks:readFile('pineapple.json')) and invoke the Camel K service (When send POST /fruits).
The test waits for the Http response and verifies its 200 OK status.
In the last step the test verifies that the fruit object has been added to the right AWS S3 bucket (medium-sugar).
As YAKS itself is not able to connect to AWS S3 the test uses Apache Camel for this step.
The test creates a Camel context, loads a AWS client and connects to AWS S3 with a temporary Camel route
(Given receive Camel exchange from("aws2-s3://medium-sugar?amazonS3Client=#amazonS3Client&deleteAfterRead=true")).
With this Apache Camel integration YAKS is able to use the complete 300+ Camel components for sending and receiving messages
to various messaging transports. The Camel exchange body should be the same fruit model object (yaks:readFile('pineapple.json')
as posted in the initial Http request.
YAKS uses the powerful message payload validation capabilities provided by Citrus for this message content verification.
The validation is able to compare message contents of type XML, Json, plaintext and many more.
This completes the test case. You can now run this test with Cucumber and JUnit for instance.
The easiest way though to directly run tests with YAKS is to use the YAKS command line client.
You do not need to set up a whole project with Maven dependencies and so on.
Just write the test file and run with:
```shell script
$ yaks run fruit-service.feature –local
You should see some log output like this:
INFO |
INFO | ————————————————————————
INFO | .__ __
INFO | __ ||/ |____ __ __ __
INFO | _/ | \ ___ __ \ | \/ __/
INFO | \ _| || | | | \/ | /___ \
INFO | ___ >||| || |//__ >
INFO | \/ \/
INFO |
INFO | C I T R U S T E S T S 3.4.0
INFO |
INFO | ————————————————————————
INFO |
Scenario: Create infrastructure # fruit-service.feature:6
Given URL: http://localhost:8080
Given Enable service S3
[…]
Scenario: Verify fruit service # fruit-service.feature:20
Given URL: http://localhost:8080
Given HTTP request body: yaks:readFile(‘pineapple.json’)
[…]
Scenario: Remove infrastructure # fruit-service.feature:31
Given URL: http://localhost:8080
Given delete Camel K integration fruit-service
Given stop LocalStack container
# Running YAKS in the Cloud
YAKS is able to run tests both locally and as part of a Kubernetes cluster.
When running tests on Cloud infrastructure YAKS leverages the Operator SDK and provides a specific operator to manage the
test case resources on the cluster.
Each time you declare a test in the form of a [custom resource](https://kubernetes.io/docs/concepts/extend-kubernetes/api-extension/custom-resources/)
the YAKS operator automatically takes care of preparing the proper runtime in order to execute the test as a Kubernetes Pod.
Why would you want to run tests as Cloud-native resources on the Kubernetes platform? Kubernetes has become a standard target
platform for Serverless and Microservices architectures.
Developing the services is different in many aspects compared to what we have done for decades.
Writing a Serverless or Microservices application for instance with Camel K is very declarative.
As a developer you just write the Camel route and run it as an integration via the Camel K operator directly on the cluster.
The declarative approach as well as the nature of Serverless applications make us rely on a given runtime infrastructure,
and it is essential to verify the applications also on that infrastructure. So it is only natural to also move the verifying
tests into this very same Cloud infrastructure.
This is why YAKS also brings your tests to the Cloud infrastructure for integration and end-to-end testing.
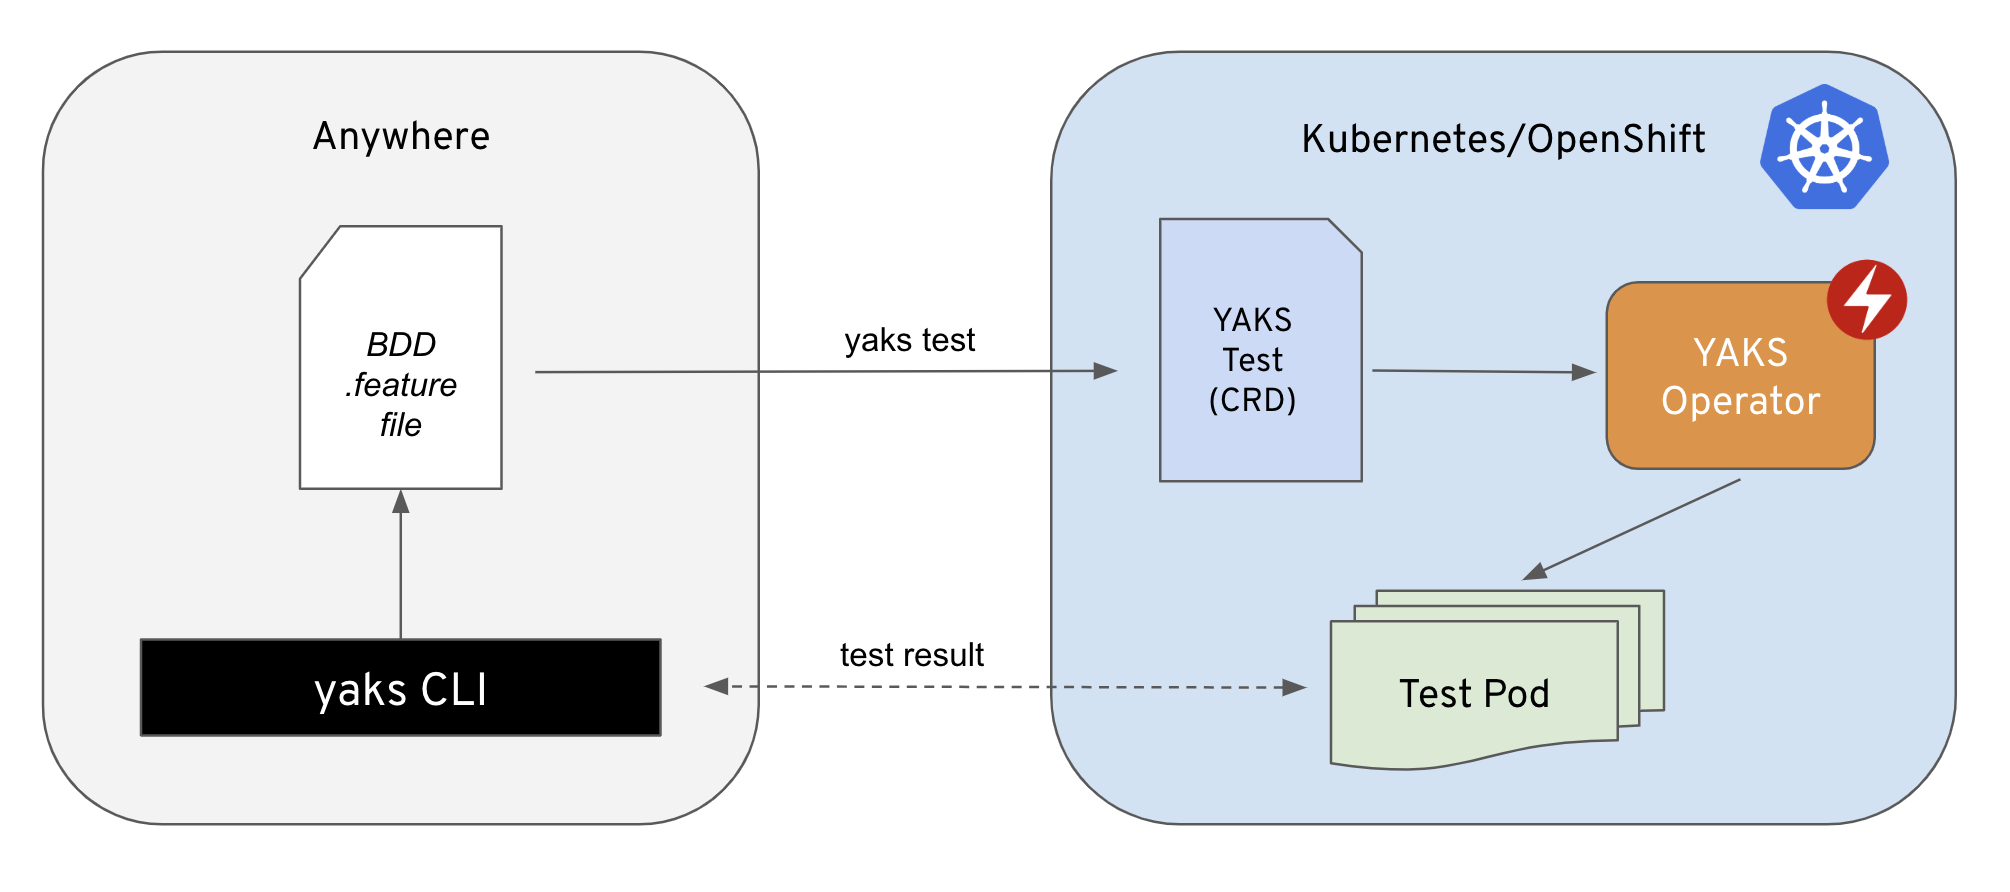
So here is how it works. You are able to run the very same YAKS test that has been run locally also as a Pod in Kubernetes.
YAKS provides a Kubernetes operator and a set of CRDs (custom resources) that we need to install on the cluster.
The best way to install YAKS is to use the [OperatorHub](https://operatorhub.io/operator/yaks) or the yaks CLI tools that
you can download from the [YAKS GitHub release pages](https://github.com/citrusframework/yaks/releases).
With the yaks-client binary simply run this install command:
```shell script
$ yaks install
This command prepares your Kubernetes cluster for running tests with YAKS.
It will take care of installing the YAKS custom resource definitions, setting up role permissions and creating the YAKS operator
in a global operator namespace.
Important: You need to be a cluster admin to install custom resource definitions.
The operation needs to be done only once for the entire cluster.
Now that the YAKS operator is up and running you can run the very same test from local testing also on the Cloud infrastructure.
The only thing that needs to be done is to adjust the Http endpoint URL of the Camel K integration from http://localhost:8080 to http://fruit-service.${YAKS_NAMESPACE}
```shell script
$ yaks run fruit-service.feature
Please notice that we have just skipped the `--local` CLI option.
Instead of using local JBang tooling to run the test locally now the YAKS CLI connects to the Kubernetes cluster in order
to create the test as a custom resource.
From there the YAKS operator takes over preparing the test runtime and running the test as a Pod.

But wait! The test did prepare some infrastructure, in particular the Camel K integration and the AWS S3 Localstack Testcontainer instance.
How does that work inside Kubernetes? YAKS completely takes care of it.
The Camel K integration is run with the Camel K operator running on the same Kubernetes cluster.
And the Testcontainer AWS S3 instance is automatically run as a Pod in Kubernetes.
Even connection settings are handled automatically. It just works!

You will see some similar test log output when running the test remotely and the test performs its actions and its validation
exactly the same as locally.

You can also review the test Pod outcome with:

```shell script
$ yaks ls
This is an example output you should get:
NAME           PHASE   TOTAL  PASSED  FAILED  SKIPPED  ERRORS
fruit-service  Passed  3      3       0       0        0
Demo
The whole demo code is available on this GitHub repository.
It also shows how to integrate the tests in a GitHub CI actions workflow,
so you can run the tests automatically with every code change.
Conclusion
This blog post showed how you can test Camel K integrations locally and in a Cloud infrastructure with YAKS.
YAKS as a framework has many more features to offer (Kafka, Knative, OpenAPI, etc.) so this is just the start of a new testing
platform for BDD testing in Cloud-native environments!
Please give feedback, ideas and of course contributions to this.
Feel free to add your thoughts on the YAKS repository by opening new issues or
even share your appreciation with a star on GitHub.
YAKS is a testing platform that leverages Behavior Driven Development concepts for running tests on Cloud-native infrastructure.
What is “YAKS”?
YAKS is an Open Source test automation platform to run your tests as Cloud-native resources on Kubernetes or OpenShift.
This means the testing tool runs your tests natively on Kubernetes and is specifically designed to verify Serverless and Microservice applications.
A typical YAKS test uses the very same infrastructure as the System under test and exchanges data/events over different
messaging transports (e.g. Http REST, Knative eventing, Kafka, JMS and many more).
The tests in YAKS follow the BDD (Behavior Driven Development) concepts, so you declare Gherkin (Given-When-Then syntax)
feature files and run those directly as Pod in your cluster.
YAKS leverages the Operator SDK and provides a specific operator to manage the test case resources on the cluster.
Each time you declare a test in the form of a custom resource the YAKS operator automatically takes care of preparing the
proper runtime in order to execute the test as a Kubernetes Pod.
The runtime uses a Java virtual machine runtime with Maven and leverages Cucumber and Citrus to run the tests.
YAKS as a framework brings a set of ready-to-use Cucumber steps so you can just start writing your feature files to verify your deployed services.
Why would you want Cloud-native testing?
Why would you want to run tests as Cloud-native resources on the Kubernetes platform?
Kubernetes has become a standard target platform for Serverless and Microservices architectures.
Developing the services is different in many aspects compared to what we have done for decades.
Writing a Serverless or Microservices application for instance with Camel K is very declarative.
As a developer you write a Camel route and run this route as an integration via the Camel K operator directly on the cluster.
The declarative approach as well as the nature of Serverless applications make us rely on a given runtime infrastructure, and it is quite hard to run tests outside that infrastructure.
So it is only natural to also move the verifying tests into this very same infrastructure.
This is why YAKS brings your tests to the cloud infrastructure for integration and end-to-end testing.
Let us have a look at a sample Camel K integration.
The integration provides a Http service and transforms incoming requests to messages sent to a Kafka topic.
Camel K sample: http-to-kafka.groovy
// expose a rest endpoint that routes transformed messages to Kafkarest().post("/greeting").route().transform()...// any kind of transformation.to("kafka:greetings")
Once you have written the Camel route you are ready to run the Camel K integration source within the Kubernetes infrastructure.
It is only natural to also move the verifying tests into this very same infrastructure because you can make use of the very same messaging transports,
databases and services (internal and external) provided in that infrastructure.
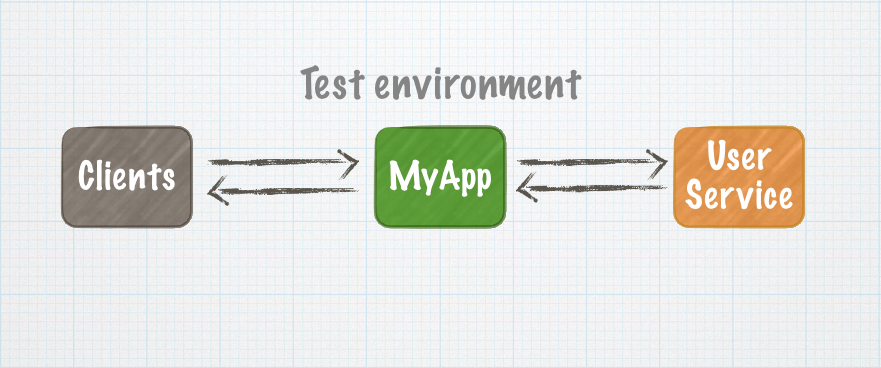
The tests are able to simulate 3rd party services or other microservices that are part of the message processing logic.
The BDD tests describe the given context, the events to occur and the expected outcome all in one single feature file.
This declarative testing approach is a perfect match to the concept of operators and custom resources on Kubernetes that
is being used in so many Cloud-native services these days.
How does it work?
YAKS provides a Kubernetes operator and a set of CRDs (custom resources) that we need to install in the cluster.
The best way to install YAKS is to use the OperatorHub or the yaks CLI tools that you can download from the GitHub release pages.
With the yaks-client binary simply run this install command:
$ yaks install
This command prepares your Kubernetes cluster for running tests with YAKS.
It will take care of installing the YAKS custom resource definitions, setting up role permissions and creating the YAKS operator in a global operator namespace.
Important: You need to be a cluster admin to install custom resource definitions.
The operation needs to be done only once for the entire cluster.
Now that the YAKS operator is up and running you can just start writing a Gherkin BDD feature file and run the test.
YAKS brings a set of ready-to-use Cucumber steps that you can use in the feature files.
File: http-to-kafka.feature
Feature: Http to Kafka
Background:Given URL:http://greeting-service-demo.svcGiven Kafka connection
|url|kafka-bootstrap.server.svc:9092||topic|greetings|Scenario: Post greeting event
Given HTTP request body:HelloYAKS!When send POST /greeting
Then receive HTTP 201 CREATED
And verify Kafka message with body:HelloYAKS!
The feature above verifies the Camel K integration to send greeting events to a Kafka topic.
The test calls the Camel K integration with a Http POST request.
The request invokes the service and verifies the Http 201 CREATED response code.
Also, the test verifies the Kafka message on the greeting topic and compares the message content to an expected template.
The whole test uses the ready-to-use YAKS steps for handling Http and Kafka communication.
So the tester does not have to implement this messaging transport logic.
You can run the test with:
$ yaks run http-to-kafka.feature
This creates a new test custom resource with the given BDD feature file.
The YAKS operator automatically executes the test as a Pod on the cluster.
You can review the test log output and see if the test passes.
So, what happens behind the scenes when running this test on Kubernetes?
The yaks tool synchronizes your test code with a Kubernetes custom resource of Kind Test.
The resource is named http-to-kafka (after the file name) in the current namespace.
So every time you run the test the custom resource is updated and executed.
The YAKS operator is the component that makes all this possible by configuring all Kubernetes resources needed for running your tests.
The test runtime uses Cucumber and Citrus to read the feature files and run the tests in a Java virtual machine.
Now let’s have a look at the predefined YAKS step implementations that you can use out of the box.
YAKS test steps
YAKS provides several ready-to-use Cucumber steps that you can just use in your feature files.
These steps should help you to verify applications that exchange data over various messaging transports.
Have a look at the predefined steps we have so far:
Module
Description
yaks-standard
Basic steps (e.g. for logging messages to the console, test delays, settings)
yaks-http
Call Http REST endpoints as a client and verify the response content. Provide a Http service that receives/verifies requests and simulates response messages.
yaks-openapi
Import OpenAPI specifications and use defined operations and test data to call Http REST endpoints
yaks-jdbc
Connect to a database for updating data or verifying SQL query result sets
yaks-camel
Create, start and stop Apache Camel routes as part of the test. This opens access to all 300+ Camel components for testing!
yaks-camel-k
Create and verify Camel K integrations as part of the test.
yaks-kafka
Publish/consume events on Kafka streams
yaks-knative
Connect with Knative eventing and leverage triggers, channels, subscriptions to exchange cloud events.
yaks-kubernetes
Apply resources on the Kubernetes cluster and provide services with exposed ports service simulation.
yaks-jms
Publish/consume messages on a JMS broker.
yaks-selenium
Run UI tests with a Selenium remote browser simulating user interaction on a web frontend.
The list of ready-to-use steps is constantly growing, and you can also write your own steps and use them in a YAKS test!
Have a look at the examples to see all those steps in action.
The steps provided in YAKS are implemented using the integration test framework Citrus.
This means that you can use features like functions, validation matchers and test variables in your test.
Demo
The following demo video shows an example of what you can do with YAKS.
It has the YAKS operator already installed and invokes a system under test via Http verifying the response content.
It continues to more complex scenarios where the test uses a Swagger OpenAPI specification for generating requests and test data.
This is just the start of a new testing platform for BDD testing in Cloud-native environments!
We are happy to receive feedback, ideas and of course contributions.
Please add your thoughts on the GitHub repository by opening new issues
or even share your appreciation with a star on GitHub.
Citrus 3 provides enhanced support for Apache Camel with new features and improvements.
This enables great opportunities and leverages the full enterprise integration power of Apache Camel in Citrus.
Before this post explains the enhancements in Citrus 3 regarding Camel let us have a brief look at what has always been in the box.
Recap the Camel support in Citrus
Camel has been integrated with the Citrus framework for years.
You can read about it in the official Citrus user guide.
With Camel included in the box Citrus users are able to use the 300+ Camel components in order to connect with various
message transports and technologies.
Citrus is able to interact with Camel in following areas
The context defines a Camel route listening on the endpoint uri direct:hello.
Incoming messages will be logged to the console using a log Camel component.
After that the message is forwarded to a seda Camel component which is a simple queue in memory.
The Citrus endpoint can interact with this sample route definition sending messages to the direct:hello endpoint.
send("camel:direct:hello").message().body("Hello from Citrus!");
The Camel endpoint uri can refer to any Camel endpoint component.
See the list of available Camel components in order to connect
your route with message transports and technologies.
As an alternative to sending messages directly to a Camel endpoint uri you can create a Citrus endpoint that interacts with a Camel route.
The endpoint can be shared in multiple tests and defines several properties such as the endpoint uri that will be called.
send(helloCamelEndpoint).message().body("Hello from Citrus!");
Of course, you can also consume messages from a Camel route using the endpoint pattern.
receive("camel:seda:greetings").message().type(MessageType.PLAINTEXT).body("Hello from Citrus!");
The Camel support in Citrus has been enhanced with Citrus 3.
Read the following sections to find out about awesome new features and improvements.
What’s new in Citrus 3?
Endpoint DSL support
Since Camel 3 you can use a Java fluent API to deal with Camel endpoint URIs.
You can use the Camel endpoint DSL in the Citrus send/receive actions now, too.
send(camel().endpoint(direct("hello")::getUri)).message().body("Hello from Citrus!");receive(camel().endpoint(seda("greetings")::getUri)")
.message()
.type(MessageType.PLAINTEXT)
.body("HellofromCitrus!");
The send and receive actions above use the Camel endpoint DSL to construct the proper endpoint URI.
The camel().endpoint(seda("test")::getUri) builds the endpoint uri seda:test.
The endpoint DSL provides all settings and properties that you can set for a Camel endpoint component.
Camel processor support
Camel implements the concept of processors as enterprise integration pattern.
A processor is able to add custom logic to a Camel route.
Each processor is able to access the Camel exchange that is being processed in the current route.
The processor is able to change the message content (body, headers) as well as the exchange information.
The send/receive operations in Citrus also implement the processor concept.
With the Citrus Camel support you can now use the very same Camel processor also in a Citrus test action.
The example above uses a Camel processor to change the exchange and the message content before the message is sent to the endpoint.
This way you can apply custom changes to the message as part of the test action.
The transform pattern is able to change the message content before a message is received/sent in Citrus.
The example above applies a JsonPath expression as part of the message processing.
The JsonPath expression evaluates $.message on the Json payload and saves the result as new message body content.
The following message validation expects the plaintext value Citrus rocks!.
The message processor is also able to apply a complete route logic as part of the test action.
With the complete route logic you have the full power of Camel ready to be used in your send/receive test action.
This enables many capabilities as Camel implements the enterprise integration patterns such as split, choice, enrich and many more.
Camel data format support
Camel uses the concept of data format to transform message content in form of marshal/unmarshal operations.
You can use the data formats supported in Camel in Citrus, too.
The example above uses the base64 data format provided in Camel to marshal/unmarshal the message content to/from a base64 encoded String.
Camel provides support for many data formats as you can see in the documentation on data formats.
Wrap up!
That completes the new features in Citrus 3 regarding Apache Camel.
Please give it a try, provide some feedback and tell us what you think about Camel and Citrus!
YAY, Citrus 3.0 is here! A few weeks ago we have released a new major release for the Citrus integration testing framework!
This is a huge step in the Citrus project! It has been over two years since the last release 2.8.0 and the journey towards
3.0 has been a tremendous challenge. Citrus is back and stronger than ever before!
This summary is here to share our strategy, ideas and all major changes that are part of Citrus 3.0!
Objectives
Citrus 3.0 is a major release, and we want to take that as an opportunity to follow up with some improvements and refactoring that we are eager to do for quite some time.
That being said we try to comply with everybody’s need to migrate from older versions.
People coming from Citrus 2.x should have a look at the 2.x migration guide.
In addition to that we take extra care to keep breaking changes on a low-level.
Here are the main objectives we have in Citrus 3.0
Update dependencies to new major versions (Cucumber, Apache Camel, Spring Framework, …)
Modularize Citrus
The citrus-core module is the heart of the framework and contains all capabilities that Citrus has to offer.
So if you include citrus-core as a dependency in your project you will load a lot of artifacts as transitive dependencies (e.g. from Maven central).
Loading that huge amount of libraries is not a good thing especially when you do not need all features provided by Citrus (e.g. Groovy script support, Xhtml, XML validation and so on).
With citrus-core it is all or nothing. So we are keen to modularize the core module into several smaller pieces.
The user can then choose which of the Citrus modules and features to include into the project or even overwrite and substitute certain pieces with own implementations.
Module categories and structure
In Citrus 3.0 we end up with following module categories:
API and base implementations of core Citrus features. There will be a separate citrus-base and citrus-spring module where latter encapsulates the Spring Framework support in Citrus (more about that in make Spring optional).
Module
Description
citrus-api
Interfaces, enums, constants
citrus-base
Default implementation of citrus-api
citrus-spring
Adds Spring Framework support to citrus-base (Bean definition parsers, Application context configuration, Autowiring in factory beans
Endpoints connect Citrus to a message transport like Apache Kafka, JMS, Http REST, Ftp, Mail and many more. Each endpoint may provide producer/consumer or client/server components to exchange message content over the respective transport.
Module
Description
citrus-camel
Interact with Apache Camel context, routes and control bus
citrus-ftp
Connect to and simulate FTP/SFTP servers
citrus-http
Http REST support
citrus-jdbc
Simulate JDBC drivers, connections and transactions
citrus-jms
Publish/consume messages on a JMS message broker
citrus-kafka
Exchange data via Kafka messaging
citrus-jmx
Call MBean operations and simulate MBeans
citrus-mail
Client and server side SMTP mail support
citrus-rmi
Call RMI via JNDI registry lookup and simulate RMI services
citrus-ssh
Connect to servers via SSH and simulate SSH servers
citrus-vertx
Exchange messages on the Vert.x event bus
citrus-websocket
Websocket support
citrus-ws
SOAP WebServices support including SOAP envelope handling, WSDL, WS-Security, …
citrus-zookeeper
Connect with Zookeeper servers
citrus-spring-integration
Exchange messages on Spring Integration message channels
When Citrus receives messages the test case is eager to verify the message content. Validation modules implement message validators and mechanisms to validate different data formats such as Json, XML, plaintext, binary content and so on. Some validation modules also add support for verification tools such as Groovy script validation, Hamcrest and AssertJ.
Module
Description
citrus-validation-xml
XML, Xpath and Xhtml message validation
citrus-validation-json
Json and JsonPath message validation
citrus-validation-text
Plain text message validation
citrus-validation-binary
Validate binary message content using input streams or base64 encoding
citrus-validation-groovy
Adds Groovy script validation for XML, Json, SQL result set
citrus-validation-hamcrest
Hamcrest matcher support like assertThat(oneOf(is(foo), is(foobar)))
Connectors are similar to endpoints yet these components connect Citrus to a foreign technology or framework rather than implementing a message transport. Connectors typically provide a client side only implementation that enable Citrus to interact with a service or framework (e.g. Docker, Kubernetes, Selenium web driver).
Module
Description
citrus-sql
Connect with a relational database
citrus-docker
Connect with Docker deamon to manage images and containers
citrus-selenium
Connect with web driver to run web-based UI tests
citrus-kubernetes
Connect to Kubernetes cluster managing PODs services and other resources
Tooling is important and the modules in this category provide little helpers and plugins for different use cases where the usage of Citrus needs to be simplified (e.g. Maven plugins, test generators, etc.)
Module
Description
citrus-restdocs
Auto generate request/response documentation for Http REST and SOAP communication
citrus-maven-plugin
Maven plugins to create tests
citrus-archetypes
Maven archetypes for project code generation
citrus-test-generator
Create and auto generate test cases (e.g. from Swagger OpenAPI specifications)
A catalog in Citrus combines several other modules into a set of modules that usually get used together. The citrus-core module for instance combines all available validation modules, runtimes and the Citrus Spring support into a single artifact. So the user just needs to add citrus-core to the project and can use everything Citrus has to offer (exactly like Citrus 2.x is doing).
Module
Description
citrus-bom
Bill of material holding all modules for imports
citrus-core
Default Citrus capabilities (validation, runtime, Spring support) combined into one single module (exactly the same what you have had with previous versions)
citrus-endpoint-catalog
Combine all endpoints to a single source for endpoint builders
We are about to take a major step in Citrus and this implies some backward incompatibilities that “vintage” modules try to solve for users that still need to stick with an older version of Citrus for some reason. With these “vintage” modules you can still run older test cases with the new Citrus 3.x code base.
Module
Description
citrus-java-dsl
Old Java DSL implementation (designer vs. runner) to be used for Citrus 2.x Java DSL tests
Module in the utility category provide tooling for internal usage only. For instance this is a shared test library that is used in unit testing by several other modules. The modules are only used when building the Citrus modules. Utility modules usually are not included in a release so they won’t be pushed to Maven central.
Module
Description
citrus-test-support
Internal helper library added as test scoped dependency for unit testing in other modules. Holds shared unit testing helpers.
How to use the new module structure
Users that do not want to change much in their project regarding the dependency setup just continue to add citrus-core dependency.
This will get you the same capabilities as in Citrus 2.x with all validation modules, runtime and Spring support enabled. The citrus-core is a catalog module combining several other modules that get automatically added to your project.
The downside of this approach is that you get a lot of features and transitive dependencies that you might not need in your project. Fortunately you can exclude some features from citrus-core with the new module structure in 3.x.
The example above excludes the Groovy validation capabilities and the TestNG runtime from the project.
The features will not be added to your project and fewer artifacts get downloaded.
Of course there is a lot more to exclude and you might end up having a more complicated configuration for all those exclusions.
For people trying to operate with just what they need in their project the pull approach might be the way to go. Here you add just citrus-base as dependency.
With the new modular setup in Citrus not every feature is enabled by default.
As you write and execute tests in your project you might then run into errors because you are using a Citrus feature
that has not yet been added to your project. Something like:
FAILURE: Caused by: NoSuchValidationMatcherException: Can not find validation matcher "assertThat" in library citrusValidationMatcherLibrary ()
	at com/consol/citrus/jms/integration/JmsTopicDurableSubscriberIT(iterate:26-48)
The error indicates that you need to add the Hamcrest validation matcher feature to the project.
You can do so by adding the respective module dependency in your project:
The awesomeness about it is that you can add your favorite matcher implementation as a dependency
(we still need to add AssertJ support in Citrus, so we would love a contribution doing that!).
What happened to citrus-*-model modules?
Each module in former Citrus versions has had a little brother that generated model classes from XSD schema files.
The XSD schemas are used for custom Spring bean definition parsing and were located in the citrus-*-model modules (e.g. citrus-config.xsd).
The initial idea behind that separate model module was to separate model classes from implementations in order to use that model in a user interface called citrus-admin.
With Citrus 3.x we included the XSD schemas into the implementation modules so we do not have to maintain all the citrus-*-model modules separately (also one less artifact to load, excellent).
Java DSL
Citrus provides a Java domain specific language to write integration tests with a fluent API.
The API makes use of the fluent builder pattern to specify test actions.
In Citrus 2.x all Java DSL related test action builders were located in a separate module called citrus-java-dsl.
For better maintainability and modularization reasons the test action builders have moved into the individual modules
where the test action implementation is located.
In fact the Java DSL builders are now inner classes of the respective test action.
In former releases users had to choose between the two different approaches to write Java DSL tests with this fluent API:
Just like many things in life both approaches have had individual advantages and downsides.
We have accepted the challenge to combine both approaches designer and runner into a single approach that combines the
advantages and minimizes downsides.
In Citrus 3.x we end up using a simplified Java DSL that uses the look and feel of the former designer API but executes
each step immediately to keep debugging options and the capability to add custom code between steps.
The separation between designer and runner has been removed completely. So there is only one single source of truth the
TestCaseRunner and the fluent Java API for writing tests in Citrus.
This simplifies the implementation in other modules (Cucumber, TestNG, JUnit) a lot.
This is how a new Java DSL test looks like in Citrus 3.x:
publicclassHelloServiceITextendsTestNGCitrusSpringSupport{@AutowiredprivateHttpClienthttpClient;@AutowiredprivateKafkaEndpointorderEvents;@Test@CitrusTestpublicvoidtest(){given(variable("orderId",1000));when(http().client(httpClient).send().post("/orders").contentType(APPLICATION_FORM_URLENCODED).body("order=${orderId}&name=foo"));then(receive(orderEvents).body("Order ${orderId} has been placed"));and(http().client(httpClient).receive().response(HttpStatus.OK));}}
The test extends TestNGCitrusSpringSupport.
This gives you the annotation support for @CitrusTest so the test is added to the Citrus test reporting.
The base class also gives you the test action execution methods given(), when(), then() and and().
This relates to the BDD Gherkin language and is widely known to a lot of people out there.
If you do not want to use this BDD approach in your test you can also use the basic run() method or its shortcut version $()instead.
Former Citrus versions provided many base classes which confused users.
The classes TestNGCitrusSupport/JUnit4CitrusSupport are now the single base class for all tests including XML and Java DSL tests.
The JUnit 5 support provides a @CitrusSupport extension annotation.
@CitrusSpringSupport@ContextConfiguration(classes={CitrusSpringConfig.class})publicclassHelloServiceIT{@AutowiredprivateHttpClienthttpClient;@AutowiredprivateKafkaEndpointorderEvents;@Test@CitrusTestpublicvoidtest(@CitrusResourceGherkinTestActionRunner$){$.given(variable("orderId",1000));$.when(http().client(httpClient).send().post("/orders").contentType(APPLICATION_FORM_URLENCODED).body("order=${orderId}&name=foo"));$.then(receive(orderEvents).body("Order ${orderId} has been placed"));$.and(http().client(httpClient).receive().response(HttpStatus.OK));}}
Make Spring optional
The Spring framework is a wide spread and well appreciated framework for Java applications.
The framework provides an awesome set of projects, libraries and tools.
The dependency injection and IoC concepts introduced with Spring are groundbreaking.
Some people prefer to choose other approaches though to work with dependency injection.
Others do struggle with mastering Citrus and Spring as new frameworks at the same time.
Both frameworks Spring and Citrus are very powerful and newbies sometimes feel overwhelmed with having to deal with so
much new stuff at the same time.
In former releases Citrus has been very tied to Spring and in some cases this has been a showstopper to work with Citrus for mentioned reasons.
In Citrus 3.x we make Spring optional in core modules so people can choose to enable/disable Spring support.
In particular this affects the way Citrus components are started and linked to each other via the Spring application context.
Citrus and Spring
When Spring is enabled for Citrus all components are loaded with a Spring application context.
This enables autowiring and bean definition parsing.
Latter bean definition parsing for custom components is mandatory when using XML based configuration and XML test cases in Citrus.
Users enable the Spring support in Citrus by adding the following module:
When using citrus-core dependency this Spring support is enabled by default in order to adjust with what has been configured in previous Citrus versions.
Citrus standalone
In case you exclude the citrus-spring module for Citrus you will load the same components and features but only without Spring framework support.
Keep in mind only the XML based configuration and XML test cases continue to require Spring.
In non-Spring mode custom components can be directly configured in the Citrus context then.
Also Citrus uses a resource common path lookup mechanism to identify common components that get loaded automatically.
So you simply add components such as citrus-validation-json to your project classpath and the Json validation capabilities are loaded automatically.
The resource path lookup is a mechanism to identify components in Citrus that should be loaded automatically when the Citrus application is started.
You only need to add components to the classpath (e.g. by adding a Maven dependency) and the resource gets loaded automatically.
This mechanism is used to decouple modules and to provide a non-Spring mode for Citrus.
Feel free to choose which approach fits best for your needs. Citrus running with or without Spring.
Update dependencies
It has been quite some time since the last major Citrus release.
So this is a point where we catch up with all the other libraries and dependencies that evolved over time.
In particular this is Apache Camel, Spring and Cucumber that all evolved with major versions in the past.
The following might be the most important updates:
Java 11
Spring framework 5.3
Apache Camel 3.9
TestNG 7.1
JUnit 5.7
Jetty 9.4
Kafka 2.8
Selenium 3.141
Log4J2 2.14
Cucumber 6.10
What’s next!?
So 3.0 is the first version of the Citrus 3.x release train. And we are not done yet!
We continue to work on our goals to simplifying the ways of writing integration tests so Citrus is ready for the future challenges of software testing.
We love to get feedback so please give it a try and tell us what you think about Citrus 3.0.
Now is the time to raise your voice to improve the framework!
Upcoming changes - What the future holds for Citrus
∞
More than ten years ago I started out on a journey to implement a Java testing framework that provides automated integration tests for message-based enterprise applications with support for multiple messaging transports and data formats.
The result is called Citrus which is an Open Source project used by many development and testing teams all over the world. Ever since then I have spent lots of energy to further developing the Citrus framework and spreading the word for fully automated integration tests.
It has been a very enjoyable and adventurous journey that will change somewhat in the near future. I am about to leave the company ConSol and move to distant shores along the Java Open Source community. ConSol has always been and continues to be a great sponsor and supporter of the Citrus framework.
As part of this move I will handover the lead developer role of Citrus to my colleague @SvenHettwer. Sven is a perfect match for this position as I have spent the past twelve months working very closely with him, providing lots of insights and in-depth knowledge, on the Citrus framework.
Project maintenance and professional consulting will be continued as before by ConSol and its test automation specialists.
As for me, I will be taking on a new opportunity (to be announced soon). Having said that I will try to continue to be part of the Citrus Open Source community. As my passion for automated integration testing is still very strong I will be thrilled to be joining forces along the path.
I am very proud of what Citrus and the community behind it have accomplished over the past decade and I am very excited to see what the future holds. I am absolutely positive that Citrus will continue to master the challenges in test automation for the software development community.
I can not wait to see that the framework continues to evolve with the goal to helping people write well tested software.
When developing software that exchanges data with other components or services you may be confronted with the proper simulation of those foreign services during integration testing. This is because you need to connect with a foreign service
that is simply not available on your local machine or in a test environment.
For unit testing purpose you can use mocks that help out to simulate proper responses. There will be times where your software is deployed to a test environment
in order to perform some acceptance tests with your stack holders before going to a final release. Usually this is also done with the customer exploring the software through manual testing. In these situations traditional service mocking is not
a good option and you need a real simulator instance that receives requests and responds with proper test data.
This is exactly what the Citrus simulator project provides for you. Standalone simulation and complex request/response processing with solid validation capabilities. The Citrus simulator provides a very easy and reliable definition of inbound and outbound messages for different scenarios.
Good news is that this is not only for Http REST interfaces but also for SOAP WebService, JMS, RMI, mail messaging and many more. So you can use the simulator whenever you need to integrate with another service that is simply not available on your local machine or in your test environment.
The citrus-simulator project is a side project of the test framework Citrus. The simulator uses Citrus to define server APIs and the logic to respond with predefined messages according to
defined scenarios.
In general the simulator is nothing but a normal Spring Boot web application that you can start on your local machine. The simulator waits for incoming requests and each request executes a predefined scenario that will create a response message for the client.
Which scenario to execute is identified based on a mapping key that is extracted from the incoming request.
Let’s have a simple example project to demonstrate the simulator concepts.
User login sample
Let’s say you are in charge of developing an application that connects with a user login service for proper authentication. Your service comes as a Microservice web application and is ready for deployment in the acceptance test environment.
Unfortunately the user authentication service is not ready yet and is not deployed in that test environment. Without the user
login service your application is not able to work properly as each user interaction needs to be authenticated with foreign service calls first.
This means the foreign user login service needs to be simulated so users can explore your application in that test environment.
Spring Boot simulator
We start to simulate that user login service by creating a new Spring Boot project. Of course you can use any build system you like when building the simulator application. Most popular tools would be Gradle or Maven.
Here we show how to setup everything using Gradle.
The build script defines a typical Spring Boot project with its dependencies and plugin configuration. In addition to that we add the citrus-simulator-starter dependency. The citrus-simulator-ui dependency is optional
and provides a detailed Angular2 user interface that you can open with your browser once the simulator is up and running.
Let’s add the Spring Boot main class for the application com.consol.citrus.simulator.Simulator.java:
The main class is a typical Spring Boot application that uses @SpringBootApplication annotation with auto configuration of needed components. As we have added the citrus-simulator-starter dependency to the project we also get auto
configuration of all simulator related beans and components. The application can use a SimulatorRestAdapter extension in order to overwrite some simulator components such as the default fallbackEndpointAdapter. This adapter defines a
default Http 500 internal server error response when something went wrong on the simulator request processing. Also we give the url mapping that defines how clients connect with the user login REST API later on using the base
URL http://localhost:8080/services/rest/v1/**.
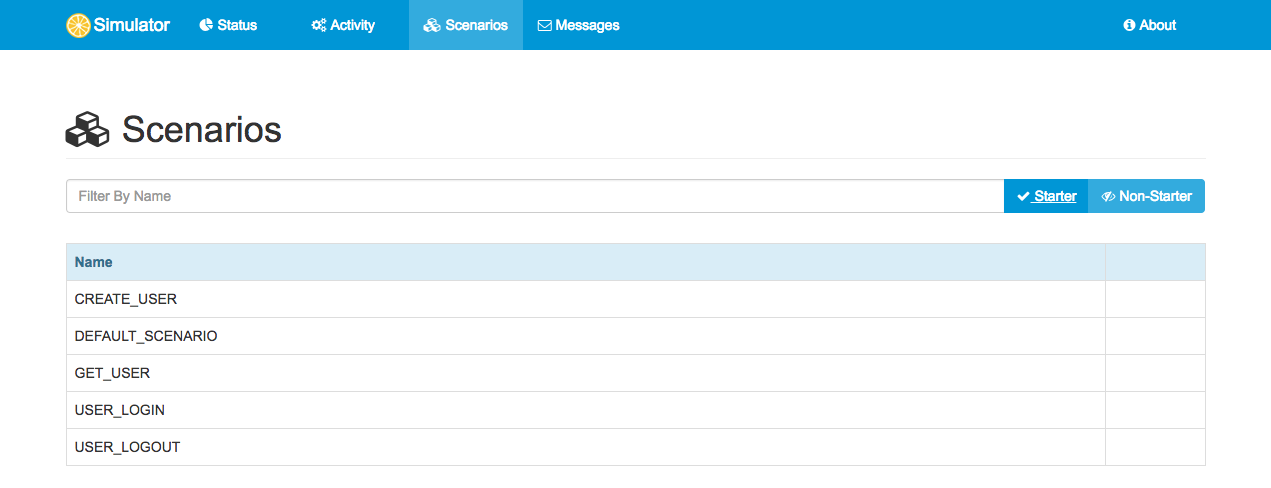
Now we can add a first a default scenario that responds to incoming requests.
packagecom.consol.citrus.simulator;importcom.consol.citrus.http.message.HttpMessage;importcom.consol.citrus.simulator.scenario.*;importorg.springframework.http.HttpStatus;@Scenario("DEFAULT_SCENARIO")publicclassDefaultScenarioextendsAbstractSimulatorScenario{@Overridepublicvoidrun(ScenarioDesignerdesigner){designer.send().message(newHttpMessage("No scenario found for this request").status(HttpStatus.NOT_FOUND));}}
The scenario uses the annotation @Scenario("DEFAULT_SCENARIO") and extends AbstractSimulatorScenario. In the run method we can use the Citrus Java DSL designer to create some response generating logic.
This default scenario is activated when no other scenario is matching the incoming request. So we send back a Http 404 NOT FOUND as we obviously did not match a scenario. Now let’s build and start the simulator application.
Build and run
You can build and run the simulator application from command line using the Gradle binaries.
./gradlew build bootRun
You will see the application starting up. Usually you will see some console log output. The web server should start within seconds. Once the application is up and running
you can open your browser and point to http://localhost:8080. You will see the simulator user interface.
You can access the simulated REST services on http://localhost:8080/services/rest/. Up to now we only have the default scenario so we constantly get Http 404 NOT FOUND responses.
Let’s add some scenarios representing the user login service.
User login REST API
The user login service defines following REST API:
{"swagger":"2.0","info":{"description":"This is a user login service","version":"1.0.0","title":"User Login Service"},"host":"user-login-service","basePath":"/v1","schemes":["http"],"paths":{"/user":{"post":{"operationId":"createUser","produces":["application/xml","application/json"],"parameters":[{"in":"body","name":"body","description":"Created user object","required":true,"schema":{"$ref":"#/definitions/User"}}],"responses":{"default":{"description":"successful operation"}}}},"/user/login":{"get":{"operationId":"loginUser","produces":["application/xml","application/json"],"parameters":[{"name":"username","in":"query","description":"The user name for login","required":true,"type":"string"},{"name":"password","in":"query","description":"The password for login in clear text","required":true,"type":"string"}],"responses":{"200":{"description":"successful operation","schema":{"type":"string"},"headers":{"X-Rate-Limit":{"type":"integer","format":"int32","description":"calls per hour allowed by the user"},"X-Expires-After":{"type":"string","format":"date-time","description":"date in UTC when token expires"}}},"400":{"description":"Invalid username/password supplied"}}}},"/user/logout":{"get":{"operationId":"logoutUser","produces":["application/xml","application/json"],"parameters":[],"responses":{"default":{"description":"successful operation"}}}},"/user/{username}":{"get":{"operationId":"getUserByName","produces":["application/xml","application/json"],"parameters":[{"name":"username","in":"path","description":"The name that needs to be fetched. Use user1 for testing. ","required":true,"type":"string"}],"responses":{"200":{"description":"successful operation","schema":{"$ref":"#/definitions/User"}},"400":{"description":"Invalid username supplied"},"404":{"description":"User not found"}}}}},"definitions":{"User":{"type":"object","properties":{"id":{"type":"integer","format":"int64"},"username":{"type":"string"},"password":{"type":"string"}},"xml":{"name":"User"}}}}
There are 4 operations defined:
Http POST user/
Http GET user/login
Http GET user/logout
Http GET user/{username}
Let’s create basic scenarios for these operations in the simulator.
The scenario for Http POST requests on request path /v1/user uses the Spring @RequestMapping annotation. The simulator scenario mapper will automatically
route incoming requests to this scenario based on that information.
The scenario itself receives the incoming request using the Citrus Java DSL. The receive operation validates the Http POST request method and gives an expected control Json message body as external file resource. The
user-control.json defines the expected user object on this operation:
The control user object verifies that the elements id, username and password are present. In addition to that we can use Citrus validation matchers in order to validate the element values. The scenario produces a proper response
only in case the incoming request matches the expected control Json object. The simulator scenario is able to use the full Citrus validation power for comparing message data in Json, XML and plaintext message format. JsonPath and XPath expression evaluation and validation
is also possible here.
Now let’s define a proper response message for the scenario. We send back a Http 200 OK response. This is how the scenario is able to control the response generation with Citrus.
We continue with the remaining scenarios for all other operations defined in the REST API:
The usage of Citrus functions makes it easy to create a random user object that meets the REST API object definitions. Let’s add the remaining login and logout scenarios.
The login operation verifies the presence of Http query parameter username and password. As response the scenario defines some header information X-Rate-Limit and X-Expires-After where latter is the
expire date time one hour from now calculated with the Citrus function citrus:currentDate(YYYY-MM-DD'T'hh:mm:ss, +1h). As payload we send back a 40 character random token as plaintext string.
Last not least the logout operation that completes the REST API for the user login service. Now the simulator is able to respond to all operations that are defined in the REST API. Clients are now able to call the
operations via Http REST. The simulator will verify the incoming request data and create proper response messages.
You can test the simulator by pointing your browser to the following URLs:
You should always get proper Http 200 OK response messages. The login request should get a new login token in the response every time. In case we send some invalid request we should get Http 500 responses and for
unsupported request paths we should get a Http 404 response. Try that with following test URLs.
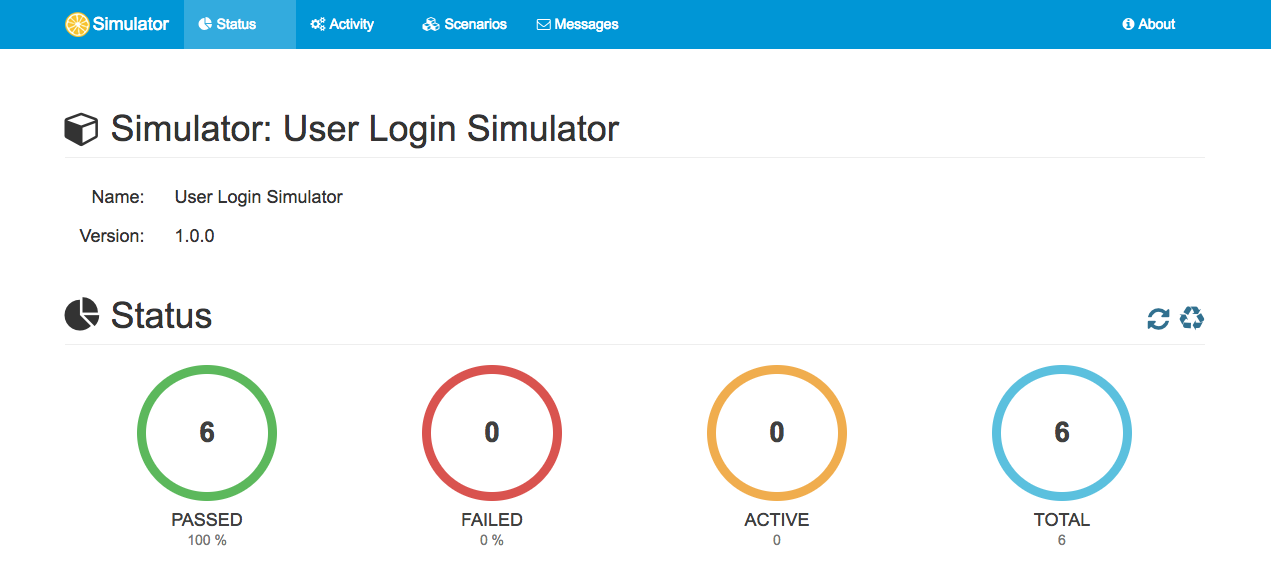
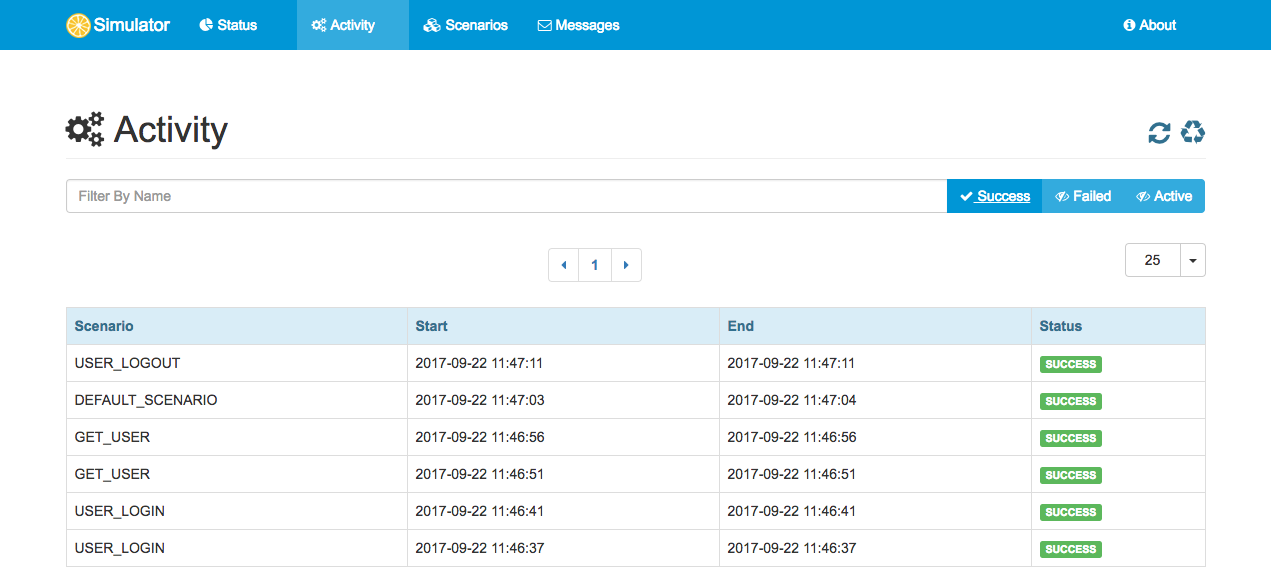
With the above test requests we triggered some activities on the simulator. Let’s review those activities in the web based user interface.
Simulator user interface
The simulator provides a web based Angular2 user interface so users can review the status and all activities on the simulator. We have already seen the dashboard that gives an overview of the simulator status:
In addition to that you can view detailed information available scenarios and their execution activity.
Auto generate scenarios
Up to now we have added simulator scenarios manually. We could have also used auto generated scenarios based on the given Swagger Open API specification of the REST API. Just add a HttpScenarioGenerator bean
to the application:
The HttpScenarioGenerator reads the Open API specification file at runtime and generates scenarios for each operation. The generated scenarios do also
verify the request data according to the rules defined in the specification. The response messages hold dynamic data objects generated from the API schema definitions.
What’s next?!
The Citrus simulator project brings everything to manage standalone simulation of interfaces that you need to connect to during software development. The sample above showed REST API simulation. Same logic is possible with SOAP web services,
JMS and many other messaging transports. The integration with Citrus framework capabilities enables us to create even very complex scenarios with intermediate message handling and consecutive message calls as well as
content based routing.
It has been a while since the last release in the Citrus universe. It took us some time to get the new Citrus release 2.7.2 ready for you.
Of course we were not being lazy in that time. Besides the new Citrus 2.7.2 release we are proud to announce a new player in the Citrus team. The Citrus administration UI is a
web-based user interface that helps you to manage your Citrus projects and test cases.
Often users complained about the complexity of having to learn all about Citrus and the Spring framework in particular as Citrus uses Spring for configuration and dependency injection.
Especially non-developers had problems to master the learning curve for Citrus and Spring when starting to use the framework. Also people asked for a way to have a user interface for managing
components and tests.
We heard you and introduced a new administration user interface for Citrus! There is a detailed Citrus Admin documentation (which is still ongoing).
However I would like to outline the main features of that web UI here in a short post for you.
Download
You can start the web UI on your local machine with an executable web archive available at
Once loaded you can start the admin UI as Spring boot web application from command line like this:
java -jar citrus-admin.war
You will see the application starting up. The web server should start within seconds. Once the application is up and running you can open your browser and point to http://localhost:8080.
The administration web UI is able to open any Citrus project on your local machine. When opened you can display the project information such as the latest test results. In addition to that you are able
to view the Citrus components configured in the in the Spring application context. The web UI is also able to navigate to all test cases in your project. You can open the tests and execute them.
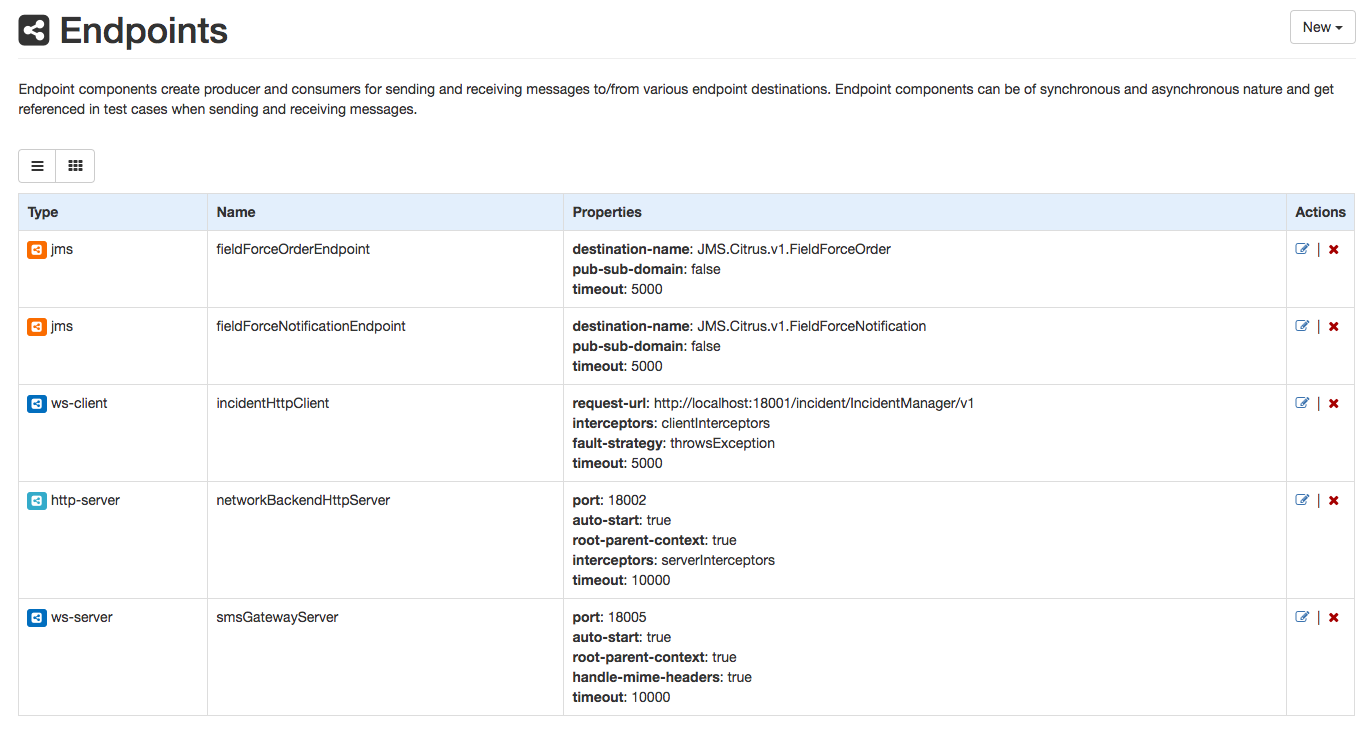
Edit configuration components
One of the major goals in the web UI is to give new users an easier way to get started with the Citrus Spring configuration. All configuration components get loaded from the Spring application context.
You can view and edit those components such as Citrus endpoints via HTML forms:
In case you add new components or save changes to configuration items the administration web UI directly changes the Spring configuration files on your local machine in that particular project. Of course you can
open the Spring configuration files in another editor (e.g. your favorite Java IDE) and review the changes made. In addition to that all configuration changes made from external editors are directly visible to the admin UI.
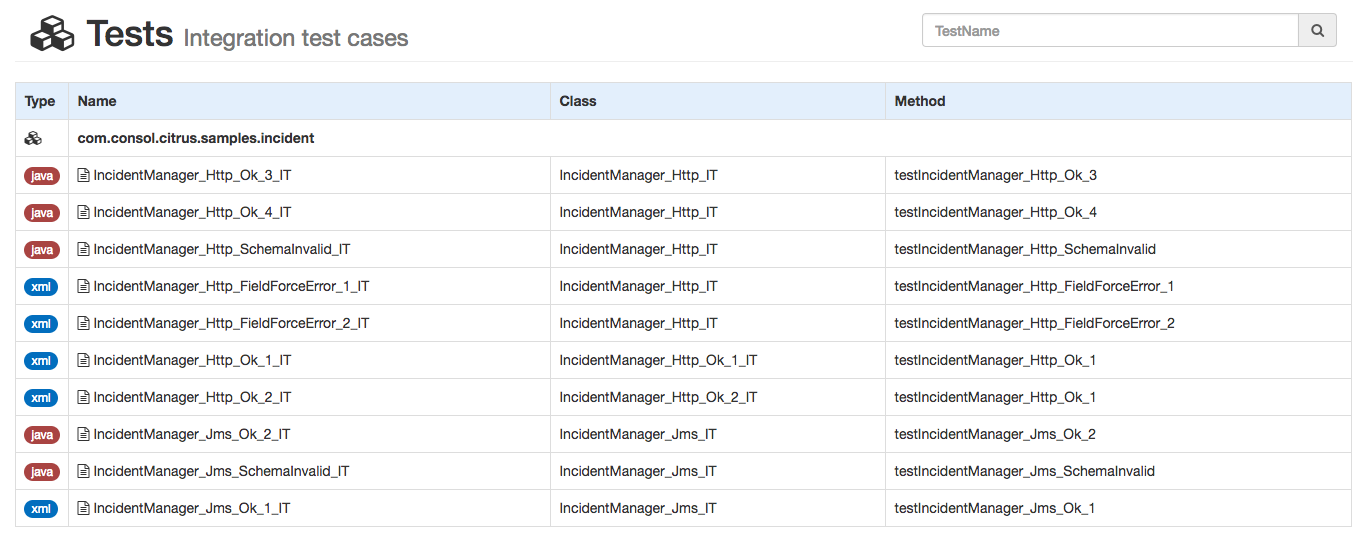
Test management
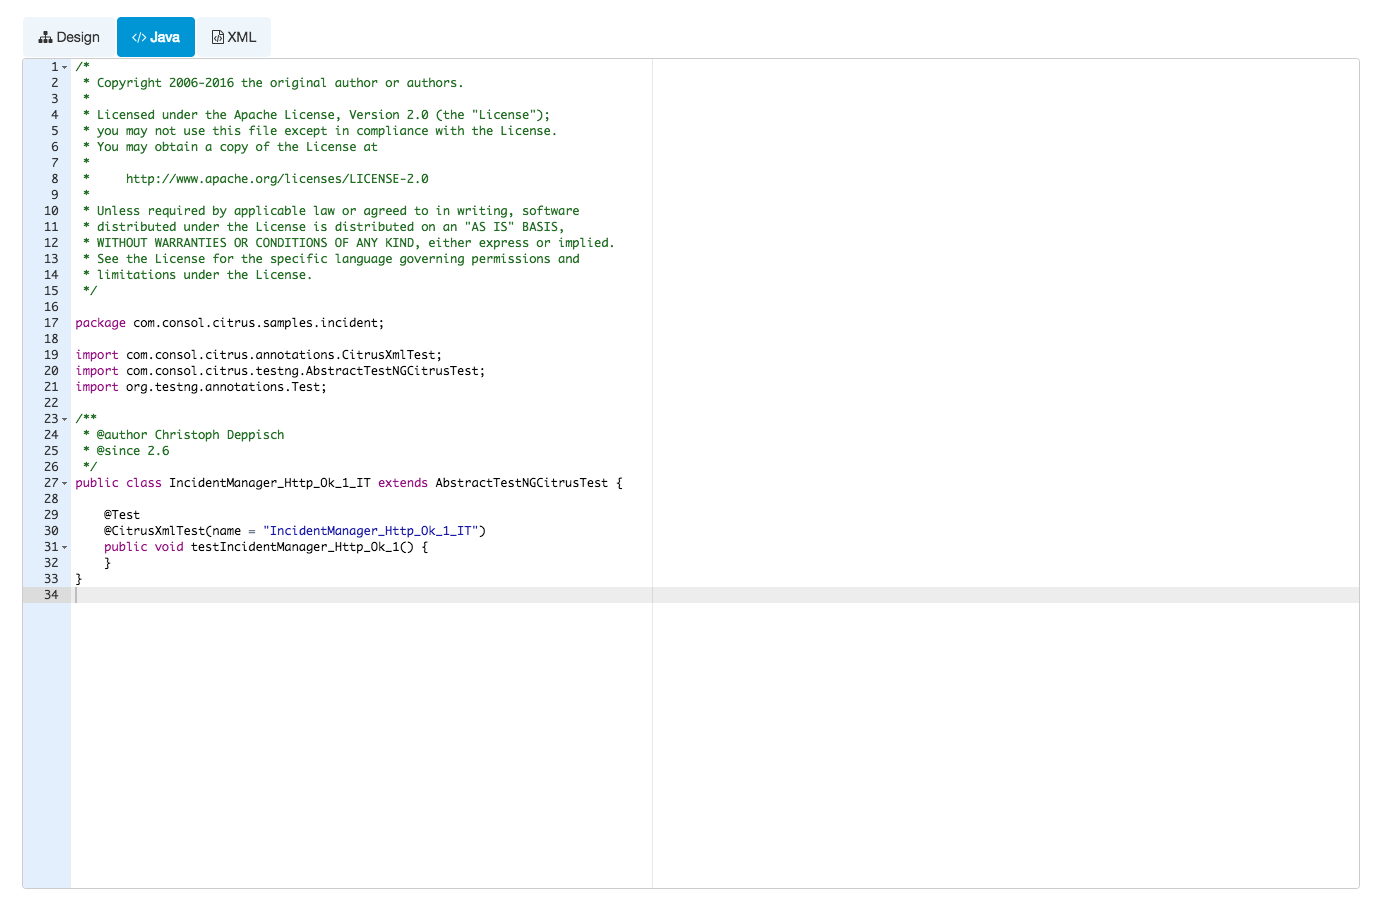
You can see all available Citrus test cases in the opened project. The list of tests contains XML and Java DSL tests.
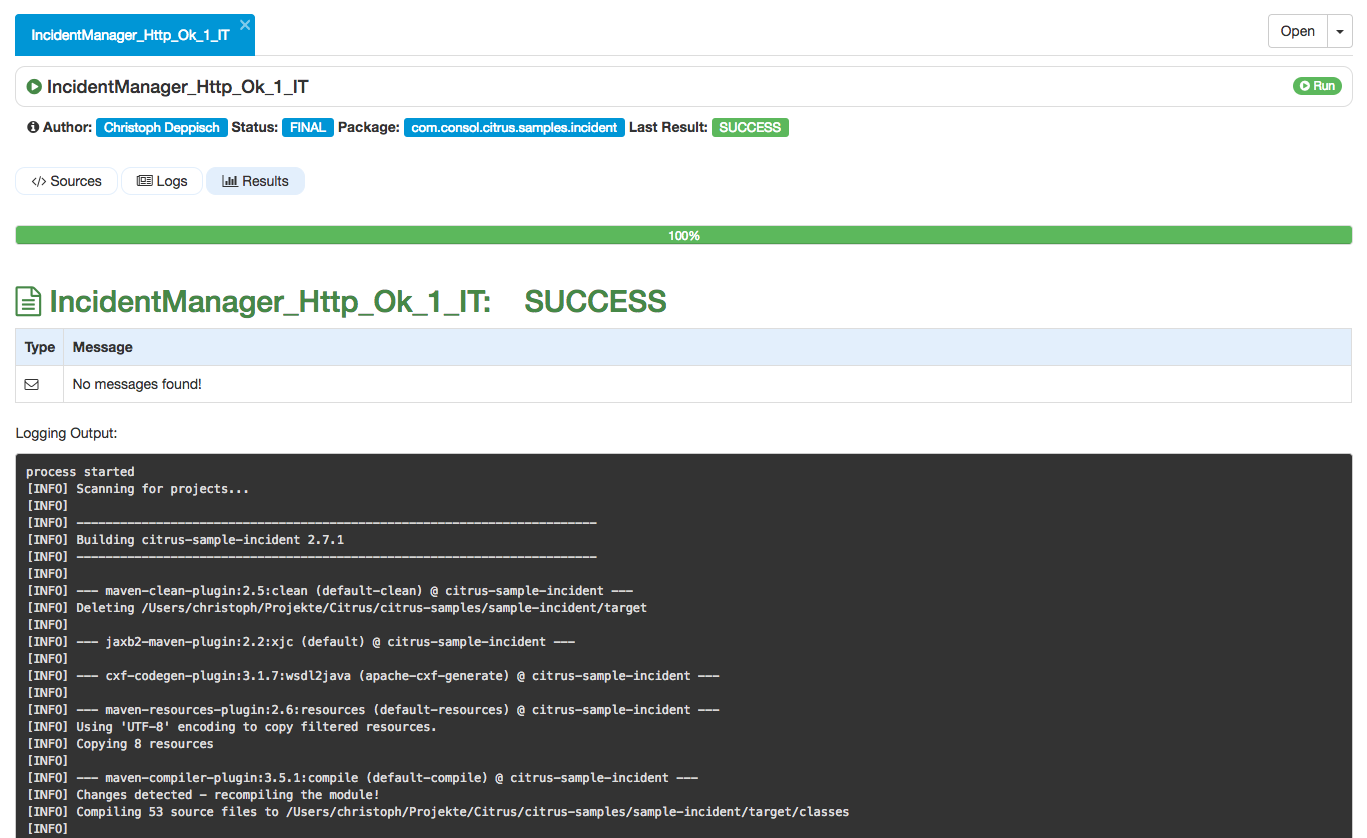
When opening a particular test case the UI will display the test details to you. This includes all test actions, source code, log output and the latest test results.
If you execute the test you will see the log output of that process and you will get a detailed access to all messages exchanged in that test run.
As you can see the test log output is forwarded to your browser. Also the test progress and result (success or failure) is tracked by the administration UI.
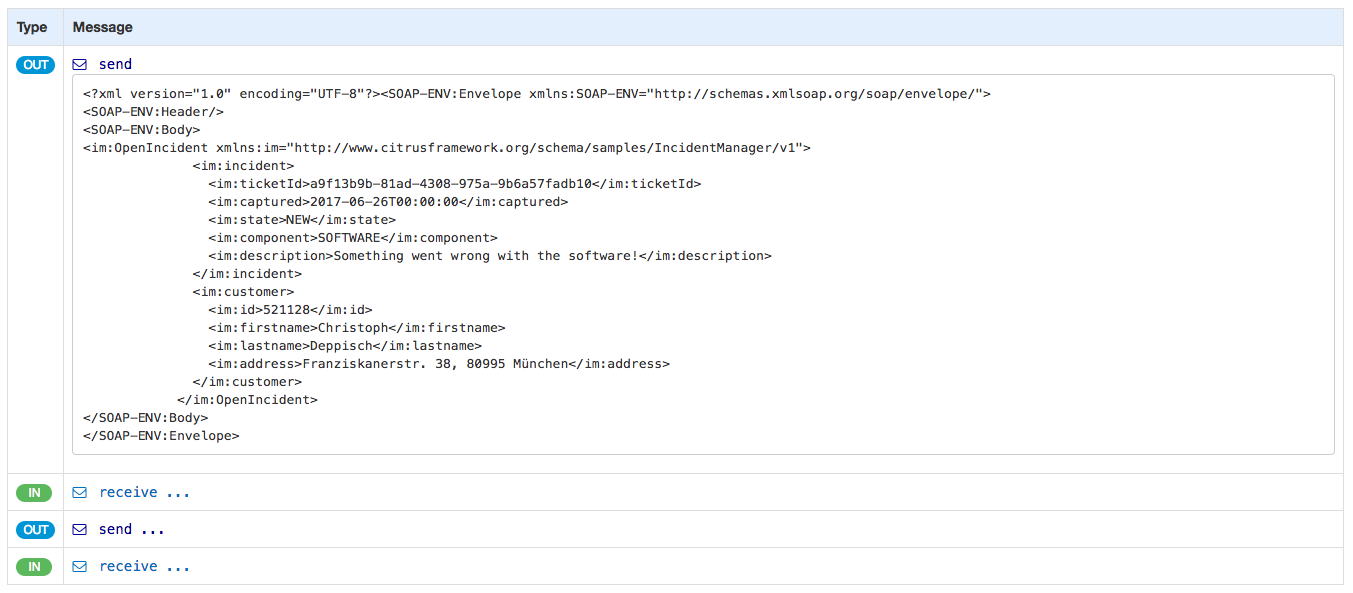
In the messages table you are able to review all messages (inbound/outbound) that were part of the test run.
Reporting
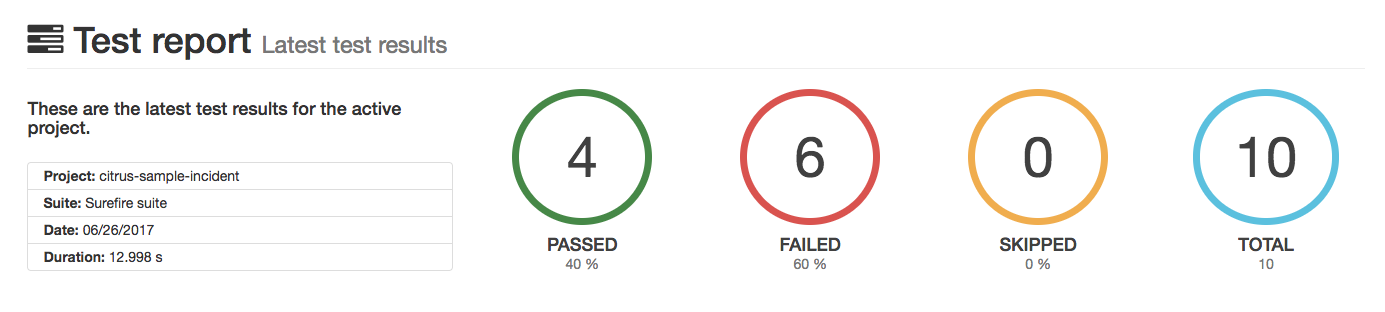
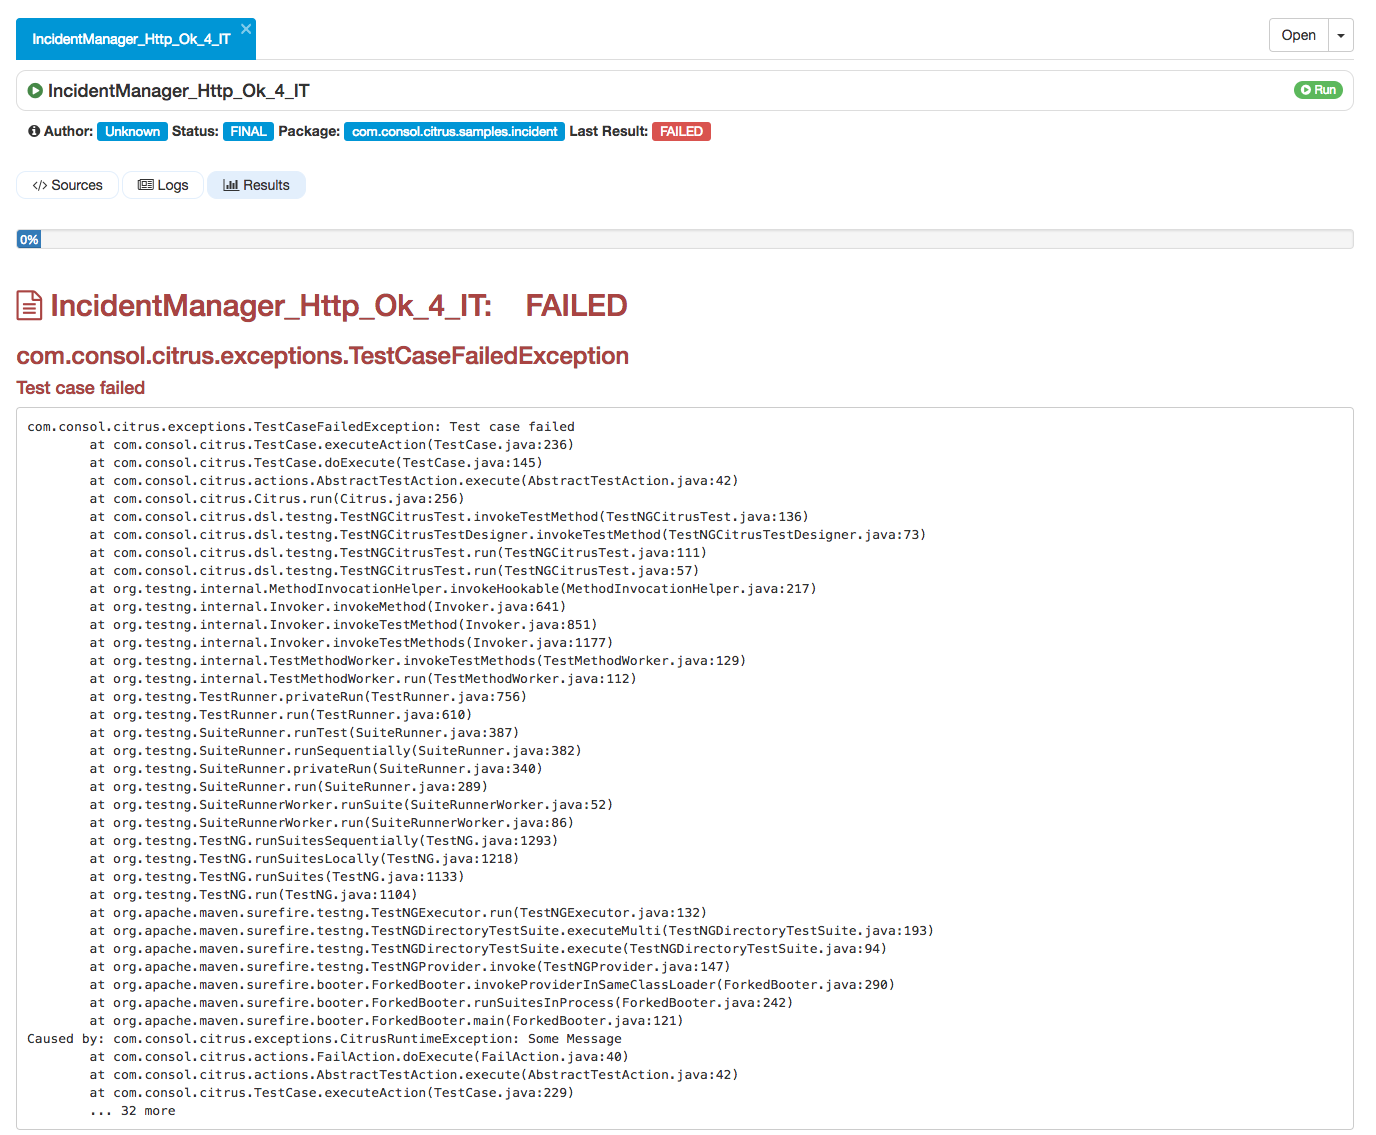
The administration UI is able to read the test results in your project. Typically these are JUnit or TestNG reports that are generated from each test run. If present the UI will read and display detailed
test results of the latest test run.
When a test case is failing for some reason exception and failure information will be provided.
The administration UI aims to give you an additional tooling for Citrus integration testing. The administration web UI is not there to eliminate your favorite IDE (IntelliJ, Eclipse or whatever)! The UI is a helping
instrument for getting in touch with Citrus and its concepts and works side by side with your local Java IDE as well as other text editors of your choice.
Also the UI is helpful when executing the Citrus integration tests in different stages (test, acceptance, explorative) of your release process. There is not always a full capable development environment available for
executing integration tests. You can run the Citrus administrative UI as Docker container or Kubernetes pod in order to make the tests portable to your containerized test environment.
Docker image
The administration UI is available as Docker image (consol/citrus-admin:latest). You can pull the image and link it to your local Citrus project:
docker run -d -p 8080:8080 -v $PWD:/maven -e CITRUS_ADMIN_PROJECT_HOME=/maven consol/citrus-admin:latest
The command above loads the Docker image and runs a new Citrus web UI container. The container is provided with a volume mount that makes the current directory accessible from within the container.
This current directory is then used as project home so the admin UI will automatically open the Citrus project from that directory. Once the container is running
you can point your local browser to http://localhost:8080 in order to access the web UI.
The CITRUS_ADMIN_PROJECT_HOME environment setting is optional and is used to automatically open a project on container startup. You can leave out this setting in order to select a project folder
in your mounted working directory when starting the web UI.
In case you do not have a Citrus project ready yet, the admin UI can also create a new project for you. It is possible to run a Maven archetype on container startup that creates a complete new project for you.
You can set the Maven archetype coordinates (groupId, artifactId, version) as environment variables when running the container.
docker run -d -p 8080:8080 -v $PWD:/maven -e CITRUS_ADMIN_MAVEN_ARCHETYPE_COORDINATES=com.consol.citrus.archetypes:citrus-quickstart:2.7.5 consol/citrus-admin:latest
The UI will load the Maven archetype and create the project sources when the container is started. The new project gets its Maven coordinates from another environment setting:
Another way to load a new project on container startup is to specify a git repository URL. The Citrus admin Docker container will then load the project sources from that git repository on startup:
docker run -d -p 8080:8080 -v $PWD:/maven -e CITRUS_ADMIN_PROJECT_REPOSITORY=https://github.com/account/citrus-project.git consol/citrus-admin:latest
The command above will load the project sources from git with URL https://github.com/account/citrus-project.git and open that project afterwards. The git repository of course should hold the Citrus project sources. In case
the Citrus project is located in a sub module in that git repository you can load that sub module by specifying additional environment properties:
With these options we are able to start the Docker image as container with special customizations via environment settings.
Use Docker Maven plugin
The Citrus admin Docker image also works fine with the Fabric8 docker-maven-plugin. So you can add the following image configuration to your Citrus Maven project:
This loads and builds the Docker image and starts a new Docker container with running Citrus Admin UI pointing to that very same Maven project.
Stopping the container is as easy as calling:
mvn docker:stop
This is a very comfortable way to build and ship a Citrus admin UI container with your project. You can deploy the tests to any Docker environment or even use
the container in Kubernetes as pod.
What’s next!?
Now it is your turn! Open your Citrus project with that web UI and tell us how you like it! There are many different approaches to using Citrus in a development project.
We tried to cover all aspects and we are sure that the web UI is able to read most of the Citrus project out there. In case there is a time when the web UI is not able to
read your project for some reason please tell us. When there is something wrong or simply not working out for you just open an issue on github.
We are keen to answer your questions and discuss any doubts and we are looking forward to receive your feedback!
In a previous article we went through how to build a chat room web application that used REST and STOMP for communicating between the client and server.
In this article I use the very same application and show how to write automated integration tests using the open source Citrus integration test framework.
If you haven’t read the first article don’t worry. A quick summary of all the important bits will be shown shortly below. But before I get to that lets talk a little bit about automated integration testing and citrus.
One of the biggest challenges when testing any application is being able to simulate all endpoints.
If you take an online web shop for example it typically interacts with numerous backend services (product catalogue, credit check, shipping, billing, etc.) during the course of processing the order.
When writing an automated integration test that tests the placement of an order you’ll have to simulate each of these services. Some services may expose a REST/HTTP interface whereas others may expose a SOAP/JMS interface.
In some scenarios the online web shop will be acting as a client, consuming the backend services. In other cases it will be acting as a server, processing customer requests.
The point is that testing such a scenario can be very complex. A simple application today with one or two interfaces may quickly grow into a complex application with 10s or even 100s of interfaces later on.
When you look at integration test tools then don’t loose sight of this. Sure some tools are great at simulating REST interfaces. Others are great at simulating SOAP.
However for me the most important criteria is to find a test tool that combines these and many other messaging protocols. The tool should be flexible and extensible. And this is where citrus comes into the equation.
Before I dive into integration testing, let’s do a quick recap on the chat room application.
Chat Room
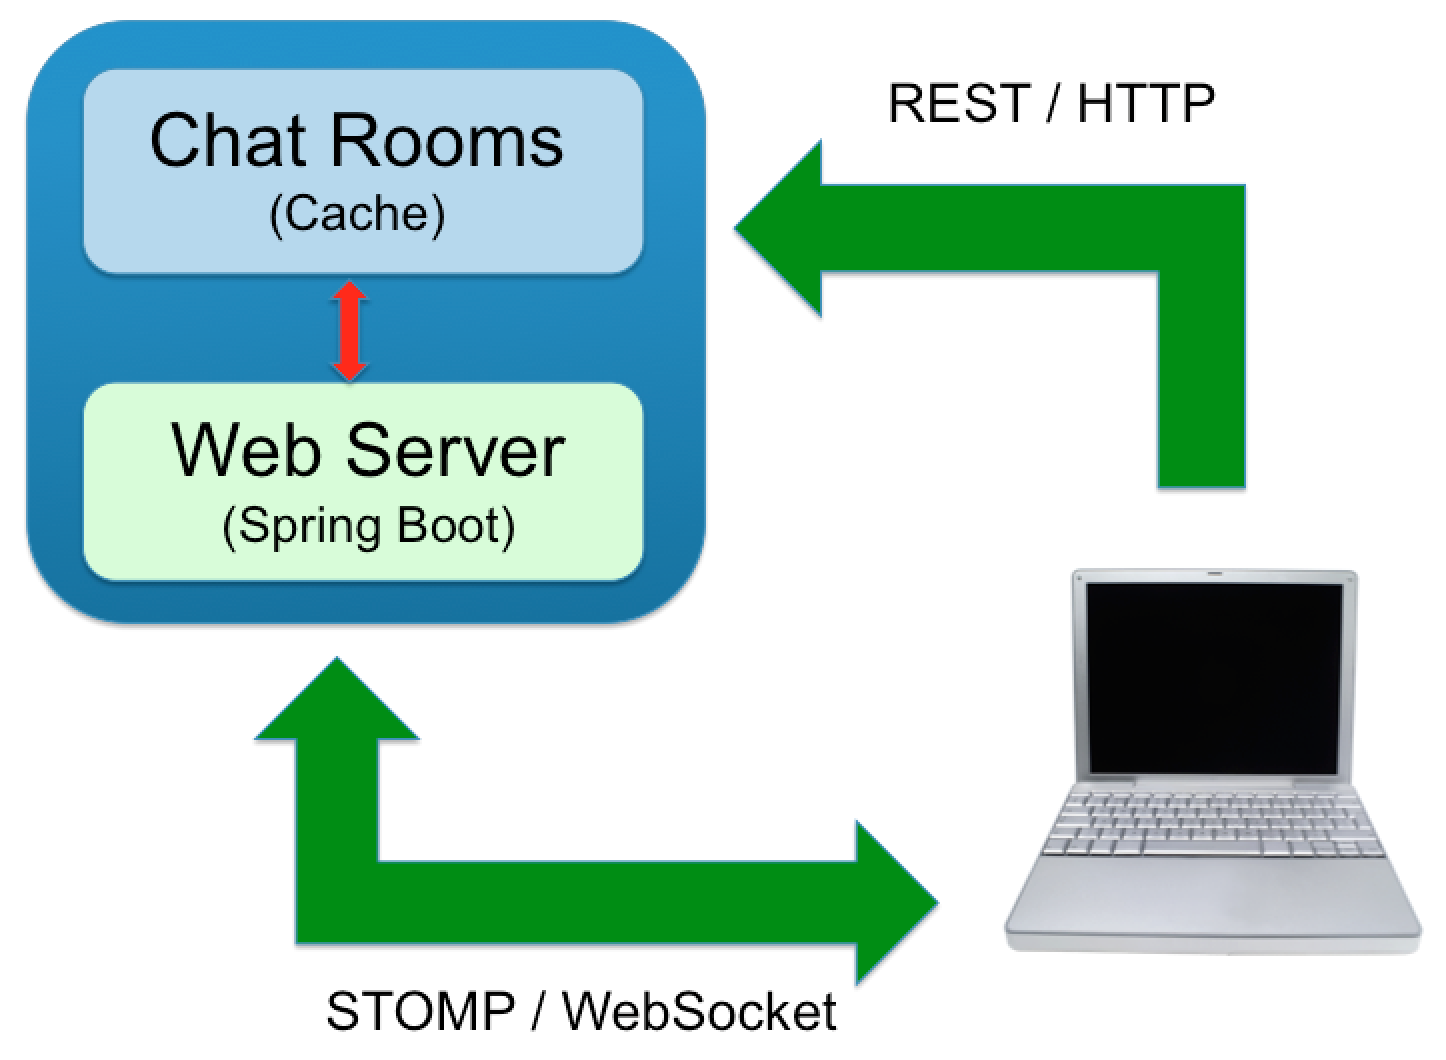
The basic architecture of the chat room application is presented below:
We have a client-server architecture, using web sockets and REST for communicating between the client and the server. The system under test is the blue box above and I’m going to write some tests that simulate the two green arrows.
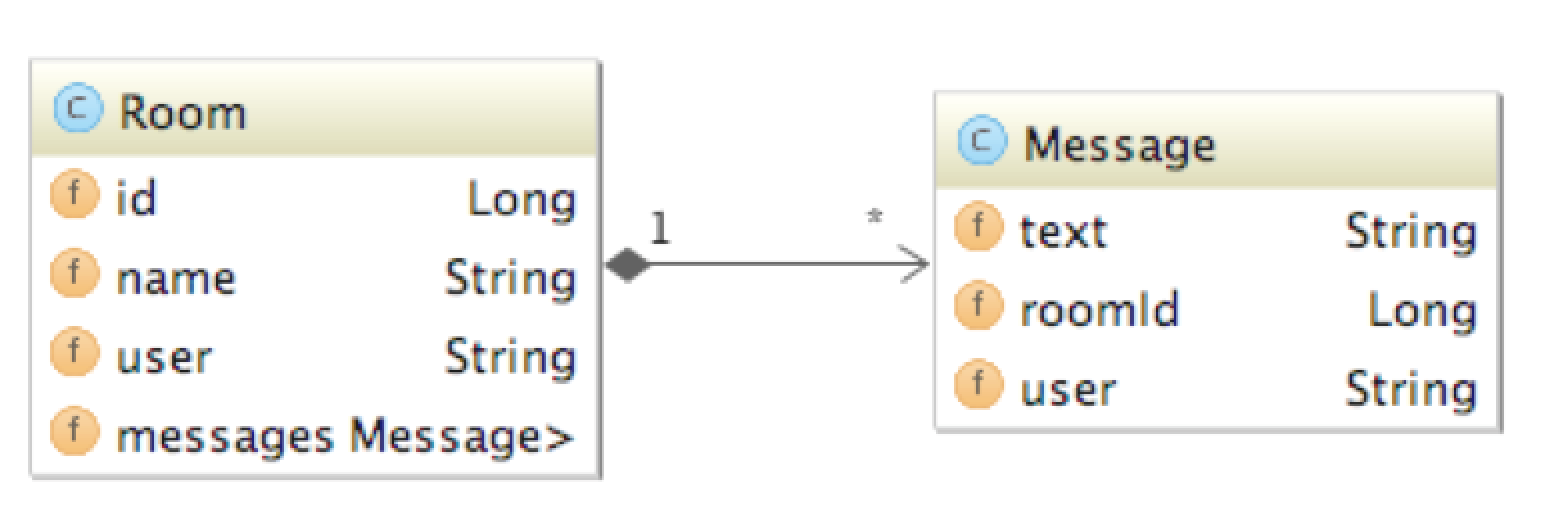
The application’s entity model is very modest, using just the two entities shown below:
A room contains a list of messages and the name of the user that created the room. A message contains some text and the name of the user that sent the message. That’s basically it.
The following REST operations can be sent from the client to the server:
Join or leave the chat application
Get the list of logged in users
Get the list of rooms
Create or remove a room
Send a message to a room
The server can push the following notifications to connected clients using STOMP over WebSocket:
Notify room created or removed
Notify chat message sent
Notify user logged-in or logged-out
Starting the application
The source code for the application is available on github.
To run the application you need to have Java 8+ and Maven 3.3.3+ installed and configured on your system.
The application comes shipped with the H2 database that you need to start firing up the application:
Open up a shell
Change to the H2 directory under ../support/h2_v1.3.176/
Run the H2 start-up script (either h2.bat or h2.sh).
Now you can start the application. This can be done either from the command line or from inside your favourite IDE.
From the command line type:
shell
$ mvn clean install spring-boot:run
This will start up one instance on port 8090.
Alternatively you can start the application from inside your IDE by running the following main class:
de.consol.chat.ChatApplication
Now go ahead and check that the application is running by opening the application in your browser:
All the source code I’ll be displaying below is available here: https://github.com/martinmaher/jcache-chat-citrus.
I will show you how to build the project from scratch so you can either clone the above repository or just follow the instructions below, whatever you prefer.
The first thing I need to do is to create an empty maven project for storing and executing our tests. The quickest way of doing this is to execute the maven archtetype goal,
which will create a citrus project with a basic pom file and some sample integration tests. This can be done as follows:
For the groupId, artifactId and package enter whatever you like. I entered
groupId: de.consol
artifactId: chat-citrus
package: de.consol.chat.citrus
Assuming all goes well you’ll find the following files in the project:
pom.xml – contains the maven project configuration
src/test/resources/citrus-context.xml – contains the citrus configuration
src/test/resources/citrus.properties – contains global properties used by citrus
src/test/resources/log4j.xml – contains the log configuration used by citrus
There may be some other files like SampleJavaIT and SampleXmlIT that can be removed if you like, since I wont be using here.
Simulating the REST requests
To keep things simple I’ll start by simulating the REST requests sent by the client. To begin with lets take the requests where a user joins the chat room.
The request I want to simulate is:
POST /users/<USERNAME> HTTP/1.1
Accept: text/plain, application/json, application/*+json, */*
Content-Type: application/json;charset=UTF-8
and if all goes well I should get the response:
HTTP/1.1 200 OK
The first thing I need to do is to create a new java class for executing my test. I extend the TestNGCitrusTestDesigner class, which allows me to use Citrus’s Java DSL and add I’ll add a variable for storing a random name, which will be used for the user name when joining the chat room.
@TestpublicclassTest_01_RestITextendsTestNGCitrusTestDesigner{@CitrusTestpublicvoidtestJoiningAndLeaving(){variable("username","citrus:randomString(10, UPPERCASE)");echo("Joining with user: ${username}");}}
If you like you can run this test and it should output “Joining with user ..” to the console.
Next I add the test actions to join the chat room.
[...]echo("Joining with user: ${username}");send("chatRestClient").payload("").http().method(HttpMethod.POST).path("/users/${username}");receive("chatRestClient").messageType(MessageType.JSON).http().status(HttpStatus.OK);
The first test action sends the request to the HTTP server. The action basically says:
send(“chatRestClient”) -> send using the chatRestClient
payload(“”) -> an empty payload
http() -> using the HTTP protocol
method(HttpMethod.POST) -> using HTTP’s POST method
path(“/users/${username}”) -> to URI to send the HTTP request to
The syntax ${variable-name} is a variable placeholder used in citrus that gets resolved to the value of the variable at runtime. In the example above I use it for adding the variable username to the URI.
The second action is used for verifying that the server processes the request successfully. It expects a HTTP 200 code to be returned from the server.
You may be wondering how citrus knows which host and port to send the request to. It doesn’t, well not yet. I still have to configure this. This strange string chatRestClient is instructing citrus to find an endpoint using this name in the citrus configuration and use this endpoint for sending and receiving requests.
So I’m going to add this endpoint to the citrus-context.xml file now.
I have added a new HTTP client endpoint chatRestClient that sends requests to the base url http://localhost:8090/. By default the request method POST will be used with the content-type application/json, but both of these can be overloaded in the test. After sending a request citrus will wait 60 seconds for a reply from the server before timing out. And that’s it.
Now go ahead and run this test. If you have the application opened up in your browser then you will notice a new user joins the chat room when the test executes.
To complete the test I’m going to add the test actions for leaving the chat.
You will notice a lot of similarities to the join test actions. The only difference is that the HTTP method DELETE is used this time instead of POST.
You can run this test again if you like and depending on how sharp your eyes are you may notice in your browser that a user joins and almost immediately leaves the chat room.
That’s it for the REST requests for the moment. Now I’m going to move onto WebSockets.
Simulating the STOMP notifications
Before I get into simulating STOMP notifications, I think its important to understand what STOMP is and how it’s used here.
STOMP is a S imple T ext O rientated M essaging P rotocol. It uses a frame-based protocol, shown below, for communicating between multiple hosts.
COMMAND
header1:value1
header2:value2

Body^@
Each frame contains a single COMMAND, zero or more HEADERS, a BODY and the null character (^@) to terminate the frame.
In the chat room application the server sends all notifications to connected clients using this protocol. It does this using the WebSocket API since it enables bidirectional communication between the web server and clients. Each time an event occurs, like a user joining the chat room, this event data is then pushed to the clients from the server.
In STOMP there are different types of COMMANDs that can be sent:
CONNECT: this is sent by a client to the server when it connects
CONNECTED: this is an acknowledgement sent by the server to a client on successful connection
SUBSCRIBE_: this is sent by a client to the server to indicate that it is interested in certain types of messages. The client sends a destination header to indicate which messages it is interested in.
MESSAGE_: this is sent by the server to the client when a destination, that the client has subscribed to, sends a message.
DISCONNECT_: this is sent by the client to the server when its disconnecting.
This is by no means an exhaustive list of commands but covers all commands used in the chat room application.
To put all that into perspective, this is basically what happens when the user Joe Blogs joins the chat room application:
The client opens a WebSocket connection to the server
The client sends a CONNECT frame to the server
CONNECT
accept-version:1.1
heart-beat:0,0
The sever sends a CONNECTED frame acknowledgement back to the client
CONNECTED
version:1.1
heart-beat:0,0
The client sends a SUBSCRIBE frame to the server, indicating that it is interested in messages on the destination /topic/users/joined
So I’m going to try and pack all of this into a single test. I start by creating a new Java class Test_02_StompIT.
@TestpublicclassTest_02_StompITextendsTestNGCitrusTestDesigner{@CitrusTestpublicvoidtestJoining(){variable("username","citrus:randomString(10, UPPERCASE)");echo("Joining with user: ${username}");}}
Then I add the test actions for connecting to the STOMP server.
The first test action is using the endpoint chatWebSocketClient to send the STOMP CONNECT frame to the server. The payload I just covered above only this time control characters like carriage return and the null character have been added.
The second test action is verifying the client was successfully connected. It compares the received payload from the server against the expected payload, which is specified in the test action. Only when both payloads match exactly will the action be successful.
Before I can execute my test I have to configure the chatWebSocketClient endpoint. Again this is done in the citrus-context.xml file by adding the following lines:
There’s nothing special here. I just added a websocket client endpoint that connects to the server on the url ws://localhost:8090/chatEndpoint/websocket.
Now you are good to go and you can run the test. If all goes well you should see a lot of console output with SUCCESS somewhere near the bottom.
Ok, so the test doesn’t really do a whole lot just yet. So I’m going to add the next test actions to subscribe to the destination /topic/users/joined, join the chat room and then finally verify that a STOMP MESSAGE frame is sent to indicate a user has joined.
echo("Subscribe to destination: /topic/users/joined");send("chatWebSocketClient").payload("SUBSCRIBE\n"+"id:sub-0\n"+"destination:/topic/users/joined\n"+"\n"+(char)0);echo("Joining with user: ${username}");send("chatRestClient").payload("").http().method(HttpMethod.POST).path("/users/${username}");receive("chatRestClient").messageType(MessageType.JSON).http().status(HttpStatus.OK);echo("Verify user-joined notification is received");receive("chatWebSocketClient").messageType(MessageType.PLAINTEXT).payload("MESSAGE\n"+"destination:/topic/users/joined\n"+"content-type:application/json;charset=UTF-8\n"+"subscription:sub-0\n"+"message-id:6-21\n"+"content-length:12\n"+"\n"+"\"${username}\""+(char)0);
If you look carefully at the last test action, the MESSAGE frame, you will notice the message-id header. The server sets the value of this header dynamically so the exact payload comparison done here is bound to fail, unless of course you are incredibly lucky. So how do I get around this problem?
Thanks to citrus there are many ways to solve this problem:
Remove the payload verification from the test action - This just ignores the problem for the time being but doesn’t fix it.
Do a partial payload verification – It’s possible to just search for certain strings in the payload, ignoring the rest.
Unmarshall the payload, converting it into a java object and verify the individual attributes – This is slightly more complicated but offers by far the most flexibility.
For the moment I’m going to go with partial payload verification. When using the Citrus Java DSL you can easily do this with a ValidationCallback as shown below:
echo("Verify user-joined notification is received");receive("chatWebSocketClient").messageType(MessageType.PLAINTEXT).validationCallback(newAbstractValidationCallback<String>(){@Overridepublicvoidvalidate(Stringpayload,Map<String,Object>headers,TestContextcontext){Assert.assertTrue(payload.contains("MESSAGE\n"));Assert.assertTrue(payload.contains("destination:/topic/users/joined\n"));Assert.assertTrue(payload.contains("subscription:sub-0\n"));Assert.assertTrue(payload.contains(context.getVariable("username")));}});
Great. Go ahead and run the test. This time it should run successfully.
Cleaning up the test
So far I’ve covered a user joining the chat room. I still have to verify that rooms can be created, removed, messages can be sent, notifications for the above are received, etc. But before I do this lets take a step back and look at our test so far.
It’s not bad, but it could be cleaned it somewhat. There are too many concatenated strings, too many carriage returns and other funny characters. It’s too hard to read. It would be great if I could use a fluid API for generating the STOMP frames. And since I’m planning on verifying and extracting data from the received payloads it would be equally cool if this could be somehow unmarshalled. Well guess what, you can do this with citrus. This is what I was talking about earlier when I mentioned how important it is to pick an integration test tool that is flexible. It’s not that citrus supports STOMP out of the box, because it doesn’t, at least not yet. However through its flexible API it enables a tester to add support for features or behaviour that is currently not supported. And this is what I’m going to show you now when I clean up or refactor this test.
I’ll leave the other test class in place and create a new test class Test_03_StompIT, copying over the contents of the original.
I’ll begin by creating a new StompFrame class, which is just a container for holding a STOMP frame in a structured way.
After some refactoring I end up with the following test class:
@TestpublicclassTest_03_StompITextendsTestNGCitrusTestDesigner{@CitrusTestpublicvoidtestJoiningAndLeaving(){variable("username","citrus:randomString(10, UPPERCASE)");echo("Connecting to server with STOMP");send("chatWebSocketClient").payload(StompFrame.toWireFormat(newStompFrameBuilder().withCommand("CONNECT").withHeader("accept-version","1.1").withHeader("heart-beat","0,0").build()));echo("Verify connection is successful");receive("chatWebSocketClient").messageType(MessageType.PLAINTEXT).payload(StompFrame.toWireFormat(newStompFrameBuilder().withCommand("CONNECTED").withHeader("version","1.1").withHeader("heart-beat","0,0").build()));echo("Subscribe to destination: /topic/users/joined");send("chatWebSocketClient").payload(StompFrame.toWireFormat(newStompFrameBuilder().withCommand("SUBSCRIBE").withHeader("id","sub-0").withHeader("destination","/topic/users/joined").build()));echo("Joining with user: ${username}");send("chatRestClient").payload("").http().method(HttpMethod.POST).path("/users/${username}");receive("chatRestClient").messageType(MessageType.JSON).http().status(HttpStatus.OK);echo("Verify user-joined notification is received");receive("chatWebSocketClient").messageType(MessageType.PLAINTEXT).validationCallback(newAbstractValidationCallback<String>(){@Overridepublicvoidvalidate(Stringpayload,Map<String,Object>headers,TestContextcontext){Assert.assertTrue(payload.contains("MESSAGE\n"));Assert.assertTrue(payload.contains("destination:/topic/users/joined\n"));Assert.assertTrue(payload.contains("subscription:sub-0\n"));Assert.assertTrue(payload.contains(context.getVariable("username")));}});}}
I’m not quite there yet but at least it’s slightly easier on the eye. I’m still validating the MESSAGE frame using partial string comparisons, so I’m going to clean that up as well now.
To do that I first need to add a second static method to the StompFrame class to convert the wire format into a StompFrame.
publicstaticStompFramefromWireFormat(Stringpayload){StompFramestompFrame=newStompFrame();intseparateAt=payload.indexOf("\n\n");Stringheader=payload.substring(0,separateAt);Stringbody=payload.substring(separateAt+1);StringTokenizerstringTokenizer=newStringTokenizer(header,"\n");// set commandstompFrame.setCommand(stringTokenizer.nextToken());// add headerswhile(stringTokenizer.hasMoreTokens()){Stringtoken=stringTokenizer.nextToken();if(StringUtils.hasText(token)&&token.contains(Character.toString(':'))){String[]keyValue=token.split(":");stompFrame.addHeader(keyValue[0],keyValue[1]);}}// add bodystompFrame.setBody(stripNullCharacter(body));returnstompFrame;}
Now I can finally refactor the validation callback:
echo("Verify user-joined notification is received");receive("chatWebSocketClient").messageType(MessageType.PLAINTEXT).validationCallback(newAbstractValidationCallback<String>(){@Overridepublicvoidvalidate(Stringpayload,Map<String,Object>headers,TestContextcontext){StompFramestompFrame=StompFrame.fromWireFormat(payload);Assert.assertEquals(stompFrame.getCommand(),"MESSAGE");Assert.assertEquals(stompFrame.getHeader("destination"),"/topic/users/joined");Assert.assertEquals(stompFrame.getHeader("subscription"),"sub-0");StringexpectedUsername=String.format("\"%s\"",context.getVariable("username"));Assert.assertEquals(stompFrame.getBody(),expectedUsername);}});
I’m done.
Wrap-up
I added one final test class Test_04_CompleteIT which simulates all REST and STOMP communication in one single test including
subscribing to all STOMP topics,
joining the chat,
creating a room,
sending a message,
deleting a room
and finally leaving the chat
You can find it in my git repository along with all the other tests.
I hope I have inspired you in this blog to at least consider Citrus when you’re thinking about integration tests in the next or even current project. Although I concentrated mainly on testing a web application here, you can use Citrus for just about all integration test scenarios you can imagine. It’s used a lot in middleware applications, which is one of the reasons the test framework was developed to begin with, but it’s not limited to middleware as is hopefully demonstrated above.
Some time has passed since part one of this blog post series and we have made some improvements on the Citrus Arquillian extension.
So we can look forward to this post as we move on with a more complex test scenario where we include some Citrus mail server within our test. In part one we have already combined both frameworks Arquillian
and Citrus with a basic example.
Let me recap first what we have so far. Citrus is part of the Arquillian test execution and we are able to call our employee REST JEE service which is deployed in an embedded Wildfly application server.
Arquillian takes care on the test deployment and provides resources such as the endpoint URL to call. In our first test we called the employee service adding new employees and getting the complete list of all employees via REST.
Now we want to extend the employee service so that each new employee gets a welcome email message. Therefore we extend the employee JEE EJB with a mail session bean that is able to send email messages.
@SingletonpublicclassEmployeeRepository{privatefinalEmployeesemployees;@EJBprivateMailSessionBeanmailSessionBean;publicEmployeeRepository(){employees=newEmployees();}publicvoidaddEmployee(Employeee){employees.getEmployees().add(e);if(e.getEmail()!=null&&e.getEmail().length()>0){mailSessionBean.sendMail(e.getEmail(),"Welcome new employee",String.format("We welcome you '%s' to our company - now get to work!",e.getName()));}}publicEmployeesgetEmployees(){returnemployees;}}
The employee service calls a mail session bean implementation when the email field is set on the new employee. The mail message is sent to the employee mail address as recipient and is a basic text message with subject and text body part.
Lets have a closer look at the mail session bean implementation that uses Java mail API for creating sending out the mail mime message.
@SingletonpublicclassMailSessionBean{/** Logger */privatestaticLoggerlog=LoggerFactory.getLogger(MailSessionBean.class);privateintport=2222;privateStringhost="localhost";privateStringfrom="employee-registry@example.com";privateStringusername="employee-registry@example.com";privateStringpassword="secretpw";publicvoidsendMail(Stringto,Stringsubject,Stringbody){Propertiesprops=newProperties();props.put("mail.smtp.host",host);props.put("mail.smtp.port",port);props.put("mail.smtp.auth",true);Authenticatorauthenticator=newAuthenticator(){privatePasswordAuthenticationpa=newPasswordAuthentication(username,password);@OverridepublicPasswordAuthenticationgetPasswordAuthentication(){returnpa;}};Sessionsession=Session.getInstance(props,authenticator);session.setDebug(true);MimeMessagemessage=newMimeMessage(session);try{message.setFrom(newInternetAddress(from));InternetAddress[]address={newInternetAddress(to)};message.setRecipients(Message.RecipientType.TO,address);message.setSubject(subject);message.setSentDate(newDate());message.setText(body);Transport.send(message);}catch(MessagingExceptione){log.error("Failed to send welcome mail!",e);}}}
Now in our test scenario we need a valid SMTP mail server on host localhost and port 2222. Fortunately Citrus is able to provide such a mail server so we add the citrus-mail Maven module to our test project.
Now we are ready to add the mail server as a Citrus component. Citrus is working with Spring so we need to add the mail server to the Spring application context. We add a new property to the Arquillian descriptor so the Citrus extension will
load our new configuration:
The configuration class must extend the Citrus base configuration class. This basic class adds all needed Spring beans for Citrus such as message validators, functions, validation matchers and so on. Important is our new mail server that uses the port
2222 and automatically starts with the Citrus application context. This is everything we need to do in order to add the mail server component to the Citrus runtime. We can add other Citrus endpoint components such as JMS endpoints, SOAP WebService servers
and Camel endpoints here the same way. For now we are finished with the configuration and we can reference the mail server in our test case.
@RunWith(Arquillian.class)@RunAsClientpublicclassEmployeeMailTest{@CitrusFrameworkprivateCitruscitrusFramework;@ArquillianResourceprivateURLbaseUri;privateStringserviceUri;@CitrusEndpointprivateMailServermailServer;@Deployment(testable=false)publicstaticWebArchivecreateDeployment(){returnShrinkWrap.create(WebArchive.class).addClasses(RegistryApplication.class,MailSessionBean.class,EmployeeResource.class,Employees.class,Employee.class,EmployeeRepository.class);}@BeforepublicvoidsetUp()throwsException{serviceUri=newURL(baseUri,"registry/employee").toExternalForm();}@Test@CitrusTestpublicvoidtestPostWithWelcomeEmail(@CitrusResourceTestDesignercitrus){citrus.send(serviceUri).fork(true).message(newHttpMessage("name=Rajesh&age=20&email=rajesh@example.com").method(HttpMethod.POST).contentType(MediaType.APPLICATION_FORM_URLENCODED));citrus.receive(mailServer).payload("<mail-message xmlns=\"http://www.citrusframework.org/schema/mail/message\">"+"<from>employee-registry@example.com</from>"+"<to>rajesh@example.com</to>"+"<cc></cc>"+"<bcc></bcc>"+"<subject>Welcome new employee</subject>"+"<body>"+"<contentType>text/plain; charset=us-ascii</contentType>"+"<content>We welcome you 'Rajesh' to our company - now get to work!</content>"+"</body>"+"</mail-message>").header(CitrusMailMessageHeaders.MAIL_SUBJECT,"Welcome new employee").header(CitrusMailMessageHeaders.MAIL_FROM,"employee-registry@example.com").header(CitrusMailMessageHeaders.MAIL_TO,"rajesh@example.com");citrus.receive(serviceUri).message(newHttpMessage().statusCode(HttpStatus.NO_CONTENT));citrus.send(serviceUri).fork(true).message(newHttpMessage().method(HttpMethod.GET).accept(MediaType.APPLICATION_XML));citrus.receive(serviceUri).message(newHttpMessage("<employees>"+"<employee>"+"<age>20</age>"+"<name>Rajesh</name>"+"<email>rajesh@example.com</email>"+"</employee>"+"</employees>").statusCode(HttpStatus.OK));citrusFramework.run(citrus.getTestCase());}}
The Arquillian test case is basically the same as before in our first part example. The test now uses a @CitrusEndpoint annotated mail server component. The Arquillian Citrus extension will automatically inject the
mail server Spring bean that we have added to the Citrus configuration before. In case multiple components of the same type are available in the configuration you can use the @CitrusEndpoint annotation with a Spring bean name
like @CitrusEndpoint(name=”myMailServer”). We receive the mail message right after the test has called the service interface with the new employee Rajesh and a valid email field rajesh@example.com. The mail server Citrus component
is ready to be used in a receive test action. Citrus waits for the mail message to arrive and performs message validation with an expected mail message. Citrus automatically converts the mail mime message to a XML message representation.
We can expect the mail message content much better using the XML syntax as we can use the powerful XML validation with XPath, ignore and validation matcher support.
In addition to that Citrus adds some special header values for explicit validation in the receive action. That completes the mail server test case. Citrus automatically start a SMTP server that receives the mail message. The mail is not sent to
a real recipient we just want to validate the mail message content in our test. The mail server did automatically accept the authentication in default mode. We could also switch to advanced mode where we can also validate the authentication steps. For now we keep
it simple and are happy to receive the mail message. Please note that we can mix the receive actions of different interfaces in Citrus very easy. Citrus acts both as client and server on our REST and mail interfaces in the test.
This should close the book for this post. You can review the example code on christophd@github. In a next post I will show you how we can execute
the test as part of the test deployment on the application server. Then we have direct access to container managed resources such as JMS connection factories and queues. Once again, stay tuned!
Citrus and Arquillian
both refer to themselves as integration test frameworks. Following from that you might think these frameworks somehow ship the same package but this is not the case. In fact the frameworks work
brilliant together when it comes to automate the integration testing of JEE applications.
Arquillian has a focus on simplifying the archive deployment with the ability to run integration test cases inside the boundaries of an application container.
The tests are literally part of a server deployment. This approach brings great advantages such as accessing deployment and container resources within the test case.
The application is deployed to a real application server (e.g. Tomcat, Wildfly) which is a good idea as we then also test our application server configuration and we load
the application with all container managed resources such as database connections, JNDI resources and so on. Secondly the test case itself is able to directly use the
container managed resources with injection in the Arquillian test case which is a great thing to do! It becomes very easy to invoke your services in a close to production
nature then.
Citrus primarily has the objective to simplify the usage of different messaging transports in a test case. Citrus offers ready to use components for sending and receiving
messages as a client or server and helps to design a message flow across multiple service calls.
In combination the two frameworks manage complex integration test scenarios that perform fully automated. And this is what we want to have at the end of a day - fully automated integration tests.
The magic is possible since Arquillian offers a great extension mechanism and Citrus provides an Arquillian extension module. Once the extension is enabled in your Arquillian project
you can use Citrus features and components within a your Arquillian test case.
The extension configuration is placed in the basic Arquillian descriptor called arquillian.xml. We use the citrus qualifier so the settings are automatically loaded with the Citrus extension.
For now the possible extension settings are:
citrusVersion: The explicit version of Citrus that should be used. Be sure to have the same library version available in your project (e.g. as Maven dependency). This property is optional. By default the extension just uses the latest stable version.
autoPackage: When true (default setting) the extension will automatically add Citrus libraries and all transitive dependencies to the test deployment. This automatically enables you to use the Citrus API inside the Arquillian test even when the test is executed inside the application container.
suiteName: This optional setting defines the name of the test suite that is used for the Citrus test run. When using before/after suite functionality in Citrus this setting might be of interest.
configurationClass: Full qualified Java class name of customized Citrus Spring bean configuration to use when loading the Citrus Spring application context. As a user you can define a custom Citrus configuration with this optional setting.
So we also need to add the Citrus Maven dependency to our project:
The dependency automatically adds the required Citrus core dependencies so you are ready to work with Citrus framework components. In case you want to use special Citrus components like JMS, FTP, Mail or something like that you need to
add these modules each separately to your Maven POM, too. For now we want to use Http clients and the Citrus Java DSL so lets add the dependencies for that.
Now we are ready to integrate Citrus in a first Arquillian test case:
@RunWith(Arquillian.class)@RunAsClientpublicclassEmployeeResourceTest{@CitrusFrameworkprivateCitruscitrusFramework;@ArquillianResourceprivateURLbaseUri;privateStringserviceUri;@DeploymentpublicstaticWebArchivecreateDeployment(){returnShrinkWrap.create(WebArchive.class).addClasses(RegistryApplication.class,EmployeeResource.class,Employees.class,Employee.class,EmployeeRepository.class);}@BeforepublicvoidsetUp()throwsMalformedURLException{serviceUri=newURL(baseUri,"registry/employee").toExternalForm();}/**
* Test adding new employees and getting list of all employees.
*/@TestpublicvoidtestCreateEmployeeAndGet(@CitrusTestCitrusTestBuildercitrus){citrus.send(serviceUri).message(newHttpMessage("name=Penny&age=20").method(HttpMethod.POST).contentType(MediaType.APPLICATION_FORM_URLENCODED));citrus.receive(serviceUri).message(newHttpMessage().statusCode(HttpStatus.NO_CONTENT));citrus.send(serviceUri).message(newHttpMessage().method(HttpMethod.GET).accept(MediaType.APPLICATION_XML));citrus.receive(serviceUri).message(newHttpMessage("<employees>"+"<employee>"+"<age>20</age>"+"<name>Penny</name>"+"</employee>"+"</employees>").statusCode(HttpStatus.OK));citrusFramework.run(citrus.build());}}
As you can see this is a normal Arquillian JUnit test case. We are running the test in client mode with the @RunAsClient annotation. As the
Citrus extension is active in background we are able to inject the framework instance with the @CitrusFramework annotation. The Citrus
framework instance is automatically loaded and configured with all necessary settings in background when the Arquillian test starts. As usual
we can build the deployment archive with our server resources that we need to test and we have access to @ArquillianResource annotated
resources such as the REST service endpoint URI of our application.
The test method itself is provided with a @CitrusTest annotated method parameter that represents the Citrus execution test builder. This is a Java DSL representation
of what Citrus has to offer when it comes to sending and receiving messages over various message transports. The Citrus Arquillian extension will automatically inject
this method parameter so we can use it inside the test method block in order to define the Citrus test logic.
Basically we invoke the deployed REST service with Citrus using the Java DSL send and receive methods. Each receive operation in Citrus also triggers the message validation mechanism. This includes
a syntax check in case of SOAP and XML messages with a WSDL or XSD given and a semantic check on received message body and header values. The tester is able to give an expected message template that is used
as comparison template. Citrus is able to deeply walk through XML or JSON message payloads comparing elements, attributes, namespaces and values. In case the received message response does not match the given message template
the Arquillian test case will fail with respective validation errors. For now lets keep it simple so we just expect some Http response status codes in the receive operations. The last receive operation expects a very simple XML
message payload with the newly added employee data.
With the ability to send and receive messages via Http REST we simply invoke the deployed service endpoint and validate its outcome. With a sequence of send and receive operations in Citrus we can build complex message flows with
multiple service endpoints involved.
That’s it we have successfully combined both frameworks. Arquillian helps us to deploy and run our application inside an application container and we have easy access to managed resources. Citrus is able to invoke the services via Http with
powerful validation of the received response messages. This is just a very simple sample for now as I just wanted to show the basic setup. Based on this knowledge we can continue with a more complex test scenario. We will start
to use Arquillian in container testing mode and we will start to use more complex Citrus server components in one of my next posts. Stay tuned!
In this post I will continue with the Apache Camel integration testing scenario that we have worked on in part one and
part two of this series.
This time we focus on exception handling in Camel routes. First of all let’s add exception handling to our Camel route.
Camel supports exception handling on specific exception types. The onException route logic is executed when the defined exception type was raised
during message processing. In the sample route we call a separate Seda endpoint seda:errors for further exception handling. The challenge for our
test scenario is obvious. We need to force this error handling and we need to make sure that the Seda endpoint seda:errors has been called accordingly.
Let’s add the error handling endpoint to the Citrus Spring bean configuration.
The static endpoint definition is not mandatory as Citrus is also able to work with dynamic endpoints. In our case the dynamic endpoint for consuming messages on
the seda:errors endpoint would simply be camel:sync:seda:errors. The decision which kind of endpoint someone should use depends
on how much the endpoint could be reused throughout multiple test scenarios. Of course static endpoints are highly reusable in different test cases. On the downside
we have to manage the additional configuration burden. In this post I will use the static endpoint that is injected to the test case via Spring’s autowiring mechanism.
Let’s write the integration test.
packagecom.consol.citrus.hello;importcom.consol.citrus.dsl.TestNGCitrusTestBuilder;importcom.consol.citrus.dsl.annotations.CitrusTest;importcom.consol.citrus.endpoint.Endpoint;importorg.testng.annotations.Test;importorg.springframework.beans.factory.annotation.Autowired;importorg.springframework.beans.factory.annotation.Qualifier;/**
* @author Christoph Deppisch
*/@TestpublicclassSayHelloTestextendsTestNGCitrusTestBuilder{@Autowired@Qualifier("directHelloEndpoint")privateEndpointdirectHelloEndpoint;@Autowired@Qualifier("sedaHelloEndpoint")privateEndpointsedaHelloEndpoint;@Autowired@Qualifier("sedaErrorHandlingEndpoint")privateEndpointsedaErrorHandlingEndpoint;@CitrusTest(name="SayHello_Error_Test")publicvoidsayHello_Error_Test(){send(directHelloEndpoint).fork(true).messageType(MessageType.PLAINTEXT).payload("Hello Citrus!");receive(sedaHelloEndpoint).messageType(MessageType.PLAINTEXT).payload("Hello Citrus!");sleep(500L);send(sedaHelloEndpoint).messageType(MessageType.PLAINTEXT).payload("Something went wrong!").header("citrus_camel_exchange_exception","com.consol.citrus.exceptions.CitrusRuntimeException").header("citrus_camel_exchange_exception_message","Something went wrong!");receive(sedaErrorHandlingEndpoint).messageType(MessageType.PLAINTEXT).payload("Something went wrong!").header("CamelExceptionCaught","com.consol.citrus.exceptions.CitrusRuntimeException: Something went wrong!");send(sedaErrorHandlingEndpoint).messageType(MessageType.PLAINTEXT).payload("Hello after error!");receive(directHelloEndpoint).messageType(MessageType.PLAINTEXT).payload("Hello after error!");}}
The magic happens when Citrus sends back a synchronous response on the seda:sayHello endpoint which is done right after the sleep action in our sample test.
Instead of responding with a usual plain text message we add special header values citrus_camel_exchange_exception and citrus_camel_exchange_exception_message.
send(sedaHelloEndpoint).messageType(MessageType.PLAINTEXT).payload("Something went wrong!").header("citrus_camel_exchange_exception","com.consol.citrus.exceptions.CitrusRuntimeException").header("citrus_camel_exchange_exception_message","Something went wrong!");
These special Citrus headers instruct the Citrus Camel endpoint to raise an exception. We are able to specify the exception type as well as the exception message. As a result
the Citrus endpoint raises the exception on the Camel exchange which should force the exception handling in our Camel route.
The route onException block in our example should send the error to the seda:errors endpoint. So let’s consume this message in a next test step.
receive(sedaErrorHandlingEndpoint).messageType(MessageType.PLAINTEXT).payload("Something went wrong!").header("CamelExceptionCaught","com.consol.citrus.exceptions.CitrusRuntimeException: Something went wrong!");
With this receive action on the error endpoint we intend to validate that the exception handling was done as expected. We are able to check the error message payload and in addition
to that we have access to the Camel internal message headers that indicate the exception handling. Both message payload and message headers are compared to expected values in Citrus.
As a next test step we should provide a proper response message that is used as fallback response. The response is sent back as synchronous response on the seda:errors endpoint saying Hello after error!.
The Camel onException block and in detail the default Camel error handler will use this message as final result of the route logic. So finally in our test we can receive the fallback response message as result
of our initial direct direct:hello request.
This completes this simple test scenario. We raised an exception and forced the Camel route to perform proper exception handling. With the Citrus endpoints in duty we received the error message and provided a fallback
response message which is used as final result of the Camel route.
Error handling in message based enterprise integration scenarios is complex. We need to deal with delivery timeouts, retry strategies and proper transaction handling. This post only showed the top of the iceberg but I hope
you got the idea of how to set up automated integration tests with Apache Camel routes. The Citrus framework is focused on providing real message endpoints no matter of what kind or nature (Http, JMS, REST, SOAP, Ftp, XML, JSON,
Seda and so on). What we get is automated integration testing with real messages being exchanged on different transports and endpoints.
In part one of this blog series we have used Citrus in combination with Apache Camel for setting up
a complete integration test scenario. Remember we have interacted with our Camel route via JMS as client and via SOAP Http WebService as a server.
Now in the second part we want to interact with a Camel route using direct and Seda in memory message transports. First of all we need a Camel route to test.
The Camel route is obviously very simple. The route reads messages from a direct inbound endpoint and forwards all messages to a Seda in memory channel. The Seda communication is synchronous
so the route waits for a synchronous response to arrive. Now when we would like to test this simple route we would have to provide the inbound messages to trigger the route and we would have to
provide proper synchronous response messages on the Seda endpoint.
Lets set up a Citrus test case for this test scenario. We need a direct Camel route message endpoint that is able to call the Camel route. The Camel endpoints are available with a separate Citrus module.
We need to add this library to our project as test scoped dependency if not already done so.
As you can see we have added two Citrus endpoint components both coming from the Citrus Camel module. The first component is interacting with the direct endpoint direct:hello and the second component is interacting with the
Seda seda:sayHello endpoint. Both Citrus components use synchronous message communication so we are able to send and receive messages synchronously. Let’s move on with writing a test case.
packagecom.consol.citrus.hello;importcom.consol.citrus.dsl.TestNGCitrusTestBuilder;importcom.consol.citrus.dsl.annotations.CitrusTest;importcom.consol.citrus.endpoint.Endpoint;importorg.testng.annotations.Test;importorg.springframework.beans.factory.annotation.Autowired;importorg.springframework.beans.factory.annotation.Qualifier;/**
* @author Christoph Deppisch
*/@TestpublicclassSayHelloTestextendsTestNGCitrusTestBuilder{@Autowired@Qualifier("directHelloEndpoint")privateEndpointdirectHelloEndpoint;@Autowired@Qualifier("sedaHelloEndpoint")privateEndpointsedaHelloEndpoint;@CitrusTest(name="SayHello_Ok_Test")publicvoidsayHello_Ok_Test(){send(directHelloEndpoint).fork(true).messageType(MessageType.PLAINTEXT).payload("Hello Citrus!");receive(sedaHelloEndpoint).messageType(MessageType.PLAINTEXT).payload("Hello Citrus!");sleep(500L);send(sedaHelloEndpoint).messageType(MessageType.PLAINTEXT).payload("Hello Camel!");receive(directHelloEndpoint).messageType(MessageType.PLAINTEXT).payload("Hello Camel!");}}
The test is using Spring’s autowiring mechanism in order to inject the Citrus message endpoint components. We have four message interactions in our test. First of all we send a plain text message to the direct Camel route endpoint.
The Camel route is triggered and according to the route logic the message is forwarded to the Seda endpoint. The second test action is a message receive action on this same Seda endpoint. So if the Camel route logic is working as
expected we should be able to receive a message here. The receive test action also performs a validation on the message content received. As a tester we specify the expected message payload. Citrus as test framework compares this
expectation to the message content actually arriving. When everything is matching as expected we continue with the test.
As the Seda endpoint is synchronous we can send back a response to the calling client. In our test this is done with a respective send message action that references the same Seda endpoint. Before we send back a plain text response message
we add a sleep test action in order to simulate some hard work on the backend. As a next step the Camel route receives our simulated response message and immediately responds to the calling direct endpoint client to complete the route.
This is our last step in the test case where we receive the very same response message on the direct endpoint as final message response.
Please do not get confused with this test setup. This scenario is purely constructed for demonstrating how Citrus interacts with Camel routes in terms of synchronous communication on both ends (consuming and producing). As the test performs
all actions four messages are exchanged in between Citrus and our Camel route to test. If everything is working as expected all messages are completed and the test case is successful.
Someone might feel uncomfortable in defining the Citrus endpoint components for each Camel route endpoint in the Spring application context just to reference them inside the test case. This is where dynamic endpoints come in handy. Citrus
is also able to create the endpoint at runtime. See how this looks like.
packagecom.consol.citrus.hello;importcom.consol.citrus.dsl.TestNGCitrusTestBuilder;importcom.consol.citrus.dsl.annotations.CitrusTest;importcom.consol.citrus.endpoint.Endpoint;importorg.testng.annotations.Test;/**
* @author Christoph Deppisch
*/@TestpublicclassSayHelloTestextendsTestNGCitrusTestBuilder{@CitrusTest(name="SayHello_Ok_Test")publicvoidsayHello_Ok_Test(){send("camel:sync:direct:hello").fork(true).messageType(MessageType.PLAINTEXT).payload("Hello Camel!");receive("camel:sync:seda:sayHello").messageType(MessageType.PLAINTEXT).payload("Hello Camel!");sleep(500L);send("camel:sync:seda:sayHello").messageType(MessageType.PLAINTEXT).payload("Hello Citrus!");receive(camel:sync:direct:hello).messageType(MessageType.PLAINTEXT).payload("Hello Citrus!");}}
With the dynamic endpoints we do not have to use any of the predefined endpoint components in the Citrus Spring application context. The test just creates the endpoints automatically at runtime. The result is exactly the same as before.
We have seen that Citrus is able to both send and receive message from an to route message endpoints in Apache Camel. This is a good way of testing Camel routes with simulation of route interface partners. In the next part I will
add some error scenarios where the Seda endpoint component is forcing an exception that should be handled within our Camel route.
Apache Camel is a great mediation and routing framework that integrates with almost every enterprise messaging transport. In the past I have experienced Camel projects struggling with integration testing where the actual message interfaces to boundary applications are not tested properly in an automated way.
So in a series of posts I would like to talk about integration testing strategies for Apache Camel projects using the Citrus integration test framework.
Part 1: Setup the Citrus test project and interact with a sample Apache Camel project with JMS and SOAP WebService components
Part 2: Invoke Camel routes from Citrus test cases and validate outbound messages
Part 3: Test error situations with Camel exception handling
So lets have a sample Camel project that we would like to test. We need a simple Camel route like this:
The route consumes messages from a JMS destination called JMS.Queue.News, logs the message content and forwards the message content to a Http SOAP WebService using the Spring WS library. So we have two different messaging interfaces (JMS and SOAP WebService) to boundary systems in our sample.
Camel does provide very good test strategies for mocking these message transports. In a unit test you can mock the boundary JMS and SOAP interfaces with special mock components. This is great, but sometimes error prone for the following reasons. The JMS protocol provides several settings that are essential for the whole application behavior. For instance the JMS consumer may operate with concurrent consumers, connection pooling and transactional behavior. These settings are done on the Camel JMS component and on the JMS connection factory. In a mocked unit test these settings are not included as the test mock just does not process the real JMS message transports. No doubt these settings make a significant difference in production and have to be tested. In addition to that the SOAP WebService interface uses a WSDL and other SOAP specific settings like the soap action header. We could also add WS-Security and WS-Addressing headers here. In a mocked unit test these quite important interface characteristics are not tested over the wire. The actual SOAP message is not created and you are not able to verify the complete message contents as they are sent over the wire.
So the crucial weapon to avoid bugs related to untested transport settings is integration testing where the actual JMS message broker and a real SOAP WebService endpoint are involved in the test. And this is where Citrus comes in. In a Citrus test case the actual JMS consumer and producer settings do apply as well as a fully qualified WebService endpoint that receives the messages via Http message protocol. We use a real JMS message broker and Http server as it is done in production.
Lets setup a Citrus project that is able to interact with the sample Camel application route.
Citrus as integration test framework works best with Maven. You can setup a Citrus Maven project in minutes with this quick start tutorial. Once you have done this we have a Maven project with some sample Citrus test cases already in it. No we need to add the JMS and SOAP WebService configuration to the Citrus project. First of all let us add ActiveMQ as JMS message broker.
We need to add the ActiveMQ Maven dependencies to our Citrus project. This is done in the Maven POM pom.xml file. Once we have this we can add the message broker to the Citrus configuration. We add a new Spring application context file citrus-activemq-context.xml in src/citrus/resources folder.
As next step we include this new Spring context file in the citrus-context.xml so both the ActiveMQ message broker and the JMS connection factory get loaded during startup. Just add a import statement to the citrus-context.xml file like this:
Good! Now we are ready to connect with the JMS message transport. Let us add the Citrus JMS endpoints. You can do this also in the citrus-context.xml file:
That’s it! Now we can send and receive JMS messages on the JMS destination JMS.Queue.News. Ok so let’s write a new integration test! We create a new Java class in src/citrus/java
packagecom.consol.citrus.news;importcom.consol.citrus.dsl.TestNGCitrusTestBuilder;importcom.consol.citrus.dsl.annotations.CitrusTest;importcom.consol.citrus.ws.message.SoapMessageHeaders;importorg.testng.annotations.Test;/**
* @author Christoph Deppisch
*/@TestpublicclassNewsFeedTestextendsTestNGCitrusTestBuilder{@CitrusTest(name="NewsFeed_Ok_Test")publicvoidnewsFeed_Ok_Test(){send("newsJmsEndpoint").payload("<News>"+"<Message>Citrus rocks!</Message>"+"</News>");receive("newsSoapServer").payload("<News>"+"<Message>Citrus rocks!</Message>"+"</News>").header(SoapMessageHeaders.SOAP_ACTION,"newsFeed");}}
This represents a Citrus Java test case. Notice that this is nothing but a normal Java unit test. I use TestNG as unit test framework. Others might prefer JUnit which is also possible. I think TestNG is much more powerful but this is another story. Also notice that we referenced the newsJmsEndpoint Citrus component in the first send operation. We could have used Spring autowire injection of the JmsEndpoint here, but we want to keep it simple for now. What we have right now is an integration test which actually sends the JMS message with some news content to the JMS queue destination and on the other side we receive the real SOAP message as a web server. But wait! We have not yet added the SOAP server configuration yet! Let’s do this in the citrus-context.xml configuration file.
The server starts a fully qualified Http web server with the SOAP endpoint for receiving the news request. In the test case we can reference the server in a receive operation. That’s it! We are able to run the test. Of course we also need to start our Camel application. You can do this in another process with Maven or you deploy your Camel application to some application server. Citrus is interacting with the Camel route as a normal interface client just using the JMS endpoint. Once you run the integration test you will see how the messages are actualy sent over the wire and you will see Citrus receiving the actual SOAP request message:
Received SOAP request:
<?xml version="1.0" encoding="UTF-8"?><SOAP-ENV:Envelopexmlns:SOAP-ENV="http://schemas.xmlsoap.org/soap/envelope/"><SOAP-ENV:Headerjmsmessageid="ID:localhost-50188-1416562129343-3:4:1:1:1"/><SOAP-ENV:Body><News><Message>Citrus rocks!</Message></News></SOAP-ENV:Body></SOAP-ENV:Envelope>
Also Citrus will put this received message content to validation with comparing the message body and header to the expected content given in the test case. Let’s recap. What we have done is a complete integration test where the Camel route interfaces are called with real message transport interaction. The ActiveMQ JMS message broker is real the SOAP WebService server is real. The message transport configuration is tested properly with message conversion and expected message content validation. The Camel application is loaded and deployed with the complete configuration and settings.
Citrus invokes the Camel route by sending a proper JMS message to the route endpoint. The Camel route processes the message and sends out the SOAP request message. In case the message content is not as expected in the Citrus receive operation or in case the SOAP message is not arriving at all the integration test fails. In this integration test we can simulate both client and server side interaction with our Camel application.
As the Citrus test case is nothing but a normal TestNG/JUnit test we can integrate the test in our Maven build lifecycle and continuous integration process. This completes our first part of how to do extended integration testing with Apache Camel projects. In my next part I will concentrate on how to interact with Apache Camel routes using direct and Seda in memory message transports.
In part I of this tutorial I introduced the basic concepts and benefits of Citrus as a test driver for ESB projects in general and webMethods in particular.
In this second part I want to discuss some Citrus project setup options and provide a quickstart template project for Ant users.
Maven or Ant?
Basically, Citrus support both options – you are free in your choice of the build system to use to drive your Citrus tests. Typically a Maven setup is preferred since Maven reduces the necessary project setup
clutter one has to face when using Ant. Check this quickstart if you want to let Maven create your project structure for you.
However, everything in the webMethods world is ant-based (like tooling, deployment etc.), at least this was the case during my experience with the 8.2 version of webMethods, let me know if things have changed meanwhile.
So it might make pretty good sense to setup the Citrus project with Ant as well to reuse existing project knowledge. That’s what the rest of this blog entry is basically about.
Ant Setup
The Citrus homepage provides an awesome Ant quickstart. Everything you need is described there in detail, however, it is quite a tough job to collect all the necessary dependency jar’s manually.
Since version 1.4, Citrus provides a maven assembly goal which creates a directory with all dependency jar’s which can be thrown into the lib folder of your newly created Citrus project. You can trigger this assembly
by grabbing the Citrus sources and execute
mvn assembly:assembly -Passembly-antlibs
from the project root. Unfortunately I faced some issues on my Macbook with Maven version 3.0.5 so this way was blocked for me. Additionally, not everyone might have interest or possibilities to check out the sources
or have maven installed and setup on his machine. That’s basically why I want to provide a template project to speed up Ant project setup.
Citrus Ant Template Project
For those who prefer the easiest way (like me), I have set up up a little Eclipse template project, where everything needed to run Citrus with Ant is already in place. It contains
The correct folder structure
All necessary Citrus (1.4) core libs and dependencies
A prepared citrus citrus-context.xml and log4j.xml
A template build.xml file
You can grab the template project on Github here , import it (Select Import –> General/Archive File in Eclipse/SAG Designer)
and kick start developing integration tests for your webMethods project. Typically, you will work in Software AG Designer to develop your webMethods solution, luckily it is based on Eclipse and you can perfectly
work with your Citrus test projects in the Java perspective of SAG Designer. In fact, the template project is created and exported from SAG Designer 9.5.
In the next part, I will enhance our empty project with a first test: a SOAP request/reply scenario with Citrus against a webMethods package.
Continuous integration is almost mainstream nowadays. Probably no one wants to argue against the value of having an all-embracing integration test suite in place,
which is lightweight enough to be executed on each code change. In this blog series I want to show the interplay between Citrus,
the integration test framework written and maintained by ConSol and a commonly used Enterprise Service Bus, the webMethods Integration Server.
Meet the participants
Citrus is a lightweight integration test framework specially suited for enterprise integration challenges. It supports a broad set of communication protocols and is able to
simulate partner applications of any type to provide proper end-to-end testing in a sandbox environment.
Our system-under-test is Software AG’s webMethods Integration Server, which is an industry-proof ESB solving complex integration and B2B challenges in large-scale deployments around the globe.
Why Citrus?
On a closer look at the built-in support for automated testing, webMethods provides integrated tooling (namely the wMTestSuite), directly incorporated into the Software AG Designer to support
developers with tests operating on the basic building blocks inside webMethods – the Flow service.
Comparing this tooling to traditional software development, this means there is a good framework for Unit/white box testing in place, but: wmTestSuite is not suited for automated tests from an
integration/black box perspective. For such tasks, several commercial tools are available, but this is where Citrus with its support for automated tests on interface level comes into play as a
smart and fully open source alternative.
What’s coming up?
Over the next parts of this series I want to share the basic steps in order to setup a Citrus project and develop automated tests for several webMethods integration scenarios, including SOAP
request/reply, SOAP and JMS mocking as well as flat file integration. In the end I might also cover the topic BPMN processes on top of webMethods which can be tested with Citrus as well.
Stay tuned for the next upcoming part II: basic project setup
Lately I had to deal with Excel files as REST Http service response. I came up with a pretty clever validation mechanism in Citrus that I would like to share with you. You can apply the Excel validator to your Citrus project, too. It is not very complicated as you will see in this post.
First of all lets have a closer look at the response message we get from REST Http service.
The response message states a Content-Type header set to application/vnd.ms-excel which indicates the Excel content to the browser. Furthermore the Content-Disposition header informs the browser that he should open the save as dialog to the user rather than displaying the content. Finally the Excel file is added as binary content with charset windows-1252.
So now we would like to receive this message in our Citrus test also being able to validate the Excel file content as well as the important header entries. This is how we can do it:
First of all we introduce a custom message validator which handles the binary Excel message content. We intend to create an Excel workbook object that we can pass into the Citrus test. The tester is then able to write Groovy validation code accessing the Excel workbook object. Heres the code for the custom Excel message validator:
publicclassExcelMessageValidatorextendsGroovyScriptMessageValidator{/**
* Default constructor using a customized groovy script template
* with POI workbook support.
*/publicExcelMessageValidator(){super(newClassPathResource("de/buk/aso/test/validation/excel-script-validation.groovy"));}@OverridepublicbooleansupportsMessageType(StringmessageType){returnmessageType.equalsIgnoreCase("ms-excel");}}
The message validator is quite simple isn’t it. We extend GroovyScriptMessageValidator as we would like to write groovy validation code inside the test. The validator uses a custom script template (excel-script-validation.groovy) and supports message type ms-excel. Keep that in mind as we will use this later in our test case. For now we add this message validator to the Citrus Spring application context (citrus-context.xml).
Not much has happened though in this validator’s Java code. The magic is done inside the Groovy script template excel-script-validation.groovy that we have added to the classpath in our project. Lets have a look at this file:
importjava.io.ByteArrayInputStreamimportjava.io.IOExceptionimportcom.consol.citrus.*importcom.consol.citrus.message.*importcom.consol.citrus.variable.*importcom.consol.citrus.context.TestContextimportcom.consol.citrus.exceptions.CitrusRuntimeExceptionimportcom.consol.citrus.validation.script.GroovyScriptMessageValidator.ValidationScriptExecutorimportorg.apache.poi.hssf.usermodel.HSSFWorkbookpublicclassExcelValidationScriptimplementsValidationScriptExecutor{publicvoidvalidate(MessagereceivedMessage,TestContextcontext){Map<String,Object>headers=receivedMessage.copyHeaders()Stringpayload=receivedMessage.getPayload(String.class)HSSFWorkbookworkbook;try{workbook=newHSSFWorkbook(newByteArrayInputStream(payload.getBytes()))}catch(IOExceptione){thrownewCitrusRuntimeException("Failed to create excel workbook",e)}@SCRIPTBODY@}}
Ah, now we are getting more precisely! We introduce a new HSSFWorkbook (see also http://poi.apache.org/) with the message payload that we have just received. Please do not mind the Java-like Groovy programming style - I want to keep things easy for Java programmers in this post. However we now have the workbook object ready for validation code in our test which automatically comes in where @SCRIPTBODY@ placeholder is located. So before we continue to look at the test example we shortly add apache poi jar dependency to our project Maven pom.
We can access the Excel workbook object like a charm. Also the important message headers are checked for expected values. Do not forget to define the message type ms-excel in the receive action. This ensures that the validation mechanism in Citrus uses our custom Excel message validator for preparing the apache poi workbook object in advance.
That’s it! We are now able to validate Excel files in Citrus! The same thing can easily be done with other MS office formats (doc), too. If I have time the next days I will zip that project code and add it as download for you. Have fun with it!
TestNG provides brilliant support for test parameters and data providers. With some annotation magic you are able to pass parameter values to your test method and finally to your Citrus test logic. Actually the TestNG parameters are injected to the Citrus test as normal test variables. Lets put this to the test with a simple example:
We have to use the Citrus data provider (citrusDataProvider) along with a named parameter annotation (message) on the test method. Just add the annotations to the Citrus test method as shown in the example above. Next thing we override the method getParameterValues() in order to provide the actual parameter values. As you can see we provide three static values for the “message” parameter.
Inside the Citrus test you can use the test variable $ as usual. TestNG and Citrus automatically take care on creating the variable with respective value from data provider. The test case is very simple and looks like follows:
As we have three static parameter values in our data provider the whole Citrus test is executed three times. Each time the data provider injects the respective test parameter and ${message} variable. The Citrus test report gives us the test results with all parameters.
 echo Hello World!
 echo Hallo Welt!
 echo Hallo Citrus!

CITRUS TEST RESULTS

DataProviderITest('Hello World!') .................................. SUCCESS
DataProviderITest('Hallo Welt!') ................................... SUCCESS
DataProviderITest('Hallo Citrus!') ................................. SUCCESS

Total number of tests: 3
Skipped:   0 (0.0%)
Failed:    0 (0.0%)
Success:   3 (100.0%)
We can also use multiple test parameters at a time with all values coming from data provider. How about reading the parameter values from external property files or database?! I use this feature a lot for preparing my Citrus tests with dynamic parameter values from external resources and I bet you will enjoy this feature as much as I do. For more information on TestNG data providers please also have a look at the official documentation (http://testng.org/doc).
Integrate your own validator into your Citrus project
∞
Citrus includes a lot of convenient features which are only waiting for you to discover and use them. The other day I needed to validate a SoapAttachment.
As you probably already know, a SoapAttachment is referenced by a href property in an Include tag like this:
<sendendpoint="facadeMessageSender"><message><data><![CDATA[...-your request-...]]></data></message></send><ws:receiveendpoint="facadeResponseHandler"><messageschema-validation="false"><data><![CDATA[
<test:MyTestRes xmlns:mail="http://www.testdomain.com/foo/bar/test"><test:MyStructure><Includehref="@ignore@"xmlns="http://www.w3.org/2004/08/xop/include"/></test:MyStructure></test:MyTestRes>
]]>
</data><ignorepath="//test:MyTestRes/test:MyStructure/*/@href"/></message><extract><messagevariable="contentId"path="///test:MyTestRes/test:MyStructure/*/@href"/></extract><!-- Extract cid: (unfortunately the @ is masked by %40 and has to be replaced too) --><ws:attachmentcontent-id="citrus:concat(citrus:substringBefore(citrus:substringAfter('${contentId}', 'cid:'), '%40www.testdomain.com'), '@www.testdomain.com')"content-type="TEXT/CALENDAR;
charset=us-ascii"validator="soapAttachmentValidator"><ws:data><![CDATA[...-the expected response-...]]></ws:data></ws:attachment></ws:receive>
Things become a little more complicated as soon as you start to connect to real backend systems for integration testing. Especially when timestamps are involved. In my case the SoapAttachment contains a calendar
invitation in vCal format which is basically a simple text based key/value format. I have to ignore the value for the key LAST-MODIFIED because it would be impossible to predict this timestamp and
it’s not really relevant either. So what I really need is a way to compare the expected structure with the actual result line by line, a possibility to completely ignore a line and a way to only ignore the value
but still compare the keys of some lines.
To solve this, the Citrus framework offers the possibility to define your own validators and include them into your test cases. Simply add a Java class which extends AbstractSoapAttachmentValidator to your test project and
implement the validateAttachmentContent method. This will be your new validator and could look somewhat like the simple example I’ll add to the end of this blog entry.
Go back to your citrus-context.xml and add your newly created validator bean:
So here’s the promised simple example for your lineByLineSoapAttachmentValidator:
publicclassLineByLineWithIgnoreSoapAttachmentValidatorextendsAbstractSoapAttachmentValidator{privatestaticfinalStringIGNORE="@ignore@";privatestaticfinalStringLINE_DELIMITERS_R_N="[\\r\\n]+";@OverrideprotectedvoidvalidateAttachmentContent(SoapAttachmentreceivedAttachment,SoapAttachmentcontrolAttachment){try{Stringcontrol=controlAttachment.getContent().trim();Stringreceived=receivedAttachment.getContent().trim();String[]controlLines=control.split(LINE_DELIMITERS_R_N);String[]receivedLines=received.split(LINE_DELIMITERS_R_N);// Check number of propertiesif(controlLines.length!=receivedLines.length){thrownewCitrusRuntimeException("Number of lines are not equal. Expected: "+controlLines.length+" Received: "+receivedLines.length);}// Now compare the propertiesfor(inti=0;i<controlLines.length;i++){StringcontrolLine=controlLines[i].trim();StringreceivedLine=receivedLines[i].trim();if(StringUtils.endsWithIgnoreCase(controlLine,IGNORE)){compareBeginningOfLines(controlLine,receivedLine);// value shall be ignored, so just continue;continue;}if(StringUtils.startsWithIgnoreCase(controlLine,IGNORE)){compareEndingOfLines(controlLine,receivedLine);// value shall be ignored, so just continue;continue;}if(!controlLine.equalsIgnoreCase(receivedLine)){thrownewCitrusRuntimeException("Lines are not equal.\n\nExpected: "+controlLine+"\n\nReceived: "+receivedLine);}}}catch(Exceptione){thrownewCitrusRuntimeException("Validation failed!",e);}}privatevoidcompareBeginningOfLines(StringcontrolLine,StringreceivedLine){// check the beginning of the lineStringbegin=controlLine.substring(0,controlLine.length()-8);if(StringUtils.hasText(begin)&&!StringUtils.startsWithIgnoreCase(receivedLine,begin)){thrownewCitrusRuntimeException("Beginning of lines not equal.\n\nExpected: "+controlLine+"\n\nReceived: "+receivedLine);}}privatevoidcompareEndingOfLines(StringcontrolLine,StringreceivedLine){// check the beginning of the lineStringend=controlLine.substring(8);if(StringUtils.hasText(end)&&!StringUtils.endsWithIgnoreCase(receivedLine,end)){thrownewCitrusRuntimeException("Ending of lines not equal.\n\nExpected: "+controlLine+"\n\nReceived: "+receivedLine);}}}
TestNG groups add great flexibility to the Citrus test execution. We are able to divide all tests into several groups reaching a sophisticated seperation of concerns in our test setup. As an example I want to classify some of my functional Citrus tests as “long-running”. These tests may not apply to continuous execution every time I package my project. Instead of this I want to set up a scheduled integration build to execute those long-running tests in a time schedule.
We simply declare the TestNG groups in the Java part of the Citrus tests, like this:
In Maven I can configure the TestNG groups to be included and excluded during build lifecycle. For better usability I add properties and profiles to my Maven POM, so the configuration looks like follows:
[...]
<properties><!-- TestNG groups (functional, performance, long-running) --><testGroups>functional, performance</testGroups><testGroupsExcluded>long-running</testGroupsExcluded></properties>
[...]
<profiles><!-- Several profiles activating single testng groups for execution --><profile><id>all-tests</id><properties><testGroups>functional, performance, long-running</testGroups><testGroupsExcluded></testGroupsExcluded></properties></profile><profile><id>performance</id><properties><testGroups>performance</testGroups></properties></profile><profile><id>long-running</id><properties><testGroups>long-running</testGroups><testGroupsExcluded></testGroupsExcluded></properties></profile></profiles>
With this setup I am not forced to wait for the long-running tests every time I build the project locally as these test group is excluded by default. However with Maven profiles I am able to run all TestNG groups together or explicitly execute a single group:
mvn install (runs only short-running tests, long-running tests are excluded)
mvn install -Pfunctional,long-running (runs all tests)
mvn install -Plong-running (runs only long-running test group)
TestNG groups in combination with Maven are extremely useful to break down Citrus tests into logical units. For additional reading and other ways to execute TestNG groups without using Maven please see the official TestNG documentation.
By setting the SOAP mustUnderstand header attribute to “1”, you indicate that the service provider must process the SOAP header entry. In case the service provider is not able to handle this special header a SOAP fault server error is sent back to the calling client. In this post I would like to point out an easy way to support these mustUnderstand headers when simulating SOAP WebServices with Citrus.
This sample SOAP request header contains some mustUnderstand header entries:
The service provider respectively the Citrus SOAP server simulation has to handle this UserID. Otherwise the client request can not succeed and is responded with SOAPFault.
Citrus uses the SpringWS project to provide SOAP WebServices endpoints for clients. In SpringWS you are able to add interceptors to the request processing chain in order to support SOAP-ENV:mustUnderstand headers. In this example we add the interceptors directly to the endpoint mapping in the Spring application context.
<!-- Special soap endpoint interceptor that accepts our must-understand headers --><beanid="soapMustUnderstandEndpointInterceptor"class="com.consol.ws.sample.SimpleMustUnderstandEndpointInterceptor"/>
We have added a custom SimpleMustUnderstandEndpointInterceptor. Let us have a closer look at the custom endpoint interceptor implementation:
SpringWS automatically raises SOAP server faults in case we do not handle a SOAP-ENV:mustUnderstand header in the interceptor chain. Fortunately we explicitly accept the UserID SOAP header in the interceptor implementation with the understands() method returning “true” in that case. With this SOAP endpoint interceptor we are able to support mustUnderstand headers in Citrus WebService endpoints.
Citrus also offers a default interceptor implementation which handles mustUnderstand headers with a simple configuration. Just add the interceptor to the request processing and you will not have to implement the interceptor on your own.
<!-- Special soap endpoint interceptor that accepts our must-understand headers --><beanid="soapMustUnderstandEndpointInterceptor"class="com.consol.citrus.ws.interceptor.SoapMustUnderstandEndpointInterceptor"><propertyname="acceptedHeaders"><list><value>{http://www.consol.com/soap-mustunderstand}UserID</value></list></property></bean>
Test cases in Citrus are usually provided with some meta information like the author’s name or the date of creation. This post shows how to extend on this to include your very specific meta data on your own.
Meta-data that comes shipped with Citrus looks like
However there may be some additional data needed to meet your individual testing strategy. Therefore you can extend the meta-info section at the very beginning of a test case very easily. Let me use a simple example to show how it is done.
First of all we define our custom meta information elements in a XML schema:
The schema declares four simple elements (requirement, pre-condition, result and classification) all typed as string. Later we want to add those elements as children to the meta-info element in the test case. But before we can do that let us add the new xsd schema to our project. As I use a Maven project layout the schema file goes to “src/main/resources/com/consol/citrus/schemas/my-testcase-info.xsd”.
Next thing we need to do is to announce the new schema to Spring. A Citrus test case is nothing else but a simple Spring configuration file with customized XML schema support. Therefore Spring needs to know our XML schema while parsing the test case configuration file. So we add the spring.schemas file to following location in our project: src/main/resources/META-INF/spring.schemas
The file maps virtual schema locations to the actual xsd locations in our project. The file content for our example will look like follows:
So now we are finally ready to use the new meta-info elements inside the test case. Note: We use a separate namespace declaration with a custom namespace prefix “custom”.
As you see it is quite easy to add custom meta information to your Citrus test case. The customized elements may be precious for automatic reporting. XSL transformations for instance are able to read those meta information elements in order to generate automatic test reports and documentation.
You can also declare our new XML schema in the Eclipse preferences section as user specific XML catalog entry. Then even the schema code completion in your Eclipse XML editor will be available for our customized meta-info elements.