Setup with ANT
In this how-to tutorial I will use Apache Ant to manage a Citrus project and we will use Ant to execute Citrus test cases. First of all I loaded the latest Citrus release archive to an empty folder on my local storage. Unzip the archive in order to have access to the Citrus binaries and sources.
Preconditions
You need following software on your computer, in order to use the Citrus Framework:
- Java 11 or higher Installed JDK plus JAVA_HOME environment variable set up and pointing to your Java installation directory
- Java IDE A Java IDE will help you manage your Citrus project, create and execute test cases. Just use the Java IDE that you are used to (e.g. Eclipse or IntelliJ IDEA).
- Ant 1.8 or higher Citrus tests will be executed with the Apache Ant build tool. But it is not required to use Ant only. You can also run tests via Apache Maven for example.
ANT project
So now lets start to set up a new Citrus Java project. In contrast to a Maven generated project we have to create our project structure ourself when using Ant. A good starting point is the samples folder coming with the Citrus release distribution. Here you can see several sample Citrus projects with given folder structure. So lets have a look at a usual Citrus project structure. I am using the Eclipse IDE development tool to set up the new Java project. I am also accessing Ant from the command line in this tutorial so you may also want to install Ant first before continuing. See the Ant homepage for detailed installation instructions.
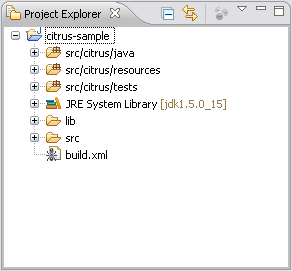
Have a look at the folder structure I created for our new Citrus project

I created a simple Java project in Eclipse called “citrus-sample”. I manually added folders and files to the project as follows. The Citrus project knows three source folders, that are also added to the Java build path as source folders:
- src/it/java: Storage for generated Java TestNG tests
- src/it/resources: Configuration files go in here (e.g. Spring application context files, citrus.properties, log4j.xml, …)
- src/it/tests: XML test case describing files (generated by Citrus)
As a next step we setup a lib folder for some libraries we need for execution. This includes the Citrus Java archives (citrus-core.jar, citrus-http.jar, etc.) coming from the downladed release archive and all dependency libraries also available in the release archive. Finally what’s missing is the Ant build file (build.xml) with following content.
<project name="citrus-sample" basedir="." default="citrus.run.tests" xmlns:artifact="antlib:org.apache.maven.artifact.ant">

    <property file="src/it/resources/citrus.properties"/>

    <path id="maven-ant-tasks.classpath" path="lib/maven-ant-tasks-2.1.3.jar" />
    <typedef resource="org/apache/maven/artifact/ant/antlib.xml"
             uri="antlib:org.apache.maven.artifact.ant"
             classpathref="maven-ant-tasks.classpath" />

    <artifact:pom id="citrus-pom" file="pom.xml" />
    <artifact:dependencies filesetId="citrus-dependencies" pomRefId="citrus-pom" />

    <path id="citrus-classpath">
      <pathelement path="src/it/java"/>
      <pathelement path="src/it/resources"/>
      <pathelement path="src/it/tests"/>
      <fileset refid="citrus-dependencies"/>
    </path>

    <taskdef resource="testngtasks" classpath="lib/testng-6.8.8.jar"/>

    <target name="compile.tests">
        <javac srcdir="src/it/java" classpathref="citrus-classpath"/>
        <javac srcdir="src/it/tests" classpathref="citrus-classpath"/>
    </target>

    <target name="create.test" description="Creates a new empty test case">
        <input message="Enter test name:" addproperty="test.name"/>
        <input message="Enter test description:" addproperty="test.description"/>
        <input message="Enter author's name:" addproperty="test.author" defaultvalue="${default.test.author}"/>
        <input message="Enter package:" addproperty="test.package" defaultvalue="${default.test.package}"/>
        <input message="Enter framework:" addproperty="test.framework" defaultvalue="testng"/>

        <java classname="com.consol.citrus.util.TestCaseCreator">
            <classpath refid="citrus-classpath"/>
            <arg line="-name ${test.name} -author ${test.author} -description ${test.description} -package ${test.package} -framework ${test.framework}"/>
        </java>
    </target>

    <target name="citrus.run.tests" depends="compile.tests" description="Runs all Citrus tests">
        <testng classpathref="citrus-classpath">
          <classfileset dir="src/it/java" includes="**/*.class" />
        </testng>
    </target>

    <target name="citrus.run.single.test" depends="compile.tests" description="Runs a single test by name">
        <touch file="test.history"/>
        <loadproperties srcfile="test.history"/>

        <echo message="Last test executed: ${last.test.executed}"/>
        <input message="Enter test name or leave empty for last test executed:" addproperty="testclass" defaultvalue="${last.test.executed}"/>

        <propertyfile file="test.history">
            <entry key="last.test.executed" type="string" value="${testclass}"/>
        </propertyfile>

        <testng classpathref="citrus-classpath">
          <classfileset dir="src/it/java" includes="**/${testclass}.class" />
        </testng>
    </target>
</project>
Those who are familiar with Ant will understand this file easily. We used the maven ant tasks in order to download all 3rd party libraries needed for a Citrus run. You need to setup the Maven Ant tasks JAR and the TestNG JAR in the lib directory before executing the build script for the first time. Further a Java classpath is defined with its conventional name “citrus-classpath”. The classpath definition includes all Java libraries found inside the lib folder. Besides that the build file declares the TestNG special Ant tasks that help us to execute the tests.
These TestNG Ant task definitions will help to execute Citrus out of a Ant build script. We will handle the execution later in this tutorial in more detail. For now we will start with the “create.test” target. This target creates new test cases for your project. So let us give it a try! I execute the “create.test” target from the command line using my seperate Ant installation. To be honest it is more comfortable to use the built-in Eclipse Ant plugin to execute Ant targets, but I choose the command line first to be more independent from the IDE tool.
The target will prompt for some information when executed, see the output below:
$ ant create.test
Buildfile: build.xml

create.test:
    [input] Enter test name: MyFirstTest
    [input] Enter test description: This is my first Citrus test
    [input] Enter author's name: [Christoph]
    [input] Enter package: [com.consol.citrus.ant.sample]
    [input] Enter framework: [testng]

BUILD SUCCESSFUL
Total time: 21 seconds
The target will ask you for the name of the test first. After that you give a description for the test. The author’s default name is located in the “citrus.properties”, but you can also specify another author of course. Same thing with the test’s package. In the “citrus.properties” you can define a default package or you can type in another package when prompted.
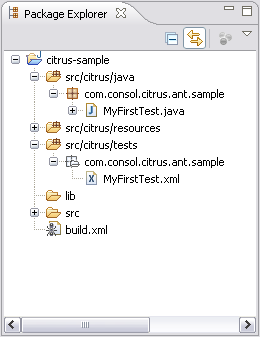
Now that we have given all information for the test Citrus will create all test files automatically. Let us have a look at the generated files.

The generated files are:
- src/it/java/MyFirstTest.java: TestNG Java test case that is executable right now
- src/it/tests/MyFirstTest.xml: Citrus XML test case describing file
With these two files you are able to run the test. Let us first have a look at the generated XML test description:
<?xml version="1.0" encoding="UTF-8"?>
<spring:beans xmlns="http://www.citrusframework.org/schema/testcase"
                 xmlns:spring="http://www.springframework.org/schema/beans"
                 xmlns:xsi="http://www.w3.org/2001/XMLSchema-instance"
                 xsi:schemaLocation="
                 http://www.springframework.org/schema/beans
                 http://www.springframework.org/schema/beans/spring-beans.xsd
                 http://www.citrusframework.org/schema/testcase
                 http://www.citrusframework.org/schema/testcase/citrus-testcase.xsd">

    <testcase name="MyFirstTest">
        <meta-info>
            <author>Christoph</author>
            <creationdate>2009-08-19</creationdate>
            <status>DRAFT</status>
            <last-updated-by>Christoph</last-updated-by>
            <last-updated-on>2009-08-19T11:18:06</last-updated-on>
        </meta-info>

        <description>This is my first Citrus test</description>

        <actions>
            <echo>
                <message>TODO: Code the test MyFirstTest</message>
            </echo>
        </actions>
    </testcase>
</spring:beans>
Citrus created an empty test case that does nothing but print a simple message to the console. The test is in status DRAFT which means it is not finished yet but be aware that the test is executable in this state. In case you need to disable the test because it is not entirely finished yet and may cause failures in a test run you can use the status DISABLED. You may code the test first and then change its status to FINAL in order to finally enable the test for execution. Right now we do not want to code any additional logic into the test case for this tutorial, so we change its status right now to FINAL and try to execute the test with Ant.
We switch again to the command line to execute the Ant target called “citrus.run.single.test”. We are asked to type in the name of the test to execute. In our example we type “MyFirstTest” and Citrus will execute the test.
$ ant citrus.run.single.test
Buildfile: build.xml

citrus.run.single.test:
[echo] Last test executed: Unknown
[input] Enter test name: [Unknown] MyFirstTest

CITRUS TESTFRAMEWORK

Found test 'com.consol.citrus.ant.sample.MyFirstTest'

RUNNING CITRUS TESTS

------------------------------------------------------------------------
INIT

Found 0 tasks in init phase
------------------------------------------------------------------------
INIT successfully

------------------------------------------------------------------------
STARTING TEST: MyFirstTest
Initializing TestCase
TestCase using the following global variables:
project.name = Citrus sample

1. action in test chain
echo TODO: Code the test MyFirstTest

TEST FINISHED: MyFirstTest
------------------------------------------------------------------------
FINISH CITRUS TEST
------------------------------------------------------------------------
________________________________________________________________________

CITRUS TEST RESULTS

  MyFirstTest                                       : SUCCESS

Found 1 test cases to execute
Skipped 0 test cases (0.0%)
Executed 1 test cases
Tests failed:            0 (0.0%)
Tests successfully:      1 (100.0%)
________________________________________________________________________
Found 0 tasks after
------------------------------------------------------------------------
FINISH successfully
The execution by test names only is suitable for executing a small amount of test cases. If you want to run a whole package of tests use the package notation instead as it is used in the “citrus.run.tests” target which executes all tests in the package “com.consol.citrus”.
The last option you have when executing Citrus is a TestNG suite xml file. TestNG can configure test suites via XML. We have a look at a very simple testng.xml.
<!DOCTYPE suite SYSTEM "http://testng.org/testng-1.0.dtd">
<suite name="citrus-samples">
  <test verbose="2" name="com.consol.citrus.ant.sample.MyFirstTest" annotations="JDK">
    <classes>
      <class name="com.consol.citrus.ant.sample.MyFirstTest"/>
    </classes>
  </test>
</suite>
The testng.xml is very powerful and you have a lot of options how to group tests together to suites. Citrus can work on those testng.xml files when executed with Ant.
<testng>
  <xmlfileset dir="configuration" includes="testng.xml"/>
</testng>
That’s it! This is how Citrus connects with a normal Eclipse Java project and Ant. With Ant you can integrate your Citrus tests easily in your continuous build environment, so the tests are executed every time something has changed in the code base of your project.