Test cases
Now let us start writing test cases! A test case in Citrus describes all steps for a certain use case in one single file. The Citrus test holds a sequence of test actions. Each action represents a very special purpose such as sending or receiving a message. Typically with message-based enterprise applications the sending and receiving of messages represent the main actions inside a test.
However you will learn that Citrus is more than just a simple SOAP client for instance. Each test case can hold complex actions such as connecting to the database, transforming data, adding loops and conditional steps. With the default Citrus action set you can accomplish very complex use case integration tests. Later in this guide we will briefly discuss all available test actions and learn how to use various message transports within the test. For now we will concentrate on the basic test case structure.
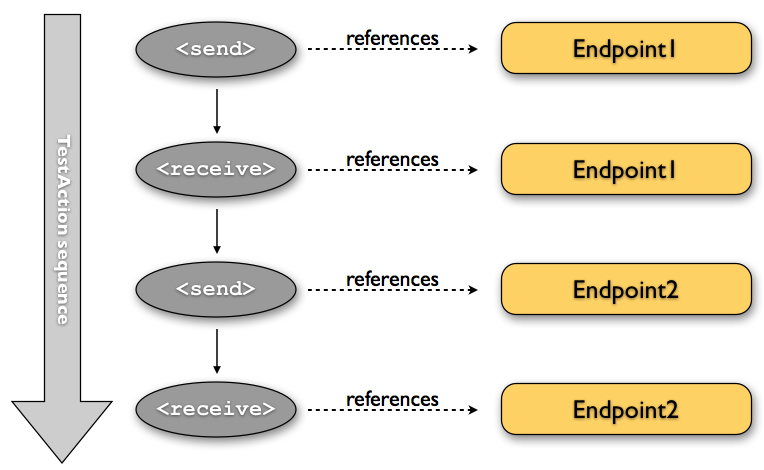
The figure above describes a typical test action sequence in Citrus. A list of sending and receiving test actions composing a typical test case here. Each action references a predefined Citrus endpoint component that we are going to talk about later on.
So how do we define those test cases? In general Citrus specifies test cases as Java classes. With TestNG or JUnit you can execute the Citrus tests within your Java runtime as you would do within unit testing. You can code the Citrus test in a single Java class doing assertions and using Spring's dependency injection mechanisms.
If you are not familiar to writing Java code you can also write Citrus tests as XML files. Whatever test language you choose for Citrus the whole test case description takes place in one single file (Java or XML). This chapter will introduce the custom XML schema language as well as the Java domain specific language so you will be able to write Citrus test cases no matter what knowledge base you belong to.
Writing test cases in XML
Put simply, a Citrus test case is nothing but a simple Spring XML configuration file. The Spring framework has become a state of the art development framework for enterprise Java applications. As you work with Citrus you will also learn how to use the Spring Ioc (Inversion of control) container and the concepts of dependency injection. So let us have a look at the pure Spring XML configuration syntax first. You are free to write fully compatible test cases for the Citrus framework just using this syntax.
Spring bean definition syntax
<beans
    xmlns="http://www.springframework.org/schema/beans"
    xmlns:xsi="http://www.w3.org/2001/XMLSchema-instance"
    xsi:schemaLocation="http://www.springframework.org/schema/beans
    http://www.springframework.org/schema/beans/spring-beans.xsd">

    <bean name="MyFirstTest"
             class="com.consol.citrus.TestCase">
        <property name="variableDefinitions">
            <!-- variables of this test go here -->
        </property>
        <property name="actions">
            <!-- actions of this test go here -->
        </property>
    </bean>
</beans>
Citrus can execute these Spring bean definitions as normal test cases - no problem, but the pure Spring XML syntax is very verbose and probably not the best way to describe a test case in Citrus. In particular you have to know a lot of Citrus internals such as Java class names and property names. In addition to that as test scenarios get more complex the test cases grow in size. So we need a more effective and comfortable way of writing tests. Therefore Citrus provides a custom XML schema definition for writing test cases which is much more adequate for our testing purpose.
The custom XML schema aims to reach the convenience of domain specific languages (DSL). Let us have a look at the Citrus test describing XML language by introducing a first very simple test case definition:
XML DSL
<spring:beans
    xmlns="http://www.citrusframework.org/schema/testcase"
    xmlns:xsi="http://www.w3.org/2001/XMLSchema-instance"
    xmlns:spring="http://www.springframework.org/schema/beans"
    xsi:schemaLocation="
    http://www.springframework.org/schema/beans
    http://www.springframework.org/schema/beans/spring-beans.xsd
    http://www.citrusframework.org/schema/testcase
    http://www.citrusframework.org/schema/testcase/citrus-testcase.xsd">

    <testcase name="MyFirstTest">
        <description>
            First example showing the basic test case definition elements!
        </description>
        <variables>
            <variable name="text" value="Hello Test Framework"/>
        </variables>
        <actions>
            <echo>
                <message>${text}</message>
            </echo>
        </actions>
    </testcase>
</spring:beans>
We do need the <spring:beans> root element as the XML file is read by the Spring IoC container. Inside this root element the Citrus specific namespace definitions take place.
The test case itself gets a mandatory name that must be unique throughout all test cases in a project. You will receive errors when using duplicate test names. The test name has to follow the common Java naming conventions and rules for Java classes. This means names must not contain any whitespace characters but characters like '-', '.', '_' are supported. For example, TestFeature_1 is valid but Test Feature 1 is not as it contains whitespace characters like spaces.
Now that we have an XML definition that describes the steps of our test we need a Java executable for the test. The Java executable is needed for the framework in order to run the test. See the following sample Java class that represents a simple Citrus Java test:
import org.testng.annotations.Test;
import com.consol.citrus.annotations.CitrusTest;
import com.consol.citrus.testng.AbstractTestNGCitrusTest;

@Test
public class MyFirstTest extends AbstractTestNGCitrusTest {

    @CitrusXmlTest(name = "MyFirstTest")
    public void myFirstTest() {
    }
}
The sample above is a Java class that represents a valid Citrus Java executable. The Java class has no programming logic as we use a XML test case here. The Java class can also be generated using the Citrus Maven plugin. The Java class extends from basic superclass AbstractTestNGCitrusTest and therefore uses TestNG as unit test framework. Citrus also supports JUnit as unit test framework. Read more about this inrun-testngandrun-junit.
Up to now it is important to understand that Citrus always needs a Java executable test class. In case we use the XML test representation the Java part is generic, can be generated and contains no programming logic. The XML test defines all steps and is our primary test case definition.
Writing test cases in Java
Before we go into more details on the attributes and actions that take place within a test case we just have a look at how to write test cases with pure Java code. Citrus works with Java and uses the well known JUnit and TestNG framework benefits that you may be used to as a tester. Many users may prefer to write Java code instead of the verbose XML syntax. Therefore you have another possibility for writing Citrus tests in pure Java.
When using the Citrus Java DSL we need to include a special Maven dependency module to our project that provides the needed API.
<dependency>
  <groupId>com.consol.citrus</groupId>
  <artifactId>citrus-java-dsl</artifactId>
  <version>2.6.2</version>
  <scope>test</scope>
</dependency>
Citrus in general differences between two ways of test cases in Java. These are test-designers and test-runners that we deal with each in the next two sections.
Java DSL test designer
The first way of defining a Citrus test in Java is the test-designer . The Java DSL for a test designer works similar to the XML approach. The whole test case is built with all test actions first. Then the whole test case is executed as a whole Citrus test. This is how to define a Citrus test with designer Java DSL methods:
Java DSL designer
import org.testng.annotations.Test;
import com.consol.citrus.annotations.CitrusTest;
import com.consol.citrus.dsl.testng.TestNGCitrusTestDesigner;

@Test
public class MyFirstTestDesigner extends TestNGCitrusTestDesigner {
    @CitrusTest(name = "MyFirstTest")
    public void myFirstTest() {
        description("First example showing the basic test case definition elements!");

        variable("text", "Hello Test Framework");

        echo("${text}");
    }
}
Citrus provides a base Java class com.consol.citrus.dsl.testng.TestNGCitrusTestDesigner that provides all capabilities for you in form of builder pattern methods. Just use the @CitrusTest annotation on top of the test method. Citrus will use the method name as the test name by default. As you can see in the example above you can also customize the test name within the @CitrusTest annotation. The test method builds all test actions using the test builder pattern. The defined test actions will then be called later on during test runtime.
The design time runtime difference in test-designer is really important to be understood. You can mix the Citrus Java DSL execution with other Java code with certain limitations. We will explain this later on when introducing the test-runner .
This is the basic test Java class pattern used in Citrus. You as a tester with development background can easily extend this pattern for customized logic. Again if you are coming without coding experience do not worry this Java code is optional. You can do exactly the same with the XML syntax only as shown before. The test designer Java DSL is much more powerful though as you can use the full Java programming language with class inheritance and method delegation.
We have mentioned that the test-designer will build the complete test case in design time with all actions first before execution of the whole test case takes place at runtime of the test. This approach has the advantage that Citrus knows all test actions in a test before execution. On the other hand you are limited in mixing Java DSL method calls and normal Java code. The following example should clarify things a little bit.
Java DSL designer
import org.testng.annotations.Test;
import com.consol.citrus.annotations.CitrusTest;
import com.consol.citrus.dsl.testng.TestNGCitrusTestDesigner;

@Test
public class LoggingTestDesigner extends TestNGCitrusTestDesigner {
    private LoggingService loggingService = new LoggingService();

    @CitrusTest(name = "LoggingTest")
    public void loggingTest() {
        echo("Before loggingService call");

        loggingService.log("Now called custom logging service");

        echo("After loggingService call");
    }
}
In this example test case above we use an instance of a custom LoggingService and call some operation log() in the middle of our Java DSL test. Now developers might expect the logging service call to be done in the middle of the Java Citrus test case but if we have a look at the logging output of the test we get a total different result:
Expected output
INFO            Citrus| STARTING TEST LoggingTest
INFO        EchoAction| Before loggingService call
INFO    LoggingService| Now called custom logging service
INFO        EchoAction| After loggingService call
INFO            Citrus| TEST SUCCESS LoggingTest
Actual output
INFO    LoggingService| Now called custom logging service
INFO            Citrus| STARTING TEST LoggingTest
INFO        EchoAction| Before loggingService call
INFO        EchoAction| After loggingService call
INFO            Citrus| TEST SUCCESS LoggingTest
So if we analyse the actual logging output we see that the logging service was called even before the Citrus test case did start its action. This is the result of test-designer building up the whole test case first. The designer collects all test actions first in internal memory cache and the executes the whole test case. So the custom service call on the LoggingService is not part of the Citrus Java DSL test and therefore is executed immediately at design time.
We can fix this with the following test-designer code:
Java DSL designer
import org.testng.annotations.Test;
import com.consol.citrus.annotations.CitrusTest;
import com.consol.citrus.dsl.testng.TestNGCitrusTestDesigner;

@Test
public class LoggingTestDesigner extends TestNGCitrusTestDesigner {
    private LoggingService loggingService = new LoggingService();

    @CitrusTest(name = "LoggingTest")
    public void loggingTest() {
        echo("Before loggingService call");

        action(new AbstractTestAction() {
            doExecute(TestContext context) {
                loggingService.log("Now called custom logging service");
            }
        });

        echo("After loggingService call");
    }
}
Now we placed the loggingService call inside a custom TestAction implementation and therefore this piece of code is part of the Citrus Java DSL and following from that part of the Citrus test execution. Now with that fix we get the expected logging output:
INFO            Citrus| STARTING TEST LoggingTest
INFO        EchoAction| Before loggingService call
INFO    LoggingService| Now called custom logging service
INFO        EchoAction| After loggingService call
INFO            Citrus| TEST SUCCESS LoggingTest
Now this is not easy to understand and people did struggle with this separation of designtime and runtime of a Citrus Java DSL test. This is why we have implemented a new Java DSL base class called test-runner that we deal with in the next section. Before we continue we have to mention that the test-designer approach does also work for JUnit. Although we have only seen TestNG sample code in this section everything is working exactly the same way with JUnit framework. Just use the base class com.consol.citrus.dsl.junit.JUnit4CitrusTestDesigner instead.
Important Neither TestNGCitrusTestDesigner nor JUnit4CitrusTestDesigner implementation is thread safe for parallel test execution. This is simply because the base class is holding state to the current test designer instance in order to delegate method calls to this instance. Therefore parallel test method execution is not available. Fortunately we have added a threadsafe base class implementation that uses resource injection. Read more about this intestcase-resource-injection.
Java DSL test runner
The new test runner concept solves the issues that may come along when working with the test designer. We have already seen a simple example where the test designer requires strict separation of designtime and runtime. The test runner implementation executes each test action immediately. This changes the prerequisites in such that the test action Java DSL method calls can be mixed with usual Java code statements. The the example that we have seen before in a test runner implementation:
Java DSL runner
import org.testng.annotations.Test;
import com.consol.citrus.annotations.CitrusTest;
import com.consol.citrus.dsl.testng.TestNGCitrusTestRunner;

@Test
public class LoggingTestRunner extends TestNGCitrusTestRunner {
    private LoggingService loggingService = new LoggingService();

    @CitrusTest(name = "LoggingTest")
    public void loggingTest() {
        echo("Before loggingService call");

        loggingService.log("Now called custom logging service");

        echo("After loggingService call");
    }
}
With the new test runner implementation as base class we are able to mix Java DSL method calls and normal Java code statement in our test in an unlimited way. This example above will also create the expected logging output as all Java DSL method calls are executed immediately.
INFO            Citrus| STARTING TEST LoggingTest
INFO        EchoAction| Before loggingService call
INFO    LoggingService| Now called custom logging service
INFO        EchoAction| After loggingService call
INFO            Citrus| TEST SUCCESS LoggingTest
In contrary to the test designer the test runner implementation will not build the complete test case before execution. Each test action is executed immediately as it is called with Java DSL builder methods. This creates a more natural way of coding test cases as you are also able to use iterations, try catch blocks, finally sections and so on.
In the examples here TestNG was used as unit framework. Of course the exact same approach can also apply to JUnit framework. Just use the base class com.consol.citrus.dsl.junit.JUnit4CitrusTestRunner instead. Feel free to choose the base class for test-designer or test-runner as you like. You can also mix those two approaches in your project. Citrus is able to handle both ways of Java DSL code in a project.
Important The TestNGCitrusTestRunner and JUnit4CitrusTestRunner implementation is not thread safe for parallel test execution. This is simply because the base class is holding state to the current test runner instance in order to delegate method calls to this instance. Therefore parallel test method execution is not available. Fortunately we have added a threadsafe base class implementation that uses resource injection. Read more about this intestcase-resource-injection.
Designer/Runner injection
In the previous sections we have seen the different approaches for test designer and runner implementations. Up to now the decision which implementation to use was made by extending one of the base classes:
- com.consol.citrus.dsl.testng.TestNGCitrusTestRunner
- com.consol.citrus.dsl.testng.TestNGCitrusTestDesigner
- com.consol.citrus.dsl.junit.JUnit4CitrusTestRunner
- com.consol.citrus.dsl.junit.JUnit4CitrusTestDesigner
These four classes represent the different designer and runner implementations for TestNG or JUnit. Now Citrus also provides a resource injection mechanism for both designer and runner implementations. The classes using this feature are:
- com.consol.citrus.dsl.testng.TestNGCitrusTest
- com.consol.citrus.dsl.junit.JUnit4CitrusTest
So what is the deal with that? It is simple when looking at a first example using resource injection:
@Test
public class InjectionTest extends JUnit4CitrusTest {

    @CitrusTest(name = "JUnit4DesignerTest")
    public void designerTest(@CitrusResource TestDesigner designer) {
        designer.echo("Now working on designer instance");
    }

    @CitrusTest(name = "JUnit4RunnerTest")
    public void runnerTest(@CitrusResource TestRunner runner) {
        runner.echo("Now working on runner instance");
    }
}
The designer or runner instance is injected as Citrus resource to the test method as parameter. This way we can mix designer and runner in a single test. But this is not the real motivation for the resource injection. The clear advantage of this approach with injected designer and runner instances is support for multi threading. In case you want to execute the Citrus tests in parallel using multiple threads you need to use this approach. This is because the usual designer and runner base classes are not thread safe. This JUnit4CitrusTest base class is because the resources injected are not kept as state in the base class.
This is our first Citrus resource injection use case. The framework is able to inject other resources, too. Find out more about this in the next sections.
Test context injection
When running a test case in Citrus we make use of basic framework components and capabilities. One of these capabilities is to use test variables, functions and validation matchers. Up to this point we have not learned about these things. They will be described in the upcoming chapters and sections in more detail. Right now I want to talk about resource injection in Citrus.
All these feature mentioned above are bound to some important Citrus component: the Citrus test context. The test context holds all variables and is able to resolve functions and matchers. In general you as a tester will not need explicit access to this component as the framework is working with it behind the scenes. In case you need some access for advanced operations with the framework Citrus provides a resource injection. Lets have a look at this so things are getting more clear.
public class ResourceInjectionIT extends JUnit4CitrusTestDesigner {

    @Test
    @CitrusTest
    public void resourceInjectionIT(@CitrusResource TestContext context) {
        context.setVariable("myVariable", "some value");
        echo("${myVariable}");
    }
}
As you can see we have added a method parameter of type com.consol.citrus.context.TestContext to the test method. The annotation @CitrusResource tells Citrus to inject this parameter with the according instance of the object for this test. Now we have easy access to the context and all its capabilities such as variable management.
Of course the same approach works with TestNG, too. As TestNG also provides resource injection mechanisms we have to make sure that the different resource injection approaches do not interfere with each other. So we tell TestNG to not inject this parameter by declaring it as @Optional for TestNG. In addition to that we need to introduce the parameter to TestNG with the @Parameters annotation. Otherwise TestNG would complain about not knowing this parameter. The final test method with Citrus resource injection looks like follows:
public class ResourceInjectionIT extends TestNGCitrusTestDesigner {

    @Test @Parameters("context")
    @CitrusTest
    public void resourceInjectionIT(@Optional @CitrusResource TestContext context) {
        context.setVariable("myVariable", "some value");
        echo("${myVariable}");
    }
}
Some more annotations needed but the result is the same. We have access to the Citrus test context. Of course you can combine the resource injection for different Citrus components. Just add more some @CitrusResource annotated method parameters to the test method.
Java DSL test behaviors
When using the Java DSL the concept of behaviors is a good way to reuse test action blocks. By putting test actions to a test behavior we can instantiate and apply the behavior to different test cases multiple times. The mechanism is explained best when having a simple sample:
public class FooBehavior extends AbstractTestBehavior {
    public void apply() {
        variable("foo", "test");

        echo("fooBehavior");
    }
}

public class BarBehavior extends AbstractTestBehavior {
    public void apply() {
        variable("bar", "test");

        echo("barBehavior");
    }
}
The listing above shows two test behaviors that add very specific test actions and test variables to the test case. As you can see the test behavior is able to use the same Java DSL action methods as a normal test case would do. Inside the apply method block we define the behaviors test logic. Now once this is done we can use the behaviors in a test case like this:
@CitrusTest
public void behaviorTest() {
    description("This is a behavior Test");
    author("Christoph");
    status(TestCaseMetaInfo.Status.FINAL);

    variable("var", "test");

    applyBehavior(new FooBehavior());

    echo("Successfully applied bar behavior");

    applyBehavior(new BarBehavior());

    echo("Successfully applied bar behavior");
}
The behavior is applied to the test case by calling the applyBehavior method. As a result the behavior is called adding its logic at this point of the test execution. The same behavior can now be called in multiple test cases so we have a reusable set of test actions.
Description
In the test examples that we have seen so far you may have noticed that a tester can give a detailed test description. The test case description clarifies the testing purpose and perspectives. The description should give a short introduction to the intended use case scenario that will be tested. The user should get a first impression what the test case is all about as well as special information to understand the test scenario. You can use free text in your test description no limit to the number of characters. But be aware of the XML validation rules of well formed XML when using the XML test syntax (e.g. special character escaping, use of CDATA sections may be required)
Test Actions
Now we get close to the main part of writing an integration test. A Citrus test case defines a sequence of actions that will take place during the test. Actions by default are executed sequentially in the same order as they are defined in the test case definition.
XML DSL
<actions>
    <action>[...]</action>
    <action>[...]</action>
</actions>
All actions have individual names and properties that define the respective behavior. Citrus offers a wide range of test actions from scratch, but you are also able to write your own test actions in Java or Groovy and execute them during a test. actions gives you a brief description of all available actions that can be part of a test case execution.
The actions are combined in free sequence to each other so that the tester is able to declare a special action chain inside the test. These actions can be sending or receiving messages, delaying the test, validating the database and so on. Step-by-step the test proceeds through the action chain. In case one single action fails by reason the whole test case is red and declared not successful.
Finally test section
Java developers might be familiar with the concept of doing something in the finally code section. The finally section contains a list of test actions that will be executed guaranteed at the very end of the test case even if errors did occur during the execution before. This is the right place to tidy up things that were previously created by the test like cleaning up the database for instance. The finally section is described in more detail in finally. However here is the basic syntax inside a test.
XML DSL
<finally>
    <echo>
        <message>Do finally - regardless of what has happened before</message>
    </echo>
</finally>
Java DSL designer
@CitrusTest
public void sampleTest() {
    echo("Hello Test Framework");

    doFinally(
        echo("Do finally - regardless of any error before")
    );
}
Java DSL runner
@CitrusTest
public void sampleTest() {
    echo("Hello Test Framework");

    doFinally()
        .actions(
            echo("Do finally - regardless of any error before")
        );
}
Test meta information
The user can provide some additional information about the test case. The meta-info section at the very beginning of the test case holds information like author, status or creation date. In detail the meta information is specified like this:
XML DSL
<testcase name="metaInfoTest">
    <meta-info>
        <author>Christoph Deppisch</author>
        <creationdate>2008-01-11</creationdate>
        <status>FINAL</status>
        <last-updated-by>Christoph Deppisch</last-updated-by>
        <last-updated-on>2008-01-11T10:00:00</last-updated-on>
    </meta-info>
    <description>
        ...
    </description>
    <actions>
        ...
    </actions>
</testcase>
Java DSL designer and runner
@CitrusTest
public void sampleTest() {
    description("This is a Test");
    author("Christoph");
    status(Status.FINAL);

    echo("Hello Citrus!");
}
The status allows following values: DRAFT, READY_FOR_REVIEW, DISABLED, FINAL. The meta-data information to a test is quite important to give the reader a first information about the test. It is also possible to generate test documentation using this meta-data information. The built-in Citrus documentation generates HTML or Excel documents that list all tests with their metadata information and description.
Note Tests with the status DISABLED will not be executed during a test suite run. So someone can just start adding planned test cases that are not finished yet in status DRAFT. In case a test is not runnable yet because it is not finished, someone may disable a test temporarily to avoid causing failures during a test run. Using these different statuses one can easily set up test plans and review the progress of test coverage by comparing the number of DRAFT tests to those in the FINAL state.
Now you know the possibilities how to write Citrus test cases in XML or Java. Please choose whatever code language type you want (Java, XML, Spring bean syntax) in order to write Citrus test cases. Developers may choose Java, testers without coding experience may run best with the XML syntax. We are constantly working on even more test writing language support such as Groovy, Scala, Xtext, and so on. In general you can mix the different language types just as you like within your Citrus project which gives you the best of flexibility.