- Preface
- 1. What's new in Citrus 2.5?!
- 2. Introduction
- 3. Setup
- 4. Test cases
- 5. Test variables
- 6. Running tests
- 7. Configuration
- 8. Endpoints
- 9. Message validation
- 9.1. Xml message validation
- 9.2. XML schema validation
- 9.3. JSON message validation
- 9.4. XHTML message validation
- 9.5. Plain text message validation
- 9.6. Java DSL validation callbacks
- 9.7. Customize message validators
- 10. Using XPath
- 11. Using JSONPath
- 12. Test actions
- 12.1. Sending messages
- 12.2. Receiving messages
- 12.3. Database actions
- 12.4. Sleep
- 12.5. Java
- 12.6. Receive timeout
- 12.7. Echo
- 12.8. Stop time
- 12.9. Create variables
- 12.10. Trace variables
- 12.11. Transform
- 12.12. Groovy script execution
- 12.13. Failing the test
- 12.14. Input
- 12.15. Load
- 12.16. Wait
- 12.17. Purging JMS destinations
- 12.18. Purging message channels
- 12.19. Purging endpoints
- 12.20. Assert failure
- 12.21. Catch exceptions
- 12.22. Running Apache Ant build targets
- 12.23. Start/Stop server instances
- 12.24. Including custom test actions
- 12.25. Stop Timer
- 13. Templates
- 14. Containers
- 15. Finally section
- 16. JMS support
- 17. HTTP REST support
- 18. WebSocket support
- 19. SOAP WebServices
- 19.1. SOAP client
- 19.2. SOAP server
- 19.3. SOAP headers
- 19.4. SOAP HTTP mime headers
- 19.5. SOAP Envelope handling
- 19.6. SOAP 1.2
- 19.7. SOAP faults
- 19.8. Send HTTP error codes with SOAP
- 19.9. SOAP attachment support
- 19.10. SOAP client basic authentication
- 19.11. SOAP server basic authentication
- 19.12. WS-Addressing support
- 19.13. SOAP client fork mode
- 19.14. SOAP servlet context customization
- 20. FTP support
- 21. Message channel support
- 22. File support
- 23. Apache Camel support
- 24. Vert.x event bus support
- 25. Mail support
- 26. Arquillian support
- 27. Docker support
- 28. SSH support
- 29. RMI support
- 30. JMX support
- 31. Dynamic endpoint components
- 32. Endpoint adapter
- 33. Functions
- 33.1. citrus:concat()
- 33.2. citrus:substring()
- 33.3. citrus:stringLength()
- 33.4. citrus:translate()
- 33.5. citrus:substringBefore()
- 33.6. citrus:substringAfter()
- 33.7. citrus:round()
- 33.8. citrus:floor()
- 33.9. citrus:ceiling()
- 33.10. citrus:randomNumber()
- 33.11. citrus:randomString()
- 33.12. citrus:randomEnumValue()
- 33.13. citrus:currentDate()
- 33.14. citrus:upperCase()
- 33.15. citrus:lowerCase()
- 33.16. citrus:average()
- 33.17. citrus:minimum()
- 33.18. citrus:maximum()
- 33.19. citrus:sum()
- 33.20. citrus:absolute()
- 33.21. citrus:mapValue()
- 33.22. citrus:randomUUID()
- 33.23. citrus:encodeBase64()
- 33.24. citrus:decodeBase64()
- 33.25. citrus:escapeXml()
- 33.26. citrus:cdataSection()
- 33.27. citrus:digestAuthHeader()
- 33.28. citrus:localHostAddress()
- 33.29. citrus:changeDate()
- 33.30. citrus:readFile()
- 34. Validation matcher
- 35. Data dictionaries
- 36. Test actors
- 37. Test suite actions
- 38. Customize meta information
- 39. Tracing incoming/outgoing messages
- 40. Reporting and test results
- A. Citrus Samples
- B. Change History
- B.1. Changes in Citrus 2.4?!
- B.2. Changes in Citrus 2.3?!
- B.3. Changes in Citrus 2.2?!
- B.4. Changes in Citrus 2.1
- B.5. Changes in Citrus 2.0
- B.5.1. Refactoring
- B.5.2. Spring framework 4.x
- B.5.3. FTP support
- B.5.4. Functions with test context access
- B.5.5. Validation matcher with test context access
- B.5.6. Message listener with test context access
- B.5.7. SOAP over JMS
- B.5.8. Multiple SOAP attachments
- B.5.9. Multiple SOAP XML header fragments
- B.5.10. Create variable validation matcher
- B.5.11. New configuration components
- B.5.12. Before/after suite components
- B.5.13. Citrus JMS module
- B.6. Changes in Citrus 1.4.x
- B.6.1. Refactoring
- B.6.2. Data dictionaries
- B.6.3. Mail adapter
- B.6.4. Endpoint adapter
- B.6.5. Global variables component
- B.6.6. Json text validator mode
- B.6.7. HTTP REST specific Java DSL options
- B.6.8. SOAP HTTP validation
- B.6.9. Apache Camel integration
- B.6.10. Vert.x integration
- B.6.11. Dynamic endpoint components
- B.7. Changes in Citrus 1.3.x
- B.7.1. @CitrusTest and @CitrusXmlTest annotations
- B.7.2. @CitrusParameters annotation
- B.7.3. Schema repository configuration components
- B.7.4. Change date function
- B.7.5. Weekday validation matcher
- B.7.6. Java DSL
- B.7.7. XHTML message validation
- B.7.8. Multiple SOAP fault detail support
- B.7.9. Jetty server security handler
- B.7.10. Test actors
- B.7.11. Simulate Http error codes with SOAP
- B.7.12. SSH server and client
- B.7.13. ANT run test action
- B.7.14. Polling interval for reply handlers
- B.7.15. Upgrading from version 1.2
- B.8. Changes in Citrus 1.2
- B.8.1. Spring version update
- B.8.2. New groovy features
- B.8.3. SQL multi-line result set validation
- B.8.4. Extended message format support
- B.8.5. New XML features
- B.8.6. SOAP support improvements
- B.8.7. Http and RESTful WebServices
- B.8.8. HTML reporting
- B.8.9. Validation matchers
- B.8.10. Conditional container
- B.8.11. Support for message selectors on message channels
- B.8.12. New test actions
- B.8.13. New functions
- B.8.14. Upgrading from version 1.1
Integration testing can be very hard, especially when there is no sufficient tool support. Unit testing is flavored with fantastic tools and APIs like JUnit, TestNG, EasyMock, Mockito and so on. These tools support you in writing automated tests. A tester who is in charge of integration testing may lack of tool support for automated testing especially when it comes to simulate messaging interfaces.
In a typical enterprise application scenario the test team has to deal with different messaging interfaces and various transport protocols. Without sufficient tool support the automated integration testing of message-based interactions between interface partners is exhausting and sometimes barely possible.
The tester is forced to simulate several interface partners in an end-to-end integration test. The first thing that comes to our mind is manual testing. No doubt manual testing is fast. In long term perspective manual testing is time consuming and causes severe problems regarding maintainability as they are error prone and not repeatable.
The Citrus framework gives a complete test automation tool for integration testing of enterprise applications. You can test your message interfaces to other applications as client and server. Every time a code change applies all automated Citrus tests ensure the stability of interfaces and message communication.
Regression testing and continuous integration is very easy as Citrus fits into your build lifecylce as usual Java unit test. You can use Citrus with JUnit or TestNG in order to integrate with your application build.
With powerful validation capabilities for various message formats like XML, CSV or JSON Citrus is designed to provide fully automated integration tests for end-to-end use cases. Citrus effectively composes complex messaging use cases with response generation, error simulation, database interaction and more.
This documentation provides a reference guide to all features of the Citrus test framework. It gives a detailed picture of effective integration testing with automated integration test environments. Since this document is considered to be under construction, please do not hesitate to give any comments or requests to us using our user or support mailing lists.
We have added lots of new features and improvements with Citrus 2.5. Namely these are the new modules for RMI and JMX support, a new x-www-form-urlencoded message validator and new functions anc test actions. Just have a look at the following features that made it to the box.
Remote method invocation is a standard Java technology and API for calling methods on remote objects across different JVM instances. Although RMI has lost its popularity it is still used in legacy components. Testing RMI bean invocation is a hard thing to do. Now Citrus provides client and server support for remote interface invocation. See Chapter 29, RMI support for details.
Similar to RMI JMX can be used to connect to remote bean invocation. This time we expose some beans to a managed bean server in order to be managed by JMX operations for read and write. With Citrus 2.5 we have added a client and server support for calling and providing managed beans on a mbean server. See Chapter 30, JMX support for details.
With 2.5 we have added mechanisms for injecting Citrus components to your Java DSL test methods. This is very useful when needing access to the Citrus test context for instance. Also we are able to use new injection of test designer and runner instances in order to support parallel test execution with multiple threads. See the explanations in Section 4.2.3, “Designer/Runner injection” and Section 4.2.4, “Test context injection”.
HTML form data can be transmitted with different methods and content types. One of the most common ways is to use x-www-form-urlencoded form data content. As validation can be tricky we have added a special message validator for that. See Section 17.4, “HTTP form urlencoded data” for details.
Added a new validation matcher implementation that is able to check that a date value is between a certain date range (from and to) The date range is able to focus on days as well as additional time (hour, minute, second) specifications. See Section 34.13, “dateRange()” for details.
A new function implementation offers you the possibilities to read file resource contents as inline data. The function is called and returns the file content as return value. The file content is then placed right where the function was called e.g. inside of a message paylaod element or as message header value. See Section 33.30, “citrus:readFile()” for details.
The new timer test action container repeats its execution based on a time expression (e.g. every 5 seconds). With this timer we can repeat test actions with a fixed time delay or constantly execute test actions with time schedule. See Section 14.7, “Timer” and Section 12.25, “Stop Timer” for details.
The Vert.x module was upgraded to use Vert.x 3.2.0 version. The Citrus module implementation was updated to work with this new Vert.x version. Learn more about the Vert.x integration in Citrus with Chapter 24, Vert.x event bus support.
Bugs are part of our software developers world and fixing them is part of your daily business, too. Finding and solving issues makes Citrus better every day. For a detailed listing of all bugfixes please refer to the complete changes log of each release in JIRA (http://www.citrusframework.org/changes-report.html).
Nowadays enterprise applications usually communicate with different partners over loosely coupled messaging interfaces. The interaction and the interface contract needs to be tested in integration testing.
In a typical integration test scenario we need to simulate the communication partners over various transports. How can we test use case scenarios that include several interface partners interacting with each other? How can somebody ensure that the software components work correctly regarding the interface contract? How can somebody run integration test cases in an automated reproducible way? Citrus tries to answer these questions!
Citrus aims to strongly support you in simulating interface partners across different messaging transports. You can easily produce and consume messages with a wide range of protocols like HTTP, JMS, TCP/IP, FTP, SMTP and more. The framework is able to both act as a client and server. In each communication step Citrus is able to validate message contents towards syntax and semantics.
In addition to that the Citrus offers a wide range of test actions to take control of the process flow during a test (e.g. iterations, system availability checks, database connectivity, parallelism, delaying, error simulation, scripting and many more).
The basic goal in Citrus test cases is to describe a whole use case scenario including several interface partners that exchange many messages with each other. The composition of complex message flows in a single test case with several test steps is one of the major features in Citrus.
The test case description is either done in XML or Java and can be executed multiple times as automated integration test. With JUnit and TestNG integration Citrus can easily be integrated into your build lifecycle process. During a test Citrus simulates all surrounding interface partners (client or server) without any coding effort. With easy definition of expected message content (header and payload) for XML, CSV, SOAP, JSON or plaintext messages Citrus is able to validate the incoming data towards syntax and semantics.
If you are in charge of an enterprise application in a message based solution with message interfaces to other software components you should use Citrus. In case your project interacts with other software over different messaging transports and in case you need to simulate these interface partners on client or server side you should use Citrus. In case you need to continuously check the software stability not only on a unit testing basis but also in an end-to-end integration scenario you should use Citrus. Bug fixing, release or regression testing is very easy with Citrus. In case you are struggling with code stability and feel uncomfortable regarding your next software release you should definitely use Citrus.
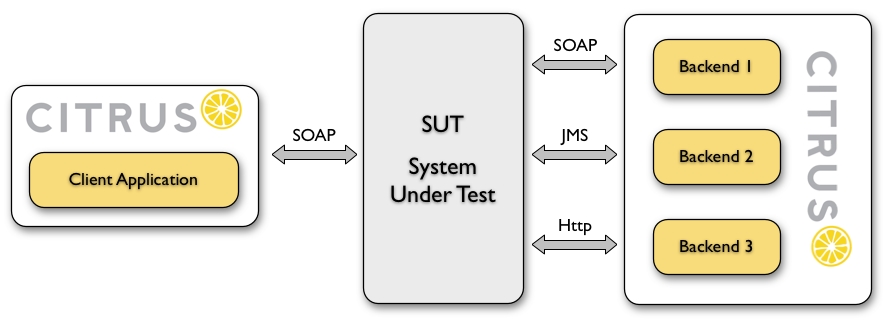
This test set up is typical for a Citrus use case. In such a test scenario we have a system under test (SUT) with several message interfaces to other applications like you would have with an enterprise service bus for instance. A client application invokes services on the SUT application. The SUT is linked to several backend applications over various messaging transports (here SOAP, JMS, and Http). Interim message notifications and final responses are sent back to the client application. This generates a bunch of messages that are exchanged throughout the applications involved.
In the automated integration test Citrus needs to send and receive those messages over different transports. Citrus takes care of all interface partners (ClientApplication, Backend1, Backend2, Backend3) and simulates their behavior by sending proper response messages in order to keep the message flow alive.
Each communication step comes with message validation and comparison against an expected message template (e.g. XML or JSON data). Besides messaging actions Citrus is also able to perform arbitrary other test actions. Citrus is able to perform a database query between requests as an example.
The Citrus test case runs fully automated as a Java application. In fact a Citrus test case is nothing but a JUnit or TestNG test case. Step by step the whole use case scenario is performed like in a real production environment. The Citrus test is repeatable and is included into the software build process (e.g. using Maven or ANT) like a normal unit test case would do. This gives you fully automated integration tests to ensure interface stability.
The following reference guide walks through all Citrus capabilities and shows how to set up a great integration test with Citrus.
This chapter discusses how to get started with Citrus. It deals with the installation and set up of the framework, so you are ready to start writing test cases after reading this chapter.
Usually you would use Citrus as a dependency library in your project. In Maven you would just add Citrus as a test-scoped dependency in your POM. When using ANT you can also run Citrus as normal Java application from your build.xml. As Citrus tests are nothing but normal unit tests you could also use JUnit or TestNG ant tasks to execute the Citrus test cases.
This chapter describes the Citrus project setup possibilities, choose one of them that fits best to include Citrus into your project.
Citrus uses Maven internally as a project build tool and provides extended support for Maven projects. Maven will ease up your life as it manages project dependencies and provides extended build life cycles and conventions for compiling, testing, packaging and installing your Java project. Therefore it is recommended to use the Citrus Maven project setup. In case you already use Maven it is most suitable for you to include Citrus as a test-scoped dependency.
As Maven handles all project dependencies automatically you do not need to download any Citrus project artifacts in advance. If you are new to Maven please refer to the official Maven documentation to find out how to set up a Maven project.
If you start from scratch or in case you would like to have Citrus operating in a separate Maven module you can use the Citrus Maven archetype to create a new Maven project. The archetype will setup a basic Citrus project structure with basic settings and files.
mvn archetype:generate -DarchetypeCatalog=http://citrusframework.org

Choose archetype:
1: http://citrusframework.org -> citrus-archetype (Basic archetype for Citrus integration test project)
Choose a number: 1

Define value for groupId: com.consol.citrus.samples
Define value for artifactId: citrus-sample
Define value for version: 1.0-SNAPSHOT
Define value for package: com.consol.citrus.samples
In the sample above we used the Citrus archetype catalog located on the Citrus homepage. Citrus archetypes are also available in Maven central repository. So can also just use "mvn archetype:generate". As the list of default archetypes available in Maven central is very long you might want to filter the list with "citrus" and you will get just a few possibilities to choose from.
We load the archetype information from "http://citrusframework.org" and choose the Citrus basic archetype. Now you have to define several values for your project: the groupId, the artifactId, the package and the project version. After that we are done! Maven created a Citrus project structure for us which is ready for testing. You should see the following basic project folder structure.
citrus-sample
  |   + src
  |   |   + main
  |   |    |   + java
  |   |    |   + resources
  |   |   + citrus
  |   |    |   + java
  |   |    |   + resources
  |   |    |   + tests
  pom.xml
The Citrus project is absolutely ready for testing. With Maven we can build, package, install and test our project right away without any adjustments. Try to execute the following commands:
mvn integration-test
mvn integration-test -Dtest=MyFirstCitrusTest
![[Note]](images/admons/note.jpg) | Note |
|---|---|
If you need additional assistance in setting up a Citrus Maven project please visit our Maven setup tutorial on http://www.citfrusframework.org. |
In case you already have a proper Maven project you can also integrate Citrus with it. Just add the Citrus project dependencies in your Maven pom.xml as a dependency like follows.
We add Citrus as test-scoped project dependency to the project POM (pom.xml)
<dependency>
  <groupId>com.consol.citrus</groupId>
  <artifactId>citrus-core</artifactId>
  <version>2.5</version>
  <scope>test</scope>
</dependency>
Add the citrus Maven plugin to your project
<plugin>
  <groupId>com.consol.citrus.mvn</groupId>
  <artifactId>citrus-maven-plugin</artifactId>
  <version>2.5</version>
  <configuration>
    <author>Donald Duck</author>
    <targetPackage>com.consol.citrus</targetPackage>
  </configuration>
</plugin>
Now that we have added Citrus to our Maven project we can start writing new test cases with the Citrus Maven plugin:
mvn citrus:create-test
Once you have written the Citrus test cases you can execute them automatically in your Maven software build lifecylce. The tests will be included into your projects integration-test phase using the Maven surefire plugin. Here is a sample surefire configuration for Citrus.
<plugin>
  <artifactId>maven-surefire-plugin</artifactId>
  <version>2.4.3</version>
  <configuration>
    <skip>true</skip>
  </configuration>
  <executions>
    <execution>
      <id>citrus-tests</id>
      <phase>integration-test</phase>
      <goals>
        <goal>test</goal>
      </goals>
      <configuration>
        <skip>false</skip>
      </configuration>
    </execution>
  </executions>
</plugin>
The Citrus source directories are defined as test sources like follows:
<testSourceDirectory>src/it/java</testSourceDirectory>
<testResources>
  <testResource>
    <directory>src/it/java</directory>
    <includes>
      <include>**</include>
    </includes>
    <excludes>
      <exclude>*.java</exclude>
    </excludes>
  </testResource>
  <testResource>
    <directory>src/it/tests</directory>
    <includes>
      <include>**/*</include>
    </includes>
    <excludes>
    </excludes>
  </testResource>
</testResources>
Now everything is set up and you can call the usual Maven install goal (mvn clean install) in order to build your project. The Citrus integration tests are executed automatically during the build process. Besides that you can call the Maven integration-test phase explicitly to execute all Citrus tests or a specific test by its name:
mvn integration-test
mvn integration-test -Dtest=MyFirstCitrusTest
| Note |
|---|---|
If you need additional assistance in setting up a Citrus Maven project please visit our Maven setup tutorial on http://www.citfrusframework.org. |
Ant is a very popular way to compile, test, package and execute Java projects. The Apache project has effectively become a standard in building Java projects. You can run Citrus test cases with Ant as Citrus is nothing but a Java application. This section describes the steps to setup a proper Citrus Ant project.
Before we start with the Citrus setup be sure to meet the following preconditions. The following software should be installed on your computer, in order to use the Citrus framework:
Java 7 or higher
Installed JDK plus JAVA_HOME environment variable set up and pointing to your Java installation directory
Java IDE (optional)
A Java IDE will help you to manage your Citrus project (e.g. creating and executing test cases). You can use the any Java IDE (e.g. Eclipse or IntelliJ IDEA) but also any convenient XML Editor to write new test cases.
Ant 1.8 or higher
Ant (http://ant.apache.org/) will run tests and compile your Citrus code extensions if necessary.
First of all we need to download the latest Citrus release archive from the official website http://www.citrusframework.org
Citrus comes to you as a zipped archive in one of the following packages:
citrus-x.x-release
citrus-x.x-src
The release package includes the Citrus binaries as well as the reference documentation and some sample applications.
In case you want to get in touch with developing and debugging Citrus you can also go with the source archive which gives you the complete Citrus Java code sources. The whole Citrus project is also accessible for you on http://github.com/christophd/citrus. This open git repository on GitHub enables you to build Citrus from scratch with Maven and contribute code changes.
After downloading the Citrus archives we extract those into an appropriate location on the local storage. We are seeking for the Citrus project artifacts coming as normal Java archives (e.g. citrus-core.jar, citrus-ws.jar, etc.)
You have to include those Citrus Java archives as well as all dependency libraries to your Apache Ant Java classpath. Usually you would copy all libraries into your project's lib directory and declare those libraries in the Ant build file. As this approach can be very time consuming I recommend to use a dependency management API such as Apache Ivy which gives you automatic dependency resolution like that from Maven. In particular this comes in handy with all the 3rd party dependencies that would be resolved automatically.
No matter what approach you are using to set up the Apache Ant classpath see the following sample Ant build script which uses the Citrus project artifacts in combination with the TestNG Ant tasks to run the tests.
<project name="citrus-sample" basedir="." default="citrus.run.tests" xmlns:artifact="antlib:org.apache.maven.artifact.ant">

  <property file="src/it/resources/citrus.properties"/>

  <path id="maven-ant-tasks.classpath" path="lib/maven-ant-tasks-2.1.3.jar" />
  <typedef resource="org/apache/maven/artifact/ant/antlib.xml"
    uri="antlib:org.apache.maven.artifact.ant"
    classpathref="maven-ant-tasks.classpath" />

  <artifact:pom id="citrus-pom" file="pom.xml" />
  <artifact:dependencies filesetId="citrus-dependencies" pomRefId="citrus-pom" />

  <path id="citrus-classpath">
    <pathelement path="src/it/java"/>
    <pathelement path="src/it/resources"/>
    <pathelement path="src/it/tests"/>
    <fileset refid="citrus-dependencies"/>
  </path>

  <taskdef resource="testngtasks" classpath="lib/testng-6.8.8.jar"/>

  <target name="compile.tests">
    <javac srcdir="src/it/java" classpathref="citrus-classpath"/>
    <javac srcdir="src/it/tests" classpathref="citrus-classpath"/>
  </target>

  <target name="create.test" description="Creates a new empty test case">
    <input message="Enter test name:" addproperty="test.name"/>
    <input message="Enter test description:" addproperty="test.description"/>
    <input message="Enter author's name:" addproperty="test.author" defaultvalue="${default.test.author}"/>
    <input message="Enter package:" addproperty="test.package" defaultvalue="${default.test.package}"/>
    <input message="Enter framework:" addproperty="test.framework" defaultvalue="testng"/>

    <java classname="com.consol.citrus.util.TestCaseCreator">
      <classpath refid="citrus-classpath"/>
      <arg line="-name ${test.name} -author ${test.author} -description ${test.description} -package ${test.package} -framework ${test.framework}"/>
    </java>
  </target>

  <target name="citrus.run.tests" depends="compile.tests" description="Runs all Citrus tests">
    <testng classpathref="citrus-classpath">
      <classfileset dir="src/it/java" includes="**/*.class" />
    </testng>
  </target>

  <target name="citrus.run.single.test" depends="compile.tests" description="Runs a single test by name">
    <touch file="test.history"/>
    <loadproperties srcfile="test.history"/>

    <echo message="Last test executed: ${last.test.executed}"/>
    <input message="Enter test name or leave empty for last test executed:" addproperty="testclass" defaultvalue="${last.test.executed}"/>

    <propertyfile file="test.history">
      <entry key="last.test.executed" type="string" value="${testclass}"/>
    </propertyfile>

    <testng classpathref="citrus-classpath">
      <classfileset dir="src/it/java" includes="**/${testclass}.class" />
    </testng>
  </target>

</project>
| Note |
|---|---|
If you need detailed assistance for building Citrus with Ant do also visit our tutorials section on http://www.citrusframework.org. There you can find a tutorial which describes the Citrus Java project set up with Ant from scratch. |
Now let us start writing test cases! A test case in Citrus describes all steps for a certain use case in one single file. The Citrus test holds a sequence of test actions. Each action represents a very special purpose such as sending or receiving a message. Typically with message-based enterprise applications the sending and receiving of messages represent the main actions inside a test.
However you will learn that Citrus is more than just a simple SOAP client for instance. Each test case can hold complex actions such as connecting to the database, transforming data, adding loops and conditional steps. With the default Citrus action set you can accomplish very complex use case integration tests. Later in this guide we will briefly discuss all available test actions and learn how to use various message transports within the test. For now we will concentrate on the basic test case structure.
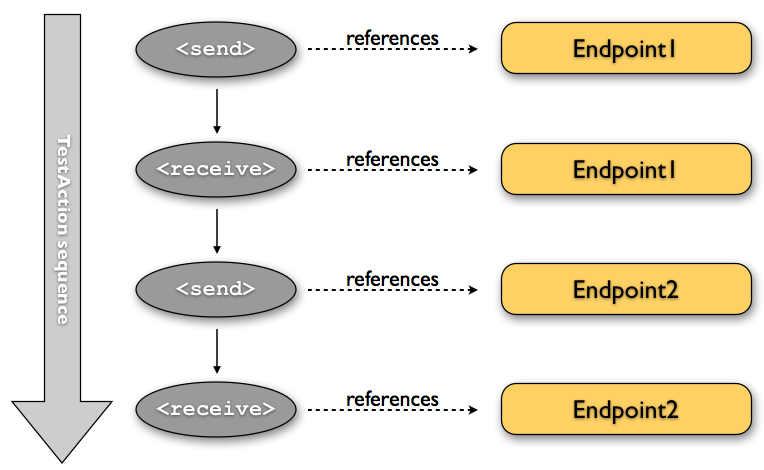
The figure above describes a typical test action sequence in Citrus. A list of sending and receiving test actions composing a typical test case here. Each action references a predefined Citrus endpoint component that we are going to talk about later on.
So how do we define those test cases? In general Citrus specifies test cases as Java classes. With TestNG or JUnit you can execute the Citrus tests within your Java runtime as you would do within unit testing. You can code the Citrus test in a single Java class doing assertions and using Spring's dependency injection mechanisms.
If you are not familiar to writing Java code you can also write Citrus tests as XML files. Whatever test language you choose for Citrus the whole test case description takes place in one single file (Java or XML). This chapter will introduce the custom XML schema language as well as the Java domain specific language so you will be able to write Citrus test cases no matter what knowledge base you belong to.
Put simply, a Citrus test case is nothing but a simple Spring XML configuration file. The Spring framework has become a state of the art development framework for enterprise Java applications. As you work with Citrus you will also learn how to use the Spring Ioc (Inversion of control) container and the concepts of dependency injection. So let us have a look at the pure Spring XML configuration syntax first. You are free to write fully compatible test cases for the Citrus framework just using this syntax.
Spring bean definition syntax
<beans
    xmlns="http://www.springframework.org/schema/beans"
    xmlns:xsi="http://www.w3.org/2001/XMLSchema-instance"
    xsi:schemaLocation="http://www.springframework.org/schema/beans
    http://www.springframework.org/schema/beans/spring-beans.xsd">

    <bean name="MyFirstTest"
             class="com.consol.citrus.TestCase">
        <property name="variableDefinitions">
            <!-- variables of this test go here -->
        </property>
        <property name="actions">
            <!-- actions of this test go here -->
        </property>
    </bean>
</beans>
Citrus can execute these Spring bean definitions as normal test cases - no problem, but the pure Spring XML syntax is very verbose and probably not the best way to describe a test case in Citrus. In particular you have to know a lot of Citrus internals such as Java class names and property names. In addition to that as test scenarios get more complex the test cases grow in size. So we need a more effective and comfortable way of writing tests. Therefore Citrus provides a custom XML schema definition for writing test cases which is much more adequate for our testing purpose.
The custom XML schema aims to reach the convenience of domain specific languages (DSL). Let us have a look at the Citrus test describing XML language by introducing a first very simple test case definition:
XML DSL
<spring:beans
    xmlns="http://www.citrusframework.org/schema/testcase"
    xmlns:xsi="http://www.w3.org/2001/XMLSchema-instance"
    xmlns:spring="http://www.springframework.org/schema/beans"
    xsi:schemaLocation="
    http://www.springframework.org/schema/beans
    http://www.springframework.org/schema/beans/spring-beans.xsd
    http://www.citrusframework.org/schema/testcase
    http://www.citrusframework.org/schema/testcase/citrus-testcase.xsd">

    <testcase name="MyFirstTest">
        <description>
            First example showing the basic test case definition elements!
        </description>
        <variables>
            <variable name="text" value="Hello Test Framework"/>
        </variables>
        <actions>
            <echo>
                <message>${text}</message>
            </echo>
        </actions>
    </testcase>
</spring:beans>
We do need the <spring:beans> root element as the XML file is read by the Spring IoC container.
Inside this root element the Citrus specific namespace definitions take place.
The test case itself gets a mandatory name that must be unique throughout all test cases in a project. You will receive errors
when using duplicate test names. The test name has to follow the common Java naming conventions and rules for Java classes. This means
names must not contain any whitespace characters but characters like '-', '.', '_' are supported. For example, TestFeature_1
is valid but Test Feature 1 is not as it contains whitespace characters like spaces.
Now that we have an XML definition that describes the steps of our test we need a Java executable for the test. The Java executable is needed for the framework in order to run the test. See the following sample Java class that represents a simple Citrus Java test:
import org.testng.annotations.Test;
import com.consol.citrus.annotations.CitrusTest;
import com.consol.citrus.testng.AbstractTestNGCitrusTest;

@Test
public class MyFirstTest extends AbstractTestNGCitrusTest {

    @CitrusXmlTest(name = "MyFirstTest")
    public void myFirstTest() {
    }
}
The sample above is a Java class that represents a valid Citrus Java executable. The Java class has no programming logic as we use a XML test case here. The Java class can also be generated using the Citrus Maven plugin. The Java class extends from basic superclass AbstractTestNGCitrusTest and therefore uses TestNG as unit test framework. Citrus also supports JUnit as unit test framework. Read more about this in Section 6.1, “Run with TestNG” and Section 6.2, “Run with JUnit”.
Up to now it is important to understand that Citrus always needs a Java executable test class. In case we use the XML test representation the Java part is generic, can be generated and contains no programming logic. The XML test defines all steps and is our primary test case definition.
Before we go into more details on the attributes and actions that take place within a test case we just have a look at how to write test cases with pure Java code. Citrus works with Java and uses the well known JUnit and TestNG framework benefits that you may be used to as a tester. Many users may prefer to write Java code instead of the verbose XML syntax. Therefore you have another possibility for writing Citrus tests in pure Java.
Citrus in general differences between two ways of test cases in Java. These are test-designers and test-runners that we deal with each in the next two sections.
The first way of defining a Citrus test in Java is the test-designer. The Java DSL for a test designer works similar to the XML approach. The whole test case is built with all test actions first. Then the whole test case is executed as a whole Citrus test. This is how to define a Citrus test with designer Java DSL methods:
Java DSL designer
import org.testng.annotations.Test;
import com.consol.citrus.annotations.CitrusTest;
import com.consol.citrus.dsl.testng.TestNGCitrusTestDesigner;

@Test
public class MyFirstTestDesigner extends TestNGCitrusTestDesigner {
    @CitrusTest(name = "MyFirstTest")
    public void myFirstTest() {
        description("First example showing the basic test case definition elements!");

        variable("text", "Hello Test Framework");

        echo("${text}");
    }
}
Citrus provides a base Java class com.consol.citrus.dsl.testng.TestNGCitrusTestDesigner that provides all capabilities for you in form of builder pattern methods. Just use the @CitrusTest annotation on top of the test method. Citrus will use the method name as the test name by default. As you can see in the example above you can also customize the test name within the @CitrusTest annotation. The test method builds all test actions using the test builder pattern. The defined test actions will then be called later on during test runtime.
The design time runtime difference in test-designer is really important to be understood. You can mix the Citrus Java DSL execution with other Java code with certain limitations. We will explain this later on when introducing the test-runner.
This is the basic test Java class pattern used in Citrus. You as a tester with development background can easily extend this pattern for customized logic. Again if you are coming without coding experience do not worry this Java code is optional. You can do exactly the same with the XML syntax only as shown before. The test designer Java DSL is much more powerful though as you can use the full Java programming language with class inheritance and method delegation.
We have mentioned that the test-designer will build the complete test case in design time with all actions first before execution of the whole test case takes place at runtime of the test. This approach has the advantage that Citrus knows all test actions in a test before execution. On the other hand you are limited in mixing Java DSL method calls and normal Java code. The following example should clarify things a little bit.
Java DSL designer
import org.testng.annotations.Test;
import com.consol.citrus.annotations.CitrusTest;
import com.consol.citrus.dsl.testng.TestNGCitrusTestDesigner;

@Test
public class LoggingTestDesigner extends TestNGCitrusTestDesigner {
    private LoggingService loggingService = new LoggingService();

    @CitrusTest(name = "LoggingTest")
    public void loggingTest() {
        echo("Before loggingService call");

        loggingService.log("Now called custom logging service");

        echo("After loggingService call");
    }
}
In this example test case above we use an instance of a custom LoggingService and call some operation log() in the middle of our Java DSL test. Now developers might expect the logging service call to be done in the middle of the Java Citrus test case but if we have a look at the logging output of the test we get a total different result:
Expected output
INFO            Citrus| STARTING TEST LoggingTest
INFO        EchoAction| Before loggingService call
INFO    LoggingService| Now called custom logging service
INFO        EchoAction| After loggingService call
INFO            Citrus| TEST SUCCESS LoggingTest
Actual output
INFO    LoggingService| Now called custom logging service
INFO            Citrus| STARTING TEST LoggingTest
INFO        EchoAction| Before loggingService call
INFO        EchoAction| After loggingService call
INFO            Citrus| TEST SUCCESS LoggingTest
So if we analyse the actual logging output we see that the logging service was called even before the Citrus test case did start its action. This is the result of test-designer building up the whole test case first. The designer collects all test actions first in internal memory cache and the executes the whole test case. So the custom service call on the LoggingService is not part of the Citrus Java DSL test and therefore is executed immediately at design time.
We can fix this with the following test-designer code:
Java DSL designer
import org.testng.annotations.Test;
import com.consol.citrus.annotations.CitrusTest;
import com.consol.citrus.dsl.testng.TestNGCitrusTestDesigner;

@Test
public class LoggingTestDesigner extends TestNGCitrusTestDesigner {
    private LoggingService loggingService = new LoggingService();

    @CitrusTest(name = "LoggingTest")
    public void loggingTest() {
        echo("Before loggingService call");

        action(new AbstractTestAction() {
            doExecute(TestContext context) {
                loggingService.log("Now called custom logging service");
            }
        });

        echo("After loggingService call");
    }
}
Now we placed the loggingService call inside a custom TestAction implementation and therefore this piece of code is part of the Citrus Java DSL and following from that part of the Citrus test execution. Now with that fix we get the expected logging output:
INFO            Citrus| STARTING TEST LoggingTest
  INFO        EchoAction| Before loggingService call
  INFO    LoggingService| Now called custom logging service
  INFO        EchoAction| After loggingService call
  INFO            Citrus| TEST SUCCESS LoggingTest
Now this is not easy to understand and people did struggle with this separation of designtime and runtime of a Citrus Java DSL test. This is why we have implemented a new Java DSL base class called test-runner that we deal with in the next section. Before we continue we have to mention that the test-designer approach does also work for JUnit. Although we have only seen TestNG sample code in this section everything is working exactly the same way with JUnit framework. Just use the base class com.consol.citrus.dsl.junit.JUnit4CitrusTestDesigner instead.
![[Important]](images/admons/important.jpg) | Important |
|---|---|
Neither TestNGCitrusTestDesigner nor JUnit4CitrusTestDesigner implementation is thread safe for parallel test execution. This is simply because the base class is holding state to the current test designer instance in order to delegate method calls to this instance. Therefore parallel test method execution is not available. Fortunately we have added a threadsafe base class implementation that uses resource injection. Read more about this in Section 4.2.3, “Designer/Runner injection”. |
The new test runner concept solves the issues that may come along when working with the test designer. We have already seen a simple example where the test designer requires strict separation of designtime and runtime. The test runner implementation executes each test action immediately. This changes the prerequisites in such that the test action Java DSL method calls can be mixed with usual Java code statements. The the example that we have seen before in a test runner implementation:
Java DSL runner
import org.testng.annotations.Test;
  import com.consol.citrus.annotations.CitrusTest;
  import com.consol.citrus.dsl.testng.TestNGCitrusTestRunner;

  @Test
  public class LoggingTestRunner extends TestNGCitrusTestRunner {
      private LoggingService loggingService = new LoggingService();

      @CitrusTest(name = "LoggingTest")
      public void loggingTest() {
          echo("Before loggingService call");

          loggingService.log("Now called custom logging service");

          echo("After loggingService call");
      }
  }
With the new test runner implementation as base class we are able to mix Java DSL method calls and normal Java code statement in our test in an unlimited way. This example above will also create the expected logging output as all Java DSL method calls are executed immediately.
INFO            Citrus| STARTING TEST LoggingTest
INFO        EchoAction| Before loggingService call
INFO    LoggingService| Now called custom logging service
INFO        EchoAction| After loggingService call
INFO            Citrus| TEST SUCCESS LoggingTest
In contrary to the test designer the test runner implementation will not build the complete test case before execution. Each test action is executed immediately as it is called with Java DSL builder methods. This creates a more natural way of coding test cases as you are also able to use iterations, try catch blocks, finally sections and so on.
In the examples here TestNG was used as unit framework. Of course the exact same approach can also apply to JUnit framework. Just use the base class com.consol.citrus.dsl.junit.JUnit4CitrusTestRunner instead. Feel free to choose the base class for test-designer or test-runner as you like. You can also mix those two approaches in your project. Citrus is able to handle both ways of Java DSL code in a project.
| Important |
|---|---|
The TestNGCitrusTestRunner and JUnit4CitrusTestRunner implementation is not thread safe for parallel test execution. This is simply because the base class is holding state to the current test runner instance in order to delegate method calls to this instance. Therefore parallel test method execution is not available. Fortunately we have added a threadsafe base class implementation that uses resource injection. Read more about this in Section 4.2.3, “Designer/Runner injection”. |
In the previous sections we have seen the different approaches for test designer and runner implementations. Up to now the decision which implementation to use was made by extending one of the base classes:
- com.consol.citrus.dsl.testng.TestNGCitrusTestRunner
- com.consol.citrus.dsl.testng.TestNGCitrusTestDesigner
- com.consol.citrus.dsl.junit.JUnit4CitrusTestRunner
- com.consol.citrus.dsl.junit.JUnit4CitrusTestDesigner
These four classes represent the different designer and runner implementations for TestNG or JUnit. Now Citrus also provides a resource injection mechanism for both designer and runner implementations. The classes using this feature are:
- com.consol.citrus.dsl.testng.TestNGCitrusTest
- com.consol.citrus.dsl.junit.JUnit4CitrusTest
So what is the deal with that? It is simple when looking at a first example using resource injection:
@Test
public class InjectionTest extends JUnit4CitrusTest {

    @CitrusTest(name = "JUnit4DesignerTest")
    public void designerTest(@CitrusResource TestDesigner designer) {
        designer.echo("Now working on designer instance");
    }

    @CitrusTest(name = "JUnit4RunnerTest")
    public void runnerTest(@CitrusResource TestRunner runner) {
        runner.echo("Now working on runner instance");
    }
}
The designer or runner instance is injected as Citrus resource to the test method as parameter. This way we can mix designer and runner in a single test. But this is not the real motivation for the resource injection. The clear advantage of this approach with injected designer and runner instances is support for multi threading. In case you want to execute the Citrus tests in parallel using multiple threads you need to use this approach. This is because the usual designer and runner base classes are not thread safe. This JUnit4CitrusTest base class is because the resources injected are not kept as state in the base class.
This is our first Citrus resource injection use case. The framework is able to inject other resources, too. Find out more about this in the next sections.
When running a test case in Citrus we make use of basic framework components and capabilities. One of these capabilities is to use test variables, functions and validation matchers. Up to this point we have not learned about these things. They will be described in the upcoming chapters and sections in more detail. Right now I want to talk about resource injection in Citrus.
All these feature mentioned above are bound to some important Citrus component: the Citrus test context. The test context holds all variables and is able to resolve functions and matchers. In general you as a tester will not need explicit access to this component as the framework is working with it behind the scenes. In case you need some access for advanced operations with the framework Citrus provides a resource injection. Lets have a look at this so things are getting more clear.
public class ResourceInjectionIT extends JUnit4CitrusTestDesigner {

    @Test
    @CitrusTest
    public void resourceInjectionIT(@CitrusResource TestContext context) {
        context.setVariable("myVariable", "some value");
        echo("${myVariable}");
    }
}
As you can see we have added a method parameter of type com.consol.citrus.context.TestContext to the test method. The annotation @CitrusResource tells Citrus to inject this parameter with the according instance of the object for this test. Now we have easy access to the context and all its capabilities such as variable management.
Of course the same approach works with TestNG, too. As TestNG also provides resource injection mechanisms we have to make sure that the different resource injection approaches do not interfere with each other. So we tell TestNG to not inject this parameter by declaring it as @Optional for TestNG. In addition to that we need to introduce the parameter to TestNG with the @Parameters annotation. Otherwise TestNG would complain about not knowing this parameter. The final test method with Citrus resource injection looks like follows:
public class ResourceInjectionIT extends TestNGCitrusTestDesigner {

    @Test @Parameters("context")
    @CitrusTest
    public void resourceInjectionIT(@Optional @CitrusResource TestContext context) {
        context.setVariable("myVariable", "some value");
        echo("${myVariable}");
    }
}
Some more annotations needed but the result is the same. We have access to the Citrus test context. Of course you can combine the resource injection for different Citrus components. Just add more some @CitrusResource annotated method parameters to the test method.
When using the Java DSL the concept of behaviors is a good way to reuse test action blocks. By putting test actions to a test behavior we can instantiate and apply the behavior to different test cases multiple times. The mechanism is explained best when having a simple sample:
public class FooBehavior extends AbstractTestBehavior {
    public void apply() {
        variable("foo", "test");

        echo("fooBehavior");
    }
}

public class BarBehavior extends AbstractTestBehavior {
    public void apply() {
        variable("bar", "test");

        echo("barBehavior");
    }
}
The listing above shows two test behaviors that add very specific test actions and test variables to the test case. As you can see the test behavior is able to use the same Java DSL action methods as a normal test case would do. Inside the apply method block we define the behaviors test logic. Now once this is done we can use the behaviors in a test case like this:
@CitrusTest
public void behaviorTest() {
    description("This is a behavior Test");
    author("Christoph");
    status(TestCaseMetaInfo.Status.FINAL);

    variable("var", "test");

    applyBehavior(new FooBehavior());

    echo("Successfully applied bar behavior");

    applyBehavior(new BarBehavior());

    echo("Successfully applied bar behavior");
}
The behavior is applied to the test case by calling the applyBehavior method. As a result the behavior is called adding its logic at this point of the test execution. The same behavior can now be called in multiple test cases so we have a reusable set of test actions.
In the test examples that we have seen so far you may have noticed that a tester can give a detailed test description. The test case description clarifies the testing purpose and perspectives. The description should give a short introduction to the intended use case scenario that will be tested. The user should get a first impression what the test case is all about as well as special information to understand the test scenario. You can use free text in your test description no limit to the number of characters. But be aware of the XML validation rules of well formed XML when using the XML test syntax (e.g. special character escaping, use of CDATA sections may be required)
Now we get close to the main part of writing an integration test. A Citrus test case defines a sequence of actions that will take place during the test. Actions by default are executed sequentially in the same order as they are defined in the test case definition.
XML DSL
<actions>
    <action>[...]</action>
    <action>[...]</action>
</actions>
All actions have individual names and properties that define the respective behavior. Citrus offers a wide range of test actions from scratch, but you are also able to write your own test actions in Java or Groovy and execute them during a test. Chapter 12, Test actions gives you a brief description of all available actions that can be part of a test case execution.
The actions are combined in free sequence to each other so that the tester is able to declare a special action chain inside the test. These actions can be sending or receiving messages, delaying the test, validating the database and so on. Step-by-step the test proceeds through the action chain. In case one single action fails by reason the whole test case is red and declared not successful.
Java developers might be familiar with the concept of doing something in the finally code section. The finally section
contains a list of test actions that will be executed guaranteed at the very end of the test case even if errors did occur during the execution before.
This is the right place to tidy up things that were previously created by the test like cleaning up the database for instance. The finally
section is described in more detail in Chapter 15, Finally section. However here is the basic syntax inside a test.
XML DSL
<finally>
    <echo>
        <message>Do finally - regardless of what has happened before</message>
    </echo>
</finally>
Java DSL designer
@CitrusTest
public void sampleTest() {
    echo("Hello Test Framework");

    doFinally(
        echo("Do finally - regardless of any error before")
    );
}
Java DSL runner
@CitrusTest
public void sampleTest() {
    echo("Hello Test Framework");

    doFinally()
        .actions(
            echo("Do finally - regardless of any error before")
        );
}
The user can provide some additional information about the test case. The meta-info section at the very beginning of the test case holds information like author, status or creation date. In detail the meta information is specified like this:
XML DSL
<testcase name="metaInfoTest">
    <meta-info>
        <author>Christoph Deppisch</author>
        <creationdate>2008-01-11</creationdate>
        <status>FINAL</status>
        <last-updated-by>Christoph Deppisch</last-updated-by>
        <last-updated-on>2008-01-11T10:00:00</last-updated-on>
    </meta-info>
    <description>
        ...
    </description>
    <actions>
        ...
    </actions>
</testcase>
Java DSL designer and runner
@CitrusTest
public void sampleTest() {
    description("This is a Test");
    author("Christoph");
    status(Status.FINAL);

    echo("Hello Citrus!");
}
The status allows following values: DRAFT, READY_FOR_REVIEW, DISABLED, FINAL. The meta-data information to a test is quite important to give the reader a first information about the test. It is also possible to generate test documentation using this meta-data information. The built-in Citrus documentation generates HTML or Excel documents that list all tests with their metadata information and description.
| Note |
|---|---|
Tests with the status DISABLED will not be executed during a test suite run. So someone can just start adding planned test cases that are not finished yet in status DRAFT. In case a test is not runnable yet because it is not finished, someone may disable a test temporarily to avoid causing failures during a test run. Using these different statuses one can easily set up test plans and review the progress of test coverage by comparing the number of DRAFT tests to those in the FINAL state. |
Now you know the possibilities how to write Citrus test cases in XML or Java. Please choose whatever code language type you want (Java, XML, Spring bean syntax) in order to write Citrus test cases. Developers may choose Java, testers without coding experience may run best with the XML syntax. We are constantly working on even more test writing language support such as Groovy, Scala, Xtext, and so on. In general you can mix the different language types just as you like within your Citrus project which gives you the best of flexibility.
The usage of test variables is a core concept when writing good maintainable tests. The key identifiers of a test case should be exposed as test variables at the very beginning of a test. This way hard coded identifiers and multiple redundant values inside the test can be avoided from scratch. As a tester you define all test variables at the very beginning of your test.
XML DSL
<variables>
    <variable name="text" value="Hello Test Framework"/>
    <variable name="customerId" value="123456789"/>
</variables>
Java DSL designer and runner
variable("text", "Hello Test Framework");
variable("customerId", "123456789");
The concept of test variables is essential when writing complex tests with lots of identifiers and semantic data. Test
variables are valid for the whole test case. You can reference them several times using a common variable expression "${variable-name}".
It is good practice to provide all important entities as test variables. This makes the test easier to maintain and more flexible.
All essential entities and identifiers are present right at the beginning of the test, which may also give the opportunity to easily
create test variants by simply changing the variable values for other test scenarios.
The name of the variable is arbitrary. Feel free to specify any name you can think of. Of course you need to be careful with special characters and reserved XML entities like '&', '<', '>'. If you are familiar with Java or any other programming language simply think of the naming rules there and you will be fine with working on Citrus variables, too. The value of a variable can be any character sequence. But again be aware of special XML characters like "<" that need to be escaped ("<") when used in variable values.
The advantage of variables is obvious. Once declared the variables can be referenced many times in the test. This makes it very easy to vary different test cases by adjusting the variables for different means (e.g. use different error codes in test cases).
The last section told us to use variables as they are very useful and extend the maintainability of test cases. Now that every test case defines local variables you can also define global variables. The global variables are valid in all tests by default. This is a good opportunity to declare constant values for all tests. As these variables are global we need to add those to the basic Spring application context file. The following example demonstrates how to add global variables in Citrus:
<citrus:global-variables>
    <citrus:variable name="projectName" value="Citrus Integration Testing"/>
    <citrus:variable name="userName" value="TestUser"/>
</citrus:global-variables>
We add the Spring bean component to the application context file. The component receives a list of name-value variable elements. You can reference the global variables in your test cases as usual.
Another possibility to set global variables is to load those from external property files. This may give you more powerful global variables with user specific properties for instance. See how to load property files as global variables in this example:
<citrus:global-variables>
    <citrus:file path="classpath:global-variable.properties"/>
</citrus:global-variables>
We have just added a file path reference to the global variables component. Citrus loads the property file content as global test variables. You can mix property file and name-value pair variable definitions in the global variables component.
| Note |
|---|---|
The global variables can have variable expressions and Citrus functions. It is possible to use previously defined global variables as values of new variables, like in this example: |
user=Citrus
greeting=Hello ${user}!
date=citrus:currentDate('yyyy-MM-dd')When using th XML test case DSL we can not have XML variable values out of the box. This would interfere with the XML DSL elements defined in the Citrus testcase XSD schema. You can use CDATA sections within the variable value element in order to do this though.
<variables>
    <variable name="persons">
        <value>
            <data>
                <![CDATA[
                  <persons>
                    <person>
                      <name>Theodor</name>
                      <age>10</age>
                    </person>
                    <person>
                      <name>Alvin</name>
                      <age>9</age>
                    </person>
                  </persons>
                ]]>
            </data>
        </value>
    </variable>
</variables>
That is how you can use XML variable values in the XML DSL. In the Java DSL we do not have these problems.
You can also use a script to create variable values. This is extremely handy when you have very complex variable values. Just code a small Groovy script for instance in order to define the variable value. A small sample should give you the idea how that works:
<variables>
    <variable name="avg">
        <value>
            <script type="groovy">
                <![CDATA[
                    a = 4
                    b = 6
                    return (a + b) / 2
                ]]>
            </script>
        </value>
    </variable>
    <variable name="sum">
        <value>
            <script type="groovy">
                <![CDATA[
                    5 + 5
                ]]>
            </script>
        </value>
    </variable>
</variables>
We use the script code right inside the variable value definition. The value of the variable is the result of the last operation performed
within the script. For longer script code the use of <![CDATA[ ]]> sections is recommended.
Citrus uses the javax ScriptEngine mechanism in order to evaluate the script code. By default Groovy is supported in any Citrus project. So you can add additional ScriptEngine implementations to your project and support other script types, too.
Citrus test cases are nothing but Java classes that get executed within a Java runtime environment. Each Citrus test therefore relates to a Java class representing a JUnit or TestNG unit test. As optional add on a Citrus test can have a XML test declaration file. This is for those of you that do not want to code in Java. In this case the XML part holds all actions to tell Citrus what should happen in the test case. The Java part will then just be responsible for test execution and is not likely to be changed at all. In the following sections we concentrate on the Java part and the test execution mechanism.
If you create new test cases in Citrus - for instance via Maven plugin or ANT build script - Citrus generates both parts in your test directory. For example: if you create a new test named MyFirstCitrusTest you will find these two files as a result:
src/it/tests/com/consol/citrus/MyFirstCitrusTest.xml
src/it/java/com/consol/citrus/MyFirstCitrusTest.java
| Note |
|---|---|
If you prefer to just write Java code you can throw away the XML part immediately and continue working with the Java part only. In case you are familiar with writing Java code you may just skip the test template generation via Maven or ANT and preferably just create new Citrus Java test classes on your own. |
With the creation of this test we have already made a very important decision. During creation, Citrus asks
you which execution framework should be used for this test. There are basically three options available:
testng and junit.
So why is Citrus related to Unit tests although it is intended to be a framework for integration testing? The answer to this question is quite simple: This is because Citrus wants to benefit from both JUnit and TestNG for Java test execution. Both the JUnit and TestNG Java APIs offer various ways of execution and both frameworks are widely supported by other tools (e.g. continuous build, build lifecycle, development IDE).
Users might already know one of these frameworks and the chances are good that they are familiar with at least one of them. Everything you can do with JUnit and TestNG test cases you can do with Citrus tests also. Include them into your Maven build lifecycle. Execute tests from your IDE (Eclipse, IDEA or NetBeans). Include them into a continuous build tool (e.g. Jenkins). Generate test execution reports and test coverage reports with Sonar, Cobertura and so on. The possibilities with JUnit and TestNG are amazing.
So let us have a closer look at the Citrus TestNG and JUnit integration.
TestNG stands for next generation testing and has had a great influence in adding Java annotations to the unit test community. Citrus is able to generate TestNG Java classes that are executable as test cases. See the following standard template that Citrus will generate when having new test cases:
package com.consol.citrus.samples;

import org.testng.annotations.Test;

import com.consol.citrus.annotations.CitrusXmlTest;
import com.consol.citrus.testng.AbstractTestNGCitrusTest;

/**
 * TODO: Description
 *
 * @author Unknown
 */
@Test
public class SampleIT extends AbstractTestNGCitrusTest {
    @CitrusXmlTest(name = "SampleIT")
    public void sampleTest() {}
}
If you are familiar with TestNG you will see that the generated Java class is nothing but a normal TestNG test class. We just extend a basic Citrus TestNG class which enables the Citrus test execution features for us. Besides that we have a usual TestNG @Test annotation placed on our class so all methods inside the class will be executed as separate test case.
The good news is that we can still use the fantastic TestNG features in our test class. You can think of parallel test execution, test groups, setup and tear down operations and so on. Just to give an example we can simply add a test group to our test like this:
@Test(groups = {"long-running"})
For more information on TestNG please visit the official homepage, where you find a complete reference documentation.
You might have noticed that the example above loads test cases from XML. This is why we are using the @CitrusXmlTest annotation. Again this approach is for people that want to write no Java code. The test logic is then provided in the XML test definition. We discuss XML tests in Citrus in more detail in Section 6.3, “Running XML tests”. Next lets have a look at a TestNG Java DSL test.
When writing tests in pure Java we have pretty much the exact same logic that applies to executing Citrus test cases. The Citrus test extends from a TestNG base class and uses the normal @Test annotations on method or class level. Here is a short sample TestNG Java class for this:
import org.testng.annotations.Test;
import com.consol.citrus.annotations.CitrusTest;
import com.consol.citrus.dsl.testng.TestNGCitrusTestDesigner;

@Test
public class MyFirstTestDesigner extends TestNGCitrusTestDesigner {
    @CitrusTest(name = "MyFirstIT")
    public void myFirstTest() {
        description("First example showing the basic test case definition elements!");

        variable("text", "Hello Test Framework");

        echo("${test}");
    }
}
You see the class is quite similar to the XML test variation. Now we extend a Citrus test designer class which enables the Java DSL features in addition to the TestNG test execution for us. The basic @Test annotation for TestNG has not changed. We still have a usual TestNG class with the possibility of several methods each representing a separate unit test.
Now what has changed is the @CitrusTest annotation. Now the Citrus test logic is placed directly as the method body with using the Java domain specific language features. The XML Citrus test part is not necessary anymore. If you are wondering about the designer super class and the Java DSL methods for adding the test logic to your test please be patient we will learn more about the Java DSL features in this reference guide later on.
Up to now we just concentrate on the TestNG integration that is quite easy isn't it.
TestNG as a framework comes with lots of great features such as data providers. Data providers execute a test case several times. Each test execution gets a specific parameter value. With Citrus you can use those data provider parameters inside the test as variables. See the next listing on how to use TestNG data providers in Citrus:
public class DataProviderIT extends AbstractTestNGCitrusTest {

  @CitrusXmlTest
  @CitrusParameters( "message" )
  @Test(dataProvider = "messageDataProvider")
  public void DataProviderIT(ITestContext testContext) {
  }

  @DataProvider
  public Object[][] messageDataProvider() {
  return new Object[][] {
      { "Hello World!" },
      { "Hallo Welt!" },
      { "Hi Citrus!" },
    };
  }
}
Above test case method is annotated with TestNG data provider called messageDataProvider. In the same class you can write the data provider that returns a list of parameter values. TestNG will execute the test case several times according to the provided parameter list. Each execution is shipped with the respective parameter value. According to the @CitrusParameter annotation the test will have a test variable called message that is accessible as usual.
JUnit is a very popular unit test framework for Java applications widely accepted and widely supported by many tools. In general Citrus supports both JUnit and TestNG as test execution frameworks. Although the TestNG customization features are slightly more powerful than those offered by JUnit you as a Citrus user should be able to use the framework of your choice. The complete support for executing test cases with package scans and multiple annotated methods is given for both frameworks. If you choose junit as execution framework Citrus generates a Java file that looks like this:
package com.consol.citrus.samples;

import org.junit.Test;
import com.consol.citrus.annotations.CitrusXmlTest;
import com.consol.citrus.junit.AbstractJUnit4CitrusTest;

/**
 * TODO: Description
 *
 * @author Unknown
 */
public class SampleIT extends AbstractJUnit4CitrusTest {
    @Test
    @CitrusXmlTest(name = "SampleIT")
    public void sampleTest() {}
}
JUnit and TestNG as frameworks reveal slight differences, but the idea is the same. We extend a base JUnit Citrus test class and have one to many test methods that load the XML Citrus test cases for execution. As you can see the test class can hold several annotated test methods that get executed as JUnit tests. The fine thing here is that we are still able to use all JUnit features such as before/after test actions or enable/disable tests.
The Java JUnit classes are simply responsible for loading and executing the Citrus test cases. Citrus takes care on loading the XML test as a file system resource and to set up the Spring application context. The test is executed and success/failure state is reported exactly like a usual JUnit unit test would do. This also means that you can execute this Citrus JUnit class like every other JUnit test, especially out of any Java IDE, with Maven, with ANT and so on. This means that you can easily include the Citrus test execution into you software building lifecycle and continuous build.
![[Tip]](images/admons/tip.jpg) | Tip |
|---|---|
So now we know both TestNG and JUnit support in Citrus. Which framework should someone choose? To be honest, there is no easy answer to this question. The basic features are equivalent, but TestNG offers better possibilities for designing more complex test setup with test groups and tasks before and after a group of tests. This is why TestNG is the default option in Citrus. But in the end you have to decide on your own which framework fits best for your project. |
The first example seen here is using @CitrusXmlTest annotation in order to load a XML file as test. The Java part is then just an empty envelope for executing the test with JUnit. This approach is for those of you that are not familiar with Java at all. You can find more information on loading XML files as Citrus tests in Section 6.3, “Running XML tests”. Secondly of course we also have the possibility to use the Citrus Java DSL with JUnit. See the following example on how this looks like:
package com.consol.citrus.samples;

import com.consol.citrus.annotations.CitrusTest;
import com.consol.citrus.dsl.JUnit4CitrusTestDesigner;
import org.junit.Test;

/**
 * TODO: Description
 *
 * @author Unknown
 */
public class SampleIT extends JUnit4CitrusTestDesigner {

    @Test
    @CitrusTest
    public void EchoSampleIT() {
        variable("time", "citrus:currentDate()");
        echo("Hello Citrus!");
        echo("CurrentTime is: ${time}");
    }

    @Test
    @CitrusTest(name = "EchoIT")
    public void echoTest() {
        echo("Hello Citrus!");
    }
}
The Java DSL test case looks quite familiar as we also use the JUnit4 @Test annotation in order to mark our test for unit test execution. In addition to that we add a @CitrusTest annotation and extend from a basic JUnit4 Citrus test designer which enables the Java domain specific language features. The Citrus test logic goes directly to the method block. There is no need for a XML test file anymore.
As you can see the @CitrusTest annotation supports multiple test methods in one single class. Each test is prepared and executed separately just as you know it from JUnit. You can define an explicit Citrus test name that is used in Citrus test reports. If no explicit test name is given the test method name will be used as a test name.
If you need to know more details about the test designer and on how to use the Citrus Java DSL just continue with this reference guide. We will describe the capabilities in detail later on.
Now we also use the @CitrusXmlTest annotation in the Java class. This annotation makes Citrus search for a XML file that represents the Citrus test within your classpath. Later on we will also discuss another Citrus annotation (@CitrusTest) which stands for defining the Citrus test just with Java domain specific language features. For now we continue to deal with the XML Citrus test execution.
The default naming convention requires a XML file with the tests name in the same package that the Java class is placed in. In the basic example above this means that Citrus searches for a XML test file in com/consol/citrus/samples/SampleIT.xml. You tell Citrus to search for another XML file by using the @CitrusXmlTest annotation properties. Following annotation properties are valid:
name: List of test case names to execute. Names also define XML file names to look for (.xml file extension is not needed here).
packageName: Custom package location for the XML files to load
packageScan: List of packages that are automatically scanned for XML test files to execute. For each XML file found separate test is executed. Note that this performs a Java Classpath package scan so all XML files in package are assumed to be valid Citrus XML test cases. In order to minimize the amount of accidentally loaded XML files the scan will only load XML files with **/*Test.xml and **/*IT.xml file name pattern.
You can also mix the various CitrusXmlTest annotation patterns in a single Java class. So we are able to have several test cases in one single Java class. Each annotated method represents one or more Citrus XML test cases. Se the following example to see what this is about.
@Test
public class SampleIT extends AbstractTestNGCitrusTest {
    @CitrusXmlTest(name = "SampleIT")
    public void sampleTest() {}

    @CitrusXmlTest(name = { "SampleIT", "AnotherIT" })
    public void multipleTests() {}

    @CitrusXmlTest(name = "OtherIT", packageName = "com.other.testpackage")
    public void otherPackageTest() {}

    @CitrusXmlTest(packageScan =  { "com.some.testpackage", "com.other.testpackage" })
    public void packageScanTest() {}
}
You are free to combine these test annotations as you like in your class. As the whole Java class is annotated with the TestNG @Test annotation each method gets executed automatically. Citrus will also take care on executing each XML test case as a separate unit test. So the test reports will have the exact number of executed tests and the JUnit/TestNG test reports do have the exact test outline for further usage (e.g. in continuous build reports).
| Note |
|---|---|
When test execution takes place each test method annotation is evaluated in sequence. XML test cases that match several times, for instance by explicit name reference and a package scan will be executed several times respectively. |
The best thing about using the @CitrusXmlTest annotation is that you can continue to use the fabulous TestNG capabilities (e.g. test groups, invocation count, thread pools, data providers, and so on).
So now we have seen how to execute a Citrus XML test with TestNG.
You have several options in customizing the Citrus project configuration. Citrus uses default settings that can be overwritten to some extend. As a framework Citrus internally works with the Spring IoC container. So Citrus will start a Spring application context and register several components as Spring beans. You can customize the behavior of these beans and you can add custom settings by setting system properties.
Citrus starts a Spring application context and adds some default Spring bean components. By default Citrus will load some internal Spring Java config classes defining those bean components. At some point you might add some custom beans to that basic application context. This is why Citrus will search for custom Spring application context files in your project. These are automatically loaded.
By default Citrus looks for custom XML Spring application context files in this location: classpath*:citrus-context.xml. So you can add a file named citrus-context.xml to your project classpath and Citrus will load all Spring beans automatically.
The location of this file can be customized by setting a System property citrus.spring.application.context. So you can customize the XML Spring application context file location. The System property is settable with Maven surefire and failsafe plugin for instance or via Java before the Citrus framework gets loaded.
See the following sample XML configuration which is a normal Spring bean XML configuration:
<?xml version="1.0" encoding="UTF-8"?>
<beans xmlns="http://www.springframework.org/schema/beans"
       xmlns:xsi="http://www.w3.org/2001/XMLSchema-instance"
       xmlns:citrus="http://www.citrusframework.org/schema/config"
       xmlns:context="http://www.springframework.org/schema/context"
       xsi:schemaLocation="http://www.springframework.org/schema/beans http://www.springframework.org/schema/beans/spring-beans.xsd
    http://www.citrusframework.org/schema/config http://www.citrusframework.org/schema/config/citrus-config.xsd
    http://www.springframework.org/schema/context http://www.springframework.org/schema/context/spring-context.xsd">

  <citrus:schema-repository id="schemaRepository" />

</beans>
Now you can add some Spring beans and you can use the Citrus XML components such as schema-repository for adding custom beans and components to your Citrus project. Citrus provides several namespaces for custom Spring XML components. These are described in more detail in the respective chapters and sections in this reference guide.
| Tip |
|---|---|
You can also use import statements in this Spring application context in order to load other configuration files. So you are free to modularize your configuration in several files that get loaded by Citrus. |
Using XML Spring application context configuration is the default behavior of Citrus. However some people might prefer pure Java code configuration. You can do that by adding a System property citrus.spring.java.config with a custom Spring Java config class as value.
System.setProperty("citrus.spring.java.config", MyCustomConfig.class.getName())
Citrus will load the Spring bean configurations in MyCustomConfig.class as Java config then. See the following example for custom Spring Java configuration:
import com.consol.citrus.TestCase;
import com.consol.citrus.report.*;
import org.slf4j.Logger;
import org.slf4j.LoggerFactory;
import org.springframework.context.annotation.Bean;
import org.springframework.context.annotation.Configuration;

@Configuration
public class MyCustomConfig {

    @Bean(name = "customTestListener")
    public TestListener customTestListener() {
        return new PlusMinusTestReporter();
    }

    private static class PlusMinusTestReporter extends AbstractTestListener implements TestReporter {

        /** Logger */
        private Logger log = LoggerFactory.getLogger(CustomBeanConfig.class);

        private StringBuilder testReport = new StringBuilder();

        @Override
        public void onTestSuccess(TestCase test) {
            testReport.append("+");
        }

        @Override
        public void onTestFailure(TestCase test, Throwable cause) {
            testReport.append("-");
        }

        @Override
        public void generateTestResults() {
            log.info(testReport.toString());
        }

        @Override
        public void clearTestResults() {
            testReport = new StringBuilder();
        }
    }
}
You can also mix XML and Java configuration so Citrus will load both configuration to the Spring bean application context on startup.
The Citrus framework references some basic System properties that can be overwritten. The properties are loaded from Java System and are also settable via property file. Just add a property file named citrus-application.properties to your project classpath. This property file contains customized settings such as:
citrus.spring.application.context=classpath*:citrus-custom-context.xml
citrus.spring.java.config=com.consol.citrus.config.MyCustomConfig
citrus.file.encoding=UTF-8
citrus.xml.file.name.pattern=/**/*Test.xml,/**/*IT.xml
Citrus loads these application properties at startup. All properties are also settable with Java System properties. The location of the citrus-application.properties is customizable with the System property citrus.application.config.
System.setProperty("citrus.application.config", "custom/path/to/citrus-application.properties")
At the moment you can use these properties for customization:
- citrus.spring.application.context: File location for Spring XML configurations
- citrus.spring.java.config: Class name for Spring Java config
- citrus.file.encoding: Default file encoding used in Citrus when reading and writing file content
- citrus.xml.file.name.pattern: File name patterns used for XML test file package scan
In one of the previous chapters we have discussed the basic test case structure as we introduced variables and test actions. The <actions> section contains a list of test actions that take place during the test case. Each test action is executed in sequential order by default. Citrus offers several built-in test actions that the user can choose from to construct a complex testing workflow without having to code everything from scratch. In particular Citrus aims to provide all the test actions that you need as predefined components ready for you to use. The goal is to minimize the coding effort for you so you can concentrate on the test logic itself.
Exactly the same approach is used in Citrus to provide ready-to-use endpoint component for connecting to different message transports. There are several ways in an enterprise application to exchange messages with some other application. We have synchronous interfaces like Http and SOAP WebServices. We have asynchronous messaging with JMS or file transfer FTP interfaces.
Citrus provides endpoint components as client and server to connect with these typical message transports. So you as a tester must not care about how to send a message to a JMS queue. The Citrus endpoints are configured in the Spring application context and receive endpoint specific properties like endpoint uri or ports or message timeouts as configuration.
The next figure shows a typical message sending endpoint component in Citrus:

The endpoint producer publishes messages to a destination. This destination can be a JMS queue/topic, a SOAP WebService endpoint, a Http URL, a FTP folder destination and so on. The producer just takes a previously defined message definition (header and payload) and sends it to the message destination.
Similar to that Citrus defines the several endpoint consumer components to consume messages from destinations. This can be a simple subscription on message channels and JMS queues/topics. In case of SOAP WebServices and Http GET/POST things are more complicated as we have to provide a server component that clients can connect to. We will handle server related communication in more detail later on. For now the endpoint consumer component in its most simple way is defined like this:

This is all you need to know about Citrus endpoints. We have mentioned that the endpoints are defined in the Spring application context. Let's have a simple example that shows the basic idea:
<citrus-jms:endpoint id="helloServiceEndpoint"
        destination-name="Citrus.HelloService.Request.Queue"
        connection-factory="myConnectionFacotry"/>
This is a simple JMS endpoint component in Citrus. The endpoint XML bean definition follows a custom XML namespace and defines endpoint specific properties like the JMS destination name and the JMS connection factory. The endpoint id is a significant property as the test cases will reference this endpoint when sending and receiving messages by its identifier.
In the next sections you will learn how a test case uses those endpoint components for producing and consuming messages.
The <send> action in a test case publishes messages to a destination. The actual message transport connection is defined with the endpoint component. The test case simply defines the message contents and references a predefined message endpoint component by its identifier. Endpoint specific configurations are centralized in the Spring bean application context while multiple test cases can reference the endpoint to actually publish the constructed message to a destination. There are several message endpoint implementations in Citrus available representing different transport protocols like JMS, SOAP, HTTP, TCP/IP and many more.
Again the type of transport to use is not specified inside the test case but in the message endpoint definition. The separation of concerns (test case/message sender transport) gives us a good flexibility of our test cases. The test case does not know anything about connection factories, queue names or endpoint uri, connection timeouts and so on. The transport internals underneath a sending test action can change easily without affecting the test case definition. We will see later in this document how to create different message endpoints for various transports in Citrus. For now we concentrate on constructing the message content to be sent.
We assume that the message's payload will be plain XML format. Citrus uses XML as the default data format for message payload data. But Citrus is not limited to XML message format though; you can always define other message data formats such as JSON, plain text, CSV. As XML is still a very popular message format in enterprise applications and message-based solution architectures we have this as a default format. Anyway Citrus works best on XML payloads and you will see a lot of example code in this document using XML. Finally let us have a look at a first example how a sending action is defined in the test.
XML DSL
<testcase name="SendMessageTest">
    <description>Basic send message example</description>

    <actions>
        <send endpoint="helloServiceEndpoint">
            <message>
                <payload>
                    <TestMessage>
                        <Text>Hello!</Text>
                    </TestMessage>
                </payload>
            </message>
            <header>
                <element name="Operation" value="sayHello"/>
            </header>
        </send>
    </actions>
</testcase>
Now lets have a closer look at the sending action. The 'endpoint' attribute might catch your attention first. This attribute references the message endpoint in Citrus configuration by its identifier. As previously mentioned the message endpoint definition lives in a separate configuration file and contains the actual message transport settings. In this example the "helloServiceEndpoint" is referenced which is a JMS endpoint for sending out messages to a JMS queue for instance.
The test case is not aware of any transport details, because it does not have to. The advantages are obvious: On the one hand multiple test cases can reference the message endpoint definition for better reuse. Secondly test cases are independent of message transport details. So connection factories, user credentials, endpoint uri values and so on are not present in the test case.
In other words the "endpoint" attribute of the <send> element specifies which message endpoint definition to use and therefore where the message should go to. Once again all available message endpoints are configured in a separate Citrus configuration file. Be sure to always pick the right message endpoint type in order to publish your message to the right destination.
If you do not like the XML language you can also use pure Java code to define the same test. In Java you would also make use of the message endpoint definition and reference this instance. The same test as shown above in Java DSL looks like this:
Java DSL designer
import org.testng.ITestContext;
import org.testng.annotations.Test;
import com.consol.citrus.annotations.CitrusTest;
import com.consol.citrus.dsl.testng.TestNGCitrusTestDesigner;

@Test
public class SendMessageTestDesigner extends TestNGCitrusTestDesigner {

    @CitrusTest(name = "SendMessageTest")
    public void sendMessageTest() {
        description("Basic send message example");

        send("helloServiceEndpoint")
            .payload("<TestMessage>" +
                        "<Text>Hello!</Text>" +
                    "</TestMessage>")
            .header("Operation", "sayHello");
    }
}
Instead of using the XML tags for send we use methods from TestNGCitrusTestDesigner class. The same message endpoint is referenced within the send message action. The payload is constructed as plain Java character sequence which is a bit verbose. We will see later on how we can improve this. For now it is important to understand the combination of send test action and a message endpoint.
| Tip |
|---|---|
It is good practice to follow naming conventions when defining names for message endpoints. The intended purpose of the message endpoint as well as the sending/receiving actor should be clear when choosing the name. For instance messageEndpoint1, messageEndpoint2 will not give you much hints to the purpose of the message endpoint. |
This is basically how to send messages in Citrus. The test case is responsible for constructing the message content while the predefined message endpoint holds transport specific settings. Test cases reference endpoint components to publish messages to the outside world. This is just the start of action. Citrus supports a whole package of other ways how to define and manipulate the message contents. Read more about message sending actions in Section 12.1, “Sending messages”.
Now we have a look at the message receiving part inside the test. A simple example shows how it works.
XML DSL
<receive endpoint="helloServiceEndpoint">
    <message>
        <payload>
            <TestMessage>
                <Text>Hello!</Text>
            </TestMessage>
        </payload>
    </message>
    <header>
        <element name="Operation" value="sayHello"/>
    </header>
</receive>
If we recap the send action of the previous chapter we can identify some common mechanisms that apply for both sending and receiving actions. The test action also uses the endpoint attribute for referencing a predefined message endpoint. This time we want to receive a message from the endpoint. Again the test is not aware of the transport details such as JMS connections, endpoint uri, and so on. The message endpoint component encapsulates this information.
Before we go into detail on validating the received message we have a quick look at the Java DSL variation for the receive action. The same receive action as above looks like this in Java DSL.
Java DSL designer
@CitrusTest
public void messagingTest() {
    receive("helloServiceEndpoint")
        .payload("<TestMessage>" +
                    "<Text>Hello!</Text>" +
                "</TestMessage>")
        .header("Operation", "sayHello");
}
The receive action waits for a message to arrive. The whole test execution is stopped while waiting for the message. This is important to ensure the step by step test workflow processing. Of course you can specify message timeouts so the receiver will only wait a given amount of time before raising a timeout error. Following from that timeout exception the test case fails as the message did not arrive in time. Citrus defines default timeout settings for all message receiving tasks.
At this point you know the two most important test actions in Citrus. Sending and receiving actions will become the main components of your integration tests when dealing with loosely coupled message based components in a enterprise application environment. It is very easy to create complex message flows, meaning a sequence of sending and receiving actions in your test case. You can replicate use cases and test your message exchange with extended message validation capabilities. See Section 12.2, “Receiving messages” for a more detailed description on how to validate incoming messages and how to expect message contents in a test case.
Now we have seen the basic endpoint concept in Citrus. The endpoint components represent the connections to the test boundary systems. This is how we can connect to the system under test for message exchange. And this is our main goal with this integration test framework. We want to provide easy access to common message transports on client and server side so that we can test the communication interfaces on a real message transport exchange.
When Citrus receives a message from external applications it is time to verify the message content. This message validation includes syntax rules as well as semantic values that need to be compared to an expected behavior. Citrus provides powerful message validation capabilities. Each incoming message is validated with syntax and semantics. The tester is able to define expected message headers and payloads. Citrus message validator implementations will compare the messages and report differences as test failure. With the upcoming sections we have a closer look at message validation of XML messages with XPath and XML schema validation and further message formats like JSON and plaintext.
XML is a very common message format especially in the SOAP WebServices and JMS messaging world. Citrus provides XML message validator implementations that are able to compare XML message structures. The validator will notice differences in the XML message structure and supports XML namespaces, attributes and XML schema validation. The default XML message validator implementation is active by default and can be overwritten with a custom implementation using the bean id defaultXmlMessageValidator.
<bean id="defaultXmlMessageValidator" class="com.consol.citrus.validation.xml.DomXmlMessageValidator"/>
The default XML message validator is very powerful when it comes to compare XML structures. The validator supports namespaces with different prefixes and attributes als well as namespace qualified attributes. See the following sections for a detailed description of all capabilities.
Once Citrus has received a message the tester can validate the message contents in various ways. First of all the tester can compare the whole message payload to a predefined control message template.
The receiving action offers following elements for control message templates:
<payload>: Defines the message payload as nested XML message template. The whole message payload is defined inside the test case.
<data>: Defines an inline XML message template as nested CDATA. Slightly different to the payload variation as we define the whole message payload inside the test case as CDATA section.
<resource>: Defines an expected XML message template via external file resources. This time the payload is loaded at runtime from the external file.
Both ways inline payload definition or external file resource give us a control message template that the test case expects to arrive. Citrus uses this control template for extended message comparison. All elements, namespaces, attributes and node values are validated in this comparison. When using XML message payloads Citrus will navigate through the whole XML structure validating each element and its content. Same with JSON payloads.
Only in case received message and control message are equal to each other as expected the message validation will pass. In case differences occur Citrus gives detailed error messages and the test case fails.
The control message template is not necessarily very static. Citrus supports various ways to add dynamic message content on the one side and on the other side Citrus can ignore some elements that are not part of message comparison (e.g. when generated content or timestamps are part of the message content). The tester can enrich the expected message template with test variables or ignore expressions so we get a more robust validation mechanism. We will talk about this in the next sections to come.
When using the Citrus Java DSL you will face a verbose message payload definition. This is because Java does not support multiline character sequence values as Strings. We have to use verbose String concatenation when constructing XML message payload contents for instance. In addition to that reserved characters like quotes must be escaped and line breaks must be explicitly added. All these impediments let me suggest to use external file resources in Java DSL when dealing with large complex message payload data. Here is an example:
Java DSL designer
@CitrusTest
public void receiveMessageTest() {
    receive("helloServiceServer")
        .payload(new ClassPathResource("com/consol/citrus/message/data/TestRequest.xml"))
        .header("Operation", "sayHello")
        .header("MessageId", "${messageId}");
}
Now that we have validated the message payload in various ways we are now interested in validating the message header. This is simple as you have to define the header name and the control value that you expect. Just add the following header validation to your receiving action.
XML DSL
<header>
    <element name="Operation" value="GetCustomer"/>
    <element name="RequestTag" value="${requestTag}"/>
</header>
Java DSL designer
@CitrusTest
public void receiveMessageTest() {
    receive("helloServiceServer")
        .header("Operation", "sayHello")
        .header("MessageId", "${messageId}");
}
Message headers are represented as name-value pairs. Each expected header element identified by its name has to be present in the received message. In addition to that the header value is compared to the given control value. If a header entry is not found by its name or the value does not fit accordingly Citrus will raise validation errors and the test case will fail.
| Note |
|---|---|
| Sometimes message headers may not apply to the name-value pair pattern. For example SOAP headers can also contain XML fragments. Citrus supports these kind of headers too. Please see the SOAP chapter for more details. |
Some elements in the message payload might not apply for validation at all. Just think of communication timestamps an dynamic values inside a message:
The timestamp value in our next example will dynamically change from test run to test run and is hardly predictable for the tester, so lets ignore it in validation.
XML DSL
 <message>
    <payload>
        <TestMessage>
            <MessageId>${messageId}</MessageId>
            <Timestamp>2001-12-17T09:30:47.0Z</Timestamp>
            <VersionId>@ignore@</VersionId>
        </TestMessage>
    </payload>
    <ignore path="/TestMessage/Timestamp"/>
</message>
Although we have given a static timestamp value in the payload data the element is ignored during validation as the ignore XPath expression matches the element. In addition to that we also ignored the version id element in this example. This time with an inline @ignore@ expression. This is for those of you that do not like XPath. As a result the ignored message elements are automatically skipped when Citrus compares and validates message contents and do not break the test case.
When using the Java DSL the @ignore@ placeholder as well as XPath expressions can be used seamlessly. Here is an example of that:
Java DSL designer
@CitrusTest
public void receiveMessageTest() {
    receive("helloServiceServer")
        .payload(new ClassPathResource("com/consol/citrus/message/data/TestRequest.xml"))
        .header("Operation", "sayHello")
        .header("MessageId", "${messageId}")
        .ignore("/TestMessage/Timestamp");
}
Of course you can use the inline @ignore@ placeholder in an external file resource, too.
With the Groovy XmlSlurper you can easily validate XML message payloads without having to deal directly with XML. People who do not want to deal with XPath may also like this validation alternative. The tester directly navigates through the message elements and uses simple code assertions in order to control the message content. Here is an example how to validate messages with Groovy script:
XML DSL
<receive endpoint="helloServiceClient" timeout="5000">
    <message>
        <validate>
            <script type="groovy">
                assert root.children().size() == 4
                assert root.MessageId.text() == '${messageId}'
                assert root.CorrelationId.text() == '${correlationId}'
                assert root.User.text() == 'HelloService'
                assert root.Text.text() == 'Hello ' + context.getVariable("user")
            </script>
        </validate>
    </message>
    <header>
        <element name="Operation" value="sayHello"/>
        <element name="CorrelationId" value="${correlationId}"/>
    </header>
</receive>
Java DSL designer
@CitrusTest
public void receiveMessageTest() {
    receive("helloServiceClient")
        .validateScript("assert root.MessageId.text() == '${messageId}';" +
                        "assert root.CorrelationId.text() == '${correlationId}';")
        .header("Operation, "sayHello")
        .header("CorrelationId", "${correlationId}")
        .timeout(5000L);
}
The Groovy XmlSlurper validation script goes right into the message-tag instead of a XML control template or XPath validation. The Groovy script
supports Java assert statements for message element validation. Citrus automatically injects the root element root to the validation script.
This is the Groovy XmlSlurper object and the start of element navigation. Based on this root element you can access child elements and attributes with a dot notated syntax.
Just use the element names separated by a simple dot. Very easy! If you need the list of child elements use the children() function on any element. With the
text() function you get access to the element's text-value. The size() is very useful for validating the number of child
elements which completes the basic validation statements.
As you can see from the example, we may use test variables within the validation script, too. Citrus has also injected the actual test context to the validation script. The test context
object holds all test variables. So you can also access variables with context.getVariable("user") for instance. On the test context you can also set new variable values with
context.setVariable("user", "newUserName").
There is even more object injection for the validation script. With the automatically added object receivedMessage You have access to the Citrus message object for this receive action.
This enables you to do whatever you want with the message payload or header.
XML DSL
<receive endpoint="helloServiceClient" timeout="5000">
    <message>
        <validate>
            <script type="groovy">
                assert receivedMessage.getPayload(String.class).contains("Hello Citrus!")
                assert receivedMessage.getHeader("Operation") == 'sayHello'

                context.setVariable("request_payload", receivedMessage.getPayload(String.class))
            </script>
        </validate>
    </message>
</receive>
The listing above shows some power of the validation script. We can access the message payload, we can access the message header. With test context access we can also save the whole message payload as a new test variable for later usage in the test.
In general Groovy code inside the XML test case definition or as part of the Java DSL code is not very comfortable to maintain. You do not have code syntax assist or code completion. This is why we can also use external file resources for the validation scripts. The syntax looks like follows:
XML DSL
<receive endpoint="helloServiceClient" timeout="5000">
    <message>
        <validate>
            <script type="groovy" file="classpath:validationScript.groovy"/>
        </validate>
    </message>
    <header>
        <element name="Operation" value="sayHello"/>
        <element name="CorrelationId" value="${correlationId}"/>
    </header>
</receive>
Java DSL designer
@CitrusTest
public void receiveMessageTest() {
    receive("helloServiceClient")
        .validateScript(new FileSystemResource("validationScript.groovy"))
        .header("Operation, "sayHello")
        .header("CorrelationId", "${correlationId}")
        .timeout(5000L);
}
We referenced some external file resource validationScript.groovy. This file content is loaded at runtime and is used as script body. Now that we have a normal groovy file we can use the code completion and
syntax highlighting of our favorite Groovy editor.
| Note |
|---|---|
| You can use the Groovy validation script in combination with other validation types like XML tree comparison and XPath validation. |
| Tip |
|---|---|
| For further information on the Groovy XmlSlurper please see the official Groovy website and documentation |
There are several possibilities to describe the structure of XML documents. The two most popular ways are DTD (Document type definition) and XSD (XML Schema definition). Once a XML document has decided to be classified using a schema definition the structure of the document has to fit the predefined rules inside the schema definition. XML document instances are valid only in case they meet all these structure rules defined in the schema definition. Currently Citrus can validate XML documents using the schema languages DTD and XSD.
Citrus tries to validate all incoming XML messages against a schema definition in order to ensure that all rules are fulfilled. As a consequence the message receiving actions in Citrus do have to know the XML schema definition (*.xsd) file resources that belong to our project. Therefore Citrus introduces a central schema repository component which holds all available XML schema files for a project.
<citrus:schema-repository id="schemaRepository">
    <citrus:schemas>
        <citrus:schema id="travelAgencySchema"
            location="classpath:citrus/flightbooking/TravelAgencySchema.xsd"/>
        <citrus:schema id="royalArilineSchema"
            location="classpath:citrus/flightbooking/RoyalAirlineSchema.xsd"/>
        <citrus:ref schema="smartArilineSchema"/>
    </citrus:schemas>
</citrus:schema-repository>

<citrus:schema id="smartArilineSchema"
      location="classpath:citrus/flightbooking/SmartAirlineSchema.xsd"/>
As you can see the schema repository is a simple XML component defined inside the Spring application context. The repository can hold nested schema definitions defined by some identifier and a file location for the xsd schema file. Schema definitions can also be referenced by its identifier for usage in several schema repository instances.
By convention the default schema repository component is defined in the Citrus Spring application context with the id schemaRepository. Spring application context is then able to inject the schema repository into all message receiving test actions at runtime. The receiving test action consolidates the repository for a matching schema definition file in order to validate the incoming XML document structure.
The connection between incoming XML messages and xsd schema files in the repository is done by a mapping strategy which we will discuss later in this chapter. By default Citrus picks the right schema based on the target namespace that is defined inside the schema definition. The target namespace of the schema definition has to match the namespace of the root element in the received XML message. With this mapping strategy you will not have to wire XML messages and schema files manually all is done automatically by the Citrus schema repository at runtime. All you need to do is to register all available schema definition files regardless of which target namespace or nature inside the Citrus schema repository.
| Important |
|---|---|
XMl schema validation is mandatory in Citrus. This means that Citrus always tries to find a matching schema definition inside the schema repository in order to perform syntax validation on incoming schema qualified XML messages. A classified XML message is defined by its namespace definitions. Consequently you will get validation errors in case no matching schema definition file is found inside the schema repository. So if you explicitly do not want to validate the XML schema for some reason you have to disable the validation explicitly in your test with schema-validation="false". <receive endpoint="httpMessageEndpoint"> <message schema-validation="false"> <validate> <xpath expression="//ns1:TestMessage/ns1:MessageHeader/ns1:MessageId" value="${messageId}"/> <xpath expression="//ns1:TestMessage/ns1:MessageHeader/ns1:CorrelationId" value="${correlationId}"/> <namespace prefix="ns1" value="http://citrus.com/namespace"/> </validate> </message> <header> <element name="Operation" value="sayHello"/> <element name="MessageId" value="${messageId}"/> </header> </receive> This mandatory schema validation might sound annoying to you but in our opinion it is very important to validate the structure of the received XML messages, so disabling the schema validation should not be the standard for all tests. Disabling automatic schema validation should only apply to very special situations. So please try to put all available schema definitions to the schema repository and you will be fine. |
In SOAP WebServices world the WSDL (WebService Schema Definition Language) defines the structure an nature of the XML messages exchanged across the interface. Often the WSDL files do hold the XML schema definitions as nested elements. In Citrus you can directly set the WSDL file as location of a schema definition like this:
<citrus:schema id="arilineWsdl"
    location="classpath:citrus/flightbooking/AirlineSchema.wsdl"/>
Citrus is able to find the nested schema definitions inside the WSDL file in order to build a valid schema file for the schema repository. So incoming XML messages that refer to the WSDL file can be validated for syntax rules.
Setting all schemas one by one in a schema repository can be verbose and uncomfortable, especially when dealing with lots of xsd and wsdl files. The schema repository also supports location pattern expressions. See this example to see how it works:
<citrus:schema-repository id="schemaRepository">
  <citrus:locations>
    <citrus:location
        path="classpath:citrus/flightbooking/*.xsd"/>
  </citrus:locations>
</citrus:schema-repository>
The schema repository searches for all files matching the resource path location pattern and adds them as schema instances to the repository. Of course this also works with WSDL files.
Sometimes multiple a schema definition is separated into multiple files. This is a problem for the Citrus schema repository as the schema mapping strategy then is not able to pick the right file for validation, in particular when working with target namespace values as key for the schema mapping strategy. As a solution for this problem you have to put all schemas with the same target namespace value into a schema collection.
<citrus:schema-collection id="flightbookingSchemaCollection">
  <citrus:schemas>
    <citrus:schema location="classpath:citrus/flightbooking/BaseTypes.xsd"/>
    <citrus:schema location="classpath:citrus/flightbooking/AirlineSchema.xsd"/>
  </citrus:schemas>
</citrus:schema-collection>
Both schema definitions BaseTypes.xsd and AirlineSchema.xsd share the same target namespace and therefore need to be combined in schema collection component. The schema collection can be referenced in any schema repository as normal schema definition.
<citrus:schema-repository id="schemaRepository">
  <citrus:schemas>
    <citrus:ref schema="flightbookingSchemaCollection"/>
  </citrus:schemas>
</citrus:schema-repository>
The schema repository in Citrus holds one to many schema definition files and dynamically picks up the right one according to the validated message payload. The repository needs to have some strategy for deciding which schema definition to choose. See the following schema mapping strategies and decide which of them is suitable for you.
This is the default schema mapping strategy. Schema definitions usually define some target namespace which is valid for all elements and types inside the schema file. The target namespace is also used as root namespace in XML message payloads. According to this information Citrus can pick up the right schema definition file in the schema repository. You can set the schema mapping strategy as property in the configuration files:
<citrus:schema-repository id="schemaRepository"
    schema-mapping-strategy="schemaMappingStrategy">
  <citrus:schemas>
    <citrus:schema id="helloSchema"
        location="classpath:citrus/samples/sayHello.xsd"/>
  </citrus:schemas>
</citrus:schema-repository>

<bean id="schemaMappingStrategy"
    class="com.consol.citrus.xml.schema.TargetNamespaceSchemaMappingStrategy"/>
The sayHello.xsd schema file defines a target namespace (http://consol.de/schemas/sayHello.xsd):
<xs:schema xmlns:xs="http://www.w3.org/2001/XMLSchema"
    xmlns="http://consol.de/schemas/sayHello.xsd"
    targetNamespace="http://consol.de/schemas/sayHello.xsd"
    elementFormDefault="qualified"
    attributeFormDefault="unqualified">

</xs:schema>
Incoming request messages should also have the target namespace set in the root element and this is how Citrus matches the right schema file in the repository.
<HelloRequest xmlns="http://consol.de/schemas/sayHello.xsd">
   <MessageId>123456789</MessageId>
   <CorrelationId>1000</CorrelationId>
   <User>Christoph</User>
   <Text>Hello Citrus</Text>
</HelloRequest>
The next possibility for mapping incoming request messages to a schema definition is via the XML root element QName. Each XML message payload starts with a root element that usually declares the type of a XML message. According to this root element you can set up mappings in the schema repository.
<citrus:schema-repository id="schemaRepository"
    schema-mapping-strategy="schemaMappingStrategy">
  <citrus:schemas>
    <citrus:ref schema="helloSchema"/>
    <citrus:ref schema="goodbyeSchema"/>
  </citrus:schemas>
</citrus:schema-repository>

<bean id="schemaMappingStrategy"
    class="com.consol.citrus.xml.schema.RootQNameSchemaMappingStrategy">
  <property name="mappings">
    <map>
      <entry key="HelloRequest" value="helloSchema"/>
      <entry key="GoodbyeRequest" value="goodbyeSchema"/>
    </map>
  </property>
</bean>

<citrus:schema id="helloSchema"
    location="classpath:citrus/samples/sayHello.xsd"/>

<citrus:schema id="goodbyeSchema"
     location="classpath:citrus/samples/sayGoodbye.xsd"/>
The listing above defines two root qname mappings - one for HelloRequest and one for GoodbyeRequest message types. An incoming message of type <HelloRequest> is then mapped to the respective schema and so on. With this dedicated mappings you are able to control which schema is used on a XML request, regardless of target namespace definitions.
Let's discuss the possibility to combine several schema mapping strategies in a logical chain. You can define more than one mapping strategy that are evaluated in sequence. The first strategy to find a proper schema definition file in the repository wins.
<citrus:schema-repository id="schemaRepository"
    schema-mapping-strategy="schemaMappingStrategy">
  <citrus:schemas>
    <citrus:ref schema="helloSchema"/>
    <citrus:ref schema="goodbyeSchema"/>
  </citrus:schemas>
</citrus:schema-repository>

<bean id="schemaMappingStrategy"
    class="com.consol.citrus.xml.schema.SchemaMappingStrategyChain">
  <property name="strategies">
    <list>
      <bean class="com.consol.citrus.xml.schema.RootQNameSchemaMappingStrategy">
        <property name="mappings">
          <map>
            <entry key="HelloRequest" value="helloSchema"/>
          </map>
        </property>
      </bean>
      <bean class="com.consol.citrus.xml.schema.TargetNamespaceSchemaMappingStrategy"/>
    </list>
  </property>
</bean>
So the schema mapping chain uses both RootQNameSchemaMappingStrategy and TargetNamespaceSchemaMappingStrategy in combination. In case the first root qname strategy fails to find a proper mapping the next target namespace strategy comes in and tries to find a proper schema.
Now it is time to talk about schema definition settings on test action level. We have learned before that Citrus tries to automatically find a matching schema definition in some schema repository. There comes a time where you as a tester just have to pick the right schema definition by yourself. You can overrule all schema mapping strategies in Citrus by directly setting the desired schema in your receiving message action.
<receive endpoint="httpMessageEndpoint">
    <message schema="helloSchema">
      <validate>
        <xpath expression="//ns1:TestMessage/ns1:MessageHeader/ns1:MessageId"
                  value="${messageId}"/>
        <xpath expression="//ns1:TestMessage/ns1:MessageHeader/ns1:CorrelationId"
                  value="${correlationId}"/>
        <namespace prefix="ns1" value="http://citrus.com/namespace"/>
      </validate>
    </message>
</receive>

<citrus:schema id="helloSchema"
    location="classpath:citrus/samples/sayHello.xsd"/>
In the example above the tester explicitly sets a schema definition in the receive action (schema="helloSchema"). The attribute value refers to named schema bean somewhere in the applciation context. This overrules all schema mapping strategies used in the central schema repository as the given schema is directly used for validation. This feature is helpful when dealing with different schema versions at the same time where the schema repository can not help you anymore.
Another possibility would be to set a custom schema repository at this point. This means you can have more than one schema repository in your Citrus project and you pick the right one by yourself in the receive action.
<receive endpoint="httpMessageEndpoint">
    <message schema-repository="mySpecialSchemaRepository">
      <validate>
        <xpath expression="//ns1:TestMessage/ns1:MessageHeader/ns1:MessageId"
                  value="${messageId}"/>
        <xpath expression="//ns1:TestMessage/ns1:MessageHeader/ns1:CorrelationId"
                  value="${correlationId}"/>
        <namespace prefix="ns1" value="http://citrus.com/namespace"/>
      </validate>
    </message>
</receive>
The schema-repository attribute refers to a Citrus schema repository component which is defined somewhere in the Spring application context.
| Important |
|---|---|
In case you have several schema repositories in your project do always define a default repository (name="schemaRepository"). This helps Citrus to always find at least one repository to interact with. |
XML DTD (Document type definition) is another way to validate the structure of a XML document. Many people say that DTD is deprecated and XML schema is the much more efficient way to describe the rules of a XML structure. We do not disagree with that, but we also know that legacy systems might still use DTD. So in order to avoid validation errors we have to deal with DTD validation as well.
First thing you can do about DTD validation is to specify an inline DTD in your expected message template.
<receive endpoint="httpMessageEndpoint">
    <message schema-validation="false">
        <data>
        <![CDATA[
            <!DOCTYPE root [
                <!ELEMENT root (message)>
                <!ELEMENT message (text)>
                <!ELEMENT text (#PCDATA)>
                ]>
            <root>
                <message>
                    <text>Hello TestFramework!</text>
                </message>
            </root>
        ]]>
        <data/>
    </message>
</receive>
The system under test may also send the message with a inline DTD definition. So validation will succeed.
In most cases the DTD is referenced as external .dtd file resource. You can do this in your expected message template as well.
<receive endpoint="httpMessageEndpoint">
    <message schema-validation="false">
        <data>
        <![CDATA[
            <!DOCTYPE root SYSTEM
                         "com/consol/citrus/validation/example.dtd">
            <root>
                <message>
                    <text>Hello TestFramework!</text>
                </message>
            </root>
        ]]>
        <data/>
    </message>
</receive>
Message formats such as JSON have become very popular, in particular when speaking of RESTful WebServices and JavaScript using JSON as the message format to go for. Citrus is able to expect and validate JSON messages as we will see in the next sections.
| Important |
|---|---|
By default Citrus will use XML message formats when sending and receiving messages. This also reflects to the message validation logic Citrus uses for incoming messages. So by default Citrus will try to parse the incoming message as XML DOM element tree. In case we would like to enable JSON message validation we have to tell Citrus that we expect a JSON message right now. And this is quite easy. Citrus has a JSON message validator implementation active by default and immediately as we mark an incoming message as JSON data this message validator will jump in. |
Citrus provides several default message validator implementations for JOSN message format:
com.consol.citrus.validation.json.JsonTextMessageValidator: Basic JSON message validator implementation compares JSON objects (expected and received). The order of JSON entries can differ as specified in JSON protocol. Tester defines an expected control JSON object with test variables and ignored entries. JSONArray as well as nested JSONObjects are supported, too. The JSON validator offers two different modes to operate. By default strict mode is set and the validator will also check the exact amount of control object fields to match. No additional fields in received JSON data structure will be accepted. In soft mode validator allows additional fields in received JSON data structure so the control JSON object can be a partial subset in which case only the control fields are validated. Additional fields in the received JSON data structure are ignored then.
com.consol.citrus.validation.script.GroovyJsonMessageValidator: Extended groovy message validator provides specific JSON slurper support. With JSON slurper the tester can validate the JSON message payload with closures for instance.
You can overwrite this default message validators for JSON by placing a bean into the Spring Application context. The bean uses a default name as identifier. Then your custom bean will overwrite the default validator:
<bean id="defaultJsonMessageValidator" class="com.consol.citrus.validation.json.JsonTextMessageValidator"/>
<bean id="defaultGroovyJsonMessageValidator" class="com.consol.citrus.validation.script.GroovyJsonMessageValidator"/>
This is how you can customize the message validators used for JSON message data.
We have mentioned before that Citrus is working with XML by default. This is why we have to tell Citrus that the message that we are receiving uses the JSON message format. We have to tell the test case receiving action that we expect a different format other than XML.
<receive endpoint="httpMessageEndpoint">
    <message type="json">
        <data>
          {
            "type" : "read",
            "mbean" : "java.lang:type=Memory",
            "attribute" : "HeapMemoryUsage",
            "path" : "@equalsIgnoreCase('USED')@",
            "value" : "${heapUsage}",
            "timestamp" : "@ignore@"
          }
        </data>
    </message>
</receive>
The message receiving action in our test case specifies a message format type type="json". This tells Citrus to look for some message validator implementation capable of validating JSON messages. As we have added the proper message validator to the Spring application context Citrus will pick the right validator and JSON message validation is performed on this message. As you can see you we can use the usual test variables and the ignore element syntax here, too. Citrus is able to handle different JSON element orders when comparing received and expected JSON object. We can also use JSON arrays and nested objects. The default JSON message validator implementation in Citrus is very powerful in comparing JSON objects.
Instead of defining an expected message payload template we can also use Groovy validation scripts. Lets have a look at the Groovy JSON message validator example. As usual the default Groovy JSON message validator is active by default. But the special Groovy message validator implementation will only jump in when we used a validation script in our receive message definition. Let's have an example for that.
<receive endpoint="httpMessageEndpoint">
    <message type="json">
        <validate>
            <script type="groovy">
                <![CDATA[
                  assert json.type == 'read'
                  assert json.mbean == 'java.lang:type=Memory'
                  assert json.attribute == 'HeapMemoryUsage'
                  assert json.value == '${heapUsage}'
                ]]>
            </script>
        </validate>
    </message>
</receive>
Again we tell Citrus that we expect a message of type="json". Now we used a validation script that is written in Groovy. Citrus will automatically activate the special message validator that executes our Groovy script. The script validation is more powerful as we can use the full power of the Groovy language. The validation script automatically has access to the incoming JSON message object json. We can use the Groovy JSON dot notated syntax in order to navigate through the JSON structure. The Groovy JSON slurper object json is automatically passed to the validation script. This way you can access the JSON object elements in your code doing some assertions.
There is even more object injection for the validation script. With the automatically added object receivedMessage You have access to the Citrus message object for this receive action.
This enables you to do whatever you want with the message payload or header.
XML DSL
<receive endpoint="httpMessageEndpoint">
    <message type="json">
        <validate>
            <script type="groovy">
                assert receivedMessage.getPayload(String.class).contains("Hello Citrus!")
                assert receivedMessage.getHeader("Operation") == 'sayHello'

                context.setVariable("request_payload", receivedMessage.getPayload(String.class))
            </script>
        </validate>
    </message>
</receive>
The listing above shows some power of the validation script. We can access the message payload, we can access the message header. With test context access we can also save the whole message payload as a new test variable for later usage in the test.
In general Groovy code inside the XML test case definition or as part of the Java DSL code is not very comfortable to maintain. You do not have code syntax assist or code completion. This is why we can also use external file resources for the validation scripts. The syntax looks like follows:
XML DSL
<receive endpoint="helloServiceClient" timeout="5000">
    <message>
        <validate>
            <script type="groovy" file="classpath:validationScript.groovy"/>
        </validate>
    </message>
</receive>
Java DSL designer
@CitrusTest
public void receiveMessageTest() {
    receive("helloServiceClient")
        .validateScript(new FileSystemResource("validationScript.groovy"));
}
We referenced some external file resource validationScript.groovy. This file content is loaded at runtime and is used as script body. Now that we have a normal groovy file we can use the code completion and
syntax highlighting of our favorite Groovy editor.
| Important |
|---|---|
Using several message validator implementations at the same time in the Spring application context is also no problem. Citrus automatically searches for all available message validators applicable for the given message format and executes these validators in sequence. So several message validators can coexist in a Citrus project. |
When we have multiple message validators that apply to the message format Citrus will execute all of them in sequence. In case you need to explicitly choose a message validator implementation you can do so in the receive action:
<receive endpoint="httpMessageEndpoint">
    <message type="json" validator="groovyJsonMessageValidator">
        <validate>
            <script type="groovy">
                <![CDATA[
                  assert json.type == 'read'
                  assert json.mbean == 'java.lang:type=Memory'
                  assert json.attribute == 'HeapMemoryUsage'
                  assert json.value == '${heapUsage}'
                ]]>
            </script>
        </validate>
    </message>
</receive>
In this example we use the groovyJsonMessageValidator explicitly in the receive test action. The message validator implementation was added as Spring bean with id groovyJsonMessageValidator to the Spring application context before. Now Citrus will only execute the explicit message validator. Other implementations that might also apply are skipped.
| Tip |
|---|---|
By default Citrus will consolidate all available message validators for a message format in sequence. You can explicitly pick a special message validator in the receive message action as shown in the example above. In this case all other validators will not take part in this special message validation. But be careful: When picking a message validator explicitly you are of course limited to this message validator capabilities. Validation features of other validators are not valid in this case (e.g. message header validation, XPath validation, etc.) |
So much for receiving JSON message data in Citrus. Of course sending JSON messages in Citrus is also very easy. Just use JSON message payloads in your sending message action.
<send endpoint="httpMessageEndpoint">
    <message>
        <data>
          {
            "type" : "read",
            "mbean" : "java.lang:type=Memory",
            "attribute" : "HeapMemoryUsage",
            "path" : "used"
          }
        </data>
    </message>
</send>
When Citrus receives plain Html messages we likely want to use the powerful XML validation capabilities such as XML tree comparison or XPath support. Unfortunately Html messages do not follow the XML well formed rules very strictly. This implies that XML message validation will fail because of non well formed Html code.
XHTML closes this gap by automatically fixing the most common Html XML incompatible rule violations such as missing end tags (e.g. <br>).
Let's try this with a simple example. Very first thing for us to do is to add a new library dependency to the project. Citrus is using the jtidy library in order to prepare the HTML and XHTML messages for validation. As this 3rd party dependency is optional in Citrus we have to add it now to our project dependency list. Just add the jtidy dependency to your Maven project POM.
<dependency>
    <groupId>net.sf.jtidy</groupId>
    <artifactId>jtidy</artifactId>
    <version>r938</version>
  </dependency>
Please refer to the jtidy project documentation for the latest versions. Now everything is ready. As usual the Citrus message validator for XHTML is active in background by default. You can overwrite this default implementation by placing a Spring bean with id defaultXhtmlMessageValidator to the Citrus application context.
<bean id="defaultXhtmlMessageValidator" class="com.consol.citrus.validation.xhtml.XhtmlMessageValidator"/>
Now we can tell the test case receiving action that we want to use the XHTML message validation in our test case.
<receive endpoint="httpMessageEndpoint">
    <message type="xhtml">
        <data>
          <![CDATA[
            <!DOCTYPE html PUBLIC "-//W3C//DTD XHTML 1.1//EN" "org/w3c/xhtml/xhtml1-strict.dtd">
            <html xmlns="http://www.w3.org/1999/xhtml">
            <head>
              <title>Citrus Hello World</title>
            </head>
            <body>
              <h1>Hello World!</h1>
              <br/>
              <p>This is a test!</p>
            </body>
          ]]>
        </data>
    </message>
</receive>
The message receiving action in our test case has to specify a message format type type="xhtml". As you can see the Html message payload get XHTML specific DOCTYPE processing instruction. The xhtml1-strict.dtd is mandatory in the XHTML message validation. For better convenience all XHTML dtd files are packaged within Citrus so you can use this as a relative path.
The incoming Html message is automatically converted into proper XHTML code with well formed XML. So now the XHTML message validator can use the XML message validation mechanism of Citrus for comparing received and expected data. As usual you can use test variables, ignore element expressions and XPath expressions.
Plain text message validation is the easiest validation in Citrus that you can think of. This validation just performs an exact Java String match of received and expected message payloads.
As usual a default message validator for plaintext messages is active by default. Citrus will pick this message validator for all messages of type="plaintext". The default message validator implementation can be overwritten by placing a Spring bean with id defaultPlaintextMessageValidator to the Spring application context.
<bean id="defaultPlaintextMessageValidator" class="com.consol.citrus.validation.text.PlainTextMessageValidator"/>
In the test case receiving action we tell Citrus to use plain text message validation.
<receive endpoint="httpMessageEndpoint">
    <message type="plaintext">
        <data>Hello World!</data>
    </message>
</receive>
With the message format type type="plaintext" set Citrus performs String equals on the message payloads (received and expected). Only exact match will pass the test.
By the way sending plain text messages in Citrus is also very easy. Just use the plain text message payload data in your sending message action.
<send endpoint="httpMessageEndpoint">
    <message>
        <data>Hello World!</data>
    </message>
</send>
Of course test variables are supported in the plain text payloads. The variables are replace by the referenced values before sending or receiving the message.
The Java DSL offers some additional validation tricks and possibilities when dealing with messages that are sent and received over Citrus. One of them is the validation callback functionality. With this feature you can marshal/unmarshal message payloads and code validation steps on Java objects.
Java DSL designer
@CitrusTest
public void receiveMessageTest() {
    receive(bookResponseEndpoint)
        .validationCallback(new MarshallingValidationCallback<AddBookResponseMessage>() {
            @Override
            public void validate(AddBookResponseMessage response, MessageHeaders headers) {
                Assert.isTrue(response.isSuccess());
            }
        });
}
By default the validation callback needs some XML unmarshaller implementation for transforming the XML payload to a Java object. Citrus will automatically search for the unmarshaller bean in your Spring application context if nothing specific is set. Of course you can also set the unmarshaller instance explicitly.
Java DSL designer
@Autowired
private Unmarshaller unmarshaller;

@CitrusTest
public void receiveMessageTest() {
    receive(bookResponseEndpoint)
        .validationCallback(new MarshallingValidationCallback<AddBookResponseMessage>(unmarshaller) {
            @Override
            public void validate(AddBookResponseMessage response, MessageHeaders headers) {
                Assert.isTrue(response.isSuccess());
            }
        });
}
Obviously working on Java objects is much more comfortable than using the XML String concatenation. This is why you can also use this feature when sending messages.
Java DSL designer
@Autowired
private Marshaller marshaller;

@CitrusTest
public void sendMessageTest() {
    send(bookRequestEndpoint)
        .payload(createAddBookRequestMessage("978-citrus:randomNumber(10)"), marshaller)
        .header("citrus_soap_action", "addBook");
}

private AddBookRequestMessage createAddBookRequestMessage(String isbn) {
    AddBookRequestMessage requestMessage = new AddBookRequestMessage();
    Book book = new Book();
    book.setAuthor("Foo");
    book.setTitle("FooTitle");
    book.setIsbn(isbn);
    book.setYear(2008);
    book.setRegistrationDate(Calendar.getInstance());
    requestMessage.setBook(book);
    return requestMessage;
}
The example above creates a AddBookRequestMessage object and puts this as payload to a send action. In combination with a marshaller instance Citrus is able to create a proper XML message payload then.
In the previous sections we have already seen some examples on how to overwrite default message validator implementations in Citrus. By default all message validators can be overwritten by placing a Spring bean of the same id to the Spring application context. The default implementations of Citrus are:
defaultXmlMessageValidator: com.consol.citrus.validation.xml.DomXmlMessageValidator
defaultXpathMessageValidator: com.consol.citrus.validation.xml.XpathMessageValidator
defaultJsonMessageValidator: com.consol.citrus.validation.json.JsonTextMessageValidator
defaultJsonPathMessageValidator: com.consol.citrus.validation.json.JsonPathMessageValidator
defaultPlaintextMessageValidator: com.consol.citrus.validation.text.PlainTextMessageValidator
defaultXhtmlMessageValidator: com.consol.citrus.validation.xhtml.XhtmlMessageValidator
defaultGroovyXmlMessageValidator: com.consol.citrus.validation.script.GroovyXmlMessageValidator
defaultGroovyJsonMessageValidator: com.consol.citrus.validation.script.GroovyJsonMessageValidator
Overwriting a single message validator with a custom implementation is then very easy. Just add your custom Spring bean to the application context using one of these default bean identifiers. In case you want to change the message validator gang by adding or removing a message validator implementation completely you can place a message validator component in the Spring application context.
<citrus:message-validators>
    <citrus:validator ref="defaultXmlMessageValidator"/>
    <citrus:validator ref="defaultXpathMessageValidator"/>
    <citrus:validator ref="defaultGroovyXmlMessageValidator"/>
    <citrus:validator class="com.consol.citrus.validation.custom.CustomMessageValidator"/>
    <citrus:validator ref="defaultJsonMessageValidator"/>
    <citrus:validator ref="defaultJsonPathMessageValidator"/>
    <citrus:validator ref="defaultGroovyJsonMessageValidator"/>
    <citrus:validator ref="defaultXhtmlMessageValidator"/>
</citrus:message-validators>
The listing above adds a custom message validator implementation to the sequence of message validators in Citrus. We reference default message validators and add a implementation of type com.consol.citrus.validation.custom.CustomMessageValidator. The custom implementation class has to implement the basic interface com.consol.citrus.validation.MessageValidator. Now Citrus will try to match the custom implementation to incoming message types and occasionally execute the message validator logic. This is how you can add and change the basic message validator registry in Citrus. You can add custom implementations for new message formats very easy.
The same approach applies in case you want to remove a message validator implementation by banning it completely. Just delete the entry in the message validator registry component:
<citrus:message-validators>
    <citrus:validator ref="defaultJsonMessageValidator"/>
    <citrus:validator ref="defaultJsonPathMessageValidator"/>
    <citrus:validator ref="defaultGroovyJsonMessageValidator"/>
</citrus:message-validators>
The Citrus message validator component deleted all default implementations except of those dealing with JSON message format. Now Citrus is only able to validate JSON messages. Be careful as the complete Citrus project will be affected by this change.
Some time ago in this document we have already seen how XML message payloads are constructed when sending and receiving messages. Now using XPath is a very powerful way of accessing elements in complex XML structures. The XPath expression language is very handy when it comes to save element values as test variables or when validating special elements in a XML message structure.
XPath is a very powerful technology for walking XML trees. This W3C standard stands for advanced XML tree handling using a special syntax as query language. Citrus supports the XPath syntax in the following fields:
<message><element path="[XPath-Expression]"></message>
<validate><xpath expression="[XPath-Expression]"/></validate>
<extract><message path="[XPath-Expression]"></extract>
<ignore path="[XPath-Expression]"/>
The next program listing indicates the power in using XPath with Citrus:
<message>
  <validate>
    <xpath expression="//User/Name" value="John"/>
    <xpath expression="//User/Address[@type='office']/Street" value="Companystreet 21"/>
    <xpath expression="//User/Name" value="${userName}"/>
    <xpath expression="//User/@isAdmin" value="${isAdmin}"/>
    <xpath expression="//User/@isAdmin" value="true" result-type="boolean"/>
    <xpath expression="//*[.='search-for']" value="searched-for"/>
    <xpath expression="count(//orderStatus[.='success'])" value="3" result-type="number"/>
  </validate>
</message>
Now we describe the XPath usage in Citrus step by step.
Some elements in XML message payloads might be of dynamic nature. Just think of generated identifiers or timestamps. Also we do not want to repeat the same static identifier several times in our test cases. This is the time where test variables and dynamic message element overwrite come in handy. The idea is simple. We want to overwrite a specific message element in our payload with a dynamic value. This can be done with XPath or inline variable declarations. Lets have a look at an example listing showing both ways:
XML DSL
<message>
  <payload>
    <TestMessage>
      <MessageId>${messageId}</MessageId>
      <CreatedBy>_</CreatedBy>
      <VersionId>${version}</VersionId>
    </TestMessage>
  </payload>
  <element path="/TestMessage/CreatedBy" value="${user}"/>
</message>
The program listing above shows ways of setting variable values inside a message template. First of all you can simply place variable expressions inside the message (see how ${messageId} is used). In addition to that you can also use XPath expressions to explicitly overwrite message elements before validation.
<element path="/TestMessage/CreatedBy" value="${user}"/>
The XPath expression evaluates and searches for the right element in the message payload. The previously defined variable ${user} replaces the element value. Of course this works with XML attributes too.
Both ways via XPath or inline variable expressions are equal to each other. With respect to the complexity of XML namespaces and XPath you may find the inline variable expression more comfortable to use. Anyway feel free to choose the way that fits best for you. This is how we can add dynamic variable values to the control template in order to increase maintainability and robustness of message validation.
| Tip |
|---|---|
| Validation matchers put validation mechanisms to a new level offering dynamic assertion statements for validation. Have a look at the possibilities with assertion statements in Chapter 34, Validation matcher |
We have already seen how to validate whole XML structures with control message templates. All elements are validated and compared one after another. In some cases this approach might be too extensive. Imagine the tester only needs to validate a small subset of message elements. The definition of control templates in combination with several ignore statements is not appropriate in this case. You would rather want to use explicit element validation.
XML DSL
<message>
  <validate>
    <xpath expression="/TestRequest/MessageId" value="${messageId}"/>
    <xpath expression="/TestRequest/VersionId" value="2"/>
  </validate>
</message>
Java DSL designer
@CitrusTest
public void receiveMessageTest() {
    receive("helloServiceServer")
        .validate("/TestRequest/MessageId", "${messageId}")
        .validate("//VersionId", "2")
        .header("Operation", "sayHello");
}
Instead of comparing the whole message some message elements are validated explicitly via XPath. Citrus evaluates the XPath expression on the received message and compares the result value to the control value. The basic message structure as well as all other message elements are not included into this explicit validation.
| Note |
|---|---|
If this type of element validation is chosen neither <payload> nor <data> nor <resource> template definitions are allowed in Citrus XML test cases. |
| Tip |
|---|---|
Citrus offers an alternative dot-notated syntax in order to walk through XML trees. In case you are not familiar with XPath or simply need a very easy way to find your element inside the XML tree you might use this way. Every element hierarchy in the XML tree is represented with a simple dot - for example:
The expression will search the XML tree for the respective <TestRequest><VersionId> element. Attributes are supported too. In case the last element in the dot-notated expression is a XML attribute the framework will automatically find it. Of course this dot-notated syntax is very simple and might not be applicable for more complex tree navigation. XPath is much more powerful - no doubt. However the dot-notated syntax might help those of you that are not familiar with XPath. So the dot-notation is supported wherever XPath expressions might apply. |
The Xpath expressions can evaluate to different result types. By default Citrus is operating on NODE and STRING result types so that you can validate some element value. But you can also use different result types such as NODESET and BOOLEAN. See this example how that works:
XML DSL
<message>
  <validate>
    <xpath expression="/TestRequest/Error" value="false" result-type="boolean"/>
    <xpath expression="/TestRequest/Status[.='success']" value="3" result-type="number"/>
    <xpath expression="/TestRequest/OrderType" value="single,multi,multi" result-type="node-set"/>
  </validate>
</message>
Java DSL designer
@CitrusTest
public void receiveMessageTest() {
    receive("helloServiceServer")
        .validate("boolean:/TestRequest/Error", "false")
        .validate("number:/TestRequest/Status[.='success']", "3")
        .validate("node-set:/TestRequest/OrderType", "single,multi,multi")
        .header("Operation", "sayHello");
}
In the example above we use different expression result types. First we want to make sure nor /TestRequest/Error element is present. This can be done with a boolean result type and false value. Second we want to validate the number of found elements for the expression /TestRequest/Status[.='success']. The XPath expression evaluates to a node list that results in its list size to be checked. And last not least we evaluate to a node-set result type where all values in the node list will be translated to a comma delimited string value.
This is how you can add very powerful message element validation in XML using XPath expressions.
Imagine you receive a message in your test with some generated message identifier values. You have no chance to predict the identifier value because it was generated at runtime by a foreign application. You can ignore the value in order to protect your validation. But in many cases you might need to return this identifier in the respective response message or somewhat later on in the test. So we have to save the dynamic message content for reuse in later test steps. The solution is simple and very powerful. We can extract dynamic values from received messages and save those to test variables. Add this code to your message receiving action.
XML DSL
<extract>
  <header name="Operation" variable="operation"/>
  <message path="/TestRequest/VersionId" variable="versionId"/>
</extract>
Java DSL designer
@CitrusTest
public void receiveMessageTest() {
    receive("helloServiceServer")
        .extractFromHeader("Operation", "operation")
        .extractFromPayload("//TestRequest/VersionId", "versionId");

    echo("Extracted operation from header is: ${operation}");
    echo("Extracted version from payload is: ${versionId}");
}
As you can see Citrus is able to extract both header and message payload content into test variables. It does not matter if you use new test variables or existing variables as target. The extraction will automatically create a new variable in case it does not exist. The time the variable was created all following test actions can access the test variables as usual. So you can reference the variable values in response messages or other test steps ahead.
| Tip |
|---|---|
We can also use expression result types in order to manipulate the test variable outcome. In case we use a boolean result type the existence of elements can be saved to variable values. The result type node-set translates a node list result to a comma separated string of all values in this node list. Simply use the expression result type attributes as shown in previous sections. |
When it comes to XML namespaces you have to be careful with your XPath expressions. Lets have a look at an example message that uses XML namespaces:
<ns1:TestMessage xmlns:ns1="http://citrus.com/namespace">
    <ns1:TestHeader>
        <ns1:CorrelationId>_</ns1:CorrelationId>
        <ns1:Timestamp>2001-12-17T09:30:47.0Z</ns1:Timestamp>
        <ns1:VersionId>2</ns1:VersionId>
    </ns1:TestHeader>
    <ns1:TestBody>
        <ns1:Customer>
            <ns1:Id>1</ns1:Id>
        </ns1:Customer>
    </ns1:TestBody>
</ns1:TestMessage>
Now we would like to validate some elements in this message using XPath
<message>
  <validate>
    <xpath expression="//TestMessage/TestHeader/VersionId" value="2"/>
    <xpath expression="//TestMessage/TestHeader/CorrelationId" value="${correlationId}"/>
  </validate>
</message>
The validation will fail although the XPath expression looks correct regarding the XML tree. Because the message
uses the namespace xmlns:ns1="http://citrus.com/namespace" with its prefix ns1
our XPath expression is not able to find the elements. The correct XPath expression uses the namespace prefix as defined
in the message.
<message>
  <validate>
    <xpath expression="//ns1:TestMessage/ns1:TestHeader/ns1:VersionId" value="2"/>
    <xpath expression="//ns1:TestMessage/ns1:TestHeader/ns1:CorrelationId" value="${correlationId}"/>
</message>
Now the expressions work fine and the validation is successful. But this is quite error prone. This is because the test is now depending on the namespace prefix that is used by some application. As soon as the message is sent with a different namespace prefix (e.g. ns2) the validation will fail again.
You can avoid this effect when specifying your own namespace context and your own namespace prefix during validation.
<message>
  <validate>
    <xpath expression="//pfx:TestMessage/pfx:TestHeader/pfx:VersionId" value="2"/>
    <xpath expression="//pfx:TestMessage/pfx:TestHeader/pfx:CorrelationId" value="${correlationId}"/>
    <namespace prefix="pfx" value="http://citrus.com/namespace"/>
  </validate>
</message>
Now the test in independent from any namespace prefix in the received message. The namespace context will resolve the namespaces and find the elements although the message might use different prefixes. The only thing that matters is that the namespace value (http://citrus.com/namespace) matches.
| Tip |
|---|---|
Instead of this namespace context on validation level you can also have a global namespace context which is valid in all test cases. We just add a bean in the basic Spring application context configuration which defines global namespace mappings. <namespace-context> <namespace prefix="def" uri="http://www.consol.de/samples/sayHello"/> </namespace-context> Once defined the def namespace prefix is valid in all test cases and all XPath expressions. This enables you to free your test cases from namespace prefix bindings that might be broken with time. You can use these global namespace mappings wherever XPath expressions are valid inside a test case (validation, ignore, extract). |
In the previous section we have seen that XML namespaces can get tricky with XPath validation. Default namespaces can do even more! So lets look at the example with default namespaces:
<TestMessage xmlns="http://citrus.com/namespace">
    <TestHeader>
        <CorrelationId>_</CorrelationId>
        <Timestamp>2001-12-17T09:30:47.0Z</Timestamp>
        <VersionId>2</VersionId>
    </TestHeader>
    <TestBody>
        <Customer>
            <Id>1</Id>
        </Customer>
    </TestBody>
</TestMessage>
The message uses default namespaces. The following approach in XPath will fail due to namespace problems.
<message>
  <validate>
    <xpath expression="//TestMessage/TestHeader/VersionId" value="2"/>
    <xpath expression="//TestMessage/TestHeader/CorrelationId" value="${correlationId}"/>
  </validate>
</message>
Even default namespaces need to be specified in the XPath expressions. Look at the following code listing that works fine with default namespaces:
<message>
  <validate>
    <xpath expression="//:TestMessage/:TestHeader/:VersionId" value="2"/>
    <xpath expression="//:TestMessage/:TestHeader/:CorrelationId" value="${correlationId}"/>
  </validate>
</message>
| Tip |
|---|---|
It is recommended to use the namespace context as described in the previous chapter when validating. Only this approach ensures flexibility and stable test cases regarding namespace changes. |
JSONPath is the JSON equivalent to XPath in the XML message world. With JSONPath expressions you can query and manipulate entries of a JSON message structure. The JSONPath expressions evaluate against a JSON message where the JSON object structure is represented in a dot notated syntax.
You will see that JSONPath is a very powerful technology when it comes to find object entries in a complex JSON hierarchy structure. Also JSONPath can help to do message manipulations before a message is sent out for instance. Citrus supports JSONPath expressions in various scenarios:
<message><element path="[JSONPath-Expression]"></message>
<validate><json-path expression="[JSONPath-Expression]"/></validate>
<extract><message path="[JSONPath-Expression]"></extract>
<ignore path="[JSONPath-Expression]"/>
First thing we want to do with JSONPath is to manipulate a message content before it is actually sent out. This is very useful when working with message file resources that are reused accross multiple test cases. Each test case can manipulate the message content individually with JSONPath before sending. Lets have a look at this simple sample:
<message type="json">
  <resource file="file:path/to/user.json" />
  <element path="$.user.name" value="Admin" />
  <element path="$.user.admin" value="true" />
  <element path="$..status" value="closed" />
</message>
We use a basic message content file that is called user.json. The content of the file is following JSON data structure:
{ user:
  {
    "id": citrus:randomNumber(10)
    "name": "Unknown",
    "admin": "?",
    "projects":
      [{
        "name": "Project1",
        "status": "open"
      },
      {
        "name": "Project2",
        "status": "open"
      },
      {
        "name": "Project3",
        "status": "closed"
      }]
  }
}
Citrus loads the file content and used it as message payload. Before the message is sent out the JSONPath expressions have the chance to manipulate the message content. All JSONPath expressions are evaluated and the give values overwrite existing values accordingly. The resulting message looks like follows:
{ user:
  {
    "id": citrus:randomNumber(10)
    "name": "Admin",
    "admin": "true",
    "projects":
      [{
        "name": "Project1",
        "status": "closed"
      },
      {
        "name": "Project2",
        "status": "closed"
      },
      {
        "name": "Project3",
        "status": "closed"
      }]
  }
}
The JSONPath expressions have set the user name to Admin. The admin boolean property was set to true and all project status values were set to closed. Now the message is ready to be sent out. In case a JSONPath expression should fail to find a matching element within the message structure the test case will fail.
With this JSONPath mechanism ou are able to manipulate message content before it is sent or received within Citrus. This makes life very easy when using message resource files that are reused across multiple test cases.
Lets continue to use JSONPath expressions when validating a receive message in Citrus:
<message type="json">
  <validate>
    <json-path expression="$.user.name" value="Penny"/>
    <json-path expression="$['user']['name']" value="${userName}"/>
    <json-path expression="$.user.aliases" value="["penny","jenny","nanny"]"/>
    <json-path expression="$.user[?(@.admin)].password" value="@startsWith('$%00')@"/>
    <json-path expression="$.user.address[?(@.type='office')]"
        value="{"city":"Munich","street":"Company Street","type":"office"}"/>
  </validate>
</message>
The above JSONPath expressions will be evaluated when Citrus validates the received message. The expression result is compared to the expected value where expectations can be static values as well as test variables and validation matcher expressions. In case a JSONPath expression should not be able to find any elements the test case will also fail.
JSON is a pretty simple yet powerful message format. Simplified a JSON message just knows JSONObject, JSONArray and JSONValue items. The handling of JSONObject and JSONValue items in JSONPath expressions is straight forward. We just use a dot notated syntax for walking through the JSONObject hierarchy. The handling of JSONArray items is also not very difficult either. Citrus will try the best to convert JSONArray items to String representation values for comparison.
| Important |
|---|---|
JSONPath expressions will only work on JSON message formats. This is why we have to tell Citrus the correct message format. By default Citrus is working with XML message data and therefore the XML validation mechanisms do apply by default. With the message type attribute set to json we make sure that Citrus enables JSON specific features on the message validation such as JSONPath support. |
Citrus is able to save message content to test variables at test runtime. When an incoming message is passing the message validation the user can extract some values of that received message to new test variables for later use in the test. This is especially handsome when having to send back some dynamic values. So lets save some values using JSONPath:
<message type="json">
  <data>
    { user:
      {
        "name": "Admin",
        "password": "secret",
        "admin": "true",
        "aliases": ["penny","chef","master"]
      }
    }
  </data>
  <extract>
    <message path="$.user.name" variable="userName"/>
    <message path="$.user.aliases" variable="userAliases"/>
    <message path="$.user[?(@.admin)].password" variable="adminPassword"/>
  </extract>
</message>
With this example we have extracted three new test variables via JSONPath expression evaluation. The three test variables will be available to all upcoming test actions. The variable values are:
userName=Admin
userAliases=["penny","chef","master"]
adminPassword=secret
As you can see we can also extract complex JSONObject items or JSONArray items. The test variable value is a String representation of the complex object.
The next usage scenario for JSONPath expressions in Citrus is the ignoring of elements during message validation. As you already know Citrus provides powerful validation mechanisms for XML and JSON message format. The framework is able to compare received and expected message contents with powerful validator implementations. Now it this time we want to use a JSONPath expression for ignoring a very specific entry in the JSON object structure.
<message type="json">
  <data>
  {
      "users":
      [{
        "name": "Jane",
        "token": "?",
        "lastLogin": 0
      },
      {
        "name": "Penny",
        "token": "?",
        "lastLogin": 0
      },
      {
        "name": "Mary",
        "token": "?",
        "lastLogin": 0
      }]
  }
  </data>
  <ignore expression="$.users[*].token" />
  <ignore expression="$..lastLogin" />
</message>
This time we add JSONPath expressions as ignore statements. This means that we explicitly leave out the evaluated elements from validation. Obviously this mechanism is a good thing to do when dynamic message data simply is not deterministic such as timestamps and dynamic identifiers. In the example above we explicitly skip the token entry and all lastLogin values that are obviously timestamp values in milliseconds.
The JSONPath evaluation is very powerful when it comes to select a set of JSON objects and elements. This is how we can ignore several elements with one single JSONPath expression which is very powerful.
This chapter gives a brief description to all test actions that a tester can incorporate into the test case. Besides sending and receiving messages the tester may access these actions in order to build a more complex test scenario that fits the desired use case.
In a integration test scenario we want to trigger processes and call interface services on the system under test. In order to do this we need to be able to send messages to various message transports. Therefore the send message test action in Citrus is one of the most important test actions. First of all let us have a look at the Citrus message definition in Citrus:
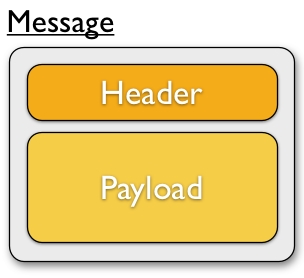
A message consists of a message header (name-value pairs) and a message payload. Later in this section we will see different ways of constructing a message with payload and header values. But first of all let's concentrate on a simple sending message action inside a test case.
XML DSL
<testcase name="SendMessageTest">
    <description>Basic send message example</description>

    <variables>
        <variable name="text" value="Hello Citrus!"/>
        <variable name="messageId" value="Mx1x123456789"/>
    </variables>

    <actions>
        <send endpoint="helloServiceEndpoint">
            <message>
                <payload>
                    <TestMessage>
                        <Text>${text}</Text>
                    </TestMessage>
                </payload>
            </message>
            <header>
                <element name="Operation" value="sayHello"/>
                <element name="MessageId" value="${messageId}"/>
            </header>
        </send>
    </actions>
</testcase>
The sample uses both header and payload as message parts to send. In both parts you can use variable definitions
(see ${text} and ${messageId}). So first of all let us recap what variables do.
Test variables are defined at the very beginning of the test case and are valid throughout all actions that take place in
the test. This means that actions can simply reference a variable by the expression ${variable-name}.
| Tip |
|---|---|
Use variables wherever you can! At least the important entities of a test should be defined as variables at the beginning. The test case improves maintainability and flexibility when using variables. |
Now lets have a closer look at the sending action. The 'endpoint' attribute might catch your attention first. This attribute references a message endpoint in Citrus configuration by name. As previously mentioned the message endpoint definition lives in a separate configuration file and contains the actual message transport settings. In this example the "helloServiceEndpoint" is referenced which is a message endpoint for sending out messages via JMS or HTTP for instance.
The test case is not aware of any transport details, because it does not have to. The advantages are obvious: On the one hand multiple test cases can reference the message endpoint definition for better reuse. Secondly test cases are independent of message transport details. So connection factories, user credentials, endpoint uri values and so on are not present in the test case.
In other words the "endpoint" attribute of the <send> element specifies which message endpoint definition to use and therefore where the message should go to. Once again all available message endpoints are configured in a separate Citrus configuration file. We will come to this later on. Be sure to always pick the right message endpoint type in order to publish your message to the right destination.
If you do not like the XML language you can also use pure Java code to define the same test. In Java you would also make use of the message endpoint definition and reference this instance. The same test as shown above in Java DSL looks like this:
Java DSL designer
import org.testng.ITestContext;
import org.testng.annotations.Test;
import com.consol.citrus.annotations.CitrusTest;
import com.consol.citrus.dsl.testng.TestNGCitrusTestDesigner;

@Test
public class SendMessageTestDesigner extends TestNGCitrusTestDesigner {

    @CitrusTest(name = "SendMessageTest")
    public void sendMessageTest() {
        description("Basic send message example");

        variable("text", "Hello Citrus!");
        variable("messageId", "Mx1x123456789");

        send("helloServiceEndpoint")
                .payload("<TestMessage>" +
                    "<Text>${text}</Text>" +
                    "</TestMessage>")
                .header("Operation", "sayHello")
                .header("RequestTag", "${messageId}");
    }
}
Java DSL runner
import org.testng.ITestContext;
import org.testng.annotations.Test;
import com.consol.citrus.annotations.CitrusTest;
import com.consol.citrus.dsl.testng.TestNGCitrusTestRunner;

@Test
public class SendMessageTestRunner extends TestNGCitrusTestRunner {

    @CitrusTest(name = "SendMessageTest")
    public void sendMessageTest() {
        variable("text", "Hello Citrus!");
        variable("messageId", "Mx1x123456789");

        send(action -> action.endpoint("helloServiceEndpoint")
                .payload("<TestMessage>" +
                        "<Text>${text}</Text>" +
                    "</TestMessage>")
                .header("Operation", "sayHello")
                .header("RequestTag", "${messageId}"));
    }
}
Instead of using the XML tags for send we use methods from TestNGCitrusTestDesigner class. The same message endpoint is referenced within the send message action.
Now that the message sender pattern is clear we can concentrate on how to specify the message content to be sent. There are several possibilities for you to define message content in Citrus:
message: This element constructs the message to be sent. There are several child elements available:
payload: Nested XML payload as direct child node.
data: Inline CDATA definition of the message payload
resource: External file resource holding the message payload
The syntax would be: <resource file="classpath:com/consol/citrus/messages/TestRequest.xml" />
The file path prefix indicates the resource type, so the file location is resolved either as file system resource (file:) or classpath resource (classpath:).
element: Explicitly overwrite values in the XML message payload using XPath. You can replace message content with dynamic values before sending. Each <element> entry provides a "path" and "value" attribute. The "path" gives a XPath expression evaluating to a XML node element or attribute in the message. The "value" can be a variable expression or any other static value. Citrus will replace the value before sending the message.
header: Defines a header for the message (e.g. JMS header information or SOAP header):
element: Each header receives a "name" and "value". The "name" will be the name of the header entry and "value" its respective value. Again the usage of variable expressions as value is supported here, too.
XML DSL
<send endpoint="helloServiceEndpoint">
    <message>
        <payload>
            <!-- message payload as XML -->
        </payload>
    </message>
</send>
<send endpoint="helloServiceEndpoint">
    <message>
        <data>
            <![CDATA[
                <!-- message payload as XML -->
            ]]>
        </data>
    </message>
</send>
<send endpoint="helloServiceEndpoint">
    <message>
        <resource file="classpath:com/consol/citrus/messages/TestRequest.xml" />
    </message>
</send>
The most important thing when dealing with sending actions is to prepare the message payload and header. You are able to construct the message payload either by nested XML child nodes (payload), as inline CDATA (<data>) or external file (<resource>).
| Note |
|---|---|
Sometimes the nested XML message payload elements may cause XSD schema validation rule violations. This is because of variable values not fitting the XSD schema rules
for example. In this scenario you could also use simple CDATA sections as payload data. In this case you need to use the With this alternative you can skip the XML schema validation from your IDE at design time. Unfortunately you will loose the XSD auto completion features many XML editors offer when constructing your payload. |
The The same possibilities apply to the Citrus Java DSL.
Java DSL designer
@CitrusTest
public void messagingTest() {
    send("helloServiceEndpoint")
        .payload("<TestMessage>" +
                "<Text>Hello!</Text>" +
            "</TestMessage>");
}
@CitrusTest
public void messagingTest() {
    send("helloServiceEndpoint")
        .payload(new ClassPathResource("com/consol/citrus/messages/TestRequest.xml"));
}
@CitrusTest
public void messagingTest() {
    send("helloServiceEndpoint")
        .payloadModel(new TestRequest("Hello Citrus!"));
}
@CitrusTest
public void messagingTest() {
    send("helloServiceEndpoint")
        .message(new DefaultMessage("<TestRequest><Message>Hello World!</Message></TestRequest>")));
}
Besides defining message payloads as normal Strings and via external file resource (classpath and file system) you can also use model objects as payload data in Java DSL. This model object payload requires a proper message marshaller that should be available as Spring bean inside the application context. By default Citrus is searching for a bean of type org.springframework.oxm.Marshaller.
In case you have multiple message marshallers in the application context you have to tell Citrus which one to use in this particular send message action.
@CitrusTest
public void messagingTest() {
    send("helloServiceEndpoint")
        .payloadModel(new TestRequest("Hello Citrus!"), "myMessageMarshallerBean");
}
Now Citrus will marshal the message payload with the message marshaller bean named myMessageMarshallerBean. This way you can have multiple message marshaller implementations active in your project (XML, JSON, and so on).
Last not least the message can be defined as Citrus message object. Here you can choose one of the different message implementations used in Citrus for SOAP, Http or JMS messages. Or you just use the default message implementation or maybe a custom implementation.
Before sending takes place you can explicitly overwrite some message values in payload. You can think of overwriting specific message elements with variable values. Also you can overwrite values using XPath(Chapter 10, Using XPath) or JSONPath (Chapter 11, Using JSONPath) expressions.
The message header is part of our duty of defining proper messages, too. So Citrus uses name-value pairs like "Operation" and "MessageId" in the next example to set message header entries. Depending on what message endpoint is used and which message transport underneath the header values will be shipped in different ways. In JMS the headers go to the header section of the message, in Http we set mime headers accordingly, in SOAP we can access the SOAP header elements and so on. Citrus aims to do the hard work for you. So Citrus knows how to set headers on different message transports.
XML DSL
<send endpoint="helloServiceEndpoint">
    <message>
        <payload>
            <TestMessage>
                <Text>Hello!</Text>
            </TestMessage>
        </payload>
    </message>
    <header>
        <element name="Operation" value="sayHello"/>
    </header>
</receive>
The message headers to send are defined by a simple name and value pair. Of course you can use test variables in header values as well. Let's see how this looks like in Java DSL:
Java DSL designer
@CitrusTest
public void messagingTest() {
    receive("helloServiceEndpoint")
        .payload("<TestMessage>" +
                "<Text>Hello!</Text>" +
            "</TestMessage>")
        .header("Operation", "sayHello");
}
Java DSL runner
@CitrusTest
public void messagingTest() {
    receive(action -> action.endpoint("helloServiceEndpoint")
        .payload("<TestMessage>" +
                "<Text>Hello!</Text>" +
            "</TestMessage>")
        .header("Operation", "sayHello"));
}
This is basically how to send messages in Citrus. The test case is responsible for constructing the message content while the predefined message endpoint holds transport specific settings. Test cases reference endpoint components to publish messages to the outside world. The variable support in message payload and message header enables you to add dynamic values before sending out the message.
Just like sending messages the receiving part is a very important action in an integration test. Honestly the receive action is even more important in Citrus as we also want to validate the incoming message contents. We are writing a test so we also need assertions and checks that everything works as expected.
As already mentioned before a message consists of a message header (name-value pairs) and a message payload. Later in this document we will see how to validate incoming messages with payload and header values. We start with a very simple example:
XML DSL
<receive endpoint="helloServiceEndpoint">
    <message>
        <payload>
            <TestMessage>
                <Text>${text}</Text>
            </TestMessage>
        </payload>
    </message>
    <header>
        <element name="Operation" value="sayHello"/>
        <element name="MessageId" value="${messageId}"/>
    </header>
</receive>
Overall the receive message action looks quite similar to the send message action. Concepts are identical as we define the message content with payload and header values. We can use test variables in both message payload an headers. Now let us have a look at the Java DSL representation of this simple example:
Java DSL designer
@CitrusTest
public void messagingTest() {
    receive("helloServiceEndpoint")
        .payload("<TestMessage>" +
                    "<Text>${text}</Text>" +
                "</TestMessage>")
        .header("Operation", "sayHello")
        .header("MessageId", "${messageId}");
}
Java DSL runner
@CitrusTest
public void messagingTest() {
    receive(action -> action.endpoint("helloServiceEndpoint")
                .payload("<TestMessage>" +
                      "<Text>${text}</Text>" +
                    "</TestMessage>")
                .header("Operation", "sayHello")
                .header("MessageId", "${messageId}"));
}
The receive action waits for a message to arrive. The whole test execution is stopped while waiting for the message. This is important to ensure the step by step test workflow processing. Of course you can specify message timeouts so the receiver will only wait a given amount of time before raising a timeout error. Following from that timeout exception the test case fails as the message did not arrive in time. Citrus defines default timeout settings for all message receiving tasks.
In a good case scenario the message arrives in time and the content can be validated as a next step. This validation can be done in various ways. On the one hand you can specify a whole XML message that you expect as control template. In this case the received message structure is compared to the expected message content element by element. On the other hand you can use explicit element validation where only a small subset of message elements is included into validation.
Besides the message payload Citrus will also perform validation on the received message header values. Test variable usage is supported as usual during the whole validation process for payload and header checks.
In general the validation component (validator) in Citrus works hand in hand with a message receiving component as the following figure shows:

The message receiving component passes the message to the validator where the individual validation steps are performed. Let us have a closer look at the validation options and features step by step.
The most detailed validation of incoming messages is to define some expected message payload. The Citrus message validator will then perform a detailed message payload comparison. The incoming message has to match exactly to the expected message payload. The different message validator implementations in Citrus provide deep comparison of message structures such as XML, JSON and so on.
So by defining an expected message payload we validate the incoming message in syntax and semantics. In case a difference is identified by the message validator the validation and the test case fails with respective exceptions. This is how you can define message payloads in receive action:
XML DSL
<receive endpoint="helloServiceEndpoint">
<message>
  <payload>
    <!-- message payload as XML -->
  </payload>
</message>
</receive>
<receive endpoint="helloServiceEndpoint">
<message>
  <data>
      <![CDATA[
        <!-- message payload as XML -->
      ]]>
  </data>
</message>
</receive>
<receive endpoint="helloServiceEndpoint">
<message>
  <resource file="classpath:com/consol/citrus/messages/TestRequest.xml" />
</message>
</receive>
The three examples above represent three different ways of defining the message payload in a receive message action. On the one hand we can use inline message payloads as nested XML or CDATA sections in the test. On the other hand we can load the message content from external file resource.
| Note |
|---|---|
Sometimes the nested XML message payload elements may cause XSD schema validation rule violations. This is because of variable values not fitting the XSD schema rules
for example. In this scenario you could also use simple CDATA sections as payload data. In this case you need to use the With this alternative you can skip the XML schema validation from your IDE at design time. Unfortunately you will loose the XSD auto completion features many XML editors offer when constructing your payload. |
In Java DSL we also have multiple options for specifying the message payloads:
Java DSL designer
@CitrusTest
public void messagingTest() {
    receive("helloServiceEndpoint")
        .payload("<TestMessage>" +
                    "<Text>Hello!</Text>" +
                "</TestMessage>");
}
@CitrusTest
public void messagingTest() {
    receive("helloServiceEndpoint")
        .payload(new ClassPathResource("com/consol/citrus/messages/TestRequest.xml"));
}
@CitrusTest
public void messagingTest() {
    receive("helloServiceEndpoint")
        .payloadModel(new TestRequest("Hello Citrus!"));
}
@CitrusTest
public void messagingTest() {
    receive("helloServiceEndpoint")
        .message(new DefaultMessage("<TestRequest><Message>Hello World!</Message></TestRequest>")));
}
The examples above represent the basic variations of how to define message payloads in Citrus Java DSL. The payload can be a simple String or a Spring file resource (classpath or file system). In addition to that we can use a model object. When using model objects as payloads we need a proper message marshaller implementation in the Spring application context. By default this is a marshaller bean of type org.springframework.oxm.Marshaller that has to be present in the Spring application context. You can add such a bean for XML and JSON message marshalling for instance.
In case you have multiple message marshallers in the application context you have to tell Citrus which one to use in this particular send message action.
@CitrusTest
public void messagingTest() {
    receive("helloServiceEndpoint")
        .payloadModel(new TestRequest("Hello Citrus!"), "myMessageMarshallerBean");
}
Now Citrus will marshal the message payload with the message marshaller bean named myMessageMarshallerBean. This way you can have multiple message marshaller implementations active in your project (XML, JSON, and so on).
Last not least the message can be defined as Citrus message object. Here you can choose one of the different message implementations used in Citrus for SOAP, Http or JMS messages. Or you just use the default message implementation or maybe a custom implementation.
In general the expected message content can be manipulated using XPath (Chapter 10, Using XPath) or JSONPath (Chapter 11, Using JSONPath). In addition to that you can ignore some elements that are skipped in comparison. We will describe this later on in this section. Now lets continue with message header validation.
Message headers are used widely in enterprise messaging solution: The message headers are part of the message semantics and need to be validated, too. Citrus can validate message header by name and value.
XML DSL
<receive endpoint="helloServiceEndpoint">
    <message>
        <payload>
        <TestMessage>
            <Text>Hello!</Text>
        </TestMessage>
        </payload>
    </message>
    <header>
        <element name="Operation" value="sayHello"/>
    </header>
</receive>
The expected message headers are defined by a name and value pair. Citrus will check that the expected message header is present and will check the value. In case the message header is not found or the value does not match Citrus will raise an exception and the test fails. You can use validation matchers (Chapter 34, Validation matcher) for a more powerful validation of header values, too.
Let's see how this looks like in Java DSL:
Java DSL designer
@CitrusTest
public void messagingTest() {
    receive("helloServiceEndpoint")
        .payload("<TestMessage>" +
                "<Text>Hello!</Text>" +
            "</TestMessage>")
        .header("Operation", "sayHello");
}
Java DSL runner
@CitrusTest
public void messagingTest() {
    receive(action -> action.endpoint("helloServiceEndpoint")
                .payload("<TestMessage>" +
                      "<Text>Hello!</Text>" +
                    "</TestMessage>")
                .header("Operation", "sayHello"));
}
Header definition in Java DSL is straight forward as we just define name and value as usual. This completes the message validation when receiving a message in Citrus. The message validator implementations may add additional validation capabilities such as XML schema validation or XPath and JSONPath validation. Please refer to the respective chapters in this guide to learn more about that.
The <selector> element inside the receiving action defines key-value pairs in order to filter the messages being received. The filter applies to the message headers. This means that a receiver will only accept messages matching a header element value. In messaging applications the header information often holds message ids, correlation ids, operation names and so on. With this information given you can explicitly listen for messages that belong to your test case. This is very helpful to avoid receiving messages that are still available on the message destination.
Lets say the tested software application keeps sending messages that belong to previous test cases. This could happen in retry situations where the application error handling automatically tries to solve a communication problem that occurred during previous test cases. As a result a message destination (e.g. a JMS message queue) contains messages that are not valid any more for the currently running test case. The test case might fail because the received message does not apply to the actual use case. So we will definitely run into validation errors as the expected message control values do not match.
Now we have to find a way to avoid these problems. The test could filter the messages on a destination to only receive messages that apply for the use case that is being tested. The Java Messaging System (JMS) came up with a message header selector that will only accept messages that fit the expected header values.
Let us have a closer look at a message selector inside a receiving action:
XML DSL
<selector>
    <element> name="correlationId" value="Cx1x123456789"</element>
    <element> name="operation" value="getOrders"</element>
</selector>
Java DSL designer
@CitrusTest
public void receiveMessageTest() {
    receive("testServiceEndpoint")
        .selector("correlationId='Cx1x123456789' AND operation='getOrders'");
}
Java DSL runner
@CitrusTest
public void receiveMessageTest() {
    receive(action -> action.endpoint("testServiceEndpoint")
                .selector("correlationId='Cx1x123456789' AND operation='getOrders'"));
}
This example shows how message selectors work. The selector will only accept messages that meet the correlation id and the operation in the header values. All other messages on the message destination are ignored. The selector elements are automatically associated to each other using the logical AND operator. This means that the message selector string would look like this: correlationId = 'Cx1x123456789' AND operation = 'getOrders'.
Instead of using several elements in the selector you can also define a selector string directly which gives you more power in constructing the selection logic yourself. This way you can use AND logical operators yourself.
<selector>
    <value>
        correlationId = 'Cx1x123456789' AND operation = 'getOrders'
    </value>
</selector>
| Important |
|---|---|
In case you want to run tests in parallel message selectors become essential in your test cases. The different tests running at the same time will steal messages from each other when you lack of message selection mechanisms. |
| Important |
|---|---|
Previously only JMS message destinations offered support for message selectors! With Citrus version 1.2 we introduced message selector support for Spring Integration message channels, too (see Section 21.3, “Message selectors on channels”). |
With the Groovy MarkupBuilder you can build XML message payloads in a simple way, without having to write the typical XML overhead. For example we use a Groovy script to construct the XML message to be sent out. Instead of a plain CDATA XML section or the nested payload XML data we write a Groovy script snippet. The Groovy MarkupBuilder generates the XML message payload with exactly the same result:
XML DSL
<send endpoint="helloServiceEndpoint">
<message>
    <builder type="groovy">
        markupBuilder.TestMessage {
                MessageId('${messageId}')
                Timestamp('?')
                VersionId('2')
                Text('Hello Citrus!')
            }
        }
    </builder>
    <element path="/TestMessage/Timestamp"
                value="${createDate}"/>
    </message>
    <header>
        <element name="Operation" value="sayHello"/>
        <element name="MessageId" value="${messageId}"/>
    </header>
</send>
We use the builder element with type groovy and the MarkupBuilder code is directly written to this element. As you can see from the example above, you can mix XPath and Groovy markup builder code. The MarkupBuilder syntax is very easy and follows the simple rule: markupBuilder.ROOT-ELEMENT{ CHILD-ELEMENTS }. However the tester has to follow some simple rules and naming conventions when using the Citrus MarkupBuilder extension:
- The MarkupBuilder is accessed within the script over an object named
markupBuilder. The name of the custom root element follows with all its child elements. - Child elements may be defined within curly brackets after the root-element (the same applies for further nested child elements)
- Attributes and element values are defined within round brackets, after the element name
- Attribute and element values have to stand within apostrophes (e.g. attribute-name: 'attribute-value')
The Groovy MarkupBuilder script may also be used within receive actions as shown in the following listing:
XML DSL
<send endpoint="helloServiceEndpoint">
    <message>
        <builder type="groovy" file="classpath:com/consol/citrus/groovy/helloRequest.groovy"/>
    </message>
</send>

<receive endpoint="helloServiceEndpoint" timeout="5000">
    <message>
        <builder type="groovy">
            markupBuilder.TestResponse(xmlns: 'http://www.consol.de/schemas/samples/sayHello.xsd'){
                MessageId('${messageId}')
                CorrelationId('${correlationId}')
                User('HelloService')
                Text('Hello ${user}')
            }
        </builder>
    </message>
</receive>
As you can see it is also possible to define the script as external file resource. In addition to that namespace support is given as normal attribute definition within the round brackets after the element name.
The MarkupBuilder implementation in Groovy offers great possibilities in defining message payloads. We do not need to write XML tag overhead and we can construct complex message payloads with Groovy logic like iterations and conditional elements. For detailed MarkupBuilder descriptions please see the official Groovy documentation.
In many cases it is necessary to access the database during a test. This enables a tester to also validate the persistent data in a database. It might also be helpful to prepare the database with some test data before running a test. You can do this using the two database actions that are described in the following sections.
The <sql> action simply executes a group of SQL statements in order to change data in a database. Typically the action is used to prepare the database at the beginning of a test or to clean up the database at the end of a test. You can specify SQL statements like INSERT, UPDATE, DELETE, CREATE TABLE, ALTER TABLE and many more.
On the one hand you can specify the statements as inline SQL or stored in an external SQL resource file as shown in the next two examples.
XML DSL
<actions>
    <sql datasource="someDataSource">
        <statement>DELETE FROM CUSTOMERS</statement>
        <statement>DELETE FROM ORDERS</statement>
    </sql>

    <sql datasource="myDataSource">
        <resource file="file:tests/unit/resources/script.sql"/>
    </sql>
</actions>
Java DSL designer
@Autowired
@Qualifier("myDataSource")
private DataSource dataSource;

@CitrusTest
public void sqlTest() {
    sql(dataSource)
        .statement("DELETE FROM CUSTOMERS")
        .statement("DELETE FROM ORDERS");

    sql(dataSource)
        .sqlResource("file:tests/unit/resources/script.sql");
}
Java DSL runner
@Autowired
@Qualifier("myDataSource")
private DataSource dataSource;

@CitrusTest
public void sqlTest() {
    sql(action -> action.dataSource(dataSource)
        .statement("DELETE FROM CUSTOMERS")
        .statement("DELETE FROM ORDERS"));

    sql(action -> action.dataSource(dataSource)
        .sqlResource("file:tests/unit/resources/script.sql"));
}
The first action uses inline SQL statements defined directly inside the test case. The next action uses an external SQL resource file instead. The file resource can hold several SQL statements separated by new lines. All statements inside the file are executed sequentially by the framework.
| Important |
|---|---|
You have to pay attention to some rules when dealing with external SQL resources.
|
| Note |
|---|---|
The external file is referenced either as file system resource or class path resource, by using the "file:" or "classpath:" prefix. |
Both examples use the "datasource" attribute. This value defines the database data source to be used. The connection to a data source is mandatory, because the test case does not know about user credentials or database names. The 'datasource' attribute references predefined data sources that are located in a separate Spring configuration file.
The <sql> query action is specially designed to execute SQL queries (SELECT * FROM). So the test is able to read data from a database. The query results are validated against expected data as shown in the next example.
XML DSL
<sql datasource="testDataSource">
    <statement>select NAME from CUSTOMERS where ID='${customerId}'</statement>
    <statement>select count(*) from ERRORS</statement>
    <statement>select ID from ORDERS where DESC LIKE 'Def%'</statement>
    <statement>select DESCRIPTION from ORDERS where ID='${id}'</statement>

    <validate column="ID" value="1"/>
    <validate column="NAME" value="Christoph"/>
    <validate column="COUNT(*)" value="${rowsCount}"/>
    <validate column="DESCRIPTION" value="null"/>
</sql>
Java DSL designer
@Autowired
@Qualifier("testDataSource")
private DataSource dataSource;

@CitrusTest
public void databaseQueryTest() {
    query(dataSource)
          .statement("select NAME from CUSTOMERS where CUSTOMER_ID='${customerId}'")
          .statement("select COUNT(1) as overall_cnt from ERRORS")
          .statement("select ORDER_ID from ORDERS where DESCRIPTION LIKE 'Migrate%'")
          .statement("select DESCRIPTION from ORDERS where ORDER_ID = 2")
          .validate("ORDER_ID", "1")
          .validate("NAME", "Christoph")
          .validate("OVERALL_CNT", "${rowsCount}")
          .validate("DESCRIPTION", "NULL");
}
Java DSL runner
@Autowired
@Qualifier("testDataSource")
private DataSource dataSource;

@CitrusTest
public void databaseQueryTest() {
    query(action -> action.dataSource(dataSource)
            .statement("select NAME from CUSTOMERS where CUSTOMER_ID='${customerId}'")
            .statement("select COUNT(1) as overall_cnt from ERRORS")
            .statement("select ORDER_ID from ORDERS where DESCRIPTION LIKE 'Migrate%'")
            .statement("select DESCRIPTION from ORDERS where ORDER_ID = 2")
            .validate("ORDER_ID", "1")
            .validate("NAME", "Christoph")
            .validate("OVERALL_CNT", "${rowsCount}")
            .validate("DESCRIPTION", "NULL"));
}
The action offers a wide range of validating functionality for database result sets. First of all you have to select the data via SQL statements. Here again you have the choice to use inline SQL statements or external file resource pattern.
The result sets are validated through <validate> elements. It is possible to do a detailed check on every selected column of the result set. Simply refer to the selected column name in order to validate its value. The usage of test variables is supported as well as database expressions like count(), avg(), min(), max().
You simply define the <validate> entry with the column name as the "column" attribute and any expected value expression as expected "value". The framework then will check the column to fit the expected value and raise validation errors in case of mismatch.
Looking at the first SELECT statement in the example you will see that test variables are supported in the SQL statements. The framework will replace the variable with its respective value before sending it to the database.
In the validation section variables can be used too. Look at the third validation entry, where the variable
"${rowsCount}" is used. The last validation in this example shows, that NULL values are
also supported as expected values.
If a single validation happens to fail, the whole action will fail with respective validation errors.
| Important |
|---|---|
The validation with <validate column="someColumnName"> <values> <value>Value in 1st row</value> <value>Value in 2nd row</value> <value>Value in 3rd row</value> <value>Value in x row</value> </values> </validate> Within Java you can pass a variable argument list to the validate method like this: query(dataSource)
.statement("select NAME from WEEKDAYS where NAME LIKE 'S%'")
.validate("NAME", "Saturday", "Sunday") |
Next example shows how to work with multiple row result sets and multiple values to expect within one column:
  <sql datasource="testDataSource">
      <statement>select WEEKDAY as DAY, DESCRIPTION from WEEK</statement>
      <validate column="DAY">
          <values>
              <value>Monday</value>
              <value>Tuesday</value>
              <value>Wednesday</value>
              <value>Thursday</value>
              <value>Friday</value>
              <value>@ignore@</value>
              <value>@ignore@</value>
          </values>
      </validate>
      <validate column="DESCRIPTION">
          <values>
              <value>I hate Mondays!</value>
              <value>Tuesday is sports day</value>
              <value>The mid of the week</value>
              <value>Thursday we play chess</value>
              <value>Friday, the weekend is near!</value>
              <value>@ignore@</value>
              <value>@ignore@</value>
          </values>
      </validate>
  </sql>
For the validation of multiple rows the <validate> element is able to host a list of control values for a column.
As you can see from the example above, you have to add a control value for each row in the result set. This also means that we have to take care
of the total number of rows. Fortunately we can use the ignore placeholder, in order to skip the validation of a specific row in the result set.
Functions and variables are supported as usual.
| Important |
|---|---|
It is important, that the control values are defined in the correct order, because they are compared one on one with the actual result set coming from database query. You may need to add "order by" SQL expressions to get the right order of rows returned. If any of the values fails in validation or the total number of rows is not equal, the whole action will fail with respective validation errors. |
Groovy provides great support for accessing Java list objects and maps. As a Java SQL result set is nothing but a list of map representations, where each entry in the list defines a row in the result set and each map entry represents the columns and values. So with Groovy's list and map access we have great possibilities to validate a SQL result set - out of the box.
XML DSL
<sql datasource="testDataSource">
    <statement>select ID from CUSTOMERS where NAME='${customerName}'</statement>
    <statement>select ORDERTYPE, STATUS from ORDERS where ID='${orderId}'</statement>

    <validate-script type="groovy">
        assert rows.size() == 2
        assert rows[0].ID == '1'
        assert rows[1].STATUS == 'in progress'
        assert rows[1] == [ORDERTYPE:'SampleOrder', STATUS:'in progress']
    </validate-script>
</sql>
Java DSL designer
query(dataSource)
    .statement("select ORDERTYPE, STATUS from ORDERS where ID='${orderId}'")
    .validateScript("assert rows.size == 2;" +
            "assert rows[0].ID == '1';" +
            "assert rows[0].STATUS == 'in progress';", "groovy");
Java DSL runner
query(action -> action.dataSource(dataSource)
    .statement("select ORDERTYPE, STATUS from ORDERS where ID='${orderId}'")
    .validateScript("assert rows.size == 2;" +
            "assert rows[0].ID == '1';" +
            "assert rows[0].STATUS == 'in progress';", "groovy"));
As you can see Groovy provides fantastic access methods to the SQL result set. We can browse the result set with named column values and check the size of the result set. We are also able to search for an entry, iterate over the result set and have other helpful operations. For a detailed description of the list and map handling in Groovy my advice for you is to have a look at the official Groovy documentation.
| Note |
|---|---|
In general other script languages do also support this kind of list and map access. For now we just have implemented the Groovy script support, but the framework is ready to work with all other great script languages out there, too (e.g. Scala, Clojure, Fantom, etc.). So if you prefer to work with another language join and help us implement those features. |
Now the validation of database entries is a very powerful feature but sometimes we simply do not know the persisted content values. The test may want to read database entries into test variables without validation. Citrus is able to do that with the following <extract> expressions:
XML DSL
<sql datasource="testDataSource">
    <statement>select ID from CUSTOMERS where NAME='${customerName}'</statement>
    <statement>select STATUS from ORDERS where ID='${orderId}'</statement>

    <extract column="ID" variable="${customerId}"/>
    <extract column="STATUS" variable="${orderStatus}"/>
</sql>
Java DSL designer
query(dataSource)
    .statement("select STATUS from ORDERS where ID='${orderId}'")
    .extract("STATUS", "orderStatus");
Java DSL runner
query(action -> action.dataSource(dataSource)
    .statement("select STATUS from ORDERS where ID='${orderId}'")
    .extract("STATUS", "orderStatus"));
We can save the database column values directly to test variables. Of course you can combine the value extraction with the normal column validation described earlier in this chapter. Please keep in mind that we can not use these operations on result sets with multiple rows. Citrus will always use the first row in a result set.
This action shows how to make the test framework sleep for a given amount of time. The attribute 'time' defines the amount of time to wait in seconds. As shown in the next example decimal values are supported too. When no waiting time is specified the default time of 50000 milliseconds applies.
XML DSL
<testcase name="sleepTest">
    <actions>
        <sleep seconds="3.5"/>

        <sleep milliseconds="500"/>

        <sleep/>
    </actions>
</testcase>
Java DSL designer and runner
@CitrusTest
public void sleepTest() {
    sleep(500); // sleep 500 milliseconds

    sleep(); // sleep default time
}
When should somebody use this action? To us this action was always very useful in case the test needed to wait until an application had done some work. For example in some cases the application took some time to write some data into the database. We waited then a small amount of time in order to avoid unnecessary test failures, because the test framework simply validated the database too early. Or as another example the test may wait a given time until retry mechanisms are triggered in the tested application and then proceed with the test actions.
The test framework is written in Java and runs inside a Java virtual machine. The functionality of calling other Java objects and methods in this same Java VM through Java Reflection is self-evident. With this action you can call any Java API available at runtime through the specified Java classpath.
The action syntax looks like follows:
<java class="com.consol.citrus.test.util.InvocationDummy">
    <constructor>
        <argument type="">Test Invocation</argument>
    </constructor>
    <method name="invoke">
        <argument type="String[]">1,2</argument>
    </method>
</java>

<java class="com.consol.citrus.test.util.InvocationDummy">
    <constructor>
        <argument type="">Test Invocation</argument>
    </constructor>
    <method name="invoke">
        <argument type="int">4</argument>
        <argument type="String">Test Invocation</argument>
        <argument type="boolean">true</argument>
    </method>
</java>

<java class="com.consol.citrus.test.util.InvocationDummy">
    <method name="main">
        <argument type="String[]">4,Test,true </argument>
    </method>
</java>
The Java class is specified by fully qualified class name. Constructor arguments are added using the <constructor> element with a list of <argument> child elements. The type of the argument is defined within the respective attribute "type". By default the type would be String.
The invoked method on the Java object is simply referenced by its name. Method arguments do not bring anything new after knowing the constructor argument definition, do they?.
Method arguments support data type conversion too, even string arrays (useful when calling CLIs). In the third action in the example code you can see that colon separated strings are automatically converted to string arrays.
Simple data types are defined by their name (int, boolean, float etc.). Be sure that the invoked method and class constructor fit your arguments and vice versa, otherwise you will cause errors at runtime.
Besides instantiating a fully new object instance for a class how about reusing a bean instance available in Spring bean container. Simply use the ref attribute and refer to an existing bean in Spring application context.
<java ref="invocationDummy">
    <method name="invoke">
        <argument type="int">4</argument>
        <argument type="String">Test Invocation</argument>
        <argument type="boolean">true</argument>
    </method>
</java>

<bean id="invocationDummy" class="com.consol.citrus.test.util.InvocationDummy"/>
The method is invoked on the Spring bean instance. This is very useful as you can inject other objects (e.g. via Autowiring) to the Spring bean instance before method invocation in test takes place. This enables you to execute any Java logic inside a test case.
In some cases it might be necessary to validate that a message is not present on a destination. This means that this action expects a timeout when receiving a message from an endpoint destination. For instance the tester intends to ensure that no message is sent to a certain destination in a time period. In that case the timeout would not be a test aborting error but the expected behavior. And in contrast to the normal behavior when a message is received in the time period the test will fail with error.
In order to validate such a timeout situation the action <expectTimout> shall help. The usage is very simple as the following example shows:
XML DSL
<testcase name="receiveJMSTimeoutTest">
    <actions>
        <expect-timeout endpoint="myEndpoint" wait="500"/>
    </actions>
</testcase>
Java DSL designer
@Autowired
@Qualifier("myEndpoint")
private Endpoint myEndpoint;

@CitrusTest
public void receiveTimeoutTest() {
    receiveTimeout(myEndpoint)
        .timeout(500);
}
Java DSL runner
@Autowired
@Qualifier("myEndpoint")
private Endpoint myEndpoint;

@CitrusTest
public void receiveTimeoutTest() {
    receiveTimeout(action -> action.endpoint(myEndpoint)
                    .timeout(500));
}
The action offers two attributes:
endpoint: Reference to a message endpoint that will try to receive messages.
wait/timeout: Time period to wait for messages to arrive
Sometimes you may want to add some selector on the timeout receiving action. This way you can very selective check on a message to not be present on a message destination. This is possible with defining a message selector on the test action as follows.
XML DSL
<expect-timeout endpoint="myEndpoint" wait="500">
  <select>MessageId='123456789'<select/>
<expect-timeout/>
Java DSL designer
@CitrusTest
public void receiveTimeoutTest() {
    receiveTimeout(myEndpoint)
        .selector("MessageId = '123456789'")
        .timeout(500);
}
Java DSL runner
@CitrusTest
public void receiveTimeoutTest() {
    receiveTimeout(action -> action.endpoint(myEndpoint)
                    .selector("MessageId = '123456789'")
                    .timeout(500));
}
The <echo> action prints messages to the console/logger. This functionality is useful when debugging test runs. The property "message" defines the text that is printed. Tester might use it to print out debug messages and variables as shown the next code example:
XML DSL
<testcase name="echoTest">
    <variables>
        <variable name="date" value="citrus:currentDate()"/>
    </variables>
    <actions>
        <echo>
            <message>Hello Test Framework</message>
        </echo>

        <echo>
            <message>Current date is: ${date}</message>
        </echo>
    </actions>
</testcase>
Java DSL designer and runner
@CitrusTest
public void echoTest() {
    variable("date", "citrus:currentDate()");

    echo("Hello Test Framework");
    echo("Current date is: ${date}");
}
Result on the console:
Hello Test Framework
Current time is: 05.08.2008
Time measurement during a test can be very helpful. The <trace-time> action creates and monitors multiple timelines. The action offers the attribute "id" to identify a time line. The tester can of course use more than one time line with different ids simultaneously.
Read the next example and you will understand the mix of different time lines:
XML DSL
<testcase name="StopTimeTest">
    <actions>
        <trace-time/>

        <trace-time id="time_line_id"/>

        <sleep seconds="3.5"/>

        <trace-time id=" time_line_id "/>

        <sleep milliseconds="5000"/>

        <trace-time/>

        <trace-time id=" time_line_id "/>
    </actions>
</testcase>
Java DSL designer and runner
@CitrusTest
public void stopTimeTest() {
    stopTime();
    stopTime("time_line_id");
    sleep(3.5); // do something
    stopTime("time_line_id");
    sleep(5000); // do something
    stopTime();
    stopTime("time_line_id");
}
The test output looks like follows:
Starting TimeWatcher:
Starting TimeWatcher: time_line_id
TimeWatcher time_line_id after 3500 milliseconds
TimeWatcher after 8500 seconds
TimeWatcher time_line_id after 8500 milliseconds
| Note |
|---|---|
| In case no time line id is specified the framework will measure the time for a default time line. |
To print out the current elapsed time for a time line you simply have to place the <trace-time> action into the action chain again and again, using the respective time line identifier. The elapsed time will be printed out to the console every time.
As you know variables usually are defined at the beginning of the test case (Chapter 5, Test variables). It might also be helpful to reset existing variables as well as to define new variables during the test. The action <create-variables> is able to declare new variables or overwrite existing ones.
XML DSL
<testcase name="createVariablesTest">
    <variables>
        <variable name="myVariable" value="12345"/>
        <variable name="id" value="54321"/>
    </variables>
    <actions>
        <echo>
            <message>Current variable value: ${myVariable}</message>
        </echo>

        <create-variables>
            <variable name="myVariable" value="${id}"/>
            <variable name="newVariable" value="'this is a test'"/>
        </create-variables>

        <echo>
            <message>Current variable value: ${myVariable} </message>
        </echo>

        <echo>
            <message>
              New variable 'newVariable' has the value: ${newVariable}
            </message>
        </echo>
    </actions>
</testcase>
Java DSL designer and runner
@CitrusTest
public void createVariableTest() {
    variable("myVariable", "12345");
    variable("id", "54321");

    echo("Current variable value: ${myVariable}");

    createVariable("myVariable", "${id}");
    createVariable("newVariable", "this is a test");

    echo("Current variable value: ${myVariable}");

    echo("New variable 'newVariable' has the value: ${newVariable}");
}
| Note |
|---|---|
Please note the difference between the variable() method and the createVariable() method. The first initializes the test case with the test variables. So all variables defined with this method are valid from the very beginning of the test. In contrary to that the createVariable() is executed within the test action chain. The newly created variables are then valid for the rest of the test. Trailing actions can reference the variables as usual with the variable expression. |
You already know the <echo> action that prints messages to the console or logger. The <trace-variables> action is specially designed to trace all currently valid test variables to the console. This was mainly used by us for debug reasons. The usage is quite simple:
XML DSL
<testcase name="traceVariablesTest">
    <variables>
        <variable name="myVariable" value="12345"/>
        <variable name="nextVariable" value="54321"/>
    </variables>
    <actions>
        <trace-variables>
            <variable name="myVariable"/>
            <variable name="nextVariable"/>
        </trace-variables>

        <trace-variables/>
    </actions>
</testcase>
Java DSL designer and runner
@CitrusTest
public void traceTest() {
    variable("myVariable", "12345");
    variable("nextVariable", "54321");

    traceVariables("myVariable", "nextVariable");
    traceVariables();
}
Simply add the <trace-variables> action to your action chain and all variables will be printed out to the console. You are able to define a special set of variables by using the <variable> child elements. See the output that was generated by the test example above:
Current value of variable myVariable = 12345
Current value of variable nextVariable = 54321
The <transform> action transforms XML fragments with XSLT in order to construct various XML representations.
The transformation result is stored into a test variable for further usage. The property xml-data defines the XML source,
that is going to be transformed, while xslt-data defines the XSLT transformation rules. The attribute
variable specifies the target test variable which receives the transformation result. The tester might use the action to
transform XML messages as shown in the next code example:
XML DSL
  <testcase name="transformTest">
      <actions>
          <transform variable="result">
              <xml-data>
                  <![CDATA[
                      <TestRequest>
                          <Message>Hello World!</Message>
                      </TestRequest>
                  ]]>
              </xml-data>
              <xslt-data>
                  <![CDATA[
                      <xsl:stylesheet version="1.0" xmlns:xsl="http://www.w3.org/1999/XSL/Transform">
                      <xsl:template match="/">
                          <html>
                              <body>
                                  <h2>Test Request</h2>
                                  <p>Message: <xsl:value-of select="TestRequest/Message"/></p>
                              </body>
                          </html>
                      </xsl:template>
                      </xsl:stylesheet>
                  ]]>
              </xslt-data>
          </transform>
          <echo>
              <message>${result}</message>
          </echo>
      </actions>
  </testcase>
The transformation above results to:
  <html>
      <body>
          <h2>Test Request</h2>
          <p>Message: Hello World!</p>
      </body>
  </html>
In the example we used CDATA sections to define the transformation source as well as the XSL transformation rules. As usual you can also use external file resources here. The transform action with external file resources looks like follows:
  <transform variable="result">
      <xml-resource file="classpath:transform-source.xml"/>
      <xslt-resource file="classpath:transform.xslt"/>
  </transform>
The Java DSL alternative for transforming data via XSTL in Citrus looks like follows:
Java DSL designer
@CitrusTest
public void transformTest() {
    transform()
        .source("<TestRequest>" +
                    "<Message>Hello World!</Message>" +
                "</TestRequest>")
        .xslt("<xsl:stylesheet version=\"1.0\" xmlns:xsl=\"http://www.w3.org/1999/XSL/Transform\">\n" +
                    "<xsl:template match=\"/\">\n" +
                    "<html>\n" +
                        "<body>\n" +
                            "<h2>Test Request</h2>\n" +
                            "<p>Message: <xsl:value-of select=\"TestRequest/Message\"/></p>\n" +
                        "</body>\n" +
                    "</html>\n" +
                    "</xsl:template>\n" +
                "</xsl:stylesheet>")
        .result("result");

    echo("${result}");

    transform()
        .source(new ClassPathResource("com/consol/citrus/actions/transform-source.xml"))
        .xslt(new ClassPathResource("com/consol/citrus/actions/transform.xslt"))
        .result("result");

    echo("${result}");
}
Java DSL runner
@CitrusTest
public void transformTest() {
    transform(action ->
        action.source("<TestRequest>" +
                        "<Message>Hello World!</Message>" +
                    "</TestRequest>")
        .xslt("<xsl:stylesheet version=\"1.0\" xmlns:xsl=\"http://www.w3.org/1999/XSL/Transform\">\n" +
                "<xsl:template match=\"/\">\n" +
                "<html>\n" +
                    "<body>\n" +
                        "<h2>Test Request</h2>\n" +
                        "<p>Message: <xsl:value-of select=\"TestRequest/Message\"/></p>\n" +
                    "</body>\n" +
                "</html>\n" +
                "</xsl:template>\n" +
            "</xsl:stylesheet>")
        .result("result"));

    echo("${result}");

    transform(action ->
        action.source(new ClassPathResource("com/consol/citrus/actions/transform-source.xml"))
              .xslt(new ClassPathResource("com/consol/citrus/actions/transform.xslt"))
              .result("result"));

    echo("${result}");
}
Defining multi-line Strings with nested quotes is no fun in Java. So you may want to use external file resources for your scripts as shown in the second part of the example. In fact you could also use script languages like Groovy or Scala that have much better support for multi-line Strings.
Groovy is an agile dynamic language for the Java Platform. Groovy ships with a lot of very powerful features and fits perfectly with Java as it is based on Java and runs inside the JVM.
The Citrus Groovy support might be the entrance for you to write customized test actions. You can easily execute Groovy code inside a test case, just like a normal test action. The whole test context with all variables is available to the Groovy action. This means someone can change variable values or create new variables very easily.
Let's have a look at some examples in order to understand the possible Groovy code interactions in Citrus:
XML DSL
<testcase name="groovyTest">
  <variables>
    <variable name="time" value="citrus:currentDate()"/>
  </variables>
  <actions>
    <groovy>
        println 'Hello Citrus'
    </groovy>
    <groovy>
        println 'The variable is: ${time}'
    </groovy>
    <groovy resource="classpath:com/consol/citrus/script/example.groovy"/>
  </actions>
</testcase>
Java DSL designer
@CitrusTest
public void groovyTest() {
    groovy("println 'Hello Citrus'");
    groovy("println 'The variable is: ${time}'");

    groovy(new ClassPathResource("com/consol/citrus/script/example.groovy"));
}
Java DSL runner
@CitrusTest
public void groovyTest() {
    groovy(action -> action.script("println 'Hello Citrus'"));
    groovy(action -> action.script("println 'The variable is: ${time}'"));

    groovy(action -> action.script(new ClassPathResource("com/consol/citrus/script/example.groovy")));
}
As you can see it is possible to write Groovy code directly into the test case. Citrus will interpret and execute the Groovy code at runtime. As usual nested variable expressions are replaced with respective values. In general this is done in advance before the Groovy code is interpreted. For more complex Groovy code sections which grow in lines of code you can also reference external file resources.
After this basic Groovy code usage inside a test case we might be interested accessing the whole TestContext. The TestContext Java object holds all test variables and function definitions for the test case and can be referenced in Groovy code via simple naming convention. Just access the object reference 'context' and you are able to manipulate the TestContext (e.g. setting a new variable which is directly ready for use in following test actions).
XML DSL
<testcase name="groovyTest">
  <actions>
    <groovy>
      context.setVariable("greetingText","Hello Citrus")
      println context.getVariable("greetingText")
    </groovy>
    <echo>
      <message>New variable: ${greetingText}</message>
    </echo>
  </actions>
</testcase>
| Note |
|---|---|
The implicit TestContext access that was shown in the previous sample works with a default Groovy script template provided by Citrus. The Groovy code you write in the test case is automatically surrounded with a Groovy script which takes care of handling the TestContext. The default template looks like follows: import com.consol.citrus.* import com.consol.citrus.variable.* import com.consol.citrus.context.TestContext import com.consol.citrus.script.GroovyAction.ScriptExecutor public class GScript implements ScriptExecutor { public void execute(TestContext context) { @SCRIPTBODY@ } } Your code is placed in substitution to the <groovy script-template="classpath:my-custom-template.groovy"> [...] </groovy> On the other hand you can disable the automatic script template wrapping in your action at all: <groovy use-script-template="false"> println 'Just use some Groovy code' </groovy> |
The next example deals with advanced Groovy code and writing whole classes. We write a new Groovy class which implements the ScriptExecutor interface offered by Citrus. This interface defines a special execute method and provides access to the whole TestContext for advanced test variables access.
<testcase name="groovyTest">
  <variables>
    <variable name="time" value="citrus:currentDate()"/>
  </variables>
  <actions>
    <groovy>
      <![CDATA[
        import com.consol.citrus.*
        import com.consol.citrus.variable.*
        import com.consol.citrus.context.TestContext
        import com.consol.citrus.script.GroovyAction.ScriptExecutor

        public class GScript implements ScriptExecutor {
            public void execute(TestContext context) {
                println context.getVariable("time")
            }
        }
      ]]>
    </groovy>
  </actions>
</testcase>
Implementing the ScriptExecutor interface in a custom Groovy class is applicable for very special test context manipulations as you are able to import and use other Java API classes in this code.
The fail action will generate an exception in order to terminate the test case with error. The test case will therefore not be successful in the reports.
The user can specify a custom error message for the exception in order to describe the error cause. Here is a very simple example to clarify the syntax:
XML DSL
<testcase name="failTest">
    <actions>
        <fail message="Test will fail with custom message"/>
    </actions>
</testcase>
Test results:
Execution of test: failTest failed! Nested exception is: com.consol.citrus.exceptions.CitrusRuntimeException: Test will fail with custom message [...] CITRUS TEST RESULTS failTest : failed - Exception is: Test will fail with custom message Found 1 test cases to execute Skipped 0 test cases (0.0%) Executed 1 test cases, containing 3 actions Tests failed: 1 (100.0%) Tests successfully: 0 (0.0%)
While using the Java DSL tester might want to raise some Java exceptions in the middle of configuring the test case. But this is not possible as we have to separate the design time and the execution time of the test case. The @CitrusTest annotated configuration method is called for building up the whole test case. After this method was processed the test gets executed in runtime oth the test. If you specify a throws exception statement in the configuration method this will not be done at runtime but at design time. This is why you have to use the special fail test action which raises a Java exception during the runtime of the test. The next example will not work as expected:
Java DSL designer and runner
@CitrusTest public void wrongUsageSample() { // some test actions throw new ValidationException("This test should fail now"); // does not work as expected }
The validation exception above is directly raised before the test is able to start as the @CitrusTest annotated method does not represent the test runtime. Instead of this we have to use the fail action as follows:
Java DSL designer and runner
@CitrusTest public void failTest() { // some test actions fail("This test should fail now"); // fails at test runtime as expected }
Now the test fails at runtime as the fail action is raised during the test execution as expected.
During the test case execution it is possible to read some user input from the command line. The test execution will stop and wait for keyboard inputs over the standard input stream. The user has to type the input and end it with the return key.
The user input is stored to the respective variable value.
XML DSL
<testcase name="inputTest"> <variables> <variable name="userinput" value=""></variable> <variable name="userinput1" value=""></variable> <variable name="userinput2" value="y"></variable> <variable name="userinput3" value="yes"></variable> <variable name="userinput4" value=""></variable> </variables> <actions> <input/> <echo><message>user input was: ${userinput}</message></echo> <input message="Now press enter:" variable="userinput1"/> <echo><message>user input was: ${userinput1}</message></echo> <input message="Do you want to continue?" valid-answers="y/n" variable="userinput2"/> <echo><message>user input was: ${userinput2}</message></echo> <input message="Do you want to continue?" valid-answers="yes/no" variable="userinput3"/> <echo><message>user input was: ${userinput3}</message></echo> <input variable="userinput4"/> <echo><message>user input was: ${userinput4}</message></echo> </actions> </testcase>
As you can see the input action is customizable with a prompt message that is displayed to the user and some valid answer possibilities. The user input is stored to a test variable for further use in the test case. In detail the input action offers following attributes:
message -> message displayed to the user
valid-answers -> optional slash separated string containing the possible valid answers
variable -> result variable name holding the user input (default = ${userinput})
The same action in Java DSL now looks quite familiar to us although attribute naming is slightly different:
Java DSL designer
@CitrusTest public void inputActionTest() { variable("userinput", ""); variable("userinput1", ""); variable("userinput2", "y"); variable("userinput3", "yes"); variable("userinput4", ""); input(); echo("user input was: ${userinput}"); input().message("Now press enter:").result("userinput1"); echo("user input was: ${userinput1}"); input().message("Do you want to continue?").answers("y", "n").result("userinput2"); echo("user input was: ${userinput2}"); input().message("Do you want to continue?").answers("yes", "no").result("userinput3"); echo("user input was: ${userinput3}"); input().result("userinput4"); echo("user input was: ${userinput4}"); }
Java DSL runner
@CitrusTest public void inputActionTest() { variable("userinput", ""); variable("userinput1", ""); variable("userinput2", "y"); variable("userinput3", "yes"); variable("userinput4", ""); input(action -> {}); echo("user input was: ${userinput}"); input(action -> action.message("Now press enter:").result("userinput1")); echo("user input was: ${userinput1}"); input(action -> action.message("Do you want to continue?").answers("y", "n").result("userinput2")); echo("user input was: ${userinput2}"); input(action -> action.message("Do you want to continue?").answers("yes", "no").result("userinput3")); echo("user input was: ${userinput3}"); input(action -> action.result("userinput4")); echo("user input was: ${userinput4}"); }
When the user input is restricted to a set of valid answers the input validation of course can fail due to mismatch. This is the case when the user provides some input not matching the valid answers given. In this case the user is again asked to provide valid input. The test action will continue to ask for valid input until a valid answer is given.
| Note |
|---|---|
User inputs may not fit to automatic testing in terms of continuous integration testing where no user is present to type in the correct answer over the keyboard. In this case you can always skip the user input in advance by specifying a variable that matches the user input variable name. As the user input variable is then already present the user input is missed out and the test proceeds automatically. |
You are able to load properties from external property files and store them as test variables. The action will require a file resource either from class path or file system in order to read the property values.
Let us look at an example to get an idea about this action:
Content of load.properties:
username=Mickey Mouse greeting.text=Hello Test Framework
XML DSL
<testcase name="loadPropertiesTest"> <actions> <load> <properties file="file:tests/resources/load.properties"/> </load> <trace-variables/> </actions> </testcase>
Java DSL designer and runner
@CitrusTest public void loadPropertiesTest() { load("file:tests/resources/load.properties"); traceVariables(); }
Output:
Current value of variable username = Mickey Mouse Current value of variable greeting.text = Hello Test Framework
The action will load all available properties in the file load.properties and store them to the test case as local variables.
| Important |
|---|---|
Please be aware of the fact that existing variables are overwritten! |
With this action you can make your test wait until a certain condition is satisfied. The attribute seconds defines the amount of time to wait in seconds. You can also use the milliseconds attribute for a more fine grained time value. The attribute interval defines the amount of time to wait between each check. The interval is always specified as millisecond time interval.
If the check does not exceed within the defined overall waiting time then the test execution fails with an appropriate error message. There are different types of conditions to check.
http: This condition is based on a Http request call on a server endpoint. Citrus will wait until the Http response is as defined (e.g. Http 200 OK). This is useful when you want to wait for a server to start.
file: This condition checks for the existence of a file on the local file system. Citrus will wait until the file is present.
Next let us have a look at a simple example:
XML DSL
<testcase name="waitTest"> <actions> <wait seconds="10" interval="2000" > <http url="http://sample.org/resource" statusCode="200" timeout="2000" /> <wait/> </actions> </testcase>
Java DSL designer and runner
@CitrusTest public void waitTest() { waitFor().http("http://sample.org/resource").seconds(10L).interval(2000L); }
The example waits for some Http server resource to be available with Http 200 OK response. Citrus will use HEAD request method by default. You can set the request method with the method attribute on the Http condition.
Next let us have a look at the file condition usage:
XML DSL
<testcase name="waitTest"> <actions> <wait seconds="10" interval="2000" > <file path="path/to/resource/file.txt" /> <wait/> </actions> </testcase>
Java DSL designer and runner
@CitrusTest public void waitTest() { waitFor().file("path/to/resource/file.txt"); }
Citrus checks for the file to exist under the given path. Only if the file exists the test will continue with further test actions.
When should somebody use this action? This action is very useful when you want your test to wait for a certain event to occur before continuing with the test execution. For example if you wish that your test waits until a Docker container is started or for an application to create a log file before continuing, then use this action. You can also create your own condition statements and bind it to the test action.
Purging JMS destinations during the test run is quite essential. Different test cases can influence each other when sending messages to the same JMS destinations. A test case should only receive those messages that actually belong to it. Therefore it is a good idea to purge all JMS queue destinations between the test cases. Obsolete messages that are stuck in a JMS queue for some reason are then removed so that the following test case is not offended.
| Note |
|---|---|
Citrus provides special support for JMS related features. We have to activate those JMS features in our test case by adding a special "jms" namespace and schema definition location to the test case XML. <spring:beans xmlns="http://www.citrusframework.org/schema/testcase" xmlns:spring="http://www.springframework.org/schema/beans" xmlns:xsi="http://www.w3.org/2001/XMLSchema-instance" xmlns:jms="http://www.citrusframework.org/schema/jms/testcase" xsi:schemaLocation=" http://www.springframework.org/schema/beans http://www.springframework.org/schema/beans/spring-beans.xsd http://www.citrusframework.org/schema/testcase http://www.citrusframework.org/schema/testcase/citrus-testcase.xsd http://www.citrusframework.org/schema/jms/testcase http://www.citrusframework.org/schema/jms/testcase/citrus-jms-testcase.xsd"> [...] </beans> |
Now we are ready to use the JMS features in our test case in order to purge some JMS queues. This can be done with following action definition:
XML DSL
<testcase name="purgeTest"> <actions> <jms:purge-jms-queues> <jms:queue name="Some.JMS.QUEUE.Name"/> <jms:queue name="Another.JMS.QUEUE.Name"/> <jms:queue name="My.JMS.QUEUE.Name"/> </jms:purge-jms-queues> <jms:purge-jms-queues connection-factory="connectionFactory"> <jms:queue name="Some.JMS.QUEUE.Name"/> <jms:queue name="Another.JMS.QUEUE.Name"/> <jms:queue name="My.JMS.QUEUE.Name"/> </jms:purge-jms-queues> </actions> </testcase>
Notice that we have referenced the jms namespace when using the purge-jms-queues test action.
Java DSL designer
@Autowired @Qualifier("connectionFactory") private ConnectionFactory connectionFactory; @CitrusTest public void purgeTest() { purgeQueues() .queue("Some.JMS.QUEUE.Name") .queue("Another.JMS.QUEUE.Name"); purgeQueues(connectionFactory) .timeout(150L) // custom timeout in ms .queue("Some.JMS.QUEUE.Name") .queue("Another.JMS.QUEUE.Name"); }
Java DSL runner
@Autowired @Qualifier("connectionFactory") private ConnectionFactory connectionFactory; @CitrusTest public void purgeTest() { purgeQueues(action -> action.queue("Some.JMS.QUEUE.Name") .queue("Another.JMS.QUEUE.Name")); purgeQueues(action -> action.connectionFactory(connectionFactory) .timeout(150L) // custom timeout in ms .queue("Some.JMS.QUEUE.Name") .queue("Another.JMS.QUEUE.Name")); }
Purging the JMS queues in every test case is quite exhausting because every test case needs to define a purging action at the very beginning of the test. Fortunately the test suite definition offers tasks to run before, between and after the test cases which should ease up this tasks a lot. The test suite offers a very simple way to purge the destinations between the tests. See Section 37.3, “Before test” for more information about this.
As you can see in the next example it is quite easy to specify a group of destinations in the Spring configuration that get purged before a test is executed.
<citrus:before-test id="purgeBeforeTest"> <citrus:actions> <jms:purge-jms-queues> <jms:queue name="Some.JMS.QUEUE.Name"/> <jms:queue name="Another.JMS.QUEUE.Name"/> </jms:purge-jms-queues> </citrus:actions> </citrus:before-test>
| Note |
|---|---|
Please keep in mind that the JMS related configuration components in Citrus belong to a separate XML namespace jms:. We have to add this namespace declaration to each test case XML and Spring bean XML configuration file as described at the very beginning of this section. |
The syntax for purging the destinations is the same as we used it inside the test case. So now we are able to purge JMS destinations with given destination names. But sometimes we do not want to rely on queue or topic names as we retrieve destinations over JNDI for instance. We can deal with destinations coming from JNDI lookup like follows:
<jee:jndi-lookup id="jmsQueueHelloRequestIn" jndi-name="jms/jmsQueueHelloRequestIn"/> <jee:jndi-lookup id="jmsQueueHelloResponseOut" jndi-name="jms/jmsQueueHelloResponseOut"/> <citrus:before-test id="purgeBeforeTest"> <citrus:actions> <jms:purge-jms-queues> <jms:queue ref="jmsQueueHelloRequestIn"/> <jms:queue ref="jmsQueueHelloResponseOut"/> </jms:purge-jms-queues> </citrus:actions> </citrus:before-test>
We just use the attribute 'ref' instead of 'name' and Citrus is looking for a bean reference for that identifier that resolves to a JMS destination. You can use the JNDI bean references inside a test case, too.
XML DSL
<testcase name="purgeTest"> <actions> <jms:purge-jms-queues> <jms:queue ref="jmsQueueHelloRequestIn"/> <jms:queue ref="jmsQueueHelloResponseOut"/> </jms:purge-jms-queues> </actions> </testcase>
Of course you can use queue object references also in Java DSL test cases. Here we easily can use Spring's dependency injection with autowiring to get the object references from the IoC container.
Java DSL designer
@Autowired @Qualifier("jmsQueueHelloRequestIn") private Queue jmsQueueHelloRequestIn; @Autowired @Qualifier("jmsQueueHelloResponseOut") private Queue jmsQueueHelloResponseOut; @CitrusTest public void purgeTest() { purgeQueues() .queue(jmsQueueHelloRequestIn) .queue(jmsQueueHelloResponseOut); }
Java DSL runner
@Autowired @Qualifier("jmsQueueHelloRequestIn") private Queue jmsQueueHelloRequestIn; @Autowired @Qualifier("jmsQueueHelloResponseOut") private Queue jmsQueueHelloResponseOut; @CitrusTest public void purgeTest() { purgeQueues(action -> action.queue(jmsQueueHelloRequestIn) .queue(jmsQueueHelloResponseOut)); }
| Note |
|---|---|
You can mix queue name and queue object references as you like within one single purge queue test action. |
Message channels define central messaging destinations in Citrus. These are namely in memory message queues holding messages for test cases. These messages may become obsolete during a test run, especially when test cases fail and stop in their message consumption. Purging these message channel destinations is essential in these scenarios in order to not influence upcoming test cases. Each test case should only receive those messages that actually refer to the test model. Therefore it is a good idea to purge all message channel destinations between the test cases. Obsolete messages that get stuck in a message channel destination for some reason are then removed so that upcoming test case are not broken.
Following action definition purges all messages from a list of message channels:
XML DSL
<testcase name="purgeChannelTest"> <actions> <purge-channel> <channel name="someChannelName"/> <channel name="anotherChannelName"/> </purge-channel> <purge-channel> <channel ref="someChannel"/> <channel ref="anotherChannel"/> </purge-channel> </actions> </testcase>
As you can see the test action supports channel names as well as channel references to Spring bean instances. When using channel references you refer to the Spring bean id or name in your application context.
The Java DSL works quite similar as you can read from next examples:
Java DSL designer
@Autowired @Qualifier("channelResolver") private DestinationResolver<MessageChannel> channelResolver; @CitrusTest public void purgeTest() { purgeChannels() .channelResolver(channelResolver) .channelNames("ch1", "ch2", "ch3") .channel("ch4"); }
Java DSL runner
@Autowired @Qualifier("channelResolver") private DestinationResolver<MessageChannel> channelResolver; @CitrusTest public void purgeTest() { purgeChannels(action -> action.channelResolver(channelResolver) .channelNames("ch1", "ch2", "ch3") .channel("ch4")); }
The channel resolver reference is optional. By default Citrus will automatically use a Spring application context channel resolver so you just have to use the respective Spring bean names that are configured in the Spring application context. However setting a custom channel resolver may be adequate for you in some special cases.
While speaking of Spring application context bean references the next example uses such bean references for channels to purge.
Java DSL designer
@Autowired @Qualifier("channel1") private MessageChannel channel1; @Autowired @Qualifier("channel2") private MessageChannel channel2; @Autowired @Qualifier("channel3") private MessageChannel channel3; @CitrusTest public void purgeTest() { purgeChannels() .channels(channel1, channel2) .channel(channel3); }
Java DSL runner
@Autowired @Qualifier("channel1") private MessageChannel channel1; @Autowired @Qualifier("channel2") private MessageChannel channel2; @Autowired @Qualifier("channel3") private MessageChannel channel3; @CitrusTest public void purgeTest() { purgeChannels(action -> action.channels(channel1, channel2) .channel(channel3)); }
Message selectors enable you to selectively remove messages from the destination. All messages that pass the message selection logic get deleted the other messages will remain unchanged inside the channel destination. The message selector is a Spring bean that implements a special message selector interface. A possible implementation could be a selector deleting all messages that are older than five seconds:
import org.springframework.messaging.Message; import org.springframework.integration.core.MessageSelector; public class TimeBasedMessageSelector implements MessageSelector { public boolean accept(Message<?> message) { if (System.currentTimeMillis() - message.getHeaders().getTimestamp() > 5000) { return false; } else { return true; } } }
| Note |
|---|---|
The message selector returns false for those messages that should be deleted from the channel! |
You simply define the message selector as a new Spring bean in the Citrus application context and reference it in your test action property.
<bean id="specialMessageSelector" class="com.consol.citrus.special.TimeBasedMessageSelector"/>
Now let us have a look at how you reference the selector in your test case:
XML DSL
<purge-channels message-selector="specialMessageSelector"> <channel name="someChannelName"/> <channel name="anotherChannelName"/> </purge-channels>
Java DSL designer
@Autowired @Qualifier("specialMessageSelector") private MessageSelector specialMessageSelector; @CitrusTest public void purgeTest() { purgeChannels() .channelNames("ch1", "ch2", "ch3") .selector(specialMessageSelector); }
Java DSL runner
@Autowired @Qualifier("specialMessageSelector") private MessageSelector specialMessageSelector; @CitrusTest public void purgeTest() { purgeChannels(action -> action.channelNames("ch1", "ch2", "ch3") .selector(specialMessageSelector)); }
In the examples above we use a message selector implementation that gets injected via Spring IoC container.
Purging channels in each test case every time is quite exhausting because every test case needs to define a purging action at the very beginning of the test. A more straight forward approach would be to introduce some purging action which is automatically executed before each test. Fortunately the Citrus test suite offers a very simple way to do this. It is described in Section 37.3, “Before test”.
When using the special action sequence before test cases we are able to purge channel destinations every time a test case executes. See the upcoming example to find out how the action is defined in the Spring configuration application context.
<citrus:before-test id="purgeBeforeTest"> <citrus:actions> <purge-channel> <channel name="fooChannel"/> <channel name="barChannel"/> </purge-channel> </citrus:actions> </citrus:before-test>
Just use this before-test bean in the Spring bean application context and the purge channel action is active. Obsolete messages that are waiting on the message channels for consumption are purged before the next test in line is executed.
| Tip |
|---|---|
Purging message channels becomes also very interesting when working with server instances in Citrus. Each server component automatically has an inbound message channel where incoming messages are stored to internally. So if you need to clean up a server that has already stored some incoming messages you can do this easily by purging the internal message channel. The message channel follows a naming convention {serverName}.inbound where {serverName} is the Spring bean name of the Citrus server endpoint component. If you purge this internal channel in a before test nature you are sure that obsolete messages on a server instance get purged before each test is executed. |
Citrus works with message endpoints when sending and receiving messages. In general endpoints can also queue messages. This is especially the case when using JMS message endpoints or any server endpoint component in Citrus. These are in memory message queues holding messages for test cases. These messages may become obsolete during a test run, especially when a test case that would consume the messages fails. Deleting all messages from a message endpoint is therefore a useful task and is essential in such scenarios so that upcoming test cases are not influenced. Each test case should only receive those messages that actually refer to the test model. Therefore it is a good idea to purge all message endpoint destinations between the test cases. Obsolete messages that get stuck in a message endpoint destination for some reason are then removed so that upcoming test case are not broken.
Following action definition purges all messages from a list of message endpoints:
XML DSL
<testcase name="purgeEndpointTest"> <actions> <purge-endpoint> <endpoint name="someEndpointName"/> <endpoint name="anotherEndpointName"/> </purge-endpoint> <purge-endpoint> <endpoint ref="someEndpoint"/> <endpoint ref="anotherEndpoint"/> </purge-endpoint> </actions> </testcase>
As you can see the test action supports endpoint names as well as endpoint references to Spring bean instances. When using endpoint references you refer to the Spring bean name in your application context.
The Java DSL works quite similar - have a look:
Java DSL designer
@Autowired @CitrusTest public void purgeTest() { purgeEndpoints() .endpointNames("endpoint1", "endpoint2", "endpoint3") .endpoint("endpoint4"); }
Java DSL runner
@Autowired @CitrusTest public void purgeTest() { purgeEndpoints(action -> action.endpointNames("endpoint1", "endpoint2", "endpoint3") .endpoint("endpoint4")); }
When using the Java DSL we can inject endpoint objects with Spring bean container IoC. The next example uses such bean references for endpoints in a purge action.
Java DSL designer
@Autowired @Qualifier("endpoint1") private Endpoint endpoint1; @Autowired @Qualifier("endpoint2") private Endpoint endpoint2; @Autowired @Qualifier("endpoint3") private Endpoint endpoint3; @CitrusTest public void purgeTest() { purgeEndpoints() .endpoints(endpoint1, endpoint2) .endpoint(endpoint3); }
Java DSL runner
@Autowired @Qualifier("endpoint1") private Endpoint endpoint1; @Autowired @Qualifier("endpoint2") private Endpoint endpoint2; @Autowired @Qualifier("endpoint3") private Endpoint endpoint3; @CitrusTest public void purgeTest() { purgeEndpoints(action -> action.endpoints(endpoint1, endpoint2) .endpoint(endpoint3)); }
Message selectors enable you to selectively remove messages from an endpoint. All messages that meet the message selector condition get deleted and the other messages remain inside the endpoint destination. The message selector is either a normal String name-value representation or a map of key value pairs:
XML DSL
<purge-endpoints> <selector> <value>operation = 'sayHello'</value> </selector> <endpoint name="someEndpointName"/> <endpoint name="anotherEndpointName"/> </purge-endpoints>
Java DSL designer
@CitrusTest public void purgeTest() { purgeEndpoints() .endpointNames("endpoint1", "endpoint2", "endpoint3") .selector("operation = 'sayHello'"); }
Java DSL runner
@CitrusTest public void purgeTest() { purgeEndpoints(action -> action.endpointNames("endpoint1", "endpoint2", "endpoint3") .selector("operation = 'sayHello'")); }
In the examples above we use a String to represent the message selector expression. In general the message selector operates on the message header. So following on from that we remove all messages selectively that have a message header operation with its value sayHello.
Purging endpoints in each test case every time is quite exhausting because every test case needs to define a purging action at the very beginning of the test. A more straight forward approach would be to introduce some purging action which is automatically executed before each test. Fortunately the Citrus test suite offers a very simple way to do this. It is described in Section 37.3, “Before test”.
When using the special action sequence before test cases we are able to purge endpoint destinations every time a test case executes. See the upcoming example to find out how the action is defined in the Spring configuration application context.
<citrus:before-test id="purgeBeforeTest"> <citrus:actions> <purge-endpoint> <endpoint name="fooEndpoint"/> <endpoint name="barEndpoint"/> </purge-endpoint> </citrus:actions> </citrus:before-test>
Just use this before-test bean in the Spring bean application context and the purge endpoint action is active. Obsolete messages that are waiting on the message endpoints for consumption are purged before the next test in line is executed.
| Tip |
|---|---|
Purging message endpoints becomes also very interesting when working with server instances in Citrus. Each server component automatically has an inbound message endpoint where incoming messages are stored to internally. Citrus will automatically use this incoming message endpoint as target for the purge action so you can just use the server instance as you know it from your configuration in any purge action. |
Citrus test actions fail with Java exceptions and error messages. This gives you the opportunity to expect an action to fail during test execution. You can simple assert a Java exception to be thrown during execution. See the example for an assert action definition in a test case:
XML DSL
<testcase name="assertFailureTest"> <actions> <assert exception="com.consol.citrus.exceptions.CitrusRuntimeException" message="Unknown variable ${date}"> <echo> <message>Current date is: ${date}</message> </echo> </assert> </actions> </testcase>
Java DSL designer and runner
@CitrusTest public void assertTest() { assertException().exception(com.consol.citrus.exceptions.CitrusRuntimeException.class) .message("Unknown variable ${date}") .when(echo("Current date is: ${date}")); }
| Note |
|---|---|
Note that the assert action requires an exception. In case no exception is thrown by the embedded test action the assertion and the test case will fail! |
The assert action always wraps a single test action, which is then monitored for failure. In case the nested test action fails with error you can validate the error in its type and error message (optional). The failure has to fit the expected one exactly otherwise the assertion fails itself.
| Important |
|---|---|
Important to notice is the fact that asserted exceptions do not cause failure of the test case. As you except the failure to happen the test continues with its work once the assertion is done successfully. |
In the previous chapter we have seen how to expect failures in Citrus with assert action. Now the assert action is designed for single actions to be monitored and for failures to be expected in any case. The 'catch' action in contrary can hold several nested test actions and exception failure is optional.
The nested actions are error proof for the chosen exception type. This means possible exceptions are caught and ignored - the test case will not fail for this exception type. But only for this particular exception type! Other exception types that occur during execution do cause the test to fail as usual.
XML DSL
<testcase name="catchExceptionTest"> <actions> <catch exception="com.consol.citrus.exceptions.CitrusRuntimeException"> <echo> <message>Current date is: ${date}</message> </echo> </catch> </actions> </testcase>
Java DSL designer and runner
@CitrusTest public void catchTest() { catchException().exception(CitrusRuntimeException.class) .when(echo("Current date is: ${date}")); }
| Important |
|---|---|
Note that there is no validation available in a catch block. So catching exceptions is just to make a test more stable towards errors that can occur. The caught exception does not cause any failure in the test. The test case may continue with execution as if there was not failure. Also notice that the catch action is also happy when no exception at all is raised. In contrary to that the assert action requires the exception and an assert action is failing in positive processing. |
Catching exceptions like this may only fit to very error prone action blocks where failures do not harm the test case success. Otherwise a failure in a test action should always reflect to the whole test case to fail with errors.
| Note |
|---|---|
| Java developers might ask why not use try-catch Java block instead? The answer is simple yet very important to understand. The test method is called by the Java DSL test case builder for building the Citrus test. This can be referred to as the design time of the test. After the building test method was processed the test gets executed, which can be called the runtime of the test. This means that a try-catch block within the design time method will never perform during the test run. The only reliable way to add the catch capability to the test as part of the test case runtime is to use the Citrus test action which gets executed during test runtime. |
The <ant> action loads a build.xml Ant file and executes one or more targets in the Ant project. The target is executed with optional build properties passed to the Ant run. The Ant build output is logged with Citrus logger and the test case success is bound to the Ant build success. This means in case the Ant build fails for some reason the test case will also fail with build exception accordingly.
See this basic Ant run example to see how it works within your test case:
XML DSL
<testcase name="AntRunTest"> <variables> <variable name="today" value="citrus:currentDate()"/> </variables> <actions> <ant build-file="classpath:com/consol/citrus/actions/build.xml"> <execute target="sayHello"/> <properties> <property name="date" value="${today}"/> <property name="welcomeText" value="Hello!"/> </properties> </ant> </actions> </testcase>
Java DSL designer
@CitrusTest public void antRunTest() { variable("today", "citrus:currentDate()"); antrun("classpath:com/consol/citrus/actions/build.xml") .target("sayHello") .property("date", "${today}") .property("welcomeText", "$Hello!"); }
Java DSL runner
@CitrusTest public void antRunTest() { variable("today", "citrus:currentDate()"); antrun(action -> action.buildFilePath("classpath:com/consol/citrus/actions/build.xml") .target("sayHello") .property("date", "${today}") .property("welcomeText", "$Hello!")); }
The respective build.xml Ant file must provide the target to call. For example:
<project name="citrus-build" default="sayHello"> <property name="welcomeText" value="Welcome to Citrus!"></property> <target name="sayHello"> <echo message="${welcomeText} - Today is ${date}"></echo> </target> <target name="sayGoodbye"> <echo message="Goodbye everybody!"></echo> </target> </project>
As you can see you can pass custom build properties to the Ant build execution. Existing Ant build properties are replaced and you can use the properties in your build file as usual.
You can also call multiple targets within one single build run by using a comma separated list of target names:
XML DSL
<testcase name="AntRunTest"> <variables> <variable name="today" value="citrus:currentDate()"/> </variables> <actions> <ant build-file="classpath:com/consol/citrus/actions/build.xml"> <execute targets="sayHello,sayGoodbye"/> <properties> <property name="date" value="${today}"/> </properties> </ant> </actions> </testcase>
Java DSL designer
@CitrusTest public void antRunTest() { variable("today", "citrus:currentDate()"); antrun("classpath:com/consol/citrus/actions/build.xml") .targets("sayHello", "sayGoodbye") .property("date", "${today}"); }
Java DSL runner
@CitrusTest public void antRunTest() { variable("today", "citrus:currentDate()"); antrun(action -> action.buildFilePath("classpath:com/consol/citrus/actions/build.xml") .targets("sayHello", "sayGoodbye") .property("date", "${today}")); }
The build properties can live in external file resource as an alternative to the inline property definitions. You just have to use the respective file resource path and all nested properties get loaded as build properties.
In addition to that you can also define a custom build listener. The build listener must implement the Ant API interface org.apache.tools.ant.BuildListener. During the Ant build run the build listener is called with several callback methods (e.g. buildStarted(), buildFinished(), targetStarted(), targetFinished(), ...). This is how you can add additional logic to the Ant build run from Citrus. A custom build listener could manage the fail state of your test case, in particular by raising some exception forcing the test case to fail accordingly.
XML DSL
<testcase name="AntRunTest"> <actions> <ant build-file="classpath:com/consol/citrus/actions/build.xml" build-listener="customBuildListener"> <execute target="sayHello"/> <properties file="classpath:com/consol/citrus/actions/build.properties"/> </ant> </actions> </testcase>
Java DSL designer
@Autowired private BuildListener customBuildListener; @CitrusTest public void antRunTest() { antrun("classpath:com/consol/citrus/actions/build.xml") .target("sayHello") .propertyFile("classpath:com/consol/citrus/actions/build.properties") .listener(customBuildListener); }
Java DSL runner
@Autowired private BuildListener customBuildListener; @CitrusTest public void antRunTest() { antrun(action -> action.buildFilePath("classpath:com/consol/citrus/actions/build.xml") .target("sayHello") .propertyFile("classpath:com/consol/citrus/actions/build.properties") .listener(customBuildListener)); }
The customBuildListener used in the example above should reference a Spring bean in the Citrus application context. The bean implements the interface org.apache.tools.ant.BuildListener and controls the Ant build run.
Citrus is working with server components that are started and stopped within a test run. This can be a Http server or some SMTP mail server for instance. Usually the Citrus server components are automatically started when Citrus is starting and respectively stopped when Citrus is shutting down. Sometimes it might be helpful to explicitly start and stop a server instance within your test case. Here you can use special start and stop test actions inside your test. This is a good way to test downtime scenarios of interface partners with respective error handling when connections to servers are lost
Let me explain with a simple sample test case:
XML DSL
<testcase name="sleepTest"> <actions> <start server="myMailServer"/> <sleep/> <stop server="myMailServer"/> </actions> </testcase>
The start and stop server test action receive a server name which references a Spring bean component of type com.consol.citrus.server.Server in your basic Spring application context. The server instance is started or stopped within the test case. As you can see in the next listing we can also start and stop multiple server instances within a single test action.
<testcase name="sleepTest"> <actions> <start> <servers> <server name="myMailServer"/> <server name="myFtpServer"/> </servers> </start> <sleep/> <stop> <servers> <server name="myMailServer"/> <server name="myFtpServer"/> </servers> </stop> </actions> </testcase>
When using the Java DSL the best way to reference a server instance is to autowire the Spring bean via dependency injection. The Spring framework takes case on injecting the proper Spring bean component defined in the SPring application context. This way you can easily start and stop server instances within Java DSL test cases.
Java DSL designer and runner
@Autowired @Qualifier("myFtpServer") private FtpServer myFtpServer; @CitrusTest public void startStopServerTest() { start(myFtpServer); sleep(); stop(myFtpServer); }
| Note |
|---|---|
Starting and stopping server instances is a synchronous test action. This means that your test case is waiting for the server to start before other test actions take place. Startup times and shut down of server instances may delay your test accordingly. |
As you can see starting and stopping Citrus server instances is very easy. You can also write your own server implementations by implementing the interface com.consol.citrus.server.Server. All custom server implementations can then be started and stopped during a test case.
Now we have a look at the opportunity to add custom test actions to the test case flow. Let us start this section with an example:
XML DSL
<testcase name="ActionReferenceTest"> <actions> <action reference="cleanUpDatabase"/> <action reference="mySpecialAction"/> </actions> </testcase>
The generic <action> element references Spring beans that implement the Java interface
com.consol.citrus.TestAction. This is a very fast way to add your own action
implementations to a Citrus test case. This way you can easily implement your own actions in Java and
include them into the test case.
In the example above the called actions are special database cleanup implementations. The actions are defined as Spring beans in the Citrus configuration and get referenced by their bean name or id.
<bean id="cleanUpDatabase" class="my.domain.citrus.actions.SpecialDatabaseCleanupAction"> <property name="dataSource" ref="testDataSource"/> </bean>
The Spring application context holds your custom bean implementations. You can set properties and use the full Spring power while implementing your custom test action in Java. Let us have a look on how such a Java class may look like.
import com.consol.citrus.actions.AbstractTestAction; import com.consol.citrus.context.TestContext; public class SpecialDatabaseCleanupAction extends AbstractTestAction { @Autowired private DataSource dataSource; @Override public void doExecute(TestContext context) { JdbcTemplate jdbcTemplate = new JdbcTemplate(dataSource); jdbcTemplate.execute("..."); } }
All you need to do in your Java class is to implement the Citrus com.consol.citrus.TestAction interface. The abstract class
com.consol.citrus.actions.AbstractTestAction may help you to start with your custom test action implementation as it provides basic
method implementations so you just have to implement the doExecute() method.
When using the Java test case DSL you are also quite comfortable with including your custom test actions.
Java DSL designer and runner
@Autowired private SpecialDatabaseCleanupAction cleanUpDatabaseAction; @CitrusTest public void genericActionTest() { echo("Now let's include our special test action"); action(cleanUpDatabaseAction); echo("That's it!"); }
Using anonymous class implementations is also possible.
Java DSL designer and runner
@CitrusTest public void genericActionTest() { echo("Now let's call our special test action anonymously"); action(new AbstractTestAction() { public void doExecute(TestContext context) { // do something } }); echo("That's it!"); }
The <stop-timer> action can be used for stopping either a specific timer (Section 14.7, “Timer”) or all timers running within a test. This action is useful when timers are started in the background (using parallel or fork=true) and you wish to stop these timers at the end of the test. Some examples of using this action are provided below:
XML DSL
<testcase name="timerTest"> <actions> <timer id="forkedTimer" fork="true"> <sleep milliseconds="50" /> </timer> <timer fork="true"> <sleep milliseconds="50" /> </timer> <timer repeatCount="5"> <sleep milliseconds="50" /> </timer> <stop-timer timerId="forkedTimer" /> </actions> <finally> <stop-timer /> </finally> </testcase>
Java DSL designer and runner
@CitrusTest public void timerTest() { timer() .timerId("forkedTimer") .fork(true) .actions(sleep(50L) ); timer() .fork(true) .actions(sleep(50L) ); timer() .repeatCount(5) .actions(sleep(50L)); stopTimer("forkedTimer") doFinally().actions( stopTimer() ); }
In the above example 3 timers are started, the first 2 in the background and the third in the test execution thread. Timer #3 has a repeatCount set to 5 so it will terminate automatically after 5 runs. Timer #1 and #2 however have no repeatCount set so they will execute until they are told to stop.
Timer #1 is stopped explicitly using the first stopTimer action. Here the stopTimer action includes the name of the timer to stop. This is convenient when you wish to terminate a specific timer. However since no timerId was set for timer #2, you can terminate this (and all other timers) using the 'stopTimer' action with no explicit timerId set.
Templates group action sequences to a logical unit. You can think of templates as reusable components that are used in several tests. The maintenance is much more effective because the templates are referenced several times.
The template always has a unique name. Inside a test case we call the template by this unique name. Have a look at a first example:
<template name="doCreateVariables"> <create-variables> <variable name="var" value="123456789"/> </create-variables> <call-template name="doTraceVariables"/> </template> <template name="doTraceVariables"> <echo> <message>Current time is: ${time}</message> </echo> <trace-variables/> </template>
The code example above describes two template definitions. Templates hold a sequence of test actions or call other templates themselves as seen in the example above.
| Note |
|---|---|
The <call-template> action calls other templates by their name. The called template not necessarily has to be located in the same test case XML file. The template might be defined in a separate XML file other than the test case itself: |
XML DSL
<testcase name="templateTest"> <variables> <variable name="myTime" value="citrus:currentDate()"/> </variables> <actions> <call-template name="doCreateVariables"/> <call-template name="doTraceVariables"> <parameter name="time" value="${myTime}"> </call-template> </actions> </testcase>
Java DSL designer
@CitrusTest public void templateTest() { variable("myTime", "citrus:currentDate()"); applyTemplate("doCreateVariables"); applyTemplate("doTraceVariables") .parameter("time", "${myTime}"); }
Java DSL runner
@CitrusTest public void templateTest() { variable("myTime", "citrus:currentDate()"); applyTemplate(template -> template.name("doCreateVariables")); applyTemplate(template -> template.name("doTraceVariables") .parameter("time", "${myTime}")); }
There is an open question when dealing with templates that are defined somewhere else outside the test case. How to handle variables? A templates may use different variable names then the test and vice versa. No doubt the template will fail as soon as special variables with respective values are not present. Unknown variables cause the template and the whole test to fail with errors.
So a first approach would be to harmonize variable usage across templates and test cases, so that templates and test cases do use the same variable naming. But this approach might lead to high calibration effort. Therefore templates support parameters to solve this problem. When a template is called the calling actor is able to set some parameters. Let us discuss an example for this issue.
The template "doDateCoversion" in the next sample uses the variable ${date}. The calling test case can set this variable as a parameter without actually declaring the variable in the test itself:
<call-template name="doDateCoversion"> <parameter name="date" value="${sampleDate}"> </call-template>
The variable sampleDate is already present in the test case and gets translated into the date parameter. Following from that the template works fine although test and template do work on different variable namings.
With template parameters you are able to solve the calibration effort when working with templates and variables. It is always a good idea to check the used variables/parameters inside a template when calling it. There might be a variable that is not declared yet inside your test. So you need to define this value as a parameter.
Template parameters may contain more complex values like XML fragments. The call-template action offers following CDATA variation for defining complex parameter values:
<call-template name="printXMLPayload"> <parameter name="payload"> <value> <![CDATA[ <HelloRequest xmlns="http://www.consol.de/schemas/samples/sayHello.xsd"> <Text>Hello South ${var}</Text> </HelloRequest> ]]> </value> </parameter> </call-template>
| Important |
|---|---|
When a template works on variable values and parameters changes to these variables will automatically affect the variables in the whole test. So if you change a variable's value inside a template and the variable is defined inside the test case the changes will affect the variable in a global context. We have to be careful with this when executing a template several times in a test, especially in combination with parallel containers (see Section 14.3, “Parallel”). <parallel> <call-template name="print"> <parameter name="param1" value="1"/> <parameter name="param2" value="Hello Europe"/> </call-template> <call-template name="print"> <parameter name="param1" value="2"/> <parameter name="param2" value="Hello Asia"/> </call-template> <call-template name="print"> <parameter name="param1" value="3"/> <parameter name="param2" value="Hello Africa"/> </call-template> </parallel> In the listing above a template print is called several times in a parallel container. The parameter values will be handled in a global context, so it is quite likely to happen that the template instances influence each other during execution. We might get such print messages: 2. Hello Europe 2. Hello Africa 3. Hello Africa Index parameters do not fit and the message 'Hello Asia' is completely gone. This is because templates overwrite parameters to each other as they are executed in parallel at the same time. To avoid this behavior we need to tell the template that it should handle parameters as well as variables in a local context. This will enforce that each template instance is working on a dedicated local context. See the global-context attribute that is set to false in this example: <template name="print" global-context="false"> <echo> <message>${param1}.${param2}</message> </echo> </template> After that template instances won't influence each other anymore. But notice that variable changes inside the template then do not affect the test case neither. |
Similar to templates a container element holds one to many test actions. In contrast to the template the container appears directly inside the test case action chain, meaning that the container is not referenced by more than one test case.
Containers execute the embedded test actions in specific logic. This can be an execution in iteration for instance. Combine different containers with each other and you will be able to generate very powerful hierarchical structures in order to create a complex execution logic. In the following sections some predefined containers are described.
The sequential container executes the embedded test actions in strict sequence. Readers now might search for the difference to the normal action chain that is specified inside the test case. The actual power of sequential containers does show only in combination with other containers like iterations and parallels. We will see this later when handling these containers.
For now the sequential container seems not very sensational - one might say boring - because it simply groups a pair of test actions to sequential execution.
XML DSL
<testcase name="sequentialTest"> <actions> <sequential> <trace-time/> <sleep/> <echo> <message>Hallo TestFramework</message> </echo> <trace-time/> </sequential> </actions> </testcase>
Java DSL designer and runner
@CitrusTest public void sequentialTest() { sequential() .actions( stopTime(), sleep(1.0), echo("Hello Citrus"), stopTime() ); }
Now we deal with conditional executions of test actions. Nested actions inside a conditional container are executed only in case a booleand expression evaluates to true. Otherwise the container execution is not performed at all.
See some example to find out how it works with the conditional expression string.
XML DSL
<testcase name="conditionalTest"> <variables> <variable name="index" value="5"/> <variable name="shouldSleep" value="true"/> </variables> <actions> <conditional expression="${index} = 5"> <sleep seconds="10"/> </conditional> <conditional expression="${shouldSleep}"> <sleep seconds="10"/> </conditional> </actions> </testcase>
Java DSL designer and runner
@CitrusTest public void conditionalTest() { variable("index", 5); variable("shouldSleep", true); conditional().when("${index} = 5")) .actions( sleep(10000L) ); conditional().when("${shouldSleep}")) .actions( sleep(10000L) ); }
The nested sleep action is executed in case the variable ${index} is equal to the value '5'. This conditional execution of test actions is useful when dealing with different test environments such as different operating systems for instance. The conditional container also supports expressions that evaluate to the character sequence "true" or "false" as shown in the ${shouldSleep} example.
Parallel containers execute the embedded test actions concurrent to each other. Every action in this container will be executed in a separate Java Thread. Following example should clarify the usage:
XML DSL
<testcase name="parallelTest"> <actions> <parallel> <sleep/> <sequential> <sleep/> <echo> <message>1</message> </echo> </sequential> <echo> <message>2</message> </echo> <echo> <message>3</message> </echo> <iterate condition="i lt= 5" index="i"> <echo> <message>10</message> </echo> </iterate> </parallel> </actions> </testcase>
Java DSL designer and runner
@CitrusTest public void paralletTest() { parallel().actions( sleep(), sequential().actions( sleep(), echo("1") ), echo("2"), echo("3"), iterate().condition("i lt= 5").index("i")) .actions( echo("10") ) ); }
So the normal test action processing would be to execute one action after another. As the first action is a sleep of five seconds, the whole test processing would stop and wait for 5 seconds. Things are different inside the parallel container. Here the descending test actions will not wait but execute at the same time.
| Note |
|---|---|
Note that containers can easily wrap other containers. The example shows a simple combination of sequential and parallel containers that will archive a complex execution logic. Actions inside the sequential container will execute one after another. But actions in parallel will be executed at the same time. |
Iterations are very powerful elements when describing complex logic. The container executes the embedded actions
several times. The container will continue with looping as long as the defined breaking condition string evaluates to
true. In case the condition evaluates to false the iteration will break an finish execution.
XML DSL
<testcase name="iterateTest"> <actions> <iterate index="i" condition="i lt 5"> <echo> <message>index is: ${i}</message> </echo> </iterate> </actions> </testcase>
Java DSL designer and runner
@CitrusTest public void iterateTest() { iterate().condition("i lt 5").index("i")) .actions( echo("index is: ${i}") ); }
The attribute "index" automatically defines a new variable that holds the actual loop index starting at "1". This index variable is available as a normal variable inside the iterate container. Therefore it is possible to print out the actual loop index in the echo action as shown in the above example.
The condition string is mandatory and describes the actual end of the loop. In iterate containers the loop
will break in case the condition evaluates to false.
The condition string can be any Boolean expression and supports several operators:
lt (lower than)
lt= (lower than equals)
gt (greater than)
gt= (greater than equals)
= (equals)
and (logical combining of two Boolean values)
or (logical combining of two Boolean values)
() (brackets)
| Important |
|---|---|
It is very important to notice that the condition is evaluated before the very first iteration takes place. The loop therefore can be executed 0-n times according to the condition value. |
Quite similar to the previously described iterate container this repeating container will execute its actions in a loop according to an ending condition. The condition describes a Boolean expression using the operators as described in the previous chapter.
| Note |
|---|---|
The loop continues its work until the provided condition evaluates to true. It is very important to notice that the repeat loop will execute the actions before evaluating the condition. This means the actions get executed 1-n times. |
XML DSL
<testcase name="iterateTest"> <actions> <repeat-until-true index="i" condition="(i = 3) or (i = 5)"> <echo> <message>index is: ${i}</message> </echo> </repeat-until-true> </actions> </testcase>
Java DSL designer and runner
@CitrusTest public void repeatTest() { repeat().until("(i gt 5) or (i = 3)").index("i")) .actions( echo("index is: ${i}") ); }
The next looping container is called repeat-on-error-until-true. This container repeats a group of actions
in case one embedded action failed with error. In case of an error inside the container the loop will try
to execute all embedded actions again in order to seek for overall success. The execution continues
until all embedded actions were processed successfully or the ending condition evaluates to true and the
error-loop will lead to final failure.
XML DSL
<testcase name="iterateTest"> <actions> <repeat-onerror-until-true index="i" condition="i = 5"> <echo> <message>index is: ${i}</message> </echo> <fail/> </repeat-onerror-until-true> </actions> </testcase>
Java DSL designer
@CitrusTest public void repeatOnErrorTest() { repeatOnError( echo("index is: ${i}"), fail("Force loop to fail!") ).until("i = 5").index("i"); }
Java DSL runner
@CitrusTest public void repeatOnErrorTest() { repeatOnError().until("i = 5").index("i")) .actions( echo("index is: ${i}"), fail("Force loop to fail!") ); }
In the code example the error-loop continues four times as the <fail> action definitely fails the test. During the fifth iteration The condition "i=5" evaluates to true and the loop breaks its processing leading to a final failure as the test actions were not successful.
| Note |
|---|---|
The overall success of the test case depends on the error situation inside the repeat-onerror-until-true container. In case the loop breaks because of failing actions and the loop will discontinue its work the whole test case is failing too. The error loop processing is successful in case all embedded actions were not raising any errors during an iteration. |
The repeat-on-error container also offers an automatic sleep mechanism. This auto-sleep property will force the container to wait a given amount of time before executing the next iteration. We used this mechanism a lot when validating database entries. Let's say we want to check the existence of an order entry in the database. Unfortunately the system under test is not very well performing and may need some time to store the new order. This amount of time is not predictable, especially when dealing with different hardware on our test environments (local testing vs. server testing). Following from that our test case may fail unpredictable only because of runtime conditions.
We can avoid unstable test cases that are based on these runtime conditions with the auto-sleep functionality.
XML DSL
<repeat-onerror-until-true auto-sleep="1000" condition="i = 5" index="i"> <echo> <sql datasource="testDataSource"> <statement> SELECT COUNT(1) AS CNT_ORDERS FROM ORDERS WHERE CUSTOMER_ID='${customerId}' </statement> <validate column="CNT_ORDERS" value="1"/> </sql> </echo> </repeat-onerror-until-true>
Java DSL designer and runner
@CitrusTest public void repeatOnErrorTest() { repeatOnError().until("i = 5").index("i").autoSleep(1000)) .actions( query(action -> action.dataSource(testDataSource) .statement("SELECT COUNT(1) AS CNT_ORDERS FROM ORDERS WHERE CUSTOMER_ID='${customerId}'") .validate("CNT_ORDERS", "1")) ); }
We surrounded the database check with a repeat-onerror container having the auto-sleep property set to 1000 milliseconds. The repeat container will try to check the database up to five times with an automatic sleep of 1 second before every iteration. This gives the system under test up to five seconds time to store the new entry to the database. The test case is very stable and just fits to the hardware environment. On slow test environments the test may need several iterations to successfully read the database entry. On very fast environments the test may succeed right on the first try.
| Important |
|---|---|
We changed auto sleep time from seconds to milliseconds with Citrus 2.0 release. So if you are coming from previous Citrus versions be sure to now use proper millisecond values. |
So fast environments are not slowed down by static sleep operations and slower environments are still able to execute this test case with high stability.
Timers are very useful containers when you wish to execute a collection of test actions several times at regular intervals. The timer component generates an event which in turn triggers the execution of the nested test actions associated with timer. This can be useful in a number of test scenarios for example when Citrus needs to simulate a heart beat or if you are debugging a test and you wist to query the contents of the database, to mention just a few. The following code sample should demonstrate the power and flexibility of timers:
XML DSL
<testcase name="timerTest"> <actions> <timer id="forkedTimer" interval="100" fork="true"> <echo> <message>I'm going to run in the background and let some other test actions run (nested action run ${forkedTimer-index} times)</message> </echo> <sleep milliseconds="50" /> </timer> <timer repeatCount="3" interval="100" delay="50"> <sleep milliseconds="50" /> <echo> <message>I'm going to repeat this message 3 times before the next test actions are executed</message> </echo> </timer> <echo> <message>Test almost complete. Make sure all timers running in the background are stopped</message> </echo> </actions> <finally> <stop-timer timerId="forkedTimer" /> </finally> </testcase>
Java DSL designer and runner
@CitrusTest public void timerTest() { timer() .timerId("forkedTimer") .interval(100L) .fork(true) .actions( echo("I'm going to run in the background and let some other test actions run (nested action run ${forkedTimer-index} times)"), sleep(50L) ); timer() .repeatCount(3) .interval(100L) .delay(50L) .actions( sleep(50L), echo("I'm going to repeat this message 3 times before the next test actions are executed") ); echo("Test almost complete. Make sure all timers running in the background are stopped"); doFinally().actions( stopTimer("forkedTimer") ); }
In the above example the first timer (timerId = forkedTimer) is started in the background. By default timers are run in the current thread of execution but to start it in the background just use "fork=true". Every 100 milliseconds this timer emits an event which will result in the nested actions being executed. The nested 'echo' action outputs the number of times this timer has already been executed. It does this with the help of an 'index' variable, in this example ${forkedTimer-index}, which is named according to the timer id with the suffix '-index'. No limit is set on the number of times this timer should run so it will keep on running until either a nested test action fails or it is instructed to stop (more on this below).
The second timer is configured to run 3 times with a delay of 100 milliseconds between each iteration. Using the attribute 'delay' we can get the timer pause for 50 milliseconds before running the nested actions for the first time. The timer is configured to run in the current thread of execution so the last test action, the 'echo', has to wait for this timer to complete before it is executed.
So how do we tell the forked timer to stop running? If we forget to do this the timer will just execute indefinitely. To help us out here we can use the 'stop-timer' action. By adding this to the finally block we ensure that the timer will be stopped, even if some nested test action fails. We could have easily added it as a nested test action, to the forkedTimer for example, but if some other test action failed before the stop-timer was called, the timer would never stop.
| Note |
|---|---|
You can also configure timers to run in the background using the 'parallel' container, rather than setting the attribute 'fork' to true. Using parallel allows more fine-grained control of the test and has the added advantage that all errors generated from a nester timer action are visible to the test executer. If an error occurs within the timer then the test status is set to failed. Using fork=true an error causes the timer to stop executing, but the test status is not influenced by this error. |
This chapter deals with a special section inside the test case that is executed even in case errors did occur during the test. Lets say you have started a Jetty web server instance at the beginning of the test case and you need to shutdown the server when the test has finished its work. Or as a second example imagine that you have prepared some data inside the database at the beginning of your test and you want to make sure that the data is cleaned up at the end of the test case.
In both situations we might run into some problems when the test failed. We face the problem that the whole test case will terminate immediately in case of errors. Cleanup tasks at the end of the test action chain may not be executed correctly.
Dirty states inside the database or still running server instances then might cause problems for following test cases. To avoid this problems you should use the finally block of the test case. The <finally> section contains actions that are executed even in case the test fails. Using this strategy the database cleaning tasks mentioned before will find execution in every case (success or failure).
The following example shows how to use the finally section at the end of a test:
XML DSL
<testcase name="finallyTest"> <variables> <variable name="orderId" value="citrus:randomNumber(5)"/> <variable name="date" value="citrus:currentDate('dd.MM.yyyy')"/> </variables> <actions> <sql datasource="testDataSource"> <statement> INSERT INTO ORDERS VALUES (${orderId}, 1, 1, '${date}') </statement> </sql> <echo> <message> ORDER creation time: ${date} </message> </echo> </actions> <finally> <sql datasource="testDataSource"> <statement> DELETE FROM ORDERS WHERE ORDER_ID='${orderId}' </statement> </sql> </finally> </testcase>
In the example the first action creates an entry in the database using an INSERT statement.
To be sure that the entry in the database is deleted after the test, the finally section contains the respective
DELETE statement that is always executed regardless the test case state (successful or failed).
Of course you can also use the finally block in the Java test case DSL. Find following example to see how it works:
Java DSL designer
@CitrusTest public void finallySectionTest() { variable("orderId", "citrus:randomNumber(5)"); variable("date", "citrus:currentDate('dd.MM.yyyy')"); sql(dataSource) .statement("INSERT INTO ORDERS VALUES (${orderId}, 1, 1, '${date}')"); echo("ORDER creation time: citrus:currentDate('dd.MM.yyyy')"); doFinally( sql(dataSource).statement("DELETE FROM ORDERS WHERE ORDER_ID='${orderId}'") ); }
Java DSL runner
@CitrusTest public void finallySectionTest() { variable("orderId", "citrus:randomNumber(5)"); variable("date", "citrus:currentDate('dd.MM.yyyy')"); sql(action -> action.dataSource(dataSource) .statement("INSERT INTO ORDERS VALUES (${orderId}, 1, 1, '${date}')")); echo("ORDER creation time: citrus:currentDate('dd.MM.yyyy')"); doFinally() .actions( sql(action -> action.dataSource(dataSource).statement("DELETE FROM ORDERS WHERE ORDER_ID='${orderId}'")) ); }
| Note |
|---|---|
| Java developers might ask why not use try-finally Java block instead? The answer is simple yet very important to understand. The @CitrusTest annotated method is called at design time of the test case. The method builds the test case afterwards the test is executed at runtime. This means that a try-finally block within the @CitrusTest annotated method will never perform during the test run but at design time before the test gets executed. This is why we have to add the finally section as part of the test case with doFinally(). |
Citrus provides support for sending and receiving JMS messages. We have to separate between synchronous and asynchronous communication. So in this chapter we explain how to setup JMS message endpoints for synchronous and asynchronous outbound and inbound communication
| Note |
|---|---|
The JMS components in Citrus are kept in a separate Maven module. If not already done so you have to include the module as Maven dependency to your project <dependency> <groupId>com.consol.citrus</groupId> <artifactId>citrus-jms</artifactId> <version>2.5</version> </dependency> Citrus provides a "citrus-jms" configuration namespace and schema definition for JMS related components and features. Include this namespace into your Spring configuration in order to use the Citrus JMS configuration elements. The namespace URI and schema location are added to the Spring configuration XML file as follows. <beans xmlns="http://www.springframework.org/schema/beans" xmlns:xsi="http://www.w3.org/2001/XMLSchema-instance" xmlns:citrus-jms="http://www.citrusframework.org/schema/jms/config" xsi:schemaLocation=" http://www.springframework.org/schema/beans http://www.springframework.org/schema/beans/spring-beans.xsd http://www.citrusframework.org/schema/jms/config http://www.citrusframework.org/schema/jms/config/citrus-jms-config.xsd"> [...] </beans> After that you are able to use customized Citrus XML elements in order to define the Spring beans. |
By default Citrus JMS endpoints are asynchronous. So let us first of all deal with asynchronous messaging which means that we will not wait for any response message after sending or receiving a message.
The test case itself should not know about JMS transport details like queue names or connection credentials. This information is stored in the endpoint component configuration that lives in the basic Spring configuration file in Citrus. So let us have a look at a simple JMS message endpoint configuration in Citrus.
<citrus-jms:endpoint id="helloServiceQueueEndpoint" destination-name="Citrus.HelloService.Request.Queue" timeout="10000"/>
The endpoint component receives an unique id and a JMS destination name. This can be a queue or topic destination. We will deal with JMS topics later on. For now the timeout setting completes our first JMS endpoint component definition.
The endpoint needs a JMS connection factory for connecting to a JMS message broker. The connection factory is also added as Spring bean to the Citrus Spring application context.
<bean id="connectionFactory" class="org.apache.activemq.ActiveMQConnectionFactory"> <property name="brokerURL" value="tcp://localhost:61616" /> </bean>
The JMS connection factory receives the JMS message broker URL and is able to hold many other connection specific options. In this example we use the Apache ActiveMQ connection factory implementation as we want to use the ActiveMQ message broker. Citrus works by default with a bean id connectionFactory. All Citrus JMS component will automatically recognize this connection factory.
| Tip |
|---|---|
Spring makes it very easy to connect to other JMS broker implementations too (e.g. Apache ActiveMQ, TIBCO Enterprise Messaging Service, IBM Websphere MQ). Just add the required connection factory implementation as connectionFactory bean. |
| Note |
|---|---|
All of the Citrus JMS endpoint components will automatically look for a bean named connectionFactory by default. You can use the connection-factory endpoint attribute in order to use another connection factory instance with different bean names. <citrus-jms:endpoint id="helloServiceQueueEndpoint" destination-name="Citrus.HelloService.Request.Queue" connection-factory="myConnectionFacotry"/> As an alternative to that you may want to use a special Spring jms template implementation as custom bean in your endpoint. <citrus-jms:endpoint id="helloServiceQueueEndpoint" destination-name="Citrus.HelloService.Request.Queue" jms-template="myJmsTemplate"/> |
The endpoint is now ready to be used inside a test case. Inside a test case you can send or receive messages using this endpoint. The test actions can reference the JMS endpoint using its identifier. When sending a message the message endpoint creates a JMS message producer and will simply publish the message to the defined JMS destination. As the communication is asynchronous by default producer does not wait for a synchronous response.
When receiving a messages with this endpoint the endpoint creates a JMS consumer on the JMS destination. The endpoint then acts as a message driven listener. This means that the message consumer connects to the given destination and waits for messages to arrive.
| Note |
|---|---|
Besides the destination-name attribute you can also provide a reference to a destination implementation. <citrus-jms:endpoint id="helloServiceQueueEndpoint" destination="helloServiceQueue"/> <amq:queue id="helloServiceQueue" physicalName="Citrus.HelloService.Request.Queue"/> The destination attribute references to a JMS destination object in the Spring application context. In the example above we used the ActiveMQ queue destination component. The destination reference can also refer to a JNDI lookup for instance. |
When using synchronous message endpoints Citrus will manage a reply destination for receiving a synchronous response message on the reply destination. The following figure illustrates that we now have two destinations in our communication scenario.

The synchronous message endpoint component is similar to the asynchronous brother that we have discussed before. The only difference is that the endpoint will automatically manage a reply destination behind the scenes. By default Citrus uses temporary reply destinations that get automatically deleted after the communication handshake is done. Again we need to use a JMS connection factory in the Spring XML configuration as the component need to connect to a JMS message broker.
<citrus-jms:sync-endpoint id="helloServiceSyncEndpoint" destination-name="Citrus.HelloService.InOut.Queue" timeout="10000"/>
The synchronous component defines a target destination which again is either a queue or topic destination. If nothing else is defined the endpoint will create temporary reply destinations on its own. When the endpoint has sent a message it waits synchronously for the response message to arrive on the reply destination. You can receive this reply message in your test case by referencing this same endooint in a receive test action. In case no reply message arrives in time a message timeout error is raised respectively.
See the following example test case which references the synchronous message endpoint in its send and receive test action in order to send out a message and wait for the synchronous response.
<testcase name="synchronousMessagingTest"> <actions> <send endpoint="helloServiceSyncEndpoint"> <message> <data> [...] </data> </message> </send> <receive endpoint="helloServiceSyncEndpoint"> <message> <data> [...] </data> </message> </receive> </actions> </testcase>
We initiated the synchronous communication by sending a message on the synchronous endpoint. The second step then receives the synchronous message on the temporary reply destination that was automatically created for us.
If you rather want to define a static reply destination you can do so, too. The static reply destination is not deleted after communication handshake. You may need to work with message selectors then in order to pick the right response message that belongs to a specific communication handshake. You can define a static reply destination on the synchronous endpoint component as follows.
<citrus-jms:sync-endpoint id="helloServiceSyncEndpoint" destination-name="Citrus.HelloService.InOut.Queue" reply-destination-name="Citrus.HelloService.Reply.Queue" timeout="10000"/>
Instead of using the reply-destination-name feel free to use the destination reference with reply-destination attribute. Again you can use a JNDI lookup then to reference a destination object.
| Important |
|---|---|
Be aware of permissions that are mandatory for creating temporary destinations. Citrus tries to create temporary queues on the JMS message broker. Following from that the Citrus JMS user has to have the permission to do so. Be sure that the user has the sufficient rights when using temporary reply destinations. |
Up to now we have sent a message and waited for a synchronous response in the next step. Now it is also possible to switch the directions of send and receive actions. Then we have the situation where Citrus receives a JMS message first and then Citrus is in charge of providing a proper synchronous response message to the initial sender.

In this scenario the foreign message producer has stored a dynamic JMS reply queue destination to the JMS header. So Citrus has to send the reply message to this specific reply destination, which is dynamic of course. Fortunately the heavy lift is done with the JMS message endpoint and we do not have to change anything in our configuration. Again we just define a synchronous message endpoint in the application context.
<citrus-jms:sync-endpoint id="helloServiceSyncEndpoint" destination-name="Citrus.HelloService.InOut.Queue" timeout="10000"/>
Now the only thing that changes here is that we first receive a message in our test case on this endpoint. The second step is a send message action that references this same endpoint and we are done. Citrus automatically manages the reply destinations for us.
<testcase name="synchronousMessagingTest"> <actions> <receive endpoint="helloServiceSyncEndpoint"> <message> <data> [...] </data> </message> </receive> <send endpoint="helloServiceSyncEndpoint"> <message> <data> [...] </data> </message> </send> </actions> </testcase>
Up to now we have used JMS queue destinations on our endpoints. Citrus is also able to connect to JMS topic destinations. In contrary to JMS queues which represents the point-to-point communication JMS topics use publish-subscribe mechanism in order to spread messages over JMS. A JMS topic producer publishes messages to the topic, while the topic accepts multiple message subscriptions and delivers the message to all subscribers.
The Citrus JMS endpoints offer the attribute 'pub-sub-domain'. Once this attribute is set to true Citrus will use JMS topics instead of queue destinations. See the following example where the publish-subscribe attribute is set to true in JMS message endpoint components.
<citrus-jms:endpoint id="helloServiceQueueEndpoint" destination="helloServiceQueue" pub-sub-domain="true"/>
When using JMS topics you will be able to subscribe several test actions to the topic destination and receive a message multiple times as all subscribers will receive the message.
| Important |
|---|---|
It is very important to keep in mind that Citrus does not deal with durable subscribers. This means that messages that were sent in advance to the message subscription are not delivered to the message endpoint. So racing conditions may cause problems when using JMS topic endpoints in Citrus. Be sure to let Citrus subscribe to the topic before messages are sent to it. Otherwise you may loose some messages that were sent in advance to the subscription. |
The JMS specification defines a set of special message header entries that can go into your JMS message. These JMS headers are stored differently in a JMS message header than other custom header entries do. Therefore these special header values should be set in a special syntax that we discuss in the next paragraphs.
<header> <element name="citrus_jms_correlationId" value="${correlationId}"/> <element name="citrus_jms_messageId" value="${messageId}"/> <element name="citrus_jms_redelivered" value="${redelivered}"/> <element name="citrus_jms_timestamp" value="${timestamp}"/> </header>
As you see all JMS specific message headers use the citrus_jms_ prefix. This prefix comes from Spring Integration message header mappers that take care of setting those headers in the JMS message header properly.
Typing of message header entries may also be of interest in order to meet the JMS standards of typed message headers. For instance the following message header is of type double and is therefore transferred via JMS as a double value.
<header> <element name="amount" value="19.75" type="double"/> </header>
When sending SOAP messages you have to deal with proper envelope, body and header construction. In Citrus you can add a special message converter that performs the heavy lift for you. Just add the message converter to the JMS endpoint as shown in the next program listing:
<citrus-jms:endpoint id="helloServiceSoapJmsEndpoint" destination-name="Citrus.HelloService.Request.Queue" message-converter="soapJmsMessageConverter"/> <bean id="soapJmsMessageConverter" class="com.consol.citrus.jms.message.SoapJmsMessageConverter"/>
With this message converter you can skip the SOAP envelope completely in your test case. You just deal with the message body payload and the header entries. The rest is done by the message converter. So you get proper SOAP messages on the producer and consumer side.
REST APIs have gained more and more significance regarding client-server interfaces. The REST client is nothing but a HTTP client sending HTTP requests usually in JSON data format to a HTTP server. As HTTP is a synchronous protocol by nature the client receives the server response synchronously. Citrus is able to connect with HTTP services and test REST APIs on both client and server side with a powerful JSON message data support. In the next sections you will learn how to invoke HTTP services as a client and how to handle REST HTTP requests in a test case. We deal with setting up a HTTP server in order to accept client requests and provide proper HTTP responses with GET, PUT, DELETE or POST request method.
| Note |
|---|---|
The http components in Citrus are kept in a separate Maven module. So you should add the module as Maven dependency to your project accordingly. <dependency> <groupId>com.consol.citrus</groupId> <artifactId>citrus-http</artifactId> <version>2.5</version> </dependency> As Citrus provides a customized HTTP configuration schema for the Spring application context configuration files we have to add name to the top level beans element. Simply include the http-config namespace in the configuration XML files as follows. <beans xmlns="http://www.springframework.org/schema/beans" xmlns:xsi="http://www.w3.org/2001/XMLSchema-instance" xmlns:citrus="http://www.citrusframework.org/schema/config" xmlns:citrus-http="http://www.citrusframework.org/schema/http/config" xsi:schemaLocation=" http://www.springframework.org/schema/beans http://www.springframework.org/schema/beans/spring-beans.xsd http://www.citrusframework.org/schema/config http://www.citrusframework.org/schema/config/citrus-config.xsd http://www.citrusframework.org/schema/http/config http://www.citrusframework.org/schema/http/config/citrus-http-config.xsd"> [...] </beans> Now we are ready to use the customized Citrus HTTP configuration elements with the citrus-http namespace prefix. |
On the client side we have a simple HTTP message client component connecting to the server. The request-url attribute defines the HTTP server endpoint URL to connect to. As usual you can reference this client in your test case in order to send and receive messages. Citrus as client waits for the response message from server. After that the response message goes through the validation process as usual. Let us see how a Citrus HTTP client component looks like:
<citrus-http:client id="helloHttpClient" request-url="http://localhost:8080/hello" request-method="GET" content-type="application/xml" timeout="60000"/>
The request-method defines the HTTP method to use. In addition to that we can specify the content-type of the request we are about to send. The client builds the HTTP request and sends it to the HTTP server. While the client is waiting for the synchronous HTTP response to arrive we are able to poll several times for the response message in our test case. As usual aou can use the same client endpoint in your test case to send and receive messages synchronously. In case the reply message comes in too late according to the timeout settings a respective timeout error is raised.
Http defines several request methods that a client can use to access Http server resources. In the example client above we are using GET as default request method. Of course you can overwrite this setting in a test case action by setting the HTTP request method inside the sending test action. The Http client component can be used as normal endpoint in a sending test action. Use something like this in your test:
XML DSL
<send endpoint="helloHttpClient"> <message> <payload> <TestMessage> <Text>Hello HttpServer</Text> </TestMessage> </payload> </message> <header> <element name="citrus_http_method" value="POST"/> </header> </send>
| Tip |
|---|---|
Citrus uses the Spring REST template mechanism for sending out HTTP requests. This means you have great customizing opportunities with a special REST template configuration. You can think of basic HTTP authentication, read timeouts and special message factory implementations. Just use the custom REST template attribute in client configuration like this: <citrus-http:client id="helloHttpClient" request-url="http://localhost:8080/hello" request-method="GET" content-type="text/plain" rest-template="customizedRestTemplate"/> <!-- Customized rest template --> <bean name="customizedRestTemplate" class="org.springframework.web.client.RestTemplate"> <property name="messageConverters"> <util:list id="converter"> <bean class="org.springframework.http.converter.StringHttpMessageConverter"> <property name="supportedMediaTypes"> <util:list id="types"> <value>text/plain</value> </util:list> </property> </bean> </util:list> </property> <property name="errorHandler"> <!-- Custom error handler --> </property> <property name="requestFactory"> <bean class="org.springframework.http.client.HttpComponentsClientHttpRequestFactory"> <property name="readTimeout" value="9000" /> </bean> </property> </bean> |
Up to now we have used a normal send test action to send Http requests as a client. This is completely valid strategy as the Citrus Http client is a normal endpoint. But we might want to set some more Http REST specific properties and settings. In order to simplify the Http usage in a test case we can use a special test action implementation. The Citrus Http specific actions are located in a separate XML namespace. So wen need to add this namespace to our test case XML first.
<beans xmlns="http://www.springframework.org/schema/beans" xmlns:xsi="http://www.w3.org/2001/XMLSchema-instance" xmlns:http="http://www.citrusframework.org/schema/http/testcase" xsi:schemaLocation=" http://www.springframework.org/schema/beans http://www.springframework.org/schema/beans/spring-beans.xsd http://www.citrusframework.org/schema/http/testcase http://www.citrusframework.org/schema/http/testcase/citrus-http-testcase.xsd"> [...] </beans>
The test case is now ready to use the specific Http test actions by using the prefix http:.
XML DSL
<http:send-request client="httpClient"> <http:POST path="/customer"> <http:headers content-type="application/xml" accept="application/xml, */*"> <http:header name="CustomHeaderId" value="${custom_header_id}"/> </http:headers> <http:body> <http:data> <![CDATA[ <customer> <id>citrus:randomNumber()</id> <name>testuser</name> </customer> ]]> </http:data> </http:body> </http:POST> </http:send-request>
The action above uses several Http specific settings such as the request method POST as well as the content-type and accept headers. As usual the send action needs a target Http client endpoint component. We can specify a request path attribute that added as relative path to the base uri used on the client.
When using a GET request we can specify some request uri parameters.
XML DSL
<http:send-request client="httpClient"> <http:GET path="/customer/${custom_header_id}"> <http:params content-type="application/xml" accept="application/xml, */*"> <http:param name="type" value="active"/> </http:params> </http:GET> </http:send-request>
The send action above uses a GET request on the endpoint uri http://localhost:8080/customer/1234?type=active.
Of course when sending Http client requests we are also interested in receiving Http response messages. We want to validate the success response with Http status code.
XML DSL
<http:receive-response client="httpClient"> <http:headers status="200" reason-phrase="OK" version="HTTP/1.1"> <http:header name="CustomHeaderId" value="${custom_header_id}"/> </http:headers> <http:body> <http:data> <![CDATA[ <customerResponse> <success>true</success> </customerResponse> ]]> </http:data> </http:body> </http:receive-response>
The receive-response test action also uses a client component. We can expect response status code information such as status and reason-phrase. Of course Citrus will raise a validation exception in case Http status codes mismatch.
Up to now we have used XML DSL test cases. The Java DSL in Citrus also works with specific Http test actions. See following example and find out how this works:
XML DSL
@CitrusTest
public void httpActionTest() {
http().client("httpClient")
.post("/customer")
.payload("<customer>" +
"<id>citrus:randomNumber()</id>" +
"<name>testuser</name>" +
"</customer>")
.header("CustomHeaderId", "${custom_header_id}")
.contentType("text/xml")
.accept("text/xml, */*");
http().client("httpClient")
.response(HttpStatus.OK)
.payload("<customerResponse>" +
"<success>true</success>" +
"</customerResponse>")
.header("CustomHeaderId", "${custom_header_id}")
.version("HTTP/1.1");
}Now we can send and receive messages as Http client with specific test actions. Now lets move on to the Http server.
The HTTP client was quite easy and straight forward. Receiving HTTP messages is a little bit more complicated because Citrus has to provide server functionality listening on a local port for client connections. Therefore Citrus offers an embedded HTTP server which is capable of handling incoming HTTP requests. Once a client connection is accepted the HTTP server must also provide a proper HTTP response to the client. In the next few lines you will see how to simulate server side HTTP REST service with Citrus.
<citrus-http:server id="helloHttpServer" port="8080" auto-start="true" resource-base="src/it/resources"/>
Citrus uses an embedded Jetty server that will automatically start when the Spring application context is loaded (auto-start="true"). The basic connector is listening on port 8080 for requests. Test cases can interact with this server instance via message channels by default. The server provides an inbound channel that holds incoming request messages. The test case can receive those requests from the channel with a normal receive test action. In a second step the test case can provide a synchronous response message as reply which will be automatically sent back to the HTTP client as response.

The figure above shows the basic setup with inbound channel and reply channel. You as a tester should not worry about this to much. By default you as a tester just use the server as synchronous endpoint in your test case. This means that you simply receive a message from the server and send a response back.
<testcase name="httpServerTest"> <actions> <receive endpoint="helloHttpServer"> <message> <data> [...] </data> </message> </receive> <send endpoint="helloHttpServer"> <message> <data> [...] </data> </message> </send> </actions> </testcase>
As you can see we reference the server id in both receive and send actions. The Citrus server instance will automatically send the response back to the calling HTTP client. In most cases this is exactly what we want to do - send back a response message that is specified inside the test. The HTTP server component by default uses a channel endpoint adapter in order to forward all incoming requests to an in memory message channel. This is done completely behind the scenes. The Http server component provides some more customization possibilities when it comes to endpoint adapter implementations. This topic is discussed in a separate section Chapter 32, Endpoint adapter. Up to now we keep it simple by synchronously receiving and sending messages in the test case.
| Tip |
|---|---|
The default channel endpoint adapter automatically creates an inbound message channel where incoming messages are stored to internally. So if you need to clean up a server that has already stored some incoming messages you can do this easily by purging the internal message channel. The message channel follows a naming convention {serverName}.inbound where {serverName} is the Spring bean name of the Citrus server endpoint component. If you purge this internal channel in a before test nature you are sure that obsolete messages on a server instance get purged before each test is executed. |
So lets get back to our mission of providing response messages as server to connected clients. As you might know Http REST works with some characteristic properties when it comes to send and receive messages. For instance a client can send different request methods GET, POST, PUT, DELETE, HEAD and so on. The Citrus server may verify this method when receiving client requests. Therefore we have introduced special Http test actions for server communication. Have a look at a simple example:
<http:receive-request server="helloHttpServer"> <http:POST path="/test"> <http:headers content-type="application/xml" accept="application/xml, */*"> <http:header name="CustomHeaderId" value="${custom_header_id}"/> <http:header name="Authorization" value="Basic c29tZVVzZXJuYW1lOnNvbWVQYXNzd29yZA=="/> </http:headers> <http:body> <http:data> <![CDATA[ <testRequestMessage> <text>Hello HttpServer</text> </testRequestMessage> ]]> </http:data> </http:body> </http:POST> <http:extract> <http:header name="X-MessageId" variable="message_id"/> </http:extract> </http:receive-request> <http:send-response server="helloHttpServer"> <http:headers status="200" reason-phrase="OK" version="HTTP/1.1"> <http:header name="X-MessageId" value="${message_id}"/> <http:header name="CustomHeaderId" value="${custom_header_id}"/> <http:header name="Content-Type" value="application/xml"/> </http:headers> <http:body> <http:data> <![CDATA[ <testResponseMessage> <text>Hello Citrus</text> </testResponseMessage> ]]> </http:data> </http:body> </http:send-response>
We receive a client request and validate that the request method is POST on request path /test. Now we can validate special message headers such as content-type. In addition to that we can check custom headers and basic authorization headers. As usual the optional message body is compared to an expected message template. The custom X-MessageId header is saved to a test variable message_id for later usage in the response.
The response message defines Http typical entities such as status and reason-phrase. Here the tester can simulate 404 NOT_FOUND errors or similar other status codes that get send back to the client. In our example everything is OK and we send back a response body and some custom header entries.
That is basically how Citrus simulates Http server operations. We receive the client request and validate the request properties. Then we send back a response with a Http status code.
As usual all these Http specific actions are also available in Java DSL.
@CitrusTest
public void httpServerActionTest() {
http().server("helloHttpServer")
.post("/test")
.payload("<testRequestMessage<" +
"<text<Hello HttpServer</text<" +
"</testRequestMessage<")
.contentType("application/xml")
.accept("application/xml, */*")
.header("CustomHeaderId", "${custom_header_id}")
.header("Authorization", "Basic c29tZVVzZXJuYW1lOnNvbWVQYXNzd29yZA==")
.extractFromHeader("X-MessageId", "message_id");
http().server("helloHttpServer")
.respond(HttpStatus.OK)
.payload("<testResponseMessage<" +
"<text<Hello Citrus</text<" +
"</testResponseMessage<")
.version("HTTP/1.1")
.contentType("application/xml")
.header("CustomHeaderId", "${custom_header_id}")
.header("X-MessageId", "${message_id}");
}This is the exact same example in Java DSL. We select server actions first and receive client requests. Then we send back a response with a HttpStatus.OK status. This completes the server actions on Http message transport. Now we continue with some more Http specific settings and features.
When dealing with HTTP request/response communication we always deal with HTTP specific headers. The HTTP protocol defines a group of header attributes that both client and server need to be able to handle. You can set and validate these HTTP headers in Citrus quite easy. Let us have a look at a client operation in Citrus where some HTTP headers are explicitly set before the request is sent out.
<http:send-request client="httpClient"> <http:POST> <http:headers> <http:header name="CustomHeaderId" value="${custom_header_id}"/> <http:header name="Content-Type" value="text/xml"/> <http:header name="Accept" value="text/xml,*/*"/> </http:headers> <http:body> <http:payload> <testRequestMessage> <text>Hello HttpServer</text> </testRequestMessage> </http:payload> </http:body> </http:POST> </http:send-request>
We are able to set custom headers (CustomHeaderId) that go directly into the HTTP header section of the request. In addition to that testers can explicitly set HTTP reserved headers such as Content-Type. Fortunately you do not have to set all headers on your own. Citrus will automatically set the required HTTP headers for the request. So we have the following HTTP request which is sent to the server:
POST /test HTTP/1.1 Accept: text/xml, */* Content-Type: text/xml CustomHeaderId: 123456789 Accept-Charset: macroman User-Agent: Jakarta Commons-HttpClient/3.1 Host: localhost:8091 Content-Length: 175 <testRequestMessage> <text>Hello HttpServer</text> </testRequestMessage>
On server side testers are interested in validating the HTTP headers. Within Citrus receive action you simply define the expected header entries. The HTTP specific headers are automatically available for validation as you can see in this example:
<http:receive-request server="httpServer"> <http:POST> <http:headers> <http:header name="CustomHeaderId" value="${custom_header_id}"/> <http:header name="Content-Type" value="text/xml"/> <http:header name="Accept" value="text/xml,*/*"/> </http:headers> <http:body> <http:payload> <testRequestMessage> <text>Hello HttpServer</text> </testRequestMessage> </http:payload> </http:body> </http:POST> </http:receive-request>
The test checks on custom headers and HTTP specific headers to meet the expected values.
Now that we have accepted the client request and validated the contents we are able to send back a proper HTTP response message. Same thing here with HTTP specific headers. The HTTP protocol defines several headers marking the success or failure of the server operation. In the test case you can set those headers for the response message with conventional Citrus header names. See the following example to find out how that works for you.
<http:send-response server="httpServer"> <http:headers status="200" reason-phrase="OK"> <http:header name="CustomHeaderId" value="${custom_header_id}"/> <http:header name="Content-Type" value="text/xml"/> </http:headers> <http:body> <http:payload> <testResponseMessage> <text>Hello Citrus Client</text> </testResponseMessage> </http:payload> </http:body> </http:send-response>
Once more we set the custom header entry (CustomHeaderId) and a HTTP reserved header (Content-Type) for the response message. On top of this we are able to set the response status for the HTTP response. We use the reserved header names status in order to mark the success of the server operation. With this mechanism we can easily simulate different server behaviour such as HTTP error response codes (e.g. 404 - Not found, 500 - Internal error). Let us have a closer look at the generated response message:
HTTP/1.1 200 OK Content-Type: text/xml;charset=UTF-8 Accept-Charset: macroman Content-Length: 205 Server: Jetty(7.0.0.pre5) <testResponseMessage> <text>Hello Citrus Client</text> </testResponseMessage>
| Tip |
|---|---|
You do not have to set the reason phrase all the time. It is sufficient to only set the HTTP status code. Citrus will automatically add the proper reason phrase for well known HTTP status codes. |
The only thing that is missing right now is the validation of HTTP status codes when receiving the server response in a Citrus test case. It is very easy as you can use the Citrus reserved header names for validation, too.
<http:receive-response client="httpClient"> <http:headers status="200" reason-phrase="OK" version="HTTP/1.1"> <http:header name="CustomHeaderId" value="${custom_header_id}"/> </http:headers> <http:body> <http:payload> <testResponseMessage> <text>Hello Test Framework</text> </testResponseMessage> </http:payload> </http:body> </http:receive-response>
Up to now we have used some of the basic Citrus reserved HTTP header names (status, version, reason-phrase). In HTTP RESTful services some other header names are essential for validation. These are request attributes like query parameters, context path and request URI. The Citrus server side REST message controller will automatically add all this information to the message header for you. So all you need to do is validate the header entries in your test.
The next example receives a HTTP GET method request on server side. Here the GET request does not have any message payload, so the validation just works on the information given in the message header. We assume the client to call http://localhost:8080/app/users?id=123456789. As a tester we need to validate the request method, request URI, context path and the query parameters.
<http:receive-request server="httpServer"> <http:GET path="/app/users" context-path="/app"> <http:params> <http:param name="id" value="123456789"/> </http:params> <http:headers> <http:header name="Host" value="localhost:8080"/> <http:header name="Content-Type" value="text/html"/> <http:header name="Accept" value="text/xml,*/*"/> </http:headers> <http:body> <http:data></http:data> </http:body> </http:GET> </http:receive-request>
| Tip |
|---|---|
Be aware of the slight differences in request URI and context path. The context path gives you the web application context path within the servlet container for your web application. The request URI always gives you the complete path that was called for this request. |
As you can see we are able to validate all parts of the initial request endpoint URI the client was calling. This completes the HTTP header processing within Citrus. On both client and server side Citrus is able to set and validate HTTP specific header entries which is essential for simulating HTTP communication.
HTML form data can be sent to the server using different methods and content types. One of them is a POST method with x-www-form-urlencoded body content. The form data elements are sent to the server using key-value pairs POST data where the form control name is the key and the control data is the url encoded value.
Form urlencoded form data content could look like this:
password=s%21cr%21t&username=foo
A you can see the form data is automatically encoded. In the example above we transmit two form controls password and username with respective values s$cr$t and foo. In case we would validate this form data in Citrus we are able to do this with plaintext message validation.
<receive endpoint="httpServer"> <message type="plaintext"> <data> <![CDATA[ password=s%21cr%21t&username=${username} ]]> </data> </message> <header> <element name="citrus_http_method" value="POST"/> <element name="citrus_http_request_uri" value="/form-test"/> <element name="Content-Type" value="application/x-www-form-urlencoded"/> </header> </receive>
Obviously validating these key-value pair character sequences can be hard especially when having HTML forms with lots of form controls. This is why Citrus provides a special message validator for x-www-form-urlencoded contents. First of all we have to add citrus-http module as dependency to our project if not done so yet. After that we can add the validator implementation to the list of message validators used in Citrus.
<citrus:message-validators> <citrus:validator class="com.consol.citrus.http.validation.FormUrlEncodedMessageValidator"/> </citrus:message-validators>
Now we are able to receive the urlencoded form data message in a test.
<receive endpoint="httpServer"> <message type="x-www-form-urlencoded"> <payload> <form-data xmlns="http://www.citrusframework.org/schema/http/message"> <content-type>application/x-www-form-urlencoded</content-type> <action>/form-test</action> <controls> <control name="password"> <value>${password}</value> </control> <control name="username"> <value>${username}</value> </control> </controls> </form-data> </payload> </message> <header> <element name="citrus_http_method" value="POST"/> <element name="citrus_http_request_uri" value="/form-test"/> <element name="Content-Type" value="application/x-www-form-urlencoded"/> </header> </receive>
We use a special message type x-www-form-urlencoded so the new message validator will take action. The form url encoded message validator is able to handle a special XML representation of the form data. This enables the very powerful XML message validation capabilities of Citrus such as ignoring elements and usage of test variables inline.
Each form control is translated to a control element with respective name and value properties. The form data is validated in a more comfortable way as the plaintext message validator would be able to offer.
So far we have received response messages with HTTP status code 200 OK. How to deal with server errors like 404 Not Found or 500 Internal server error? The default HTTP message client error strategy is to propagate server error response messages to the receive action for validation. We simply check on HTTP status code and status text for error validation.
<http:send-request client="httpClient"> <http:body> <http:payload> <testRequestMessage> <text>Hello HttpServer</text> </testRequestMessage> </http:payload> </http:body> </http:send-request> <http:receive-request client="httpClient"> <http:body> <http:data><![CDATA[]]></http:data> </http:body> <http:headers status="403" reason-phrase="FORBIDDEN"/> </http:receive>
The message data can be empty depending on the server logic for these error situations. If we receive additional error information as message payload just add validation assertions as usual.
Instead of receiving such empty messages with checks on HTTP status header information we can change the error strategy in the message sender component in order to automatically raise exceptions on response messages other than 200 OK. Therefore we go back to the HTTP message sender configuration for changing the error strategy.
<citrus-http:client id="httpClient" request-url="http://localhost:8080/test" error-strategy="throwsException"/>
Now we expect an exception to be thrown because of the error response. Following from that we have to change our test case. Instead of receiving the error message with receive action we assert the client exception and check on the HTTP status code and status text.
<assert exception="org.springframework.web.client.HttpClientErrorException" message="403 Forbidden"> <http:send-request client="httpClient"> <http:body> <http:payload> <testRequestMessage> <text>Hello HttpServer</text> </testRequestMessage> </http:payload> </http:body> </http:send-request> </assert>
Both ways of handling HTTP error messages on client side are valid for expecting the server to raise HTTP error codes. Choose the preferred way according to your test project requirements.
As client you may have to use basic authentication in order to access a resource on the server. In most cases this will be username/password authentication where the credentials are transmitted in the request header section as base64 encoding.
The easiest approach to set the Authorization header for a basic authentication HTTP request would be to set it on your own in the send action definition. Of course you have to use the correct basic authentication header syntax with base64 encoding for the username:password phrase. See this simple example.
<http:headers> <http:header name="Authorization" value="Basic c29tZVVzZXJuYW1lOnNvbWVQYXNzd29yZA=="/> </http:headers>
Citrus will add this header to the HTTP requests and the server will read the Authorization username and password. For more convenient base64 encoding you can also use a Citrus function, see Section 33.23, “citrus:encodeBase64()”
Now there is a more comfortable way to set the basic authentication header in all the Citrus requests. As Citrus uses Spring's REST support with the RestTemplate and ClientHttpRequestFactory the basic authentication is already covered there in a more generic way. You simply have to configure the basic authentication credentials on the RestTemplate's ClientHttpRequestFactory. Just see the following example and learn how to do that.
<citrus-http:client id="httpClient" request-method="POST" request-url="http://localhost:8080/test" request-factory="basicAuthFactory"/> <bean id="basicAuthFactory" class="com.consol.citrus.http.client.BasicAuthClientHttpRequestFactory"> <property name="authScope"> <bean class="org.apache.http.auth.AuthScope"> <constructor-arg value="localhost"/> <constructor-arg value="8072"/> <constructor-arg value=""/> <constructor-arg value="basic"/> </bean> </property> <property name="credentials"> <bean class="org.apache.http.auth.UsernamePasswordCredentials"> <constructor-arg value="someUsername"/> <constructor-arg value="somePassword"/> </bean> </property> </bean>
The advantages of this method is obvious. Now all sending test actions that reference the client component will automatically add the basic authentication header.
| Important |
|---|---|
Since Citrus has upgraded to Spring 3.1.x the Jakarta commons HTTP client is deprecated with Citrus version 1.2. The formerly used UserCredentialsClientHttpRequestFactory is therefore also deprecated and will not continue with next versions. Please update your configuration if you are coming from Citrus 1.1 or earlier versions. |
The above configuration results in HTTP client requests with authentication headers properly set for basic authentication. The client request factory takes care on adding the proper basic authentication header to each request that is sent with this Citrus message sender. Citrus uses preemtive authentication. The message sender only sends a single request to the server with all authentication information set in the message header. The request which determines the authentication scheme on the server is skipped. This is why you have to add some auth scope in the client request factory so Citrus can setup an authentication cache within the HTTP context in order to have preemtive authentication.
As a result of the basic auth client request factory the following example request that is created by the Citrus HTTP client has the Authorization header set. This is done now automatically for all requests with this HTTP client.
POST /test HTTP/1.1 Accept: text/xml, */* Content-Type: text/xml Accept-Charset: iso-8859-1, us-ascii, utf-8 Authorization: Basic c29tZVVzZXJuYW1lOnNvbWVQYXNzd29yZA== User-Agent: Jakarta Commons-HttpClient/3.1 Host: localhost:8080 Content-Length: 175 <testRequestMessage> <text>Hello HttpServer</text> </testRequestMessage>
Citrus as a server can also set basic authentication so clients need to authenticate properly when accessing server resources.
<citrus-http:server id="basicAuthHttpServer" port="8090" auto-start="true" resource-base="src/it/resources" security-handler="basicSecurityHandler"/> <bean id="securityHandler" class="com.consol.citrus.http.security.SecurityHandlerFactory"> <property name="users"> <list> <bean class="com.consol.citrus.http.security.User"> <property name="name" value="citrus"/> <property name="password" value="secret"/> <property name="roles" value="CitrusRole"/> </bean> </list> </property> <property name="constraints"> <map> <entry key="/foo/*"> <bean class="com.consol.citrus.http.security.BasicAuthConstraint"> <constructor-arg value="CitrusRole"/> </bean> </entry> </map> </property> </bean>
We have set a security handler on the server web container with a constraint on all resources with /foo/*. Following from that the server requires basic authentication for these resources. The granted users and roles are specified within the security handler bean definition. Connecting clients have to set the basic auth HTTP header properly using the correct user and role for accessing the Citrus server now.
You can customize the security handler for your very specific needs (e.g. load users and roles with JDBC from a database). Just have a look at the code base and inspect the settings and properties offered by the security handler interface.
| Tip |
|---|---|
This mechanism is not restricted to basic authentication only. With other settings you can also set up digest or form-based authentication constraints very easy. |
The Citrus HTTP server uses Spring application context loading on startup. For high customizations you can provide a custom servlet context file which holds all custom configurations as Spring beans for the server. Here is a sample servlet context with some basic Spring MVC components and the central HttpMessageController which is responsible for handling incoming requests (GET, PUT, DELETE, POST, etc.).
<bean id="citrusHandlerMapping" class="org.springframework.web.servlet.mvc.method.annotation.RequestMappingHandlerMapping"/> <bean id="citrusMethodHandlerAdapter" class="org.springframework.web.servlet.mvc.method.annotation.RequestMappingHandlerAdapter"> <property name="messageConverters"> <util:list id="converters"> <bean class="org.springframework.http.converter.StringHttpMessageConverter"> <property name="supportedMediaTypes"> <util:list> <value>text/xml</value> </util:list> </property> </bean> </util:list> </property> </bean> <bean id="citrusHttpMessageController" class="com.consol.citrus.http.controller.HttpMessageController"> <property name="endpointAdapter"> <bean class="com.consol.citrus.endpoint.adapter.EmptyResponseEndpointAdapter"/> </property> </bean>
The beans above are responsible for proper HTTP server configuration. In general you do not need to adjust those beans, but we have the possibility to do so which gives us a great customization and extension points. The important part is the endpoint adapter definition inside the HttpMessageController. Once a client request was accepted the adapter is responsible for generating a proper response to the client.
You can add the custom servlet context as file resource to the Citrus HTTP server component. Just use the context-config-location attribute as follows:
<citrus-http:server id="helloHttpServer" port="8080" auto-start="true" context-config-location="classpath:com/consol/citrus/http/custom-servlet-context.xml" resource-base="src/it/resources"/>
The WebSocket message protocol builds on top of Http standard and brings bidirectional communication to the Http client-server world. Citrus is able to send and receive messages with WebSocket connections as client and server. The Http server implementation is now able to define multiple WebSocket endpoints. The new Citrus WebSocket client is able to publish and consumer messages via bidirectional WebSocket protocol.
The new WebSocket support is located in the module citrus-websocket. Therefore we need to add this module to our project as dependency when we are about to use the WebSocket features in Citrus.
<dependency> <groupId>com.consol.citrus</groupId> <artifactId>citrus-websocket</artifactId> <version>2.5</version> </dependency>
As Citrus provides a customized WebSocket configuration schema for the Spring application context configuration files we have to add name to the top level beans element. Simply include the websocket-config namespace in the configuration XML files as follows.
<beans xmlns="http://www.springframework.org/schema/beans" xmlns:xsi="http://www.w3.org/2001/XMLSchema-instance" xmlns:citrus="http://www.citrusframework.org/schema/config" xmlns:citrus-websocket="http://www.citrusframework.org/schema/websocket/config" xsi:schemaLocation=" http://www.springframework.org/schema/beans http://www.springframework.org/schema/beans/spring-beans.xsd http://www.citrusframework.org/schema/config http://www.citrusframework.org/schema/config/citrus-config.xsd http://www.citrusframework.org/schema/websocket/config http://www.citrusframework.org/schema/websocket/config/citrus-websocket-config.xsd"> [...] </beans>
Now our project is ready to use the Citrus WebSocket support. First of all let us send a message via WebSocket connection to some server.
On the client side Citrus offers a client component that goes directly to the Spring bean application context. The client needs a server endpoint uri. This is a WebSocket protocol endpoint uri.
<citrus-websocket:client id="helloWebSocketClient" url="http://localhost:8080/hello" timeout="5000"/>
The url defines the endpoint to send messages to. The server has to be a WebSocket ready web server that supports Http connection upgrade for WebSocket protocols. WebSocket by its nature is an asynchronous bidirectional protocol. This means that the connection between client and server remains open and both server and client can send and receive messages. So when the Citrus client is waiting for a message we need a timeout that stops the asynchronous waiting. The receiving test action and the test case will fail when such a timeout is raised.
The WebSocket client will automatically open a connection to the server and ask for a connection upgrade to WebSocket protocol. This handshake is done once when the connection to the server is established. After that the client can push messages to the server and on the other side the server can push messages to the client. Now lets first push some messages to the server:
<send endpoint="helloWebSocketClient"> <message> <payload> <TestMessage> <Text>Hello WebSocketServer</Text> </TestMessage> </payload> </message> </send>
The connection handshake and the connection upgrade is done automatically by the client. After that the message is pushed to the server. As WebSocket is a bidirectional protocol we can also receive messages on the WebSocket client. These messages are pushed from server to all connected clients.
<receive endpoint="helloWebSocketClient"> <message> <payload> <TestMessage> <Text>Hello WebSocketClient</Text> </TestMessage> </payload> </message> </receive>
We just use the very same client endpoint component in a message receive action. The client will wait for messages from the server and once received perform the well known message validation. Here we expect some XML message payload. This completes the client side as we are able to push and consumer messages via WebSocket connections.
| Tip |
|---|---|
Up to now we have used static WebSocket endpoint URIs in our client component configurations. This can be done with a more powerful dynamic endpoint URI in WebSocket client. Similar to the endpoint resolving mechanism in SOAP you can dynamically set the called endpoint uri at test runtime through message header values. By default Citrus will check a specific header entry for dynamic endpoint URI which is simply defined for each message sending action inside the test. The dynamicEndpointResolver bean must implement the EndpointUriResolver interface in order to resolve dynamic endpoint uri values. Citrus offers a default implementation, the DynamicEndpointUriResolver, which uses a specific message header for setting dynamic endpoint uri. The message header needs to specify the header citrus_endpoint_uri with a valid request uri. <header> <element name="citrus_endpoint_uri" value="ws://localhost:8080/customers/${customerId}"/> </header> The specific send action above will send its message to the dynamic endpoint (ws://localhost:8080/customers/${customerId}) which is set in the header citrus_endpoint_uri. |
On the server side Citrus has a Http server implementation that we can easily start during test runtime. The Http server accepts connections from clients and also supports WebSocket upgrade strategies. This means clients can ask for a upgrade to the WebSocket standard. In this handshake the server will upgrade the connection to WebSocket and afterwards client and server can exchange messages over this connection. This means the connection is kept alive and multiple messages can be exchanged. Lets see how WebSocket endpoints are added to a Http server component in Citrus.
<citrus-websocket:server id="helloHttpServer" port="8080" auto-start="true" resource-base="src/it/resources"> <citrus-websocket:endpoints> <citrus-websocket:endpoint ref="websocket1"/> <citrus-websocket:endpoint ref="websocket2"/> </citrus-websocket:endpoints> </citrus-websocket:server> <citrus-websocket:endpoint id="websocket1" path="/test1"/> <citrus-websocket:endpoint id="websocket2" path="/test2" timeout="10000"/>
The embedded Jetty WebSocket server component in Citrus now is able to define multiple WebSocket endpoints. The WebSocket endpoints match to a request path on the server and are referenced by a unique id. Each WebSocket endpoint can follow individual timeout settings. In a test we can use these endpoints directly to receive messages.
<testcase name="httpWebSocketServerTest"> <actions> <receive endpoint="websocket1"> <message> <data> [...] </data> </message> </receive> <send endpoint="websocket1"> <message> <data> [...] </data> </message> </send> </actions> </testcase>
As you can see we reference the endpoint id in both receive and send actions. Each WebSocket endpoint holds one or more open connections to its clients. Each message that is sent is pushed to all connected clients. Each client can send messages to the WebSocket endpoint.
The WebSocket endpoint component handles connection handshakes automatically and caches all open sessions in memory. By default all connected clients will receive the messages pushed from server. This is done completely behind the scenes. The Citrus server is able to handle multiple WebSocket endpoints with different clients connected to it at the same time. This is why we have to choose the WebSocket endpoint on the server by its identifier when sending and receiving messages.
With this WebSocket endpoints we change the Citrus server behavior so that clients can upgrade to WebSocket connection. Now we have a bidirectional connection where the server can push messages to the client and vice versa.
The WebSocket standard defines some default headers to use during connection upgrade. These headers are made available to the test case in both directions. Citrus will handle these header values with special care when WebSocket support is activated on a server or client. Now WebSocket messages can also be split into multiple pieces. Each message part is pushed separately to the server but still is considered to be a single message payload. The server has to collect and aggregate all messages until a special message header isLast is set in one of the message parts.
The Citrus WebSocket client can slice messages into several parts.
<send endpoint="webSocketClient"> <message type="json"> <data> [ { "event" : "client_message_1", "timestamp" : "citrus:currentDate()" }, </data> </message> <header> <element name="citrus_websocket_is_last" value="false"/> </header> </send> <sleep milliseconds="500"/> <send endpoint="webSocketClient"> <message type="json"> <data> { "event" : "client_message_2", "timestamp" : "citrus:currentDate()" } ] </data> </message> <header> <element name="citrus_websocket_is_last" value="true"/> </header> </send>
The test above has two separate send operations both sending to a WebSocket endpoint. The first sending action sets the header citrus_websocket_is_last to false which indicates that the message is not complete yet. The 2nd send action pushes the rest of the message to the server and set the citrus_websocket_is_last header to true. Now the server is able to aggregate the message pieces to a single message payload. The result is a valida JSON array with both events in it.
[
{
"event" : "client_message_1",
"timestamp" : "2015-01-01"
},
{
"event" : "client_message_2",
"timestamp" : "2015-01-01"
}
]Now the server part in Citrus is able to handle these sliced messages, too. The server will automatically aggregate those message parts before passing it to the test case for validation.
SOAP Web Services over HTTP is a widely used communication scenario in modern enterprise applications. A SOAP Web Service client is posting a SOAP request via HTTP to a server. SOAP via HTTP is a synchronous message protocol by default so the client is waiting synchronously for the response message. Citrus provides both SOAP client and server components in order to meet both directions of this scenario. The components used are very similar to the HTTP components that were have discussed in the sections before.
| Note |
|---|---|
The SOAP WebService components in Citrus are kept in a separate Maven module. So you should add the module as Maven dependency to your project accordingly. <dependency> <groupId>com.consol.citrus</groupId> <artifactId>citrus-ws</artifactId> <version>2.5</version> </dependency> In order to use the SOAP WebService support you need to include the specific XML configuration schema provided by Citrus. See following XML definition to find out how to include the citrus-ws namespace. <beans xmlns="http://www.springframework.org/schema/beans" xmlns:xsi="http://www.w3.org/2001/XMLSchema-instance" xmlns:citrus="http://www.citrusframework.org/schema/config" xmlns:citrus-ws="http://www.citrusframework.org/schema/ws/config" xsi:schemaLocation=" http://www.springframework.org/schema/beans http://www.springframework.org/schema/beans/spring-beans.xsd http://www.citrusframework.org/schema/config http://www.citrusframework.org/schema/config/citrus-config.xsd http://www.citrusframework.org/schema/ws/config http://www.citrusframework.org/schema/ws/config/citrus-ws-config.xsd"> [...] </beans> Now you are ready to use the customized soap configuration elements - all using the citrus-ws prefix - in your Spring configuration. |
Citrus is able to form a proper SOAP request in order to pass it to the server via HTTP and validate the respective SOAP response message. Let us see how a message client for SOAP looks like in the Spring configuration:
<citrus-ws:client id="soapClient" request-url="http://localhost:8090/test" timeout="60000"/>
The client component uses the request-url in order to access the server resource. The client will automatically build a proper SOAP request message including the SOAP envelope, SOAP header and the message payload as SOAP body. This means that you as a tester do not care about SOAP envelope specific logic in the test case. The client endpoint component saves the synchronous SOAP response so the test case can receive this message with a normal receive test action.
In detail you as a tester just send and receive using the same client endpoint reference just as you would do with a synchronous JMS or channel communication. In case no response message is available in time according to the timeout settings Citrus raises a timeout error and the test will fail.
| Important |
|---|---|
The SOAP client component uses a SoapMessageFactory implementation in order to create the SOAP messages. This is a Spring bean added to the Citrus Spring application context. Spring offers several reference implementations as message factories so you can choose one of them (e.g. for SOAP 1.1 or 1.2 implementations). <!-- Default SOAP Message Factory (SOAP 1.1) --> <bean id="messageFactory" class="org.springframework.ws.soap.saaj.SaajSoapMessageFactory"/> <!-- SOAP 1.2 Message Factory --> <bean id="soap12MessageFactory" class="org.springframework.ws.soap.saaj.SaajSoapMessageFactory"> <property name="soapVersion"> <util:constant static-field="org.springframework.ws.soap.SoapVersion.SOAP_12"/> </property> </bean> By default Citrus will search for a bean with id 'messageFactory'. In case you intend to use different identifiers you need to tell the SOAP client component which message factory to use: <citrus-ws:client id="soapClient" request-url="http://localhost:8090/test" message-factory="soap12MessageFactory"/> |
| Tip |
|---|---|
Up to now we have used a static endpoint request url for the SOAP message sender. Besides that we can use dynamic endpoint uri in configuration. We just use an endpoint uri resolver instead of the static request url like this: <citrus-ws:client id="soapClient" endpoint-resolver="dynamicEndpointResolver" message-factory="soap12MessageFactory"/> <bean id="dynamicEndpointResolver" class="com.consol.citrus.endpoint.resolver.DynamicEndpointUriResolver"/> The dynamicEndpointResolver bean must implement the EndpointUriResolver interface in order to resolve dynamic endpoint uri values. Citrus offers a default implementation, the DynamicEndpointUriResolver, which uses a specific message header for setting the dynamic endpoint uri for each message. The message header needs to specify the header citrus_endpoint_uri with a valid request uri. Just like this: <header> <element name="citrus_endpoint_uri" value="http://localhost:${port}/${context}" /> </header> As you can see you can use dynamic test variables then in order to build the request uri to use. The SOAP client evaluates the endpoint uri header and sends the message to this server resource. You can use a different uri value then in different test cases and send actions. |
Every client need a server to talk to. When receiving SOAP messages we require a web server instance listening on a port. Citrus is using an embedded Jetty server instance in combination with the Spring Web Service API in order to accept SOAP request calls asa server. See how the Citrus SOAP server is configured in the Spring configuration.
<citrus-ws:server id="helloSoapServer" port="8080" auto-start="true" resource-base="src/it/resources"/>
The server component is able to start automatically when application starts up. In the example above the server is listening for requests on port 8080. This setup uses the standard
connector configuration for the Jetty server. For detailed customization the Citrus Jetty server configuration also supports explicit connector configurations (@connector and @connectors attributes).
For more information please see the Jetty connector documentation.
Test cases interact with this server instance via message channels by default. The server component provides an inbound channel that holds incoming request messages. The test case can receive those requests from the channel with a normal receive test action. In a second step the test case can provide a synchronous response message as reply which will be automatically sent back to the calling SOAP client as response.

The figure above shows the basic setup with inbound channel and reply channel. You as a tester should not worry about this to much. By default you as a tester just use the server as synchronous endpoint in your test case. This means that you simply receive a message from the server and send a response back.
<testcase name="soapServerTest"> <actions> <receive endpoint="helloSoapServer"> <message> <data> [...] </data> </message> </receive> <send endpoint="helloSoapServer"> <message> <data> [...] </data> </message> </send> </actions> </testcase>
As you can see we reference the server id in both receive and send actions. The Citrus server instance will automatically send the response back to the calling client. In most cases this is what you need to simulate a SOAP server instance in Citrus. Of course we have some more customization possibilities that we will go over later on. This customizations are optional so you can also skip the next description on endpoint adapters if you are happy with just what you have learned about the SOAP server component in Citrus.
Just like the HTTP server component the SOAP server component by default uses the channel endpoint adapter in order to forward all incoming requests to an in memory message channel. This is done completely behind the scenes. The Citrus configuration has become a lot easier here so you do not have to configure this by default. When nothing else is set the test case does not worry about that settings on the server and just uses the server id reference as synchronous endpoint.
| Tip |
|---|---|
The default channel endpoint adapter automatically creates an inbound message channel where incoming messages are stored to internally. So if you need to clean up a server that has already stored some incoming messages you can do this easily by purging the internal message channel. The message channel follows a naming convention {serverName}.inbound where {serverName} is the Spring bean name of the Citrus server endpoint component. If you purge this internal channel in a before test nature you are sure that obsolete messages on a server instance get purged before each test is executed. |
However we do not want to loose the great extendability and customizing capabilities of the Citrus server component. This is why you can optionally define the endpoint adapter implementation used by the Citrus SOAP server. We provide several message endpoint adapter implementations for different simulation strategies. With these endpoint adapters you should be able to generate proper SOAP response messages for the client in various ways. Before we have a closer look at the different adapter implementations we want to show how you can set a custom endpoint adapter on the server component.
<citrus-ws:server id="helloSoapServer" port="8080" auto-start="true" endpoint-adapter="emptyResponseEndpointAdapter" resource-base="src/it/resources"/> <citrus:empty-response-adapter id="emptyResponseEndpointAdapter"/>
With this endpoint adapter configuration above we change the Citrus server behavior from scratch. Now the server automatically sends back an empty SOAP response message every time. Setting a custom endpoint adapter implementation with custom logic is easy as defining a custom endpoint adapter Spring bean and reference it in the server attribute. You can read more about endpoint adapters in Chapter 32, Endpoint adapter.
SOAP defines several header variations that we discuss in the following sections. First of all we deal with the special SOAP action header. In case we need to set this SOAP action header we simply need to use
the special header key called citrus_soap_action in our test. The special header key in combination with a underlying SOAP client endpoint component constructs the SOAP action in the SOAP message as intended.
<header> <element name="citrus_soap_action" value="sayHello"/> </header>
Secondly a SOAP message is able to contain customized SOAP headers. These are key-value pairs where the key is a qualified name (QName) and the value a normal String value.
<header> <element name="{http://www.consol.de/sayHello}h1:Operation" value="sayHello"/> <element name="{http://www.consol.de/sayHello}h1:Request" value="HelloRequest"/> </header>
The key is defined as qualified QName character sequence which has a mandatory XML namespace and a prefix along with a header name. Last not least a SOAP header can contain whole XML fragment values. The next example shows how to set these XML fragments as SOAP header in Citrus:
<header> <data> <![CDATA[ <User xmlns="http://www.consol.de/schemas/sayHello"> <UserId>123456789</UserId> <Handshake>S123456789</Handshake> </User> ]]> </data> </header>
You can also use external file resources to set this SOAP header XML fragment as shown in this last example code:
<header> <resource file="classpath:request-soap-header.xml"/> </header>
This completes the SOAP header possibilities for sending SOAP messages with Citrus. Of course you can also use these variants in SOAP message header validation. You define expected SOAP headers, SOAP action and XML fragments and Citrus will match incoming request to that. Just use citrus_soap_action header key in your receiving message action and you validate this SOAP header accordingly.
When validating SOAP header XML fragments you need to define the whole XML header fragment as expected header data like this:
<receive endpoint="soapMessageEndpoint"> <message> <data> <![CDATA[ <ResponseMessage xmlns="http://citrusframework.org/schema"> <resultCode>OK</resultCode> </ResponseMessage> ]]> </data> </message> <header> <data> <![CDATA[ <SOAP-ENV:Header xmlns:SOAP-ENV="http://schemas.xmlsoap.org/soap/envelope/"> <customHeader xmlns="http://citrusframework.org/headerschema"> <correlationId>${correlationId}</correlationId> <applicationId>${applicationId}</applicationId> <trackingId>${trackingId}</trackingId> <serviceId>${serviceId}</serviceId> <interfaceVersion>1.0</interfaceVersion> <timestamp>@ignore@</timestamp> </customHeader> </SOAP-ENV:Header> ]]> </data> <element name="citrus_soap_action" value="doResponse"/> </header> </receive>
As you can see the SOAP XML header validation can combine header element and XML fragment validation. This is also likely to be used when dealing with WS-Security message headers.
Besides the SOAP specific header elements the HTTP mime headers (e.g. Content-Type, Content-Length, Authorization) might be candidates for validation, too. When using HTTP as transport layer the SOAP message may define those mime headers. The tester is able to send and validate these headers inside the test case, although these HTTP headers are located outside of the SOAP envelope. Let us first of all speak about validating the HTTP mime headers. This feature is not enabled by default. We have enable this in our SOAP server configuration.
<citrus-ws:server id="helloSoapServer" port="8080" auto-start="true" handle-mime-headers="true" resource-base="src/it/resources"/>
With this configuration Citrus will handle all available mime headers and pass those to the test case for normal header validation.
<ws:receive endpoint="helloSoapServer"> <message> <payload> <SoapMessageRequest xmlns="http://www.consol.de/schemas/sample.xsd"> <Operation>Validate mime headers</Operation> </SoapMessageRequest> </payload> </message> <header> <element name="Content-Type" value="text/xml; charset=utf-8"/> </header> </ws:receive>
The validation of these HTTP mime headers is as usual now that we have enabled the mime header handling in the SOAP server. The transport HTTP headers are available in the header just like the normal SOAP header elements do. So you can validate the headers as usual.
So much for receiving and validating HTTP mime message headers with SOAP communication. Now we want to send special mime headers on client side. We overwrite or add mime
headers to our sending action. We mark some headers with following prefix "citrus_http_". This tells the SOAP client to add these headers to the
HTTP header section outside the SOAP envelope. Keep in mind that header elements without this prefix go right into the SOAP header section by default.
<ws:send endpoint="soapClient"> [...] <header> <element name="citrus_http_operation" value="foo"/> </header> [...] </ws:send>
The listing above defines a HTTP mime header operation. The header prefix citrus_http_ is cut off before the header goes into the HTTP
header section. With this feature we can decide where exactly our header information is located in our resulting client message.
By default Citrus will remove the SOAP envelope in message converter. Following from that the Citrus test case is independent from SOAP message formats and is not bothered with handling of SOAP envelope at all. This is great in most cases but sometimes it might be mandatory to also see the whole SOAP envelope inside the test case receive action. Therefore you can keep the SOAP envelope for incoming messages by configuration on the SOAP server side.
<citrus-ws:server id="helloSoapServer" port="8080" auto-start="true" keep-soap-envelope="true"/>
With this configuration Citrus will handle all available mime headers and pass those to the test case for normal header validation.
<ws:receive endpoint="helloSoapServer"> <message> <payload> <SOAP-ENV:Envelope xmlns:SOAP-ENV="http://schemas.xmlsoap.org/soap/envelope/"> <SOAP-ENV:Header/> <SOAP-ENV:Body> <SoapMessageRequest xmlns="http://www.consol.de/schemas/sample.xsd"> <Operation>Validate mime headers</Operation> </SoapMessageRequest> </SOAP-ENV:Body> </SOAP-ENV:Envelope> </payload> </message> </ws:receive>
So now you are able to validate the whole SOAP envelope as is. This might be of interest in very special cases. As mentioned by default the Citrus server will automatically remove the SOAP envelope and translate the SOAP body to the message payload for straight forward validation inside the test cases.
By default Citrus components use SOAP 1.1 version. Fortunately SOAP 1.2 is supported same way. As we already mentioned before the Citrus SOAP components do use a SOAP message factory for creating messages in SOAP format.
<!-- SOAP 1.1 Message Factory --> <bean id="soapMessageFactory" class="org.springframework.ws.soap.saaj.SaajSoapMessageFactory"> <property name="soapVersion"> <util:constant static-field="org.springframework.ws.soap.SoapVersion.SOAP_11"/> </property> </bean> <!-- SOAP 1.2 Message Factory --> <bean id="soap12MessageFactory" class="org.springframework.ws.soap.saaj.SaajSoapMessageFactory"> <property name="soapVersion"> <util:constant static-field="org.springframework.ws.soap.SoapVersion.SOAP_12"/> </property> </bean>
As you can see the SOAP message factory can either create SOAP 1.1 or SOAP 1.2 messages. This is how Citrus can create both SOAP 1.1 and SOAP 1.2 messages. Of course you can have multiple message factories configured in your project. Just set the message factory on a WebService client or server component in order to define which version should be used.
<citrus-ws:client id="soap12Client" request-url="http://localhost:8080/echo" message-factory="soap12MessageFactory" timeout="1000"/> <citrus-ws:server id="soap12Server" port="8080" auto-start="true" message-factory="soap12MessageFactory"/>
By default Citrus components do connect with a message factory called messageFactory no matter what SOAP version this factory is using.
SOAP faults describe a failed communication in SOAP WebServices world. Citrus is able to send and receive SOAP fault messages. On server side Citrus can simulate SOAP faults with fault-code, fault-reason, fault-actor and fault-detail. On client side Citrus is able to handle and validate SOAP faults in response messages. The next section describes how to deal with SOAP faults in Citrus.
As Citrus simulates SOAP server endpoints you also need to think about sending a SOAP fault to the calling client. In case Citrus receives a SOAP request as a server you can respond with a proper SOAP fault if necessary.
Please keep in mind that we use the citrus-ws extension for sending SOAP faults in our test case, as shown in this very simple example:
<ws:send-fault endpoint="helloSoapServer"> <ws:fault> <ws:fault-code>{http://www.citrusframework.org/faults}citrus:TEC-1000</ws:fault-code> <ws:fault-string>Invalid request</ws:fault-string> <ws:fault-actor>SERVER</ws:fault-actor> <ws:fault-detail> <![CDATA[ <FaultDetail xmlns="http://www.consol.de/schemas/sayHello.xsd"> <MessageId>${messageId}</MessageId> <CorrelationId>${correlationId}</CorrelationId> <ErrorCode>TEC-1000</ErrorCode> <Text>Invalid request</Text> </FaultDetail> ]]> </ws:fault-detail> </ws:fault> <ws:header> <ws:element name="citrus_soap_action" value="sayHello"/> </ws:header> </ws:send-fault>
The example generates a simple SOAP fault that is sent back to the calling client. The fault-actor and the fault-detail elements are optional.
Same with the soap action declared in the special Citrus header citrus_soap_action. In the sample above the fault-detail data is
placed inline as XML data. As an alternative to that you can also set the fault-detail via external file resource. Just use the
file attribute as fault detail instead of the inline CDATA definition.
<ws:send-fault endpoint="helloSoapServer"> <ws:fault> <ws:fault-code>{http://www.citrusframework.org/faults}citrus:TEC-1000</ws:fault-code> <ws:fault-string>Invalid request</ws:fault-string> <ws:fault-actor>SERVER</ws:fault-actor> <ws:fault-detail file="classpath:myFaultDetail.xml"/> </ws:fault> <ws:header> <ws:element name="citrus_soap_action" value="sayHello"/> </ws:header> </ws:send-fault>
The generated SOAP fault looks like follows:
HTTP/1.1 500 Internal Server Error Accept: text/xml, text/html, image/gif, image/jpeg, *; q=.2, */*; q=.2 SOAPAction: "sayHello" Content-Type: text/xml; charset=utf-8 Content-Length: 680 Server: Jetty(7.0.0.pre5) <SOAP-ENV:Envelope xmlns:SOAP-ENV="http://schemas.xmlsoap.org/soap/envelope/"> <SOAP-ENV:Header/> <SOAP-ENV:Body> <SOAP-ENV:Fault> <faultcode xmlns:citrus="http://www.citrusframework.org/faults">citrus:TEC-1000</faultcode> <faultstring xml:lang="en">Invalid request</faultstring> <detail> <FaultDetail xmlns="http://www.consol.de/schemas/sayHello.xsd"> <MessageId>9277832563</MessageId> <CorrelationId>4346806225</CorrelationId> <ErrorCode>TEC-1000</ErrorCode> <Text>Invalid request</Text> </FaultDetail> </detail> </SOAP-ENV:Fault> </SOAP-ENV:Body> </SOAP-ENV:Envelope>
| Important |
|---|---|
Notice that the send action uses a special XML namespace (ws:send). This ws namespace belongs to the Citrus WebService extension and
adds SOAP specific features to the normal send action. When you use such ws extensions you need to define the additional namespace in your test case.
This is usually done in the root <spring:beans> element where we simply declare the citrus-ws specific namespace like follows.
<spring:beans xmlns="http://www.citrusframework.org/schema/testcase" xmlns:spring="http://www.springframework.org/schema/beans" xmlns:ws="http://www.citrusframework.org/schema/ws/testcase" xsi:schemaLocation="http://www.springframework.org/schema/beans http://www.springframework.org/schema/beans/spring-beans.xsd http://www.citrusframework.org/schema/testcase http://www.citrusframework.org/schema/testcase/citrus-testcase.xsd http://www.citrusframework.org/schema/ws/testcase http://www.citrusframework.org/schema/ws/testcase/citrus-ws-testcase.xsd"> |
In case you receive SOAP response messages as a client endpoint you may need to handle and validate SOAP faults in error situations. Citrus can validate SOAP faults with fault-code, fault-actor, fault-string and fault-detail values.
As a client we send out a request and receive a SOAP fault as response. By default the client sending action in Citrus
throws a specific exception when the SOAP response is a SOAP fault element. This exception is called SoapFaultClientException
coming from the Spring API. You as a tester can assert this kind of exception in a test case in order to expect the SOAP error.
<assert class="org.springframework.ws.soap.client.SoapFaultClientException"> <send endpoint="soapClient"> <message> <payload> <SoapFaultForcingRequest xmlns="http://www.consol.de/schemas/soap"> <Message>This is invalid</Message> </SoapFaultForcingRequest> </payload> </message> </send> </assert>
The SOAP message sending action is surrounded by a simple assert action. The asserted exception class is the
SoapFaultClientException that we have mentioned before. This means that the test expects the exception to be thrown during the communication.
In case the exception is missing the test is fails.
So far we have used the Citrus core capabilities of asserting an exception. This basic assertion test action is not able to offer direct access to the SOAP fault-code and fault-string values for validation. The basic assert action simply has no access to the actual SOAP fault elements. Fortunately we can use the citrus-ws namespace again which offers a special assert action implementation especially designed for SOAP faults in this case.
<ws:assert fault-code="{http://www.citrusframework.org/faults}TEC-1001" fault-string="Invalid request"> fault-actor="SERVER"> <send endpoint="soapClient"> <message> <payload> <SoapFaultForcingRequest xmlns="http://www.consol.de/schemas/soap"> <Message>This is invalid</Message> </SoapFaultForcingRequest> </payload> </message> </send> </ws:assert>
The special assert action offers several attributes to validate the expected SOAP fault. Namely these are "fault-code", "fault-string" and "fault-actor". The fault-code is defined as a QName string and is mandatory for the validation. The fault assertion also supports test variable replacement as usual (e.g. fault-code="{http://www.citrusframework.org/faults}${myFaultCode}").
The time you use SOAP fault validation you need to tell Citrus how to validate the SOAP faults. Citrus needs an
instance of a SoapFaultValitator that we need to add to the Spring application context. By default
Citrus is searching for a bean with the id 'soapFaultValidator'.
<bean id="soapFaultValidator" class="com.consol.citrus.ws.validation.SimpleSoapAttachmentValidator"/>
Citrus offers several reference implementations for these SOAP fault validators. These are:
- com.consol.citrus.ws.validation.SimpleSoapAttachmentValidator
- com.consol.citrus.ws.validation.SimpleSoapFaultValidator
- com.consol.citrus.ws.validation.XmlSoapFaultValidator
Please see the API documentation for details on the available reference implementations. Of course you can also define your own SOAP validator logic (would be great if you could share your ideas!). In the test case you can explicitly choose the validator to use:
<ws:assert fault-code="{http://www.citrusframework.org/faults}TEC-1001" fault-string="Invalid request" fault-validator="mySpecialSoapFaultValidator"> [...] </ws:assert>
| Important |
|---|---|
Another important thing to notice when asserting SOAP faults is the fact, that Citrus needs to have a <bean id="messageFactory" class="org.springframework.ws.soap.saaj.SaajSoapMessageFactory"/> Choose one of Spring's reference implementations or some other implementation as SOAP message factory. Citrus will search for a bean with id 'messageFactory' by default. In case you have other beans with different identifiers please choose the messageFactory in the test case assert action: <ws:assert fault-code="{http://www.citrusframework.org/faults}TEC-1001" fault-string="Invalid request" message-factory="mySpecialMessageFactory"> [...] </ws:assert> |
| Important |
|---|---|
Notice the ws specific namespace that belongs to the Citrus WebService extensions. As the ws:assert action uses SOAP specific features
we need to refer to the citrus-ws namespace. You can find the namespace declaration in the root element in your test case.
<spring:beans xmlns="http://www.citrusframework.org/schema/testcase" xmlns:spring="http://www.springframework.org/schema/beans" xmlns:ws="http://www.citrusframework.org/schema/ws/testcase" xsi:schemaLocation="http://www.springframework.org/schema/beans http://www.springframework.org/schema/beans/spring-beans.xsd http://www.citrusframework.org/schema/testcase http://www.citrusframework.org/schema/testcase/citrus-testcase.xsd http://www.citrusframework.org/schema/ws/testcase http://www.citrusframework.org/schema/ws/testcase/citrus-ws-testcase.xsd"> |
Citrus is also able to validate SOAP fault details. See the following example for understanding how to do it:
<ws:assert fault-code="{http://www.citrusframework.org/faults}TEC-1001" fault-string="Invalid request"> <ws:fault-detail> <![CDATA[ <FaultDetail xmlns="http://www.consol.de/schemas/soap"> <ErrorCode>TEC-1000</ErrorCode> <Text>Invalid request</Text> </FaultDetail> ]]> </ws:fault-detail> <send endpoint="soapClient"> <message> <payload> <SoapFaultForcingRequest xmlns="http://www.consol.de/schemas/soap"> <Message>This is invalid</Message> </SoapFaultForcingRequest> </payload> </message> </send> </ws:assert>
The expected SOAP fault detail content is simply added to the ws:assert action. The SoapFaultValidator implementation defined in the Spring application context
is responsible for checking the SOAP fault detail with validation algorithm. The validator implementation checks the detail content to meet the expected template.
Citrus provides some default SoapFaultValidator implementations. Supported algorithms are pure String comparison (com.consol.citrus.ws.validation.SimpleSoapFaultValidator)
as well as XML tree walk-through (com.consol.citrus.ws.validation.XmlSoapFaultValidator).
When using the XML validation algorithm you have the complete power as known from normal message validation in receive actions. This includes schema validation or ignoring elements for instance. On the fault-detail element you are able to add some validation settings such as schema-validation=enabled/disabled, custom schema-repository and so on.
<ws:assert fault-code="{http://www.citrusframework.org/faults}TEC-1001" fault-string="Invalid request"> <ws:fault-detail schema-validation="false"> <![CDATA[ <FaultDetail xmlns="http://www.consol.de/schemas/soap"> <ErrorCode>TEC-1000</ErrorCode> <Text>Invalid request</Text> </FaultDetail> ]]> </ws:fault-detail> <send endpoint="soapClient"> [...] </send> </ws:assert>
Please see also the Citrus API documentation for available validator implementations and validation algorithms.
So far we have used assert action wrapper in order to catch SOAP fault exceptions and validate the SOAP fault content. Now we have an alternative way of handling SOAP faults in Citrus. With exceptions the send action aborts and we do not have a receive action for the SOAP fault. This might be inadequate if we need to validate the SOAP message content (SOAPHeader and SOAPBody) coming with the SOAP fault. Therefore the web service message sender component offers several fault strategy options. In the following we discuss the propagation of SOAP fault as messages to the receive action as we would do with normal SOAP messages.
<citrus-ws:client id="soapClient" request-url="http://localhost:8090/test" fault-strategy="propagateError"/>
We have configured a fault strategy propagateError so the message sender will not raise client exceptions but inform the receive action with SOAP fault message contents. By default the fault strategy raises client exceptions (fault-strategy=throwsException).
So now that we do not raise exceptions we can leave out the assert action wrapper in our test. Instead we simply use a receive action and validate the SOAP fault like this.
<send endpoint="soapClient"> <message> <payload> <SoapFaultForcingRequest xmlns="http://www.consol.de/schemas/sample.xsd"> <Message>This is invalid</Message> </SoapFaultForcingRequest> </payload> </message> </send> <receive endpoint="soapClient" timeout="5000"> <message> <payload> <SOAP-ENV:Fault xmlns:SOAP-ENV="http://schemas.xmlsoap.org/soap/envelope/"> <faultcode xmlns:CITRUS="http://citrus.org/soap">CITRUS:${soapFaultCode}</faultcode> <faultstring xml:lang="en">${soapFaultString}</faultstring> </SOAP-ENV:Fault> </payload> </message> </receive>
So choose the preferred way of handling SOAP faults either by asserting client exceptions or propagating fault messages to the receive action on a SOAP client.
SOAP fault messages can hold multiple SOAP fault detail elements. In the previous sections we have used SOAP fault details in sending and receiving actions as single element. In order to meet the SOAP specification Citrus is also able to handle multiple SOAP fault detail elements in a message. You just use multiple fault-detail elements in your test action like this:
<ws:send-fault endpoint="helloSoapServer"> <ws:fault> <ws:fault-code>{http://www.citrusframework.org/faults}citrus:TEC-1000</ws:fault-code> <ws:fault-string>Invalid request</ws:fault-string> <ws:fault-actor>SERVER</ws:fault-actor> <ws:fault-detail> <![CDATA[ <FaultDetail xmlns="http://www.consol.de/schemas/sayHello.xsd"> <MessageId>${messageId}</MessageId> <CorrelationId>${correlationId}</CorrelationId> <ErrorCode>TEC-1000</ErrorCode> <Text>Invalid request</Text> </FaultDetail> ]]> </ws:fault-detail> <ws:fault-detail> <![CDATA[ <ErrorDetail xmlns="http://www.consol.de/schemas/sayHello.xsd"> <ErrorCode>TEC-1000</ErrorCode> </ErrorDetail> ]]> </ws:fault-detail> </ws:fault> <ws:header> <ws:element name="citrus_soap_action" value="sayHello"/> </ws:header> </ws:send-fault>
This will result in following SOAP envelope message:
HTTP/1.1 500 Internal Server Error Accept: text/xml, text/html, image/gif, image/jpeg, *; q=.2, */*; q=.2 SOAPAction: "sayHello" Content-Type: text/xml; charset=utf-8 Content-Length: 680 Server: Jetty(7.0.0.pre5) <SOAP-ENV:Envelope xmlns:SOAP-ENV="http://schemas.xmlsoap.org/soap/envelope/"> <SOAP-ENV:Header/> <SOAP-ENV:Body> <SOAP-ENV:Fault> <faultcode xmlns:citrus="http://www.citrusframework.org/faults">citrus:TEC-1000</faultcode> <faultstring xml:lang="en">Invalid request</faultstring> <detail> <FaultDetail xmlns="http://www.consol.de/schemas/sayHello.xsd"> <MessageId>9277832563</MessageId> <CorrelationId>4346806225</CorrelationId> <ErrorCode>TEC-1000</ErrorCode> <Text>Invalid request</Text> </FaultDetail> <ErrorDetail xmlns="http://www.consol.de/schemas/sayHello.xsd"> <ErrorCode>TEC-1000</ErrorCode> </ErrorDetail> </detail> </SOAP-ENV:Fault> </SOAP-ENV:Body> </SOAP-ENV:Envelope>
Of course we can also expect several fault detail elements when receiving a SOAP fault.
<ws:assert fault-code="{http://www.citrusframework.org/faults}TEC-1001" fault-string="Invalid request"> <ws:fault-detail schema-validation="false"> <![CDATA[ <FaultDetail xmlns="http://www.consol.de/schemas/soap"> <ErrorCode>TEC-1000</ErrorCode> <Text>Invalid request</Text> </FaultDetail> ]]> </ws:fault-detail> <ws:fault-detail> <![CDATA[ <ErrorDetail xmlns="http://www.consol.de/schemas/soap"> <ErrorCode>TEC-1000</ErrorCode> </ErrorDetail> ]]> </ws:fault-detail> <send endpoint="soapClient"> [...] </send> </ws:assert>
As you can see we can individually use validation settings for each fault detail. In the example above we disabled schema validation for the first fault detail element.
The SOAP server logic in Citrus is able to simulate pure HTTP error codes such as 404 "Not found" or 500 "Internal server error". The good thing is that the Citrus server is able to receive a request for proper validation in a receive action and then simulate HTTP errors on demand.
The mechanism on HTTP error code simulation is not different to the usual SOAP request/response handling in Citrus. We receive the request as usual and we provide a response. The HTTP error situation is simulated according to the special HTTP header citrus_http_status in the Citrus SOAP response definition. In case this header is set to a value other than 200 OK the Citrus SOAP server sends an empty SOAP response with HTTP error status code set accordingly.
<receive endpoint="helloSoapServer"> <message> <payload> <Message xmlns="http://consol.de/schemas/sample.xsd"> <Text>Hello SOAP server</Text> </Message> </payload> </message> </receive> <send endpoint="helloSoapServer"> <message> <data></data> </message> <header> <element name="citrus_http_status_code" value="500"/> </header> </send>
The SOAP response must be empty and the HTTP status code is set to a value other than 200, like 500. This results in a HTTP error sent to the calling client with error 500 "Internal server error".
Citrus is able to add attachments to a SOAP request on client and server side. As usual you can validate the SOAP attachment content on a received SOAP message. The next chapters describe how to handle SOAP attachments in Citrus.
As client Citrus is able to add attachments to the SOAP message. I think it is best to go straight into an example in order to understand how it works.
<ws:send endpoint="soapClient"> <message> <payload> <SoapMessageWithAttachment xmlns="http://consol.de/schemas/sample.xsd"> <Operation>Read the attachment</Operation> </SoapMessageWithAttachment> </payload> </message> <ws:attachment content-id="MySoapAttachment" content-type="text/plain"> <ws:resource file="classpath:com/consol/citrus/ws/soapAttachment.txt"/> </ws:attachment> </ws:send>
| Note |
|---|---|
In the previous chapters you may have already noticed the citrus-ws namespace that stands for the SOAP extensions in Citrus. Please include the citrus-ws namespace in your test case as described earlier in this chapter so you can use the attachment support. |
The special send action of the SOAP extension namespace is aware of SOAP attachments. The attachment content usually consists of a content-id a content-type and the actual content as plain text or binary content. Inside the test case you can use external file resources or inline CDATA sections for the attachment content. As you are familiar with Citrus you may know this already from other actions.
Citrus will construct a SOAP message with the SOAP attachment. Currently only one attachment per message is supported.
When Citrus calls SOAP WebServices as a client we may receive SOAP responses with attachments. The tester can validate those received SOAP messages with attachment content quite easy. As usual let us have a look at an example first.
<ws:receive endpoint="soapClient"> <message> <payload> <SoapMessageWithAttachmentRequest xmlns="http://consol.de/schemas/sample.xsd"> <Operation>Read the attachment</Operation> </SoapMessageWithAttachmentRequest> </payload> </message> <ws:attachment content-id="MySoapAttachment" content-type="text/plain" validator="mySoapAttachmentValidator"> <ws:resource file="classpath:com/consol/citrus/ws/soapAttachment.txt"/> </ws:attachment> </ws:receive>
Again we use the Citrus SOAP extension namespace with the specific receive action that is aware of SOAP attachment validation. The tester can validate the content-id, the content-type and the attachment content. Instead of using the external file resource you could also define an expected attachment template directly in the test case as inline CDATA section.
| Note |
|---|---|
The ws:attachment element specifies a validator instance. This validator determines how to validate the attachment content. SOAP attachments are not
limited to XML content. Plain text content and binary content is possible, too. So each SOAP attachment validating action can use a different <bean id="soapAttachmentValidator" class="com.consol.citrus.ws.validation.SimpleSoapAttachmentValidator"/> <bean id="mySoapAttachmentValidator" class="com.company.ws.validation.MySoapAttachmentValidator"/> You can define several validator instances in the Citrus configuration. The validator with the general id "soapAttachmentValidator" is the default validator
for all actions that do not explicitly set a validator instance. Citrus offers a set of reference validator implementations. The |
MTOM (Message Transmission Optimization Mechanism) enables you to send and receive large SOAP message content using streamed data handlers. This optimizes the resource allocation on server and client side where not all data is loaded into memory when marshalling/unmarshalling the message payload data. In detail MTOM enabled messages do have a XOP package inside the message payload replacing the actual large content data. The content is then streamed aas separate attachment. Server and client can operate with a data handler providing access to the streamed content. This is very helpful when using large binary content inside a SOAP message for instance.
Citrus is able to both send and receive MTOM enabled SOAP messages on client and server. Just use the mtom-enabled flag when sending a SOAP message:
<ws:send endpoint="soapMtomClient" mtom-enabled="true"> <message> <data> <![CDATA[ <image:addImage xmlns:image="http://www.citrusframework.org/imageService/"> <image>cid:IMAGE</image> </image:addImage> ]]> </data> </message> <ws:attachment content-id="IMAGE" content-type="application/octet-stream"> <ws:resource file="classpath:com/consol/citrus/hugeImageData.png"/> </ws:attachment> </ws:send>
As you can see the example above sends a SOAP message that contains a large binary image content. The actual binary image data is referenced with a content id marker cid:IMAGE inside the message payload. The actual image content is added as attachment with a separate file resource. Important is here the content-id which matches the id marker in the SOAP message payload (IMAGE).
Citrus builds a proper SOAP MTOM enabled message automatically adding the XOP package inside the message. The binary data is sent as separate SOAP attachment accordingly. The resulting SOAP message looks like this:
<SOAP-ENV:Envelope xmlns:SOAP-ENV="http://schemas.xmlsoap.org/soap/envelope/"> <SOAP-ENV:Header></SOAP-ENV:Header> <SOAP-ENV:Body> <image:addImage xmlns:image="http://www.citrusframework.org/imageService/"> <image><xop:Include xmlns:xop="http://www.w3.org/2004/08/xop/include" href="cid:IMAGE"/></image> </image:addImage> </SOAP-ENV:Body> </SOAP-ENV:Envelope>
On the server side Citrus is also able to handle MTOM enabled SOAP messages. In a server receive action you can specify the MTOM SOAP attachment content as follows.
<ws:receive endpoint="soapMtomServer" mtom-enabled="true"> <message schema-validation="false"> <data> <![CDATA[ <image:addImage xmlns:image="http://www.citrusframework.org/imageService/"> <image><xop:Include xmlns:xop="http://www.w3.org/2004/08/xop/include" href="cid:IMAGE"/></image> </image:addImage> ]]> </data> </message> <ws:attachment content-id="IMAGE" content-type="application/octet-stream"> <ws:resource file="classpath:com/consol/citrus/hugeImageData.png"/> </ws:attachment> </ws:receive>
We define the MTOM attachment content as separate SOAP attachment. The content-id is referenced somewhere in the SOAP message payload data. At runtime Citrus will add the XOP package definition automatically and perform validation on the message and its streamed MTOM attachment data.
Next thing that we have to talk about is inline MTOM data. This means that the content should be added as either base64Binary or hexBinary encoded String data directly to the message content. See the following example that uses the mtom-inline setting:
<ws:send endpoint="soapMtomClient" mtom-enabled="true"> <message> <data> <![CDATA[ <image:addImage xmlns:image="http://www.citrusframework.org/imageService/"> <image>cid:IMAGE</image> <icon>cid:ICON</icon> </image:addImage> ]]> </data> </message> <ws:attachment content-id="IMAGE" content-type="application/octet-stream" mtom-inline="true" encoding-type="base64Binary"> <ws:resource file="classpath:com/consol/citrus/image.png"/> </ws:attachment> <ws:attachment content-id="ICON" content-type="application/octet-stream" mtom-inline="true" encoding-type="hexBinary"> <ws:resource file="classpath:com/consol/citrus/icon.ico"/> </ws:attachment> </ws:send>
The listing above defines two inline MTOM attachments. The first attachment cid:IMAGE uses the encoding type base64Binary which is the default. The second attachment cid:ICON uses hexBinary encoding. Both attachments are added as inline data before the message is sent. The final SOAP message looks like follows:
<SOAP-ENV:Envelope xmlns:SOAP-ENV="http://schemas.xmlsoap.org/soap/envelope/"> <SOAP-ENV:Header></SOAP-ENV:Header> <SOAP-ENV:Body> <image:addImage xmlns:image="http://www.citrusframework.org/imageService/"> <image>VGhpcyBpcyBhIGJpbmFyeSBpbWFnZSBhdHRhY2htZW50IQpWYXJpYWJsZXMgJXt0ZXN0fSBzaG91bGQgbm90IGJlIHJlcGxhY2VkIQ==</image> <icon>5468697320697320612062696E6172792069636F6E206174746163686D656E74210A5661726961626C657320257B746573747D2073686F756C64206E6F74206265207265706C6163656421</icon> </image:addImage> </SOAP-ENV:Body> </SOAP-ENV:Envelope>
The image content is a base64Binary String and the icon a heyBinary String. Of course this mechanism also is supported in receive actions on the server side where the expected message content is added als inline MTOM data before validation takes place.
As a SOAP client you may have to use basic authentication in order to access a server resource. Basic authentication via HTTP stands for username/password authentication
where the credentials are transmitted in the HTTP request header section as base64 encoded entry. As Citrus uses the Spring WebService stack we can use the basic authentication
support there. We set the user credentials on the HttpClient message sender which is used inside the Spring WebServiceTemplate.
Citrus provides a comfortable way to set the HTTP message sender with basic authentication credentials on the WebServiceTemplate. Just see the following
example and learn how to do that.
<citrus-ws:client id="soapClient" request-url="http://localhost:8090/test" message-sender="basicAuthClient"/> <bean id="basicAuthClient" class="org.springframework.ws.transport.http.HttpComponentsMessageSender"> <property name="authScope"> <bean class="org.apache.http.auth.AuthScope"> <constructor-arg value="localhost"/> <constructor-arg value="8090"/> <constructor-arg value=""/> <constructor-arg value="basic"/> </bean> </property> <property name="credentials"> <bean class="org.apache.http.auth.UsernamePasswordCredentials"> <constructor-arg value="someUsername"/> <constructor-arg value="somePassword"/> </bean> </property> </bean>
The above configuration results in SOAP requests with authentication headers properly set for basic authentication. The special message sender takes care on adding the proper basic authentication header to each request that is sent with this Citrus message sender. By default preemtive authentication is used. The message sender only sends a single request to the server with all authentication information set in the message header. The request which determines the authentication scheme on the server is skipped. This is why you have to add some auth scope so Citrus can setup an authentication cache within the HTTP context in order to have preemtive authentication.
| Tip |
|---|---|
You can also skip the message sender configuration and set the Authorization header on each request in your send action definition on your own. Be aware of setting the header as HTTP mime header using the correct prefix and take care on using the correct basic authentication with base64 encoding for the username:password phrase. <header> <element name="citrus_http_Authorization" value="Basic c29tZVVzZXJuYW1lOnNvbWVQYXNzd29yZA=="/> </header> For base64 encoding you can also use a Citrus function, see Section 33.23, “citrus:encodeBase64()” |
When providing SOAP WebService server functionality Citrus can also set basic authentication so all clients need to authenticate properly when accessing the server resource.
<citrus-ws:server id="simpleSoapServer" port="8080" auto-start="true" resource-base="src/it/resources" security-handler="basicSecurityHandler"/> <bean id="securityHandler" class="com.consol.citrus.ws.security.SecurityHandlerFactory"> <property name="users"> <list> <bean class="com.consol.citrus.ws.security.User"> <property name="name" value="citrus"/> <property name="password" value="secret"/> <property name="roles" value="CitrusRole"/> </bean> </list> </property> <property name="constraints"> <map> <entry key="/foo/*"> <bean class="com.consol.citrus.ws.security.BasicAuthConstraint"> <constructor-arg value="CitrusRole"/> </bean> </entry> </map> </property> </bean>
We have set a security handler on the server web container with a constraint on all resources with /foo/*. Following from that the server requires basic authentication for these resources. The granted users and roles are specified within the security handler bean definition. Connecting clients have to set the basic auth HTTP header properly using the correct user and role for accessing the Citrus server now.
You can customize the security handler for your very specific needs (e.g. load users and roles with JDBC from a database). Just have a look at the code base and inspect the settings and properties offered by the security handler interface.
| Tip |
|---|---|
This mechanism is not restricted to basic authentication only. With other settings you can also set up digest or form-based authentication constraints very easy. |
The web service stack offers a lot of different technologies and standards within the context of SOAP WebServices. We speak of WS-* specifications in particular. One of these specifications deals with addressing. On client side you may add wsa header information to the request in order to give the server instructions how to deal with SOAP faults for instance.
In Citrus WebService client you can add those header information using the common configuration like this:
<citrus-ws:client id="soapClient" request-url="http://localhost:8090/test" message-converter="wsAddressingMessageConverter"/> <bean id="wsAddressingMessageConverter" class="com.consol.citrus.ws.message.converter.WsAddressingMessageConverter"> <constructor-arg> <bean id="wsAddressing200408" class="com.consol.citrus.ws.addressing.WsAddressingHeaders"> <property name="version" value="VERSION200408"/> <property name="action" value="http://citrus.sample/sayHello"/> <property name="to" value="http://citrus.sample/server"/> <property name="from"> <bean class="org.springframework.ws.soap.addressing.core.EndpointReference"> <constructor-arg value="http://citrus.sample/client"/> </bean> </property> <property name="replyTo"> <bean class="org.springframework.ws.soap.addressing.core.EndpointReference"> <constructor-arg value="http://citrus.sample/client"/> </bean> </property> <property name="faultTo"> <bean class="org.springframework.ws.soap.addressing.core.EndpointReference"> <constructor-arg value="http://citrus.sample/fault/resolver"/> </bean> </property> </bean> </constructor-arg> </bean>
| Note |
|---|---|
The WS-Addressing specification knows several versions. Supported version are VERSION10 (WS-Addressing 1.0 May 2006) and VERSION200408 (August 2004 edition of the WS-Addressing specification). |
The addressing headers find a place in the SOAP message header with respective namespaces and values. A possible SOAP request with WS addressing headers looks like follows:
<SOAP-ENV:Envelope xmlns:SOAP-ENV="http://schemas.xmlsoap.org/soap/envelope/"> <SOAP-ENV:Header xmlns:wsa="http://schemas.xmlsoap.org/ws/2004/08/addressing"> <wsa:To SOAP-ENV:mustUnderstand="1">http://citrus.sample/server</wsa:To> <wsa:From> <wsa:Address>http://citrus.sample/client</wsa:Address> </wsa:From> <wsa:ReplyTo> <wsa:Address>http://citrus.sample/client</wsa:Address> </wsa:ReplyTo> <wsa:FaultTo> <wsa:Address>http://citrus.sample/fault/resolver</wsa:Address> </wsa:FaultTo> <wsa:Action>http://citrus.sample/sayHello</wsa:Action> <wsa:MessageID>urn:uuid:4c4d8af2-b402-4bc0-a2e3-ad33b910e394</wsa:MessageID> </SOAP-ENV:Header> <SOAP-ENV:Body> <cit:HelloRequest xmlns:cit="http://citrus/sample/sayHello"> <cit:Text>Hello Citrus!</cit:Text> </cit:HelloRequest> </SOAP-ENV:Body> </SOAP-ENV:Envelope>
| Important |
|---|---|
The message id property is automatically generated for each request. If you need to set a static message id you can do so in Spring application context message sender configuration. |
SOAP over HTTP uses synchronous communication by nature. This means that sending a SOAP message in Citrus over HTTP will automatically block further test actions until the synchronous HTTP response has been received. In test cases this synchronous blocking might cause problems for several reasons. A simple reason would be that you need to do further test actions in parallel to the synchronous HTTP SOAP communication (e.g. simulate another backend system in the test case).
You can separate the SOAP send action from the rest of the test case by using the "fork" mode. The SOAP client will automatically open a new Java Thread for the synchronous communication and the test is able to continue with execution although the synchronous HTTP SOAP response has not arrived yet.
<ws:send endpoint="soapClient" fork="true"> <message> <payload> <SoapRequest xmlns="http://www.consol.de/schemas/sample.xsd"> <Operation>Read the attachment</Operation> </SoapRequest> </payload> </message> </ws:send>
With the "fork" mode enabled the test continues with execution while the sending action waits for the synchronous response in a separate Java Thread. You could reach the same behaviour with a complex <parallel>/<sequential> container construct, but forking the send action is much more straight forward.
| Important |
|---|---|
It is highly recommended to use a proper "timeout" setting on the SOAP receive action when using fork mode. The forked send operation might take
some time and the corresponding receive action might run into failure as the response was has not been received yet. The result would be a broken test because of the missing response message.
A proper "timeout" setting for the receive action solves this problem as the action waits for this time period and occasionally repeatedly asks for the SOAP response message.
The following listing sets the receive timeout to 10 seconds, so the action waits for the forked send action to deliver the SOAP response in time.
<ws:receive endpoint="soapClient" timeout="10000"> <message> <payload> <SoapResponse xmlns="http://www.consol.de/schemas/sample.xsd"> <Operation>Did something</Operation> <Success>true</Success> </SoapResponse> </payload> </message> </ws:receive> |
For highly customized SOAP server components in Citrus you can define a full servlet context configuration file. Here you have the full power to add Spring endpoint mappings and custom endpoint implementations. You can set the custom servlet context as external file resource on the server component:
<citrus-ws:client id="soapClient" context-config-location="classpath:citrus-ws-servlet.xml" message-factory="soap11MessageFactory"/>
Now let us have a closer look at the context-config-location attribute. This configuration defines the Spring application context file for endpoints, request mappings and other SpringWS specific information. Please see the official SpringWS documentation for details on this Spring based configuration. You can also just copy the following example application context which should work for you in general.
<beans xmlns="http://www.springframework.org/schema/beans" xmlns:xsi="http://www.w3.org/2001/XMLSchema-instance" xsi:schemaLocation=" http://www.springframework.org/schema/beans http://www.springframework.org/schema/beans/spring-beans.xsd"> <bean id="loggingInterceptor" class="org.springframework.ws.server.endpoint.interceptor.PayloadLoggingInterceptor"> <description> This interceptor logs the message payload. </description> </bean> <bean id="helloServicePayloadMapping" class="org.springframework.ws.server.endpoint.mapping.PayloadRootQNameEndpointMapping"> <property name="mappings"> <props> <prop key="{http://www.consol.de/schemas/sayHello}HelloRequest"> helloServiceEndpoint </prop> </props> </property> <property name="interceptors"> <list> <ref bean="loggingInterceptor"/> </list> </property> </bean> <bean id="helloServiceEndpoint" class="com.consol.citrus.ws.server.WebServiceEndpoint"> <property name="endpointAdapter" ref="staticResponseEndpointAdapter"/> </bean> <citrus:static-response-adapter id="staticResponseEndpointAdapter"> <citrus:payload> <![CDATA[ <HelloResponse xmlns="http://www.consol.de/schemas/sayHello"> <MessageId>123456789</MessageId> <CorrelationId>CORR123456789</CorrelationId> <User>WebServer</User> <Text>Hello User</Text> </HelloResponse> ]]> </citrus:payload> <citrus:header> <citrus:element name="{http://www.consol.de/schemas/samples/sayHello.xsd}ns0:Operation" value="sayHelloResponse"/> <citrus:element name="{http://www.consol.de/schemas/samples/sayHello.xsd}ns0:Request" value="HelloRequest"/> <citrus:element name="citrus_soap_action" value="sayHello"/> </citrus:header> </citrus:static-response-adapter> </beans>
The program listing above describes a normal SpringWS request mapping with endpoint configurations. The mapping is responsible to forward
incoming requests to the endpoint which will handle the request and provide a proper response message. First of all we add a logging interceptor
to the context so all incoming requests get logged to the console first. Then we use a payload mapping (PayloadRootQNameEndpointMapping) in order
to map all incoming 'HelloRequest' SOAP messages to the 'helloServiceEndpoint'. Endpoints are of
essential nature in Citrus SOAP WebServices implementation. They are responsible for processing a request in order to provide a proper response
message that is sent back to the calling client. Citrus uses the endpoint in combination with a message endpoint adapter implementation.

The endpoint works together with the message endpoint adapter that is responsible for providing a response message for the client. The various message endpoint adapter implementations in Citrus were already discussed in Chapter 32, Endpoint adapter.
In this example the 'helloServiceEndpoint' uses the 'static-response-adapter'
which is always returning a static response message. In most cases static responses will not fit the test scenario and you will have to
respond more dynamically.
Regardless of which message endpoint adapter setup you are using in your test case the endpoint transforms the response into a proper SOAP message. You can add as many request mappings and endpoints as you want to the server context configuration. So you are able to handle different request types with one single Jetty server instance.
That's it for connecting with SOAP WebServices! We saw how to send and receive SOAP messages with Jetty and Spring WebServices. Have a look at the samples coming with your Citrus archive in order to learn more about the SOAP message handling.
Citrus is able to start a little ftp server accepting incoming client requests. Also Citrus is able to call FTP commands as a client. The next sections deal with FTP connectivity.
| Note |
|---|---|
The FTP components in Citrus are kept in a separate Maven module. So you should add the module as Maven dependency to your project accordingly. <dependency> <groupId>com.consol.citrus</groupId> <artifactId>citrus-ftp</artifactId> <version>2.5</version> </dependency> As Citrus provides a customized FTP configuration schema for the Spring application context configuration files we have to add name to the top level beans element. Simply include the ftp-config namespace in the configuration XML files as follows. <beans xmlns="http://www.springframework.org/schema/beans" xmlns:xsi="http://www.w3.org/2001/XMLSchema-instance" xmlns:citrus="http://www.citrusframework.org/schema/config" xmlns:citrus-ftp="http://www.citrusframework.org/schema/ftp/config" xsi:schemaLocation=" http://www.springframework.org/schema/beans http://www.springframework.org/schema/beans/spring-beans.xsd http://www.citrusframework.org/schema/config http://www.citrusframework.org/schema/config/citrus-config.xsd http://www.citrusframework.org/schema/http/config http://www.citrusframework.org/schema/ftp/config/citrus-ftp-config.xsd"> [...] </beans> Now we are ready to use the customized Citrus FTP configuration elements with the citrus-ftp namespace prefix. |
We want to use Citrus fo connect to dome FTP server as a client sending commands such as creating a directory or listing all files. Citrus offers a client component doing exactly this FTP client connection.
<citrus-ftp:client id="ftpClient" host="localhost" port="22222" username="admin" password="admin" timeout="10000"/>
The configuration above describes a Citrus ftp client connected to a ftp server with ftp://localhost:22222. For authentication username and password are defined as well as the global connection timeout. The client will automatically send username and password for proper authentication to the server when opening a new connection.
In a test case you are now able to use the client to push commands to the server.
<send endpoint="ftpClient" fork="true"> <message> <data></data> </message> <header> <element name="citrus_ftp_command" value="PWD"/> <element name="citrus_ftp_arguments" value="test"/> </header> </send> <receive endpoint="ftpClient"> <message type="plaintext"> <data>PWD</data> </message> <header> <element name="citrus_ftp_command" value="PWD"/> <element name="citrus_ftp_arguments" value="test"/> <element name="citrus_ftp_reply_code" value="257"/> <element name="citrus_ftp_reply_string" value="@contains('is current directory')@"/> </header> </receive>
As you can see most of the ftp communication parameters are specified as special header elements in the message. Citrus automatically converts those information to proper FTP commands and response messages.
Now that we are able to access FTP as a client we might also want to simulate the server side. Therefore Citrus offers a server component that is listening on a port for incoming FTP connections. The server has a default home directory on the local file system specified. But you can also define home directories per user. For now let us have a look at the server configuration component:
<citrus-ftp:server id="ftpServer"> port="22222" auto-start="true" user-manager-properties="classpath:ftp.server.properties"/>
The ftp server configuration is quite simple. The server starts automatically and binds to a port. The user configuration is read from a user-manager-property file. Let us have a look at the content of this user management file:
# Password is "admin" ftpserver.user.admin.userpassword=21232F297A57A5A743894A0E4A801FC3 ftpserver.user.admin.homedirectory=target/ftp/user/admin ftpserver.user.admin.enableflag=true ftpserver.user.admin.writepermission=true ftpserver.user.admin.maxloginnumber=0 ftpserver.user.admin.maxloginperip=0 ftpserver.user.admin.idletime=0 ftpserver.user.admin.uploadrate=0 ftpserver.user.admin.downloadrate=0 ftpserver.user.anonymous.userpassword= ftpserver.user.anonymous.homedirectory=target/ftp/user/anonymous ftpserver.user.anonymous.enableflag=true ftpserver.user.anonymous.writepermission=false ftpserver.user.anonymous.maxloginnumber=20 ftpserver.user.anonymous.maxloginperip=2 ftpserver.user.anonymous.idletime=300 ftpserver.user.anonymous.uploadrate=4800 ftpserver.user.anonymous.downloadrate=4800
As you can see you are able to define as many user for the ftp server as you like. Username and password define the authentication on the server. In addition to that you have plenty of configuration possibilities per user. Citrus uses the Apache ftp server implementation. So for more details on configuration capabilities please consult the official Apache ftp server documentation.
Now we would like to use the server in a test case. Very easy you just have to define a receive message action within your test case that uses the server id as endpoint reference:
<echo> <message>Receive user login on FTP server</message> </echo> <receive endpoint="ftpServer"> <message type="plaintext"> <data>USER</data> </message> <header> <element name="citrus_ftp_command" value="USER"/> <element name="citrus_ftp_arguments" value="admin"/> </header> </receive> <send endpoint="ftpServer"> <message type="plaintext"> <data>OK</data> </message> </send> <echo> <message>Receive user password on FTP server</message> </echo> <receive endpoint="ftpServer"> <message type="plaintext"> <data>PASS</data> </message> <header> <element name="citrus_ftp_command" value="PASS"/> <element name="citrus_ftp_arguments" value="admin"/> </header> </receive> <send endpoint="ftpServer"> <message type="plaintext""> <data>OK</data> </message> </send>
The listing above shows two incoming commands representing a user login. We indicate with re send actions that we would link the server to respond with positive feedback and to accept the login. As we have a fully qualified ftp server running the client can also push files read directories and more. All incoming commands can be validated inside a test case.
Message channels represent the in memory messaging solution in Citrus. Producer and consumer components are linked via channels exchanging messages in memory. As this transport mechanism comes from Spring Integration API (http://www.springsource.org/spring-integration) and Citrus itself uses a lot of Spring APIs, especially those from Spring Integration you are able to connect to all Spring messaging adapters via these in memory channels.
Citrus offers a channel components that can be used both by Citrus and Spring Integration. The conclusion is that Citrus supports the sending and receiving of messages both to and from Spring Integration message channel components. This opens up a lot of great possibilities to interact with the Spring Integration transport adapters for FTP, TCP/IP and so on. In addition to that the message channel support provides us a good way to exchange messages in memory.
Citrus provides support for sending and receiving JMS messages. We have to separate between synchronous and asynchronous communication. So in this chapter we explain how to setup JMS message endpoints for synchronous and asynchronous outbound and inbound communication
| Note |
|---|---|
The message channel configuration components use the default "citrus" configuration namespace and schema definition. Include this namespace into your Spring configuration in order to use the Citrus configuration elements. The namespace URI and schema location are added to the Spring configuration XML file as follows. <beans xmlns="http://www.springframework.org/schema/beans" xmlns:xsi="http://www.w3.org/2001/XMLSchema-instance" xmlns:citrus-jms="http://www.citrusframework.org/schema/config" xsi:schemaLocation=" http://www.springframework.org/schema/beans http://www.springframework.org/schema/beans/spring-beans.xsd http://www.citrusframework.org/schema/config http://www.citrusframework.org/schema/config/citrus-config.xsd"> [...] </beans> After that you are able to use customized Citrus XML elements in order to define the Spring beans. |
Citrus offers a channel endpoint component that is able to create producer and consumer components. Producer and consumer send and receive messages both to and from a channel endpoint. By default the endpoint is asynchronous when configured in the Citrus application context. With this component you are able to access message channels directly:
<citrus:channel-endpoint id="helloEndpoint" channel="helloChannel"/> <si:channel id="helloChannel"/>
The Citrus channel endpoint references a Spring Integration channel directly. Inside your test case you can reference the Citrus endpoint as usual to send and receive messages. We will see this later in some example code listings.
| Note |
|---|---|
The Spring Integration configuration components use a specific namespace that has to be included into your Spring application context. You can use the following template which holds all necessary namespaces and schema locations: <?xml version="1.0" encoding="UTF-8"?> <beans xmlns="http://www.springframework.org/schema/beans" xmlns:xsi="http://www.w3.org/2001/XMLSchema-instance" xmlns:citrus="http://www.citrusframework.org/schema/config" xmlns:si="http://www.springframework.org/schema/integration" xsi:schemaLocation="http://www.springframework.org/schema/beans http://www.springframework.org/schema/beans/spring-beans.xsd http://www.citrusframework.org/schema/config http://www.citrusframework.org/schema/config/citrus-config.xsd http://www.springframework.org/schema/integration http://www.springframework.org/schema/integration/spring-integration.xsd"> </beans> |
The Citrus channel endpoint also supports a customized message channel template that will actually send the messages. The customized template might give you access to special configuration possibilities. However it is optional, so if no message channel template is defined in the configuration Citrus will create a default template.
<citrus:channel-endpoint id="helloEndpoint" channel="helloChannel" message-channel-template="myMessageChannelTemplate"/>
The message sender is now ready to publish messages to the defined channel. The communication is supposed to be asynchronous, so the producer is not able to process a reply message. We will deal with synchronous communication and reply messages later in this chapter. The message producer just publishes messages to the channel and is done. Interacting with the endpoints in a test case is quite easy. Just reference the id of the endpoint in your send and receive test actions
<send endpoint="helloEndpoint"> <message> <payload> <v1:HelloRequest xmlns:v1="http://citrusframework.org/schemas/HelloService.xsd"> <v1:Text>Hello World!</v1:Text> </v1:HelloRequest> </payload> </message> </send> <receive endpoint="helloEndpoint"> <message> <payload> <v1:HelloResponse xmlns:v1="http://citrusframework.org/schemas/HelloService.xsd"> <v1:Text>Hello Citrus!</v1:Text> </v1:HelloResponse> </payload> </message> </receive>
As you can see Citrus is also able to receive messages from the same Spring Integration message channel destination. We just references the same channel-endpoint in the receive action.
As usual the receiver connects to the message destination and waits for messages to arrive. The user can set a receive timeout which is set to 5000 milliseconds by default. In case no message was received in this time frame the receiver raises timeout errors and the test fails.
The synchronous channel producer publishes messages and waits synchronously for the response to arrive on some reply channel destination. The reply channel name is set in the message's header attributes so the counterpart in this communication can send its reply to that channel. The basic configuration for a synchronous channel endpoint component looks like follows:
<citrus:channel-sync-endpoint id="helloSyncEndpoint" channel="helloChannel" reply-timeout="1000" polling-interval="1000"/>
Synchronous message channel endpoints usually do poll for synchronous reply messages for processing the reply messages. The poll interval is an optional setting in order to manage the amount of reply message handshake attempts. Once the endpoint was able to receive the reply message synchronously the test case can receive the reply. In case all message handshake attempts do fail because the reply message is not available in time we raise some timeout error and the test will fail.
| Note |
|---|---|
By default the channel endpoint uses temporary reply channel destinations. The temporary reply channels are only used once for a single communication handshake. After that the reply channel is deleted again. Static reply channels are not supported as it has not been in scope yet. |
When sending a message to this endpoint in the first place the producer will wait synchronously for the response message to arrive on the reply destination. You can receive the reply message in your test case using the same endpoint component. So we have two actions on the same endpoint, first send then receive.
<send endpoint="helloSyncEndpoint"> <message> <payload> <v1:HelloRequest xmlns:v1="http://citrusframework.org/schemas/HelloService.xsd"> <v1:Text>Hello World!</v1:Text> </v1:HelloRequest> </payload> </message> </send> <receive endpoint="helloSyncEndpoint"> <message> <payload> <v1:HelloResponse xmlns:v1="http://citrusframework.org/schemas/HelloService.xsd"> <v1:Text>Hello Citrus!</v1:Text> </v1:HelloResponse> </payload> </message> </receive>
In the last section we saw that synchronous communication is based on reply messages on temporary reply channels. We saw that Citrus is able to publish messages to channels and wait for reply messages to arrive on temporary reply channels. This section deals with the same synchronous communication over reply messages, but now Citrus has to send dynamic reply messages to temporary channels.
The scenario we are talking about is that Citrus receives a message and we need to reply to a temporary reply channel that is stored in the message header attributes. We handle this synchronous communication with the same synchronous channel endpoint component. When initiating the communication by receiving a message from a synchronous channel endpoint you are able to send a synchronous response back. Again just use the same endpoint reference in your test case. The handling of temporary reply destinations is done automatically behind the scenes. So we have again two actions in our test case, but this time first receive then send.
<receive endpoint="helloSyncEndpoint"> <message> <payload> <v1:HelloRequest xmlns:v1="http://citrusframework.org/schemas/HelloService.xsd"> <v1:Text>Hello World!</v1:Text> </v1:HelloRequest> </payload> </message> </receive> <send endpoint="helloSyncEndpoint"> <message> <payload> <v1:HelloResponse xmlns:v1="http://citrusframework.org/schemas/HelloService.xsd"> <v1:Text>Hello Citrus!</v1:Text> </v1:HelloResponse> </payload> </message> </send>
The synchronous message channel endpoint will handle all reply channel destinations and provide those behind the scenes.
Unfortunately Spring Integration message channels do not support message selectors on header values as described in ???. With Citrus version 1.2 we found a way to also add message selector support on message channels. We had to introduce a special queue message channel implementation. So first of all we use this new message channel implementation in our configuration.
<citrus:channel id="orderChannel" capacity="5"/>
The Citrus message channel implementation extends the queue channel implementation from Spring Integration. So we can add a capacity attribute for this channel. That's it! Now we use the message channel that supports message selection. In our test we define message selectors on header values as described in ??? and you will see that it works.
In addition to that we have implemented other message filter possibilities on message channels that we discuss in the next sections.
You can use the XML root QName of your message as selection criteria. Let's see how this works in a small example:
We have two different XML messages on a message channel waiting to be picked up by a consumer.
<HelloMessage xmlns="http://citrusframework.org/schema">Hello Citrus</HelloMessage> <GoodbyeMessage xmlns="http://citrusframework.org/schema">Goodbye Citrus</GoodbyeMessage>
We would like to pick up the GoodbyeMessage in our test case. The HelloMessage should be left on the message channel as we are not interested in it right now. We can define a root qname message selector in the receive action like this:
<receive endpoint="orderChannelEndpoint"> <selector> <element name="root-qname" value="GoodbyeMessage"/> </selector> <message> <payload> <GoodbyeMessage xmlns="http://citrusframework.org/schema">Goodbye Citrus</GoodbyeMessage> </payload> </message> </receive>
The Citrus receiver picks up the GoodbyeMessage from the channel selected via the root qname of the XML message payload. Of course you can also combine message header selectors and root qname selectors as shown in this example below where a message header sequenceId is added to the selection logic.
<selector> <element name="root-qname" value="GoodbyeMessage"/> <element name="sequenceId" value="1234"/> </selector>
As we deal with XML qname values, we can also use namespaces in our selector root qname selection.
<selector> <element name="root-qname" value="{http://citrusframework.org/schema}GoodbyeMessage"/> </selector>
It is also possible to evaluate some XPath expression on the message payload in order to select a message from a message channel. The XPath expression outcome must match an expected value and only then the message is consumed form the channel.
The syntax for the XPath expression is to be defined as the element name like this:
<selector> <element name="xpath://Order/status" value="pending"/> </selector>
The message selector looks for order messages with status="pending" in the message payload. This means that following messages would get accepted/declined by the message selector.
<Order><status>pending</status></Order> = ACCEPTED <Order><status>finished</status></Order> = NOT ACCEPTED
Of course you can also use XML namespaces in your XPath expressions when selecting messages from channels.
<selector> <element name="xpath://ns1:Order/ns1:status" value="pending"/> </selector>
Namespace prefixes must match the incoming message - otherwise the XPath expression will not work as expected. In our example the message should look like this:
<ns1:Order xmlns:ns1="http://citrus.org/schema"><ns1:status>pending</ns1:status></ns1:Order>
Knowing the correct XML namespace prefix is not always easy. If you are not sure which namespace prefix to choose Citrus ships with a dynamic namespace replacement for XPath expressions. The XPath expression looks like this and is most flexible:
<selector> <element name="xpath://{http://citrus.org/schema}:Order/{http://citrus.org/schema}:status" value="pending"/> </selector>
This will match all incoming messages regardless the XML namespace prefix that is used.
In chapter Chapter 21, Message channel support we discussed the native Spring Integration channel support which enables Citrus to interact with all Spring Integration messaging adapter implementations. This is a fantastic way to extend Citrus for additional transports. This interaction now comes handy when writing and reading files from the file system in Citrus.
We want to use the Spring Integration file adapter for both reading and writing files with a local directory. Citrus can easily connect to this file adapter implementation with its message channel support. Citrus message sender and receiver speak to message channels that are connected to the Spring Integration file adapters.
<citrus:channel-endpoint id="fileEndpoint" channel="fileChannel"/> <file:outbound-channel-adapter id="fileOutboundAdapter" channel="fileChannel" directory="file:${some.directory.property}"/> <si:channel id="fileChannel"/>
The configuration above describes a Citrus message channel endpoint connected to a Spring Integration outbound file adapter that writes messages to a storage directory. With this combination you are able to write files to a directory in your Citrus test case. The test case uses the channel endpoint in its send action and the endpoint interacts with the Spring Integration file adapter so sending out the file.
| Note |
|---|---|
The Spring Integration file adapter configuration components add a new namespace to our Spring application context. See this template which holds all necessary namespaces and schema locations: <?xml version="1.0" encoding="UTF-8"?> <beans xmlns="http://www.springframework.org/schema/beans" xmlns:xsi="http://www.w3.org/2001/XMLSchema-instance" xmlns:citrus="http://www.citrusframework.org/schema/config" xmlns:si="http://www.springframework.org/schema/integration" xmlns:file="http://www.springframework.org/schema/integration/file" xsi:schemaLocation="http://www.springframework.org/schema/beans http://www.springframework.org/schema/beans/spring-beans.xsd http://www.citrusframework.org/schema/config http://www.citrusframework.org/schema/config/citrus-config.xsd http://www.springframework.org/schema/integration http://www.springframework.org/schema/integration/spring-integration.xsd http://www.springframework.org/schema/integration/file http://www.springframework.org/schema/integration/file/spring-integration-file.xsd"> </beans> |
The next program listing shows a possible inbound file communication. So the Spring Integration file inbound adapter will read files from a storage directory and publish the file contents to a message channel. Citrus can then receive those files as messages in a test case via the channel endpoint and validate the file contents for instance.
<file:inbound-channel-adapter id="fileInboundAdapter" channel="fileChannel" directory="file:${some.directory.property}"> <si:poller fixed-rate="100"/> </file:inbound-channel-adapter> <si:channel id="fileChannel"> <si:queue capacity="25"/> <si:interceptors> <bean class="org.springframework.integration.transformer.MessageTransformingChannelInterceptor"> <constructor-arg> <bean class="org.springframework.integration.file.transformer.FileToStringTransformer"/> </constructor-arg> </bean> </si:interceptors> </si:channel> <citrus:channel-endpoint id="fileEndpoint" channel="fileChannel"/>
| Important |
|---|---|
The file inbound adapter constructs Java file objects as the message payload by default. Citrus can only work on String message payloads. So we need a file transformer that converts the file objects to String payloads representing the file's content. |
This file adapter example shows how easy Citrus can work hand in hand with Spring Integration adapter implementations. The message channel support is a fantastic way to extend the transport and protocol support in Citrus by connecting with the very good Spring Integration adapter implementations. Have a closer look at the Spring Integration project for more details and other adapter implementations that you can use with Citrus integration testing.
Apache Camel project implements the enterprise integration patterns for building mediation and routing rules in your enterprise application. With the Citrus Camel support you are able to directly interact with the Apache Camel components and route definitions. You can call Camel routes and receive synchronous response messages. You can also simulate the Camel route endpoint with receiving messages and providing simulated response messages.
| Note |
|---|---|
The camel components in Citrus are kept in a separate Maven module. So you should add the module as Maven dependency to your project accordingly. <dependency> <groupId>com.consol.citrus</groupId> <artifactId>citrus-camel</artifactId> <version>2.5</version> </dependency> Citrus provides a special Apache Camel configuration schema that is used in our Spring configuration files. You have to include the citrus-camel namespace in your Spring configuration XML files as follows. <beans xmlns="http://www.springframework.org/schema/beans" xmlns:xsi="http://www.w3.org/2001/XMLSchema-instance" xmlns:citrus="http://www.citrusframework.org/schema/config" xmlns:citrus-camel="http://www.citrusframework.org/schema/camel/config" xsi:schemaLocation=" http://www.springframework.org/schema/beans http://www.springframework.org/schema/beans/spring-beans.xsd http://www.citrusframework.org/schema/config http://www.citrusframework.org/schema/config/citrus-config.xsd http://www.citrusframework.org/schema/camel/config http://www.citrusframework.org/schema/camel/config/citrus-camel-config.xsd"> [...] </beans> Now you are ready to use the Citrus Apache Camel configuration elements using the citrus-camel namespace prefix. |
The next sections explain the Citrus capabilities while working with Apache Camel.
Camel and Citrus both use the endpoint pattern in order to define message destinations. Users can interact with these endpoints when creating the mediation and routing logic. The Citrus endpoint component for Camel interaction is defined as follows in your Citrus Spring configuration.
<citrus-camel:endpoint id="directCamelEndpoint" endpoint-uri="direct:news"/>
Right next to that Citrus endpoint we need the Apache Camel route that is located inside a camel context component.
<camelContext id="camelContext" xmlns="http://camel.apache.org/schema/spring"> <route id="newsRoute"> <from uri="direct:news"/> <to uri="log:com.consol.citrus.camel?level=INFO"/> <to uri="seda:news-feed"/> </route> </camelContext>
As you can see the Citrus camel endpoint is able to interact with the Camel route. In the example above the Camel context is placed as Spring bean Camel context. This would be the easiest setup to use Camel with Citrus as you can add the Camel context straight to the Spring bean application context. Of course you can also import your Camel context and routes from other Spring bean context files or you can start the Camel context routes with Java code.
In the example the Apache Camel route is listening on the route endpoint uri direct:news. Incoming messages will be logged to the console using a log Camel component. After that the message is forwarded to a seda Camel component which is a simple queue in memory. So we have a small Camel routing logic with two different message transports.
The Citrus endpoint can interact with this sample route definition. The endpoint configuration holds the endpoint uri information that tells Citrus how to access the Apache Camel route destination. This endpoint uri can be any Camel endpoint uri that is used in a Camel route. Here we just use the direct endpoint uri direct:news so the sample Camel route gets called directly. In your test case you can use this endpoint component referenced by its id or name in order to send and receive messages on the route address direct:news. The Camel route listening on this direct address will be invoked accordingly.
The Apache Camel routes support asynchronous and synchronous message communication patterns. By default Citrus uses asynchronous communication with Camel routes. This means that the Citrus producer sends the exchange message to the route endpoint uri and is finished immediately. There is no synchronous response to await. In contrary to that the synchronous endpoint will send and receive a synchronous message on the Camel destination route. We will discuss this later on in this chapter. For now we have a look on how to use the Citrus camel endpoint in a test case in order to send a message to the Camel route:
<send endpoint="directCamelEndpoint"> <message type="plaintext"> <payload>Hello from Citrus!</payload> </message> </send>
The Citrus camel endpoint component can also be used in a receive message action in your test case. In this situation you would receive a message from the route endpoint. This is especially designed for queueing endpoint routes such as the Camel seda component. In our example Camel route above the seda Camel component is called with the endpoint uri seda:news-feed. This means that the Camel route is sending a message to the seda component. Citrus is able to receive this route message with a endpoint component like this:
<citrus-camel:endpoint id="sedaCamelEndpoint" endpoint-uri="seda:news-feed"/>
You can use the Citrus camel endpoint in your test case receive action in order to consume the message on the seda component.
<receive endpoint="sedaCamelEndpoint"> <message type="plaintext"> <payload>Hello from Citrus!</payload> </message> </receive>
| Tip |
|---|---|
Instead of defining a static Citrus camel component you could also use the dynamic endpoint components in Citrus. This would enable you to send your message directly using the endpoint uri direct:news in your test case. Read more about this in Chapter 31, Dynamic endpoint components. |
Citrus is able to send and receive messages with Camel route endpoint uri. This enables you to invoke a Camel route. The Camel components used is defined by the endpoint uri as usual. When interacting with Camel routes you might need to send back some response messages in order to simulate boundary applications. We will discuss the synchronous communication in the next section.
The synchronous Apache Camel producer sends a message to some route and waits synchronously for the response to arrive. In Camel this communication is represented with the exchange pattern InOut. The basic configuration for a synchronous Apache Camel endpoint component looks like follows:
<citrus-camel:sync-endpoint id="camelSyncEndpoint" endpoint-uri="direct:hello" timeout="1000" polling-interval="300"/>
Synchronous endpoints poll for synchronous reply messages to arrive. The poll interval is an optional setting in order to manage the amount of reply message handshake attempts. Once the endpoint was able to receive the reply message synchronously the test case can receive the reply. In case the reply message is not available in time we raise some timeout error and the test will fail.
In a first test scenario we write a test case the sends a message to the synchronous endpoint and waits for the synchronous reply message to arrive. So we have two actions on the same Citrus endpoint, first send then receive.
<send endpoint="camelSyncEndpoint"> <message type="plaintext"> <payload>Hello from Citrus!</payload> </message> </send> <receive endpoint="camelSyncEndpoint"> <message type="plaintext"> <payload>This is the reply from Apache Camel!</payload> </message> </receive>
The next variation deals with the same synchronous communication, but send and receive roles are switched. Now Citrus receives a message from a Camel route and has to provide a reply message. We handle this synchronous communication with the same synchronous Apache Camel endpoint component. Only difference is that we initially start the communication by receiving a message from the endpoint. Knowing this Citrus is able to send a synchronous response back. Again just use the same endpoint reference in your test case. So we have again two actions in our test case, but this time first receive then send.
<receive endpoint="camelSyncEndpoint"> <message type="plaintext"> <payload>Hello from Apache Camel!</payload> </message> </receive> <send endpoint="camelSyncEndpoint"> <message type="plaintext"> <payload>This is the reply from Citrus!</payload> </message> </send>
This is pretty simple. Citrus takes care on setting the Apache Camel exchange pattern InOut while using synchronous communications. The Camel routes do respond and Citrus is able to receive the synchronous messages accordingly. With this pattern you can interact with Apache Camel routes where Citrus simulates synchronous clients and consumers.
Apache Camel uses exchanges when sending and receiving messages to and from routes. These exchanges hold specific information on the communication outcome. Citrus automatically converts these exchange information to special message header entries. You can validate those exchange headers then easily in your test case:
<receive endpoint="sedaCamelEndpoint"> <message type="plaintext"> <payload>Hello from Camel!</payload> </message> <header> <element name="citrus_camel_route_id" value="newsRoute"/> <element name="citrus_camel_exchange_id" value="ID-local-50532-1402653725341-0-3"/> <element name="citrus_camel_exchange_failed" value="false"/> <element name="citrus_camel_exchange_pattern" value="InOnly"/> <element name="CamelCorrelationId" value="ID-local-50532-1402653725341-0-1"/> <element name="CamelToEndpoint" value="seda://news-feed"/> </header> </receive>
Besides the Camel specific exchange information the Camel exchange does also hold some custom properties. These properties such as CamelToEndpoint or CamelCorrelationId are also added automatically to the Citrus message header so can expect them in a receive message action.
Let us suppose following route definition:
<camelContext id="camelContext" xmlns="http://camel.apache.org/schema/spring"> <route id="newsRoute"> <from uri="direct:news"/> <to uri="log:com.consol.citrus.camel?level=INFO"/> <to uri="seda:news-feed"/> <onException> <exception>com.consol.citrus.exceptions.CitrusRuntimeException</exception> <to uri="seda:exceptions"/> </onException> </route> </camelContext>
The route has an exception handling block defined that is called as soon as the exchange processing ends up in some error or exception. With Citrus you can also simulate a exchange exception when sending back a synchronous response to a calling route.
<send endpoint="sedaCamelEndpoint"> <message type="plaintext"> <payload>Something went wrong!</payload> </message> <header> <element name="citrus_camel_exchange_exception" value="com.consol.citrus.exceptions.CitrusRuntimeException"/> <element name="citrus_camel_exchange_exception_message" value="Something went wrong!"/> <element name="citrus_camel_exchange_failed" value="true"/> </header> </send>
This message as response to the seda:news-feed route would cause Camel to enter the exception handling in the route definition. The exception handling is activated and calls the error handling route endpoint seda:exceptions. Of course Citrus would be able to receive such an exception exchange validating the exception handling outcome.
In such failure scenarios the Apache Camel exchange holds the exception information (CamelExceptionCaught) such as causing exception class and error message. These headers are present in an error scenario and can be validated in Citrus when receiving error messages as follows:
<receive endpoint="errorCamelEndpoint"> <message type="plaintext"> <payload>Something went wrong!</payload> </message> <header> <element name="citrus_camel_route_id" value="newsRoute"/> <element name="citrus_camel_exchange_failed" value="true"/> <element name="CamelExceptionCaught" value="com.consol.citrus.exceptions.CitrusRuntimeException: Something went wrong!"/> </header> </receive>
This completes the basic exception handling in Citrus when using the Apache Camel endpoints.
In the previous samples we have used the Apache Camel context as Spring bean context that is automatically loaded when Citrus starts up. Now when using a single Camel context instance Citrus is able to automatically pick this Camel context for route interaction. If you use more that one Camel context you have to tell the Citrus endpoint component which context to use. The endpoint offers an optional attribute called camel-context.
<citrus-camel:endpoint id="directCamelEndpoint" camel-context="newsContext" endpoint-uri="direct:news"/> <camelContext id="newsContext" xmlns="http://camel.apache.org/schema/spring"> <route id="newsRoute"> <from uri="direct:news"/> <to uri="log:com.consol.citrus.camel?level=INFO"/> <to uri="seda:news-feed"/> </route> </camelContext> <camelContext id="helloContext" xmlns="http://camel.apache.org/schema/spring"> <route id="helloRoute"> <from uri="direct:hello"/> <to uri="log:com.consol.citrus.camel?level=INFO"/> <to uri="seda:hello"/> </route> </camelContext>
In the example abpove we have two Camel context instances loaded. The endpoint has to pick the context to use with the attribute camel-context which resides to the Spring bean id of the Camel context.
Since Citrus 2.4 we introduced some Camel specific test actions that enable easy interaction with Camel routes and the Camel context. The test actions do follow a specific XML namespace so we have to add this namespace to the test case when using the actions.
<beans xmlns="http://www.springframework.org/schema/beans" xmlns:xsi="http://www.w3.org/2001/XMLSchema-instance" xmlns:camel="http://www.citrusframework.org/schema/camel/testcase" xsi:schemaLocation=" http://www.springframework.org/schema/beans http://www.springframework.org/schema/beans/spring-beans.xsd http://www.citrusframework.org/schema/camel/testcase http://www.citrusframework.org/schema/camel/testcase/citrus-camel-testcase.xsd"> [...] </beans>
We added a special camel namespace with prefix camel: so now we can start to add Camel test actions to the test case:
XML DSL
<testcase name="CamelRouteIT"> <actions> <camel:create-routes> <routeContext xmlns="http://camel.apache.org/schema/spring"> <route id="route_1"> <from uri="direct:test1"/> <to uri="mock:test1"/> </route> <route id="route_2"> <from uri="direct:test2"/> <to uri="mock:test2"/> </route> </routeContext> </camel:create-routes> <camel:create-routes camel-context="camelContext"> <routeContext xmlns="http://camel.apache.org/schema/spring"> <route> <from uri="direct:test3"/> <to uri="mock:test3"/> </route> </routeContext> </camel:create-routes> </actions> </testcase>
In the example above we have used the camel:create-route test action that will create new Camel routes at runtime in the Camel context. The target Camel context is specified with the optional camel-context attribute. By default Citrus will search for a Camel context available in the Spring bean application context. Removing routes at runtime is also supported.
XML DSL
<testcase name="CamelRouteIT"> <actions> <camel:remove-routes camel-context="camelContext"> <route id="route_1"/> <route id="route_2"/> <route id="route_3"/> </camel:remove-routes> </actions> </testcase>
Next operation we will discuss is the start and stop of existing Camel routes:
XML DSL
<testcase name="CamelRouteIT"> <actions> <camel:start-routes camel-context="camelContext"> <route id="route_1"/> </camel:start-routes> <camel:stop-routes camel-context="camelContext"> <route id="route_2"/> <route id="route_3"/> </camel:stop-routes> </actions> </testcase>
Starting and stopping Camel routes at runtime is important when temporarily Citrus need to receive a message on a Camel endpoint URI. We can stop a route, use a Citrus camel endpoint instead for validation and start the route after the test is done. This way wen can also simulate errors and failure scenarios in a Camel route interaction.
Of course all Camel route actions are also available in Java DSL.
Java DSL
@Autowired private CamelContext camelContext; @CitrusTest public void camelRouteTest() { camel().context(camelContext).create(new RouteBuilder(camelContext) { @Override public void configure() throws Exception { from("direct:news") .routeId("route_1") .autoStartup(false) .setHeader("headline", simple("This is BIG news!")) .to("mock:news"); from("direct:rumors") .routeId("route_2") .autoStartup(false) .setHeader("headline", simple("This is just a rumor!")) .to("mock:rumors"); } }); camel().context(camelContext).start("route_1", "route_2"); camel().context(camelContext).stop("route_2"); camel().context(camelContext).remove("route_2"); }
As you can see we have access to the Camel route builder that adds 1-n new Camel routes to the context. After that we can start, stop and remove the routes within the test case.
The Camel controlbus component is a good way to access route statistics and route status information within a Camel context. Citrus provides controlbus test actions to easily access the controlbus operations at runtime.
XML DSL
<testcase name="CamelControlBusIT"> <actions> <camel:control-bus> <camel:route id="route_1" action="start"/> </camel:control-bus> <camel:control-bus camel-context="camelContext"> <camel:route id="route_2" action="status"/> <camel:result>Stopped</camel:result> </camel:control-bus> <camel:control-bus> <camel:language type="simple">${camelContext.stop()}</camel:language> </camel:control-bus> <camel:control-bus camel-context="camelContext"> <camel:language type="simple">${camelContext.getRouteStatus('route_3')}</camel:language> <camel:result>Started</camel:result> </camel:control-bus> </actions> </testcase>
The example test case shows the controlbus access. Camel provides two different ways to specify operations and parameters. The first option is the use of an action attribute. The Camel route id has to be specified as mandatory attribute. As a result the controlbus action will be executed on the target route during test runtime. This way we can also start and stop Camel routes in a Camel context.
In case an controlbus operation has a result such as the status action we can specify a control result that is compared. Citrus will raise validation exceptions when the results differ. The second option for executing a controlbus action is the language expression. We can use Camel language expressions on the Camel context for accessing a controlbus operation. Also here we can define an optional outcome as expected result.
The Java DSL also supports these controlbus operations as the next example shows:
Java DSL
@Autowired private CamelContext camelContext; @CitrusTest public void camelRouteTest() { camel().controlBus() .route("my_route", "start"); camel().controlBus() .language(SimpleBuilder.simple("${camelContext.getRouteStatus('my_route')}")) .result(ServiceStatus.Started); }
The Java DSL works with Camel language expression builders as well as ServiceStatus enum values as expected result.
Vert.x is an application platform for the JVM that provides a network event bus for lightweight scalable messaging solutions. The Citrus Vert.x components do participate on that event bus messaging as producer or consumer. With these components you can access Vert.x instances available in your network in order to test those Vert.x applications in some integration test scenario.
| Note |
|---|---|
The Vert.x components in Citrus are kept in a separate Maven module. So you should add the module as Maven dependency to your project accordingly. <dependency> <groupId>com.consol.citrus</groupId> <artifactId>citrus-vertx</artifactId> <version>2.5</version> </dependency> Citrus provides a special Vert.x configuration schema that is used in our Spring configuration files. You have to include the citrus-vertx namespace in your Spring configuration XML files as follows. <beans xmlns="http://www.springframework.org/schema/beans" xmlns:xsi="http://www.w3.org/2001/XMLSchema-instance" xmlns:citrus="http://www.citrusframework.org/schema/config" xmlns:citrus-vertx="http://www.citrusframework.org/schema/vertx/config" xsi:schemaLocation=" http://www.springframework.org/schema/beans http://www.springframework.org/schema/beans/spring-beans.xsd http://www.citrusframework.org/schema/config http://www.citrusframework.org/schema/config/citrus-config.xsd http://www.citrusframework.org/schema/vertx/config http://www.citrusframework.org/schema/vertx/config/citrus-vertx-config.xsd"> [...] </beans> Now you are ready to use the Citrus Vert.x configuration elements using the citrus-vertx namespace prefix. |
The next sections discuss sending and receiving operations on the Vert.x event bus with Citrus.
As usual Citrus uses an endpoint component in order to specify some message destination to send and receive messages to and from. The Vert.x endpoint component is defined as follows in your Citrus Spring configuration.
<citrus-vertx:endpoint id="simpleVertxEndpoint" host="localhost" port="5001" pubSubDomain="false" address="news-feed"/> <bean id="vertxInstanceFactory" class="com.consol.citrus.vertx.factory.CachingVertxInstanceFactory"/>
The endpoint holds some general information how to access the Vert.x event bus. Host and port values define the Vert.x Hazelcast cluster hostname and port. Citrus starts a new Vert.x instance using this cluster. So all other Vert.x instances connected to this cluster host will receive the event bus messages from Citrus during the test. In your test case you can use this endpoint component referenced by its id or name in order to send and receive messages on the event bus address news-feed. In Vert.x the event bus address defines the destination for event consumers to listen on. As already mentioned cluster hostname and port are optional, so Citrus will use localhost and a new random port on the cluster host if nothing is specified.
The Vert.x event bus supports publish-subscribe and point-to-point message communication patterns. By default the pubSubDomain in Citrus is false so the event bus sender will initiate a point-to-point communication on the event bus address. This means that only one single consumer on the event bus address will receive the message. If there are more consumers on the address the first to come wins and receives the message. In contrary to that the publish-subscribe scenario would deliver the message to all available consumers on the event bus address simultaneously. You can enable the pubSubDomain on the Vert.x endpoint component for this communication pattern.
The Vert.x endpoint needs a instance factory implementation in order to create the embedded Vert.x instance. By default the bean name vertxInstanceFactory is recognized by all Vert.x endpoint components. We will talk about Vert.x instance factories in more detail later on in this chapter.
As message content you can send and receive JSON objects or simple character sequences to the event bus. Let us have a look at a simple sample sending action that uses the new Vert.x endpoint component:
<send endpoint="simpleVertxEndpoint"> <message type="plaintext"> <payload>Hello from Citrus!</payload> </message> </send>
As the Vert.x Citrus endpoint is bidirectional you can also receive messages from the event bus.
<receive endpoint="simpleVertxEndpoint"> <message type="plaintext"> <payload>Hello from Vert.x!</payload> </message> <header> <element name="citrus_vertx_address" value="news-feed"/> </header> </receive>
Citrus automatically adds some special message headers to the message, so you can validate the Vert.x event bus address. This completes the simple send and receive operations on a Vert.x event bus. Now lets move on to synchronous endpoints where Citrus waits for a reply on the event bus.
The synchronous Vert.x event bus producer sends a message and waits synchronously for the response to arrive on some reply address destination. The reply address name is generated automatically and set in the request message header attributes so the receiving counterpart in this communication can send its reply to that event bus address. The basic configuration for a synchronous Vert.x endpoint component looks like follows:
<citrus-vertx:sync-endpoint id="vertxSyncEndpoint" address="hello" timeout="1000" polling-interval="300"/>
Synchronous endpoints poll for synchronous reply messages to arrive on the event bus reply address. The poll interval is an optional setting in order to manage the amount of reply message handshake attempts. Once the endpoint was able to receive the reply message synchronously the test case can receive the reply. In case all message handshake attempts do fail because the reply message is not available in time we raise some timeout error and the test will fail.
| Note |
|---|---|
The Vert.x endpoint uses temporary reply address destinations. The temporary reply address in generated and is only used once for a single communication handshake. After that the reply address is dismissed again. |
When sending a message to the synchronous Vert.x endpoint the producer will wait synchronously for the response message to arrive on the reply address. You can receive the reply message in your test case using the same endpoint component. So we have two actions on the same endpoint, first send then receive.
<send endpoint="vertxSyncEndpoint"> <message type="plaintext"> <payload>Hello from Citrus!</payload> </message> </send> <receive endpoint="vertxSyncEndpoint"> <message type="plaintext"> <payload>This is the reply from Vert.x!</payload> </message> </receive>
In the last section we saw that synchronous communication is based on reply messages on temporary reply event bus address. We saw that Citrus is able to send messages to event bus address and wait for reply messages to arrive. This next section deals with the same synchronous communication, but send and receive roles are switched. Now Citrus receives a message and has to send a reply message to a temporary reply address.
We handle this synchronous communication with the same synchronous Vert.x endpoint component. Only difference is that we initially start the communication by receiving a message from the endpoint. Knowing this Citrus is able to send a synchronous response back. Again just use the same endpoint reference in your test case. The handling of the temporary reply address is done automatically behind the scenes. So we have again two actions in our test case, but this time first receive then send.
<receive endpoint="vertxSyncEndpoint"> <message type="plaintext"> <payload>Hello from Vert.x!</payload> </message> </receive> <send endpoint="vertxSyncEndpoint"> <message type="plaintext"> <payload>This is the reply from Citrus!</payload> </message> </send>
The synchronous message endpoint for Vert.x event bus communication will handle all reply address destinations and provide those behind the scenes.
Citrus starts an embedded Vert.x instance at runtime in order to participate in the Vert.x cluster. Within this cluster multiple Vert.x instances are connected via the event bus. For starting the Vert.x event bus Citrus uses a cluster hostname and port definition. You can customize this cluster host in order to connect to a very special cluster in your network.
Now Citrus needs to manage the Vert.x instances created during the test run. By default Citrus will look for a instance factory bean named vertxInstanceFactory. You can choose the factory implementation to use in your project. By default you can use the caching factory implementation that caches the Vert.x instances so we do not connect more than one Vert.x instance to the same cluster host. Citrus offers following instance factory implementations:
com.consol.citrus.vertx.factory.CachingVertxInstanceFactory- default implementation that reuses the Vert.x instance based on given cluster host and port. With this implementation we ensure to connect a single Citrus Vert.x instance to a cluster host.com.consol.citrus.vertx.factory.SingleVertxInstanceFactory- creates a single Vert.x instance and reuses this instance for all endpoints. You can also set your very custom Vert.x instance via configuration for custom Vert.x instantiation.
The instance factory implementations do implement the VertxInstanceFactory interface. So you can also provide your very special implementation. By default Citrus looks
for a bean named vertxInstanceFactory but you can also define your very special factory implementation onm an endpoint component. The Vert.x instance factory is set on the Vert.x endpoint as follows:
<citrus-vertx:endpoint id="vertxHelloEndpoint" address="hello" vertx-factory="singleVertxInstanceFactory"/> <bean id="singleVertxInstanceFactory" class="com.consol.citrus.vertx.factory.SingleVertxInstanceFactory"/>
Sending and receiving mails is the next interest we are going to talk about. When dealing with mail communication you most certainly need to interact with some sort of IMAP or POP mail server. But in Citrus we do not want to manage mails in a personal inbox. We just need to be able to exchange mail messages the persisting in a user inbox is not part of our business.
This is why Citrus provides just a SMTP mail server which accepts mail messages from clients. Once the SMTP server has accepted an incoming mail it forwards those data to the running test case. In the test case you can receive the incoming mail message and perform message validation as usual. The mail sending part is easy as Citrus offers a mail client that connects to some SMTP server for sending mails to the outside world.
| Note |
|---|---|
The mail components in Citrus are kept in a separate Maven module. So you should check that the module is available as Maven dependency in your project <dependency> <groupId>com.consol.citrus</groupId> <artifactId>citrus-mail</artifactId> <version>2.5</version> </dependency> As usual Citrus provides a customized mail configuration schema that is used in Spring configuration files. Simply include the citrus-mail namespace in the configuration XML files as follows. <beans xmlns="http://www.springframework.org/schema/beans" xmlns:xsi="http://www.w3.org/2001/XMLSchema-instance" xmlns:citrus="http://www.citrusframework.org/schema/config" xmlns:citrus-mail="http://www.citrusframework.org/schema/mail/config" xsi:schemaLocation=" http://www.springframework.org/schema/beans http://www.springframework.org/schema/beans/spring-beans.xsd http://www.citrusframework.org/schema/config http://www.citrusframework.org/schema/config/citrus-config.xsd http://www.citrusframework.org/schema/mail/config http://www.citrusframework.org/schema/mail/config/citrus-mail-config.xsd"> [...] </beans> Now you are ready to use the customized Http configuration elements with the citrus-mail namespace prefix. |
Read the next section in order to find out more about the mail message support in Citrus.
The mail sending part is quite easy and straight forward. We just need to send a mail message to some SMTP server. So Citrus provides a mail client that sends out mail messages.
<citrus-mail:client id="simpleMailClient" host="localhost" port="25025"/>
This is how a Citrus mail client component is defined in the Spring application context. You can use this client referenced by its id or name in your test case in a message sending action. The client defines a host and port attribute which should connect the client to some SMTP server instance.
We all know mail message contents. The mail message has some general properties set by the user:
- from: The message sender mail address
- to: The message recipient mail address. You can add multiple recipients by using a comma separated list.
- cc: Copy recipient mail address. You can add multiple recipients by using a comma separated list.
- bcc: Blind copy recipient mail address. You can add multiple recipients by using a comma separated list.
- subject: Some subject used as mail head line.
As a tester you are able to set these properties in your test case. Citrus defines a XML mail message representation that you can use inside your send action. Let us have a look at this:
<send endpoint="simpleMailClient"> <message> <payload> <mail-message xmlns="http://www.citrusframework.org/schema/mail/message"> <from>christoph@citrusframework.com</from> <to>dev@citrusframework.com</to> <cc></cc> <bcc></bcc> <subject>This is a test mail message</subject> <body> <contentType>text/plain; charset=utf-8</contentType> <content>Hello Citrus mail server!</content> </body> </mail-message> </payload> </message> </send>
The basic XML mail message representation defines a list of basic mail properties such as from, to or subject. In addition to that we define a text body which is either plain text or HTML. You can specify the content type of the mail body very easy (e.g. text/plain or text/html). By default Citrus uses text/plain content type.
Now when dealing with mail messages you often come to use multipart structures for attachments. In Citrus you can define attachment content as base64 character sequence. The Citrus mail client will automatically create a proper multipart mail mime message using the content types and body parts specified.
<send endpoint="simpleMailClient"> <message> <payload> <mail-message xmlns="http://www.citrusframework.org/schema/mail/message"> <from>christoph@citrusframework.com</from> <to>dev@citrusframework.com</to> <cc></cc> <bcc></bcc> <subject>This is a test mail message</subject> <body> <contentType>text/plain; charset=utf-8</contentType> <content>Hello Citrus mail server!</content> <attachments> <attachment> <contentType>text/plain; charset=utf-8</contentType> <content>This is attachment data</content> <fileName>attachment.txt</fileName> </attachment> </attachments> </body> </mail-message> </payload> </message> </send>
That completes the basic mail client capabilities. But wait we have not talked about error scenarios where mail communication results in error. When running into mail error scenarios we have to handle the error respectively with exception handling. When the mail server responded with errors Citrus will raise mail exceptions automatically and your test case fails accordingly.
As a tester you can catch and assert these mail exceptions verifying your error scenario.
<assert exception="org.springframework.mail.MailSendException"> <send endpoint="simpleMailClient"> <message> <payload> <mail-message xmlns="http://www.citrusframework.org/schema/mail/message"> [...] </mail-message> </payload> </message> </send> <assert/>
We assert the MailSendException from Spring to be thrown while sending the mail message to the SMTP server.
With exception message validation you are able to expect very specific mail send errors on the client side. This is how you can handle
some sort of error situation returned by the mail server. Speaking of mail servers we need to also talk about providing a mail server
endpoint in Citrus for clients. This is part of our next section.
Consuming mail messages is a more complicated task as we need to have some sort of server that clients can connect to. In your mail client software you typically point to some IMAP or POP inbox and receive mails from that endpoint. In Citrus we do not want to manage a whole personal mail inbox such as IMAP or POP would provide. We just need a SMTP server endpoint for clients to send mails to. The SMTP server accepts mail messages and forwards those to a running test case for further validation.
| Note |
|---|---|
We have no user inbox where incoming mails are stored. The mail server just forwards incoming mails to the running test for validation. After the test the incoming mail message is gone. |
And this is exactly what the Citrus mail server is capable of. The server is a very lightweight SMTP server. All incoming mail client connections are accepted by default and the mail data is converted into a Citrus XML mail interface representation. The XML mail message is then passed to the running test for validation.
Let us have a look at the Citrus mail server component and how you can add it to the Spring application context.
<citrus-mail:server id="simpleMailServer" port="25025" auto-start="true"/>
The mail server component receives several properties such as port or auto-start. Citrus starts a in memory SMTP server that clients can connect to.
In your test case you can then receive the incoming mail messages on the server in order to perform the well known XML validation mechanisms within Citrus. The message header and the payload contain all mail information so you can verify the content with expected templates as usual:
<receive endpoint="simpleMailServer"> <message> <payload> <mail-message xmlns="http://www.citrusframework.org/schema/mail/message"> <from>christoph@citrusframework.com</from> <to>dev@citrusframework.com</to> <cc></cc> <bcc></bcc> <subject>This is a test mail message</subject> <body> <contentType>text/plain; charset=utf-8</contentType> <content>Hello Citrus mail server!</content> </body> </mail-message> </payload> <header> <element name="citrus_mail_from" value="christoph@citrusframework.com"/> <element name="citrus_mail_to" value="dev@citrusframework.com"/> <element name="citrus_mail_subject" value="This is a test mail message"/> <element name="citrus_mail_content_type" value="text/plain; charset=utf-8"/> </header> </message> </receive>
The general mail properties such as from, to, subject are available as elements in the mail payload and in the message header information. The message header names do start with a common Citrus mail prefix citrus_mail. Following from that you can verify these special mail message headers in your test as shown above. Citrus offers following mail headers:
- citrus_mail_from
- citrus_mail_to
- citrus_mail_cc
- citrus_mail_bcc
- citrus_mail_subject
- citrus_mail_replyTo
- citrus_mail_date
In addition to that Citrus converts the incoming mail data to a special XML mail representation which is passed as message payload to the test. The mail body parts are represented as body and optional attachment elements. As this is plain XML you can verify the mail message content as usual using Citrus variables, functions and validation matchers.
Regardless of how the mail message has passed the validation the Citrus SMTP mail server will automatically respond with success codes (SMTP 250 OK) to the calling client. This is the basic Citrus mail server behavior where all client connections are accepted an all mail messages are responded with SMTP 250 OK response codes.
Now in more advanced usage scenarios the tester may want to control the mail communication outcome. User can force some error scenarios where mail clients are not accepted or mail communication should fail with some SMTP error state for instance.
By using a more advanced mail server setup the tester gets more power to sending back mail server response codes to the mail client. Just use the advanced mail adapter implementation in your mail server component configuration:
<citrus-mail:server id="advancedMailServer" auto-accept="false" split-multipart="true" port="25025" auto-start="true"/>
We have disabled the auto-accept mode on the mail server. This means that we have to do some additional steps in your test case to accept the incoming mail message first. So we can decide in our test case whether to accept or decline the incoming mail message for a more powerful test. You accept/decline a mail message with a special XML accept request/response exchange in your test case:
<receive endpoint="advancedMailServer"> <message> <payload> <accept-request xmlns="http://www.citrusframework.org/schema/mail/message"> <from>christoph@citrusframework.com</from> <to>dev@citrusframework.com</to> </accept-request> </payload> </message> </receive>
So before receiving the actual mail message we receive this simple accept-request in our test. The accept request gives us the message from and to resources of the mail message. Now the test decides to also decline a mail client connection. You can simulate that the server does not accept the mail client connection by sending back a negative accept response.
<send endpoint="advancedMailServer"> <message> <payload> <accept-response xmlns="http://www.citrusframework.org/schema/mail/message"> <accept>true</accept> </accept-response> </payload> </message> </send>
Depending on the accept outcome the mail client will receive an error response with proper error codes. If you accept the mail message with a positive accept response the next step in your test receives the actual mail message as we have seen it before in this chapter.
Now besides not accepting a mail message in the first place you can als simulate another error scenario with the mail server. In this scenario the mail server should respond with some sort of SMTP error code after accepting the message. This is done with a special mail response message like this:
<receive endpoint="advancedMailServer"> <message> <payload> <mail-message xmlns="http://www.citrusframework.org/schema/mail/message"> <from>christoph@citrusframework.com</from> <to>dev@citrusframework.com</to> <cc></cc> <bcc></bcc> <subject>This is a test mail message</subject> <body> <contentType>text/plain; charset=utf-8</contentType> <content>Hello Citrus mail server!</content> </body> </mail-message> </payload> </message> </receive> <send endpoint="advancedMailServer"> <message> <payload> <mail-response xmlns="http://www.citrusframework.org/schema/mail/message"> <code>443</code> <message>Failed!</message> </mail-response> </payload> </message> </send>
As you can see from the example above we first accept the connection and receive the mail content as usual. Now the test returns a negative mail response with some error code reason set. The Citrus SMTP communication will then fail and the calling mail client receives the respective error.
If you skip the negative mail response the server will automatically response with positive SMTP response codes to the calling client.
Arquillian is a well known integration test framework that comes with a great feature set when it comes to Java EE testing inside of a full qualified application server. With Arquiliian you can deploy your Java EE services in a real application server of your choice and execute the tests inside the application server boundaries. This makes it very easy to test your Java EE services in scope with proper JNDI resource allocation and other resources provided by the application server. Citrus is able to connect with the Arquillian test case. Speaking in more detail your Arquillian test is able to use a Citrus extension in order to use the Citrus feature set inside the Arquillian boundaries.
Read the next section in order to find out more about the Citrus Arquillian extension.
Arquillian offers a fine mechanism for extensions adding features to the Arquillian test setup and test execution. The Citrus extension respectively adds Citrus framework instance creation and Citrus test execution to the Arquillian world. First of all lets have a look at the extension descriptor properties settable via arquillian.xml:
<extension qualifier="citrus"> <property name="citrusVersion">2.5</property> <property name="autoPackage">true</property> <property name="suiteName">citrus-arquillian-suite</property> </extension>
The Citrus extension uses a specific qualifier citrus for defining properties inside the Arquillian descriptor. Following properties are settable in current version:
- citrusVersion: The explicit version of Citrus that should be used. Be sure to have the same library version available in your project (e.g. as Maven dependency). This property is optional. By default the extension just uses the latest stable version.
- autoPackage: When true (default setting) the extension will automatically add Citrus libraries and all transitive dependencies to the test deployment. This automatically enables you to use the Citrus API inside the Arquillian test even when the test is executed inside the application container.
- suiteName: This optional setting defines the name of the test suite that is used for the Citrus test run. When using before/after suite functionality in Citrus this setting might be of interest.
- configurationClass: Full qualified Java class name of customized Citrus Spring bean configuration to use when loading the Citrus Spring application context. As a user you can define a custom configuration class that must be a subclass of com.consol.citrus.config.CitrusSpringConfig. When specified the custom class is loaded otherwise the default com.consol.citrus.config.CitrusSpringConfig is loaded to set up the Spring application context.
Now that we have added the extension descriptor with all properties we need to add the respective Citrus Arquillian extension as library to our project. This is done via Maven in your project's POM file as normal dependency:
<dependency> <groupId>com.consol.citrus</groupId> <artifactId>citrus-arquillian</artifactId> <version>2.5</version> <scope>test</scope> </dependency>
Now everything is set up to use Citrus within Arquillian. Lets use Citrus functionality in a Arquillian test case.
Arquillian separates client and container side testing. When using client side testing the test case is executed outside of the application container deployment. This means that your test case has no direct access to container managed resources such as JNDI resources. On the plus side it is not necessary to include your test in the container deployment. The test case interacts with the container deployment as a normal client would do. Lets have a look at a first example:
@RunWith(Arquillian.class) @RunAsClient public class EmployeeResourceTest { @CitrusFramework private Citrus citrusFramework; @ArquillianResource private URL baseUri; private String serviceUri; @Deployment public static WebArchive createDeployment() { return ShrinkWrap.create(WebArchive.class) .addClasses(RegistryApplication.class, EmployeeResource.class, Employees.class, Employee.class, EmployeeRepository.class); } @Before public void setUp() throws MalformedURLException { serviceUri = new URL(baseUri, "registry/employee").toExternalForm(); } @Test @CitrusTest public void testCreateEmployeeAndGet(@CitrusResource TestDesigner designer) { designer.send(serviceUri) .message(new HttpMessage("name=Penny&age=20") .method(HttpMethod.POST) .contentType(MediaType.APPLICATION_FORM_URLENCODED)); designer.receive(serviceUri) .message(new HttpMessage() .statusCode(HttpStatus.NO_CONTENT)); designer.send(serviceUri) .message(new HttpMessage() .method(HttpMethod.GET) .accept(MediaType.APPLICATION_XML)); designer.receive(serviceUri) .message(new HttpMessage("<employees>" + "<employee>" + "<age>20</age>" + "<name>Penny</name>" + "</employee>" + "</employees>") .statusCode(HttpStatus.OK)); citrusFramework.run(designer.build()); } }
First of all we use the basic Arquillian JUnit test runner @RunWith(Arquillian.class) in combination with the @RunAsClient annotation telling Arquillian that this is a client side test case. As this is a usual Arquillian test case we have access to Arquillian resources that automatically get injected such as the base uri of the test deployment. The test deployment is a web deployment created via ShrinkWrap. We add the application specific classes that build our remote RESTful service that we would like to test.
The Citrus Arquillian extension is able to setup a proper Citrus test environment in the background. As a result the test case can reference a Citrus framework instance with the @CitrusFramework annotation. We will use this instance of Citrus later on when it comes to execute the Citrus testing logic.
No we can focus on writing a test method which is again nothing but a normal JUnit test method. The Citrus extension takes care on injecting the @CitrusResource annotated method parameter. With this Citrus test designer instance we can build a Citrus test logic for sending and receiving messages via Http in order to call the remote RESTful employee service of our test deployment. The Http endpoint uri is injected via Arquillian and we are able to call the remote service as a client.
The Citrus test designer provides Java DSL methods for building the test logic. Please note that the designer will aggregate all actions such as send or receive until the designer is called to build the test case with build() method invocation. The resulting test case object can be executed by the Citrus framework instance with run() method.
When the Citrus test case is executed the messages are sent over the wire. The respective response message is received with well known Citrus receive message logic. We can validate the response messages accordingly and make sure the client call was done right. In case something goes wrong within Citrus test execution the framework will raise exceptions accordingly. As a result the JUnit test method is successful or failed with errors coming from Citrus test execution.
This is how Citrus and Arquillian can interact in a test scenario where the test deployment is managed by Arquillian and the client side actions take place within Citrus. This is a great way to combine both frameworks with Citrus being able to call different service API endpoints in addition with validating the outcome. This was a client side test case where the test logic was executed outside of the application container. Arquillian also supports container remote test cases where we have direct access to container managed resources. The following section describes how this works with Citrus.
In previous sections we have seen how to combine Citrus with Arquillian in a client side test case. This is the way to go for all test cases that do not need to have access on container managed resources. Lets have a look at a sample where we want to gain access to a JMS queue and connection managed by the application container.
@RunWith(Arquillian.class) public class EchoServiceTest { @CitrusFramework private Citrus citrusFramework; @Resource(mappedName = "jms/queue/test") private Queue echoQueue; @Resource(mappedName = "/ConnectionFactory") private ConnectionFactory connectionFactory; private JmsSyncEndpoint jmsSyncEndpoint; @Deployment @OverProtocol("Servlet 3.0") public static WebArchive createDeployment() throws MalformedURLException { return ShrinkWrap.create(WebArchive.class) .addClasses(EchoService.class); } @Before public void setUp() { JmsSyncEndpointConfiguration endpointConfiguration = new JmsSyncEndpointConfiguration(); endpointConfiguration.setConnectionFactory(new SingleConnectionFactory(connectionFactory)); endpointConfiguration.setDestination(echoQueue); jmsSyncEndpoint = new JmsSyncEndpoint(endpointConfiguration); } @After public void cleanUp() { closeConnections(); } @Test @CitrusTest public void shouldBeAbleToSendMessage(@CitrusResource TestDesigner designer) throws Exception { String messageBody = "ping"; designer.send(jmsSyncEndpoint) .messageType(MessageType.PLAINTEXT) .message(new JmsMessage(messageBody)); designer.receive(jmsSyncEndpoint) .messageType(MessageType.PLAINTEXT) .message(new JmsMessage(messageBody)); citrusFramework.run(designer.build()); } private void closeConnections() { ((SingleConnectionFactory)jmsSyncEndpoint.getEndpointConfiguration().getConnectionFactory()).destroy(); } }
As you can see the test case accesses two container managed resources via JNDI. This is a JMS queue and a JMS connection that get automatically injected as resources. In a before test annotated method we can use these resources to build up a proper Citrus JMS endpoint. Inside the test method we can use the JMS endpoint for sending and receiving JMS messages via Citrus. As usual response messages received are validated and compared to an expected message. As usual we use the Citrus TestDesigner method parameter that is injected by the framework. The designer is able to build Citrus test logic with Java DSL methods. Once the complete test is designed we can build the test case and run the test case with the framework instance. After the test we should close the JMS connection in order to avoid exceptions when the application container is shutting down after the test.
The test is now part of the test deployment and is executed within the application container boundaries. As usual we can use the Citrus extension to automatically inject the Citrus framework instance as well as the Citrus test builder instance for building the Citrus test logic.
This is how to combine Citrus and Arquillian in order to build integration tests on Java EE services in a real application container environment. With Citrus you are able to set up more complex test scenarios with simulated services such as mail or ftp servers. We can build Citrus endpoints with container managed resources.
In the previous sections we have used the Citrus TestDesigner in order to construct a Citrus test case to execute within the Arquillian boundaries. The nature of the test designer is to aggregate all Java DSL method calls in order to build a complete Citrus test case before execution is done via the Citrus framework. This approach can cause some unexpected behavior when mixing the Citrus Java DSL method calls with Arquillian test logic. Lets describe this by having a look at an example where th mixture of test designer and pure Java test logic causes unseen problems.
@Test
@CitrusTest
public void testDesignRuntimeMixture(@CitrusResource TestDesigner designer) throws Exception {
designer.send(serviceUri)
.message(new HttpMessage("name=Penny&age=20")
.method(HttpMethod.POST)
.contentType(MediaType.APPLICATION_FORM_URLENCODED));
designer.receive(serviceUri)
.message(new HttpMessage())
.statusCode(HttpStatus.NO_CONTENT));
Employee testEmployee = employeeService.findEmployee("Penny");
employeeService.addJob(testEmployee, "waitress");
designer.send(serviceUri)
.message(new HttpMessage()
.method(HttpMethod.GET)
.accept(MediaType.APPLICATION_XML));
designer.receive(serviceUri)
.message(new HttpMessage("<employees>" +
"<employee>" +
"<age>20</age>" +
"<name>Penny</name>" +
"<jobs>" +
"<job>waitress</job>" +
"</jobs>" +
"</employee>" +
"</employees>"))
.statusCode(HttpStatus.OK));
citrusFramework.run(designer.build());
}As you can see in this example we create a new Employee named Penny via the Http REST API on our service. We do this with Citrus Http send and receive message logic. Once this is done we would like to add a job description to the employee. We use a service instance of EmployeeService which is a service of our test domain that is injected to the Arquillian test as container JEE resource. First of all we find the employee object and then we add some job description using the service. Now as a result we would like to receive the employee as XML representation via a REST service call with Citrus and we expect the job description to be present.
This combination of Citrus Java DSL methods and service call logic will not work with TestDesigner. This is because the Citrus test logic is not executed immediately but aggregated to the very end where the designer is called to build the test case. The combination of Citrus design time and Java test runtime is tricky.
Fortunately we have solved this issue with providing a separate TestRunner component. The test runner provides nearly the same Java DSL methods for constructing Citrus test logic as the test designer. The difference though is that the test logic is executed immediately when calling the Java DSL methods. So following from that we can mix Citrus Java DSL code with test runtime logic as expected. See how this looks like with our example:
@Test
@CitrusTest
public void testDesignRuntimeMixture(@CitrusResource TestRunner runner) throws Exception {
runner.send(new BuilderSupport<SendMessageBuilder>() {
@Override
public void configure(SendMessageBuilder builder) {
builder.endpoint(serviceUri)
.message(new HttpMessage("name=Penny&age=20")
.method(HttpMethod.POST)
.contentType(MediaType.APPLICATION_FORM_URLENCODED));
}
});
runner.receive(new BuilderSupport<ReceiveMessageBuilder>() {
@Override
public void configure(ReceiveMessageBuilder builder) {
builder.endpoint(serviceUri)
.message(new HttpMessage()
.statusCode(HttpStatus.NO_CONTENT));
}
});
Employee testEmployee = employeeService.findEmployee("Penny");
employeeService.addJob(testEmployee, "waitress");
runner.send(new BuilderSupport<SendMessageBuilder>() {
@Override
public void configure(SendMessageBuilder builder) {
builder.endpoint(serviceUri)
.message(new HttpMessage()
.method(HttpMethod.GET)
.accept(MediaType.APPLICATION_XML));
}
});
runner.receive(new BuilderSupport<ReceiveMessageBuilder>() {
@Override
public void configure(ReceiveMessageBuilder builder) {
builder.endpoint(serviceUri)
.message(new HttpMessage("<employees>" +
"<employee>" +
"<age>20</age>" +
"<name>Penny</name>" +
"<jobs>" +
"<job>waitress</job>" +
"</jobs>" +
"</employee>" +
"</employees>")
.statusCode(HttpStatus.OK));
}
});
}The test logic has not changed significantly. We use the Citrus TestRunner as method injected parameter instead of the TestDesigner. And this is pretty much the trick. Now the Java DSL methods do execute the Citrus test logic immediately. This is why the syntax of the Citrus Java DSL methods have changed a little bit. We now use a anonymous interface implementation for constructing the send/receive test action logic. As a result we can use the Citrus Java DSL as normal code and we can mix the runtime Java logic as each statement is executed immediately.
With Java 8 lambda expressions our code looks even more straight forward and less verbose as we can skip the anonymous interface implementations. With Java 8 you can write the same test like this:
@Test
@CitrusTest
public void testDesignRuntimeMixture(@CitrusResource TestRunner runner) throws Exception {
runner.send(builder -> builder.endpoint(serviceUri)
.message(new HttpMessage("name=Penny&age=20")
.method(HttpMethod.POST)
.contentType(MediaType.APPLICATION_FORM_URLENCODED));
runner.receive(builder -> builder.endpoint(serviceUri)
.message(new HttpMessage()
.statusCode(HttpStatus.NO_CONTENT));
Employee testEmployee = employeeService.findEmployee("Penny");
employeeService.addJob(testEmployee, "waitress");
runner.send(builder -> builder.endpoint(serviceUri)
.message(new HttpMessage()
.method(HttpMethod.GET)
.accept(MediaType.APPLICATION_XML));
runner.receive(builder -> builder.endpoint(serviceUri)
.message(new HttpMessage("<employees>" +
"<employee>" +
"<age>20</age>" +
"<name>Penny</name>" +
"<jobs>" +
"<job>waitress</job>" +
"</jobs>" +
"</employee>" +
"</employees>")
.statusCode(HttpStatus.OK));
}Citrus provides configuration components and test actions for interaction with a Docker deamon. The Citrus docker client component will execute Docker commands for container management such as start, stop, build, inspect and so on. The Docker client by default uses the Docker remote REST API. As a user you can execute Docker commands as part of a Citrus test and validate possible command results.
| Note |
|---|---|
The Docker test components in Citrus are kept in a separate Maven module. If not already done so you have to include the module as Maven dependency to your project <dependency> <groupId>com.consol.citrus</groupId> <artifactId>citrus-docker</artifactId> <version>2.5</version> </dependency> Citrus provides a "citrus-docker" configuration namespace and schema definition for Docker related components and actions. Include this namespace into your Spring configuration in order to use the Citrus Docker configuration elements. The namespace URI and schema location are added to the Spring configuration XML file as follows. <beans xmlns="http://www.springframework.org/schema/beans" xmlns:xsi="http://www.w3.org/2001/XMLSchema-instance" xmlns:citrus-docker="http://www.citrusframework.org/schema/docker/config" xsi:schemaLocation=" http://www.springframework.org/schema/beans http://www.springframework.org/schema/beans/spring-beans.xsd http://www.citrusframework.org/schema/docker/config http://www.citrusframework.org/schema/docker/config/citrus-docker-config.xsd"> [...] </beans> After that you are able to use customized Citrus XML elements in order to define the Spring beans. |
Citrus operates with the Docker remote REST API in order to interact with the Docker deamon. The Docker client is defined as Spring bean component in the configuration as follows:
<citrus-docker:client id="dockerClient"/>
The Docker client component above is using all default configuration values. By default Citrus is searching the system properties as well as environment variables for default Docker settings such as:
DOCKER_HOST="tcp://localhost:2376"
DOCKER_CERT_PATH="~/.docker/machine/machines/default"
DOCKER_TLS_VERIFY="1"
DOCKER_MACHINE_NAME="default"
In case these settings are not settable in your environment you can also use explicit settings in the Docker client component:
<citrus-docker:client id="dockerClient" url="http://192.168.2.100:2376" version="1.20" username="user" password="s!cr!t" email="user@consol.de" server-address="https://index.docker.io/v1/" cert-path="/path/to/some/cert/directory" config-path="/path/to/some/config/directory"/>
Now Citrus is able to access the Docker remote API for executing commands such as start, stop, build, inspect and so on.
We have several Citrus test actions each representing a Docker command. These actions can be part of a test case where you can manage Docker containers inside the test. As a prerequisite we have to enable the Docker specific test actions in our XML test as follows:
<beans xmlns="http://www.springframework.org/schema/beans" xmlns:xsi="http://www.w3.org/2001/XMLSchema-instance" xmlns:docker="http://www.citrusframework.org/schema/docker/testcase" xsi:schemaLocation=" http://www.springframework.org/schema/beans http://www.springframework.org/schema/beans/spring-beans.xsd http://www.citrusframework.org/schema/docker/testcase http://www.citrusframework.org/schema/docker/testcase/citrus-docker-testcase.xsd"> [...] </beans>
We added a special docker namespace with prefix docker: so now we can start to add Docker test actions to the test case:
XML DSL
<testcase name="DockerCommandIT"> <actions> <docker:ping></docker:ping> <docker:version> <docker:expect> <docker:result> <![CDATA[ { "Version":"1.8.3", "ApiVersion":"1.21", "GitCommit":"@ignore@", "GoVersion":"go1.4.2", "Os":"darwin", "Arch":"amd64", "KernelVersion":"@ignore@" } ]]> </docker:result> </docker:expect> </docker:version> </actions> </testcase>
In this very simple example we first ping the Docker deamon to make sure we have connectivity up and running. After that we get the Docker version information. The second action shows an important concept when executing Docker commands in Citrus. As a tester we might be interested in validating the command result. So wen can specify an optional docker:result which is usually in JSON data format. As usual we can use test variables here and ignore some values explicitly such as the GitCommit value.
Based on that we can execute several Docker commands in a test case:
XML DSL
<testcase name="DockerCommandIT"> <variables> <variable name="imageId" value="busybox"></variable> <variable name="containerName" value="citrus_box"></variable> </variables> <actions> <docker:pull image="${imageId}" tag="latest"/> <docker:create image="${imageId}" name="${containerName}" cmd="top"> <docker:expect> <docker:result> <![CDATA[ {"Id":"@variable(containerId)@","Warnings":null} ]]> </docker:result> </docker:expect> </docker:create> <docker:start container="${containerName}"/> </actions> </testcase>
In this example we pull a Docker image, build a new container out of this image and start the container. As you can see each Docker command action offers attributes such as container, image or tag. These are command settings that are available on the Docker command specification. Read more about the Docker commands and the specific settings in official Docker API reference guide.
Citrus supports the following Docker commands with respective test actions:
docker:pull
docker:build
docker:create
docker:start
docker:stop
docker:wait
docker:ping
docker:version
docker:inspect
docker:remove
docker:info
Some of the Docker commands can be executed both on container and image targets such as docker:inspect or docker:remove. The command action then offers both container and image attributes so the user can choose the target of the command operation to be a container or an image.
Up to now we have only used the Citrus XML DSL. Of course all Docker commands are also available in Java DSL as the next example shows.
Java DSL
@CitrusTest public void dockerTest() { docker().version() .validateCommandResult(new CommandResultCallback<Version>() { @Override public void doWithCommandResult(Version version, TestContext context) { Assert.assertEquals(version.getApiVersion(), "1.20"); } }); docker().ping(); docker().start("my_container"); }
The Java DSL Docker commands provide an optional CommandResultCallback that is called with the unmarshalled command result object. In the example above the Version model object is passed as argument to the callback. So the tester can access the command result and validate its properties.
By default Citrus tries to find a Docker client component within the Citrus Spring application context. If not present Citrus will instantiate a default docker client with all default settings. You can also explicitly set the docker client instance when using the Java DSL Docker command actions:
Java DSL
@Autowired private DockerClient dockerClient; @CitrusTest public void dockerTest() { docker().client(dockerClient).version() .validateCommandResult(new CommandResultCallback<Version>() { @Override public void doWithCommandResult(Version version, TestContext context) { Assert.assertEquals(version.getApiVersion(), "1.20"); } }); docker().client(dockerClient).ping(); docker().client(dockerClient).start("my_container"); }
In the spirit of other Citrus mock services, there is support for simulating an external SSH server as well as for connecting to SSH servers as a client during the test execution. Citrus translates SSH requests and responses to simple XML documents for better validation with the common Citrus mechanisms.
This means that the Citrus test case does not deal with pure SSH protocol commands. Instead of this we use the powerful XML validation capabilities in Citrus when dealing with the simple XML documents that represent the SSH request/response data.
Let us clarify this with a little example. Once the real SSH server daemon is fired up within Citrus we accept a SSH EXEC request for instance. The request is translated into a XML message of the following format:
<ssh-request xmlns="http://www.citrusframework.org/schema/ssh/message"> <command>cat - | sed -e 's/Hello/Hello SSH/'</command> <stdin>Hello World</stdin> </ssh-request>
This message can be validated with the usual Citrus mechanism in a receive test action. If you do not know how to do this, please read one of the sections about XML message validation in this reference guide first. Now after having received this request message the respective SSH response should be provided as appropriate answer. This is done with a message sending action on a reply handler as it is known from synchronous http message communication in Citrus for instance. The SSH XML representation of a response message looks like this:
<ssh-response xmlns="http://www.citrusframework.org/schema/ssh/message"> <stdout>Hello SSH World</stdout> <stderr></stderr> <exit>0</exit> </ssh-response>
Besides simulating a full featured SSH server, Citrus also provides SSH client functionality. This client uses the same request message pattern, which is translated into a real SSH call to an SSH server. The SSH response received is also translated into a XML message as shown above so we can validate it with known validation mechanisms in Citrus.
Similar to the other Citrus modules (http, soap), a Citrus SSH server and client is configured in Citrus Spring application context. There is a dedicated ssh namespace available for all ssh Citrus components. The namespace declaration goes into the context top-level element as usual:
<beans [...] xmlns:citrus-ssh="http://www.citrusframework.org/schema/ssh/config" [...] xsi:schemaLocation=" [...] http://www.citrusframework.org/schema/ssh/config http://www.citrusframework.org/schema/ssh/config/citrus-ssh-config.xsd [...] "> [...] </beans>
Both, SSH server and client along with their configuration options are described in the following two sections.
A Citrus SSH client is useful for testing against a real SSH server. So Citrus is able to invoke SSH commands on the external server and validate the SSH response accordingly. The test case does not deal with the pure SSH protocol within this communication. The Citrus SSH client component expects a customized XML representation and automatically translates these request messages into a real SSH call to a specific host. Once the synchronous SSH response was received the result gets translated back to the XML response message representation. On this translated response we can easily apply the validation steps by the usual Citrus means.
The SSH client components receive its configuration in the Spring application context as usual. We can use the special SSH module namespace for easy configuration:
<citrus-ssh:client id="sshClient" port="9072" user="roland" private-key-path="classpath:com/consol/citrus/ssh/test_user.priv" strict-host-checking="false" host="localhost"/>
The SSH client receives several attributes, these are:
id: Id identifying the bean and used as reference from with test descriptions. (e.g. id="sshClient")
host: Host to connect to for sending an SSH Exec request. Default is 'localhost' (e.g. host="localhost")
port Port to use. Default is 2222 (e.g. port="9072")
private-key-path: Path to a private key, which can be either a plain file path or an class resource if prefixed with 'classpath' (e.g. private-key-path="classpath:test_user.priv")
private-key-password: Optional password for the private key (e.g. password="s!cr!t")
user: User used for connecting to the SSH server (e.g. user="roland")
password: Password used for password based authentication. Might be combined with "private-key-path" in which case both authentication mechanism are tried (e.g. password="ps!st)
strict-host-checking: Whether the host key should be verified by looking it up in a 'known_hosts' file. Default is false (e.g. strict-host-checking="true")
known-hosts-path: Path to a known hosts file. If prefixed with 'classpath:' this file is looked up as a resource in the classpath (e.g. known-hosts-path="/etc/ssh/known_hosts")
command-timeout: Timeout in milliseconds for how long to wait for the SSH command to complete. Default is 5 minutes (e.g. command-timeout="300000")
connection-timeout: Timeout in milliseconds for how long to for a connectiuon to connect. Default is 1 minute (e.g. connection-timeout="60000")
actor: Actor used for switching groups of actions (e.g. actor="ssh-mock")
Once defines as client component in the Spring application context test cases can reference the client in every send test action.
<send endpoint="sshClient"> <message> <payload> <ssh-request xmlns="http://www.citrusframework.org/schema/ssh/message"> <command>shutdown</command> <stdin>input</stdin> </ssh-request> </payload> </message> </send> <receive endpoint="sshClient"> <message> <payload> <ssh-response xmlns="http://www.citrusframework.org/schema/ssh/message"> <stdout>Hello Citrus</stdout> <stderr/> <exit>0</exit> </ssh-response> </payload> </message> </receive>
As you can see we use usual send and receive test actions. The XML SSH representation helps us to specify the request and response data for validation. This way you can call SSH commands against an external SSH server and validate the response data.
Now that we have used Citrus on the client side we can also use Citrus SSH server module in order to provide a full stacked SSH server deamon. We can accept SSH client connections and provide proper response messages as an answer.
Given the above SSH module namespace declaration, adding a new SSH server is quite simple:
<citrus-ssh:server id="sshServer" allowed-key-path="classpath:com/consol/citrus/ssh/test_user_pub.pem" user="roland" port="9072" auto-start="true" endpoint-adapter="sshEndpointAdapter"/>
endpoint-adapter is the handler which receives the SSH request as messages (in the request format described above). Endpoint adapter implementations are fully described in Section 17.2, “HTTP REST server” All adapters described there are supported in SSH server module, too.
The <citrus-ssh:server> supports the following attributes:
SSH Server Attributes:
id: Name of the SSH server which identifies it unique within the Citrus Spring context (e.g. id="sshServer")
host-key-path: Path to PEM encoded key pair (public and private key) which is used as host key. By default, a standard, pre-generate, fixed keypair is used. The path can be specified either as an file path, or, if prefixed with classpath: is looked up from within the classpath. The path the is relative from to the top-level package, so no leading slash should be used (e.g. hist-key-path="/etc/citrus_ssh_server.pem)
user: User which is allowed to connect (e.g. user="roland")
allowed-key-path: Path to a SSH public key stored in PEM format. These are the keys, which are allowed to connect to the SSH server when publickey authentication is used. It seves the same purpose as
authorized_keysfor standard SSH installations. The path can be specified either as an file path, or, if prefixed with classpath: is looked up from within the classpath. The path the is relative from to the top-level package, so no leading slash should be used (e.g. allowed-key-path="classpath:test_user_pub.pem)password: Password which should be used when password authentication is used. Both publickey authentication and password based authentication can be used together in which case both methods are tried in turn (e.g. password="s!cr!t")
host: Host address (e.g. localhost)
port: Port on which to listen. The SSH server will bind on localhost to this port (e.g. port="9072")
auto-start: Whether to start this SSH server automatically. Default is true. If set to false, a test action is responsible for starting/stopping the server (e.g. auto-start="true")
endpoint-adapter: Bean reference to a endpoint adapter which processes the incoming SSH request. The message format for the request and response are described above (e.g. endpoint-adapter="sshEndpointAdapter")
Once the SSH server component is added to the Spring application context with a proper endpoint adapter like the MessageChannel forwarding adapter we can receive incoming requests in a test case and provide a respone message for the client.
<receive endpoint="sshServer"> <message> <payload> <ssh-request xmlns="http://www.citrusframework.org/schema/ssh/message"> <command>shutdown</command> <stdin>input</stdin> </ssh-request> </payload> </message> </receive> <send endpoint="sshServer"> <message> <payload> <ssh-response xmlns="http://www.citrusframework.org/schema/ssh/message"> <stdout>Hello Citrus</stdout> <exit>0</exit> </ssh-response> </payload> </message> </send>
RMI stands for Remote Method Invocation and is a standard way of calling Java method interfaces where caller and callee (client and server) are not located within the same JVM. So the object passed to the method as argument as well as the method return value are transmitted over the wire.
As a client Citrus is able to connect to some RMI registry that exposes some remote interfaces. As a server Citrus implements such a RMI registry and handles incoming method calls with providing the respective return value.
| Note |
|---|---|
The RMI components in Citrus are kept in a separate Maven module. So you should check that the module is available as Maven dependency in your project <dependency> <groupId>com.consol.citrus</groupId> <artifactId>citrus-rmi</artifactId> <version>2.5</version> </dependency> As usual Citrus provides a customized rmi configuration schema that is used in Spring configuration files. Simply include the citrus-rmi namespace in the configuration XML files as follows. <beans xmlns="http://www.springframework.org/schema/beans" xmlns:xsi="http://www.w3.org/2001/XMLSchema-instance" xmlns:citrus="http://www.citrusframework.org/schema/config" xmlns:citrus-rmi="http://www.citrusframework.org/schema/rmi/config" xsi:schemaLocation=" http://www.springframework.org/schema/beans http://www.springframework.org/schema/beans/spring-beans.xsd http://www.citrusframework.org/schema/config http://www.citrusframework.org/schema/config/citrus-config.xsd http://www.citrusframework.org/schema/rmi/config http://www.citrusframework.org/schema/rmi/config/citrus-rmi-config.xsd"> [...] </beans> Now you are ready to use the customized Http configuration elements with the citrus-rmi namespace prefix. |
Read the next section in order to find out more about the RMI message support in Citrus.
On the client side we want to call e remote interface. We need to specify the method to call as well as all method arguments. The respective method return value is receivable within the test case for validation. Citrus provides a client component for RMI that sends out service invocation calls.
<citrus-rmi:client id="rmiClient1" host="localhost" port="1099" binding="newsService"/> <citrus-rmi:client id="rmiClient2" server-url="rmi://localhost:1099/newsService"/>
The client component in the Spring application context receives host and port configuration of a valid RMI service registry. Either by specifying a proper server url or by giving host, port and binding properties. The service binding is the name of the service that we would like to address in the registry. Now we are ready to use this client referenced by its id or name in a test case for a message sending action.
XML DSL
<send endpoint="rmiClient"> <message> <payload> <service-invocation xmlns="http://www.citrusframework.org/schema/rmi/message"> <remote>com.consol.citrus.rmi.remote.NewsService</remote> <method>getNews</method> </service-invocation> </payload> </message> </send>
Java DSL
@CitrusTest public void rmiClientTest() { send(rmiClient) .message(RmiMessage.invocation(NewsService.class, "getNews")); }
We are using the usual Citrus send message action referencing the rmiClient as endpoint. The message payload is a special Citrus message that defines the service invocation. We define the remote interface as well as the method to call. Citrus RMI client component will be able to interpret this message content and call the service method.
The method return value is receivable for validation using the very same client endpoint.
XML DSL
<receive endpoint="rmiClient"> <message> <payload> <service-result xmlns="http://www.citrusframework.org/schema/rmi/message"> <object type="java.lang.String" value="This is news from RMI!"/> </service-result> </payload> </message> </receive>
Java DSL
@CitrusTest public void rmiClientTest() { receive(rmiClient) .message(RmiMessage.result("This is news from RMI!")); }
In the sample above we receive the service result and expect a java.lang.String object return value. The return value content is also validated within the service result payload.
Of course we can also deal with method arguments.
XML DSL
<send endpoint="rmiClient"> <message> <payload> <service-invocation xmlns="http://www.citrusframework.org/schema/rmi/message"> <remote>com.consol.citrus.rmi.remote.NewsService</remote> <method>setNews</method> <args> <arg value="This is breaking news!"/> </args> </service-invocation> </payload> </message> </send>
@CitrusTest public void rmiServerTest() { send(rmiClient) .message(RmiMessage.invocation(NewsService.class, "setNews") .argument("This is breaking news!")); }
This completes the basic remote service call. Citrus invokes the remote interface method and validates the method return value. As a tester you might also face errors and exceptions when calling the remote interface method. You can catch and assert these remote exceptions verifying your error scenario.
XML DSL
<assert exception="java.rmi.RemoteException"> <send endpoint="rmiClient"> <message> <payload> <service-invocation xmlns="http://www.citrusframework.org/schema/rmi/message"> [...] </service-invocation> </payload> </message> </send> <assert/>
We assert the RemoteException to be thrown while calling the remote service method. This is how you can handle
some sort of error situation while calling remote services. In the next section we will handle RMI communication where Citrus provides
the remote interfaces.
On the server side Citrus needs to provide remote interfaces with methods callable for clients. This means that Citrus needs to support all your remote interfaces with method arguments and return values. The Citrus RMI server is able to bind your remote interfaces to a service registry. All incoming RMI client method calls are automatically accepted and the method arguments are converted into a Citrus XML service invocation representation. The RMI method call is then passed to the running test for validation.
Let us have a look at the Citrus RMI server component and how you can add it to the Spring application context.
<citrus-rmi:server id="rmiServer" host="localhost" port="1099" interface="com.consol.citrus.rmi.remote.NewsService" binding="newService" create-registry="true" auto-start="true"/>
The RMI server component uses properties such as host and port to define the service registry. By default Citrus will connect to this service registry and bind its remote interfaces to it. With the attribute create-registry Citrus can also create the registry for you.
You have to give Citrus the fully qualified remote interface name so Citrus can bind it to the service registry and handle incoming method calls properly. In your test case you can then receive the incoming method calls on the server in order to perform validation steps.
XML DSL
<receive endpoint="rmiServer"> <message> <payload> <service-invocation xmlns="http://www.citrusframework.org/schema/rmi/message"> <remote>com.consol.citrus.rmi.remote.NewsService</remote> <method>getNews</method> </service-invocation> </payload> <header> <element name="citrus_rmi_interface" value="com.consol.citrus.rmi.remote.NewsService"/> <element name="citrus_rmi_method" value="getNews"/> </header> </message> </receive>
Java DSL
@CitrusTest public void rmiServerTest() { receive(rmiServer) .message(RmiMessage.invocation(NewsService.class, "getNews")); }
As you can see Citrus converts the incoming service invocation to a special XML representation which is passed as message payload to the test. As this is plain XML you can verify the RMI message content as usual using Citrus variables, functions and validation matchers.
Since we have received the method call we need to provide some return value for the client. As usual we can specify the method return value with some XML representation.
XML DSL
<send endpoint="rmiServer"> <message> <payload> <service-result xmlns="http://www.citrusframework.org/schema/rmi/message"> <object type="java.lang.String" value="This is news from RMI!"/> </service-result> </payload> </message> </send>
Java DSL
@CitrusTest public void rmiServerTest() { send(rmiServer) .message(RmiMessage.result("This is news from RMI!")); }
The service result is defined as object with a type and value. The Citrus RMI remote interface method will return this value to the calling client. This would complete the successful remote service invocation. At this point we also have to think of choosing to raise some remote exception as service outcome.
XML DSL
<send endpoint="rmiServer"> <message> <payload> <service-result xmlns="http://www.citrusframework.org/schema/rmi/message"> <exception>Something went wrong<exception/> </service-result> </payload> </message> </send>
Java DSL
@CitrusTest public void rmiServerTest() { send(rmiServer) .message(RmiMessage.exception("Something went wrong")); }
In the example above Citrus will not return some object as service result but raise a java.rmi.RemoteException with respective error message as specified in the test case. The calling client will receive the exception accordingly.
JMX is a standard Java API for making beans accessible to others in terms of management and remote configuration. JMX is the short term for Java Management Extensions and is often used in JEE application servers to manage bean attributes and operations from outside (e.g. another JVM). A managed bean server hosts multiple managed beans for JMX access. Remote connections to JMX can be realized with RMI (Remote method invocation) capabilities.
Citrus is able to connect to JMX managed beans as client and server. As a client Citrus can invoke managed bean operations and read write managed bean attributes. As a server Citrus is able to expose managed beans as mbean server. Clients can access those Citrus managed beans and get proper response objects as result. Doing so you can use the JVM platform managed bean server or some RMI registry for providing remote access.
| Note |
|---|---|
The JMX components in Citrus are kept in a separate Maven module. So you should check that the module is available as Maven dependency in your project <dependency> <groupId>com.consol.citrus</groupId> <artifactId>citrus-jmx</artifactId> <version>2.5</version> </dependency> As usual Citrus provides a customized jmx configuration schema that is used in Spring configuration files. Simply include the citrus-jmx namespace in the configuration XML files as follows. <beans xmlns="http://www.springframework.org/schema/beans" xmlns:xsi="http://www.w3.org/2001/XMLSchema-instance" xmlns:citrus="http://www.citrusframework.org/schema/config" xmlns:citrus-jmx="http://www.citrusframework.org/schema/jmx/config" xsi:schemaLocation=" http://www.springframework.org/schema/beans http://www.springframework.org/schema/beans/spring-beans.xsd http://www.citrusframework.org/schema/config http://www.citrusframework.org/schema/config/citrus-config.xsd http://www.citrusframework.org/schema/jmx/config http://www.citrusframework.org/schema/jmx/config/citrus-jmx-config.xsd"> [...] </beans> Now you are ready to use the customized Http configuration elements with the citrus-jmx namespace prefix. |
Next sections describe the JMX message support in Citrus in more detail.
On the client side we want to call some managed bean by either accessing managed attributes with read/write or by invoking a managed bean operation. For proper mbean server connectivity we should specify a client component for JMX that sends out mbean invocation calls.
<citrus-jmx:client id="jmxClient" server-url="platform"/>
The client component specifies the target managed bean server that we want to connect to. In this example we are using the JVM platform mbean server. This means we are able to access all JVM managed beans such as Memory, Threading and Logging. In addition to that we can access all custom managed beans that were exposed to the platform mbean server.
In most cases you may want to access managed beans on a different JVM or application server. So we need some remote connection to the foreign mbean server.
<citrus-jmx:client id="jmxClient" server-url="service:jmx:rmi:///jndi/rmi://localhost:1099/jmxrmi" username="user" password="s!cr!t" auto-reconnect="true" delay-on-reconnect="5000"/>
In this example above we connect to a remote mbean server via RMI using the default RMI registry localhost:1099 and the service name jmxrmi. Citrus is able to handle different remote transport protocols. Just define those in the server-url.
Now that we have setup the client component we can use it in a test case to access a managed bean.
XML DSL
<send endpoint="jmxClient"> <message> <payload> <mbean-invocation xmlns="http://www.citrusframework.org/schema/jmx/message"> <mbean>java.lang:type=Memory</mbean> <attribute name="Verbose"/> </mbean-invocation> </payload> </message> </send>
Java DSL
@CitrusTest public void jmxClientTest() { send(jmxClient) .message(JmxMessage.invocation("java.lang:type=Memory") .attribute("Verbose")); }
As you can see we just used a normal send action referencing the jmx client component that we have just added. The message payload is a XML representation of the managed bean access. This is a special Citrus XML representation. Citrus will convert this XML payload to the actuel managed bean access. In the example above we try to access a managed bean with object name java.lang:type=Memory. The object name is defined in JMX specification and consists of a key java.lang:type and a value Memory. So we identify the managed bean on the server by its type.
Now that we have access to the managed bean we can read its managed attributes such as Verbose. This is a boolean type attribute so the mbean invocation result will be a respective Boolean object. We can validate the managed bean attribute access in a receive action.
XML DSL
<receive endpoint="jmxClient"> <message> <payload> <mbean-result xmlns="http://www.citrusframework.org/schema/jmx/message"> <object type="java.lang.Boolean" value="false"/> </mbean-result> </payload> </message> </receive>
Java DSL
@CitrusTest public void jmxClientTest() { receive(jmxClient) .message(JmxMessage.result(false)); }
In the sample above we receive the mbean result and expect a java.lang.Boolean object return value. The return value content is also validated within the mbean result payload.
Some managed bean attributes might also be settable for us. So wen can define the attribute access as write operation by specifying a value in the send action payload.
XML DSL
<send endpoint="jmxClient"> <message> <payload> <mbean-invocation xmlns="http://www.citrusframework.org/schema/jmx/message"> <mbean>java.lang:type=Memory</mbean> <attribute name="Verbose" value="true" type="java.lang.Boolean"/> </mbean-invocation> </payload> </message> </send>
Java DSL
@CitrusTest public void jmxClientTest() { send(jmxClient) .message(JmxMessage.invocation("java.lang:type=Memory") .attribute("Verbose", true)); }
Now we have write access to the managed attribute Verbose. We do specify the value and its type java.lang.Boolean. This is how we can set attribute values on managed beans.
Last not least we are able to access managed bean operations.
XML DSL
<send endpoint="jmxClient"> <message> <payload> <mbean-invocation xmlns="http://www.citrusframework.org/schema/jmx/message"> <mbean>com.consol.citrus.jmx.mbean:type=HelloBean</mbean> <operation name="sayHello"> >parameter> >param type="java.lang.String" value="Hello JMX!"/> >/parameter> >/operation> </mbean-invocation> </payload> </message> </send>
Java DSL
@CitrusTest public void jmxClientTest() { send(jmxClient) .message(JmxMessage.invocation("com.consol.citrus.jmx.mbean:type=HelloBean") .operation("sayHello") .parameter("Hello JMX!")); }
In the example above we access a custom managed bean and invoke its operation sayHello. We are also using operation parameters for the invocation. This should call the managed bean operation and return its result if any as usual.
This completes the basic JMX managed bean access as client. Now we also want to discuss the server side were Citrus is able to provide managed beans for others
The server side is always a little bit more tricky because we need to simulate custom managed bean access as a server. First of all Citrus provides a server component that specifies the connection properties for clients such as transport protocols, ports and mbean object names. Lets create a new server that accepts incoming requests via RMI on a remote registry localhost:1099.
<citrus-jmx:server id="jmxServer" server-url="service:jmx:rmi:///jndi/rmi://localhost:1099/jmxrmi" <citrus-jmx:mbeans> <citrus-jmx:mbean type="com.consol.citrus.jmx.mbean.HelloBean"/> <citrus-jmx:mbean type="com.consol.citrus.jmx.mbean.NewsBean" objectDomain="com.consol.citrus.news" objectName="name=News"/> </citrus-jmx:mbeans> </citrus-jmx:server>
As usual we define a server-url that controls the JMX connector access to the mbean server. In this example above we open a JMX RMI connector for clients using the registry localhost:1099 and the service name jmxrmi By default Citrus will not attempt to create this registry automatically so the registry has to be present before the server start up. With the optional server property create-registry set to true you can auto create the registry when the server starts up. These properties do only apply when using a remote JMX connector server.
Besides using the whole server-url as property we can also construct the connection by host, port, protocol and binding properties.
<citrus-jmx:server id="jmxServer" host="localhost" port="1099" protocol="rmi" binding="jmxrmi" <citrus-jmx:mbeans> <citrus-jmx:mbean type="com.consol.citrus.jmx.mbean.HelloBean"/> <citrus-jmx:mbean type="com.consol.citrus.jmx.mbean.NewsBean" objectDomain="com.consol.citrus.news" objectName="name=News"/> </citrus-jmx:mbeans> </citrus-jmx:server>
On last thing to mention is that we could have also used platform as server-url in order to use the JVM platform mbean server instead.
Now that we clarified the connectivity we need to talk about how to define the managed beans that are available on our JMX mbean server. This is done as nested mbean configuration elements. Here the managed bean definitions describe the managed bean with its objectDomain, objectName, operations and attributes. The most convenient way of defining such managed bean definitions is to give a bean type which is the fully qualified class name of the managed bean. Citrus will use the package name and class name for proper objectDomain and objectName construction.
Lets have a closer look at the irst mbean definition in the example above. So the first managed bean is defined by its class name com.consol.citrus.jmx.mbean.HelloBean and therefore is accessible using the objectName com.consol.citrus.jmx.mbean:type=HelloBean. In addition to that Citrus will read the class information such as available methods, getters and setters for constructing a proper MBeanInfo. In the second managed bean definition in our example we have used additional custom objectDomain and objectName values. So the NewsBean will be accessible with com.consol.citrus.news:name=News on the managed bean server.
This is how we can define the bindings of managed beans and what clients need to search for when finding and accessing the managed beans on the server. When clients try to find the managed beans they have to use proper objectNames accordingly. ObjectNames that are not defined on the server will be rejected with managed bean not found error.
Right now we have to use the qualified class name of the managed bean in the definition. What happens if we do not have access to that mbean class or if there is not managed bean interface available at all? Citrus provides a generic managed bean that is able to handle any managed bean interaction. The generic bean implementation needs to know the managed operations and attributes though. So lets define a new generic managed bean on our server:
<citrus-jmx:server id="jmxServer" server-url="service:jmx:rmi:///jndi/rmi://localhost:1099/jmxrmi" <citrus-jmx:mbeans> <citrus-jmx:mbean name="fooBean" objectDomain="foo.object.domain" objectName="type=FooBean"> <citrus-jmx:operations> <citrus-jmx:operation name="fooOperation"> <citrus-jmx:parameter> <citrus-jmx:param type="java.lang.String"/> <citrus-jmx:param type="java.lang.Integer"/> </citrus-jmx:parameter> </citrus-jmx:operation> <citrus-jmx:operation name="barOperation"/> </citrus-jmx:operations> <citrus-jmx:attributes> <citrus-jmx:attribute name="fooAttribute" type="java.lang.String"/> <citrus-jmx:attribute name="barAttribute" type="java.lang.Boolean"/> </citrus-jmx:attributes> </citrus-jmx:mbean> </citrus-jmx:mbeans> </citrus-jmx:server>
The generic bean definition needs to define all operations and attributes that are available for access. Up to now we are restricted to using Java base types when defining operation parameter and attribute return types. There is actually no way to define more complex return types. Nevertheless Citrus is now able to expose the managed bean for client access without having to know the actual managed bean implementation.
Now we can use the server component in a test case to receive some incoming managed bean access.
XML DSL
<receive endpoint="jmxServer"> <message> <payload> <mbean-invocation xmlns="http://www.citrusframework.org/schema/jmx/message"> <mbean>com.consol.citrus.jmx.mbean:type=HelloBean</mbean> <operation name="sayHello"> >parameter> >param type="java.lang.String" value="Hello JMX!"/> >/parameter> </operation> </mbean-invocation> </payload> </message> </receive>
Java DSL
@CitrusTest public void jmxServerTest() { receive(jmxServer) .message(JmxMessage.invocation("com.consol.citrus.jmx.mbean:type=HelloBean") .operation("sayHello") .parameter("Hello JMX!")); }
In this very first example we expect a managed bean access to the bean com.consol.citrus.jmx.mbean:type=HelloBean. We further expect the operation sayHello to be called with respective parameter values. Now we have to define the operation result that will be returned to the calling client as operation result.
XML DSL
<send endpoint="jmxServer"> <message> <payload> <mbean-result xmlns="http://www.citrusframework.org/schema/jmx/message"> <object type="java.lang.String" value="Hello from JMX!"/> </mbean-result> </payload> </message> </send>
Java DSL
@CitrusTest public void jmxServerTest() { send(jmxServer) .message(JmxMessage.result("Hello from JMX!")); }
The operation returns a String Hello from JMX!. This is how we can expect operation calls on managed beans. Now we already have seen that managed beans also expose attributes. The next example is handling incoming attribute read access.
XML DSL
<receive endpoint="jmxServer"> <message> <payload> <mbean-invocation xmlns="http://www.citrusframework.org/schema/jmx/message"> <mbean>com.consol.citrus.news:name=News</mbean> >attribute name="newsCount"/> </mbean-invocation> </payload> </message> </receive> <send endpoint="jmxServer"> <message> <payload> <mbean-result xmlns="http://www.citrusframework.org/schema/jmx/message"> <object type="java.lang.Integer" value="100"/> </mbean-result> </payload> </message> </send>
Java DSL
@CitrusTest public void jmxServerTest() { receive(jmxServer) .message(JmxMessage.invocation("com.consol.citrus.news:name=News") .attribute("newsCount"); send(jmxServer) .message(JmxMessage.result(100)); }
The receive action expects read access to the NewsBean attribute newsCount and returns a result object of type java.lang.Integer. This way we can expect all attribute access to our managed beans. Write operations will have a attribute value specified.
This completes the JMX server capabilities with managed bean access on operations and attributes.
Endpoints represent the central components in Citrus to send or receive a message on some destination. Usually endpoints get defined in the basic Citrus Spring application context configuration as Spring bean components. In some cases this might be over engineering as the tester just wants to send or receive a message. In particular this is done when doing sanity checks in server endpoints while debugging a certain scenario.
With endpoint components you are able to create the Citrus endpoint for sending and receiving a message at test runtime. There is no additional configuration or Spring bean component needed. You just use the endpoint uri in a special naming convention and Citrus will create the endpoint for you. Let us see a first example of this scenario:
<testcase name="DynamicEndpointTest"> <actions> <send endpoint="jms:Hello.Queue?timeout=10000"> <message> <payload> [...] </payload> </message> </send> <receive endpoint="jms:Hello.Response.Queue?timeout=5000"> <message> <payload> [...] </payload> </message> </receive> </actions> </testcase>
As you can see the endpoint uri just goes into the test case action in substitution to the usual endpoint reference name. Instead of referencing a bean id that points to the previously configured Citrus endpoint we use the endpoint uri directly. The endpoint uri should give all information to create the endpoint at runtime. In the example above we use a keyword jms: which tells Citrus that we need to create a JMS message endpoint. Secondly we give the JMS destination name Hello.Queue which is a mandatory part of the endpoint uri when using the JMS component. The optional timeout parameter completed the uri. Citrus is able to create the JMS endpoint at runtime sending the message to the defined destination via JMS.
Of course this mechanism is not limited to JMS endpoints. We can use all default Citrus message transports in the endpoint uri. Just pick the right keyword that defines the message transport to use. Here is a list of supported keywords:
- jms: Creates a JMS endpoint for sending and receiving message to a queue or topic
- channel: Creates a channel endpoint for sending and receiving messages using an in memory Spring Integration message channel
- http: Creates a HTTP client for sending a request to some server URL synchronously waiting for the response message
- ws: Creates a Web Socket client for sending messages to or receiving messages from a Web Socket server
- soap: Creates a SOAP WebService client that send a proper SOAP message to the server URL and waits for the synchronous response to arrive
- ssh: Creates a new ssh client for publishing a command to the server
- mail: or smtp: Creates a new mail client for sending a mail mime message to a SMTP server
- camel: Creates a new Apache Camel endpoint for sending and receiving Camel exchanges both to and from Camel routes.
- vertx: or eventbus: Creates a new Vert.x instance sending and receiving messages with the network event bus
- rmi: Creates a new RMI client instance sending and receiving messages for method invocation on remote interfaces
- jmx: Creates a new JMX client instance sending and receiving messages to and from a managed bean server.
Depending on the message transport we have to add mandatory parameters to the endpoint uri. In the JMS example we had to specify the destination name. The mandatory parameters are always part of the endpoint uri. Optional parameters can be added as key value pairs to the endpoint uri. The available parameters depend on the endpoint keyword that you have chosen. See these example endpoint uri expressions:
jms:queuename?connectionFactory=specialConnectionFactory&timeout=10000
jms:topic:topicname?connectionFactory=topicConnectionFactory
jms:sync:queuename?connectionFactory=specialConnectionFactory&pollingInterval=100&replyDestination=myReplyDestination
channel:channelName
channel:sync:channelName
channel:channelName?timeout=10000&channelResolver=myChannelResolver
http:localhost:8088/test
http://localhost:8088/test
http:localhost:8088?requestMethod=GET&timeout=10000&errorHandlingStrategy=throwsException&requestFactory=myRequestFactory
http://localhost:8088/test?requestMethod=DELETE&customParam=foo
websocket:localhost:8088/test
websocket://localhost:8088/test
ws:localhost:8088/test
ws://localhost:8088/test
soap:localhost:8088/test
soap:localhost:8088?timeout=10000&errorHandlingStrategy=propagateError&messageFactory=myMessageFactory
mail:localhost:25000
smtp://localhost:25000
smtp://localhost?timeout=10000&username=foo&password=1234&mailMessageMapper=myMapper
ssh:localhost:2200
ssh://localhost:2200?timeout=10000&strictHostChecking=true&user=foo&password=12345678
rmi://localhost:1099/someService
rmi:localhost/someService&timeout=10000
jmx:rmi:///jndi/rmi://localhost:1099/someService
jmx:platform&timeout=10000
camel:direct:address
camel:seda:address
camel:jms:queue:someQueue?connectionFactory=myConnectionFactory
camel:activemq:queue:someQueue?concurrentConsumers=5&destination.consumer.prefetchSize=50
camel:controlbus:route?routeId=myRoute&action=status
vertx:addressName
vertx:addressName?port=10105&timeout=10000&pubSubDomain=true
vertx:addressName?vertxInstanceFactory=vertxFactoryThe optional parameters get directly set as endpoint configuration. You can use primitive values as well as Spring bean id references. Citrus will automatically detect the target parameter type and resolve the value to a Spring bean in the application context if necessary. If you use some unknown parameter Citrus will raise an exception at runtime as the endpoint could not be created properly.
In synchronous communication we have to reuse endpoint components in order to receive synchronous messages on reply destinations. This is a problem when using dynamic endpoints as the endpoints get created at runtime. Citrus uses a caching of endpoints that get created at runtime. Following from that we have to use the exact same endpoint uri in your test case in order to get the cached endpoint instance. With this little trick synchronous communication will work just as it is done with static endpoint components. Have a look at this sample test:
<testcase name="DynamicEndpointTest"> <actions> <send endpoint="jms:sync:Hello.Sync.Queue"> <message> <payload> [...] </payload> </message> </send> <receive endpoint="jms:sync:Hello.Sync.Queue"> <message> <payload> [...] </payload> </message> </receive> </actions> </testcase>
As you can see we used the exact dynamic endpoint uri in both send and receive actions. Citrus is then able to reuse the same dynamic endpoint and the synchronous reply will be received as expected. However the reuse of exactly the same endpoint uri might get annoying as we also have to copy endpoint uri parameters and so on.
<testcase name="DynamicEndpointTest"> <actions> <send endpoint="http://localhost:8080/HelloService?user=1234567"> <message> <payload> [...] </payload> </message> </send> <receive endpoint="http://localhost:8080/HelloService?user=1234567"> <message> <payload> [...] </payload> </message> </receive> </actions> </testcase>
We have to use the exact same endpoint uri when receiving the synchronous service response. This is not very straight forward. This is why Citrus also supports dynamic endpoint names. With a special endpoint uri parameter called endpointName you can name the dynamic endpoint. In a corresponding receive action you just use the endpoint name as reference which makes life more easy:
<testcase name="DynamicEndpointTest"> <actions> <send endpoint="http://localhost:8080/HelloService?endpointName=myHttpClient"> <message> <payload> [...] </payload> </message> </send> <receive endpoint="http://localhost?endpointName=myHttpClient"> <message> <payload> [...] </payload> </message> </receive> </actions> </testcase>
So we can reference the dynamic endpoint with the given name. The internal endpointName uri parameter is automatically removed before sending out messages. Once again the dynamic endpoint uri mechanism provides a fast way to write test cases in Citrus with less configuration. But you should consider to use the static endpoint components defined in the basic Spring bean application context for endpoints that are heavily reused in multiple test cases.
Endpoint adapter help to customize the behavior of a Citrus server such as HTTP or SOAP web servers. As the servers get started with the Citrus context they are ready to receive incoming client requests. Now there are different ways to process these incoming requests and to provide a proper response message. By default the server will forward the incoming request to a in memory message channel where a test can receive the message and provide a synchronous response. This message channel handling is done automatically behind the scenes so the tester does not care about these things. The tester just uses the server directly as endpoint reference in the test case. This is the default behaviour. In addition to that you can define custom endpoint adapters on the Citrus server in order to change this default behavior.
You set the custom endpoint adapter directly on the server configuration as follows:
<citrus-http:server id="helloHttpServer" port="8080" auto-start="true" endpoint-adapter="emptyResponseEndpointAdapter" resource-base="src/it/resources"/> <citrus:empty-response-adapter id="emptyResponseEndpointAdapter"/>
Now let us have a closer look at the provided endpoint adapter implementations.
This is the simplest endpoint adapter you can think of. It simply provides an empty success response using the HTTP response code 200. The adapter does not need any configurations or properties as it simply responds with an empty HTTP response.
<citrus:empty-response-adapter id="emptyResponseEndpointAdapter"/>
The next more complex endpoint adapter will always return a static response message.
<citrus:static-response-adapter id="endpointAdapter"> <citrus:payload> <![CDATA[ <HelloResponse xmlns="http://www.consol.de/schemas/samples/sayHello.xsd"> <MessageId>123456789</MessageId> <CorrelationId>Cx1x123456789</CorrelationId> <Text>Hello User</Text> </HelloResponse> ]]> </citrus:payload> <citrus:header> <citrus:element name="{http://www.consol.de/schemas/samples}h1:Operation" value="sayHello"/> <citrus:element name="{http://www.consol.de/schemas/samples}h1:MessageId" value="123456789"/> </citrus:header> </citrus:static-response-adapter>
The endpoint adapter is configured with a static message payload and static response header values. The response to the client is therefore always the same.
The idea behind the request dispatching endpoint adapter is that the incoming requests are dispatched to several other endpoint adapters. The decision which endpoint adapter should handle the actual request is done depending on some adapter mapping. The mapping is done based on the payload or header data of the incoming request. A mapping strategy evaluates a mapping key using the incoming request. You can think of an XPath expression that evaluates to the mapping key for instance. The endpoint adapter that maps to the mapping key is then called to handle the request.
So the request dispatching endpoint adapter is able to dynamically call several other endpoint adapters based on the incoming request message at runtime. This is very powerful. The next example uses the request dispatching endpoint adapter with a XPath mapping key extractor.
<citrus:dispatching-endpoint-adapter id="dispatchingEndpointAdapter" mapping-key-extractor="mappingKeyExtractor" mapping-strategy="mappingStrategy"/> <bean id="mappingStrategy" class="com.consol.citrus.endpoint.adapter.mapping.SimpleMappingStrategy"> <property name="adapterMappings"> <map> <entry key="sayHello" ref="helloEndpointAdapter"/> </map> </property> </bean> <bean id="mappingKeyExtractor" class="com.consol.citrus.endpoint.adapter.mapping.XPathPayloadMappingKeyExtractor"> <property name="xpathExpression" value="//TestMessage/Operation/*"/> </bean> <citrus:static-response-adapter id="helloEndpointAdapter"> <citrus:payload> <![CDATA[ <HelloResponse xmlns="http://www.consol.de/schemas/samples/sayHello.xsd"> <MessageId>123456789</MessageId> <Text>Hello User</Text> </HelloResponse> ]]> </citrus:payload> </citrus:static-response-adapter>
The XPath mapping key extractor expression decides for each request which mapping key to use in order to find a proper endpoint adapter through the mapping strategy. The endpoint adapters available in the
application context are mapped via their bean id. For instance an incoming request with a matching element //TestMessage/Operation/sayHello would be handled by the endpoint
adapter bean that is registered in the mapping strategy as "sayHello" key. The available endpoint adapters are configured in the same Spring application context.
Citrus provides several default mapping key extractor implementations.
HeaderMappingKeyExtractor: Reads a special header entry and uses its value as mapping key
SoapActionMappingKeyExtractor: Uses the soap action header entry as mapping key
XPathPayloadMappingKeyExtractor: Evaluates a XPath expression on the request payload and uses the result as mapping key
In addition to that we need a mapping strategy. Citrus provides following default implementations.
SimpleMappingStrategy: Simple key value map with endpoint adapter references
BeanNameMappingStrategy: Loads the endpoint adapter Spring bean with the given id matching the mapping key
ContextLoadingMappingStrategy: Same as BeanNameMappingStrategy but loads a separate application context defined by external file resource
The channel connecting endpoint adapter is the default adapter used in all Citrus server components. Indeed this adapter also provides the most flexibility. This adapter forwards incoming requests to a channel destination. The adapter is waiting for a proper response on a reply destination synchronously. With the channel endpoint components you can read the requests on the channel and provide a proper response on the reply destination.
<citrus:channel-endpoint-adapter id="channelEndpointAdapter" channel-name="inbound.channel" timeout="2500"/>
Another powerful endpoint adapter is the JMS connecting adapter implementation. This adapter forwards incoming requests to a JMS destination and waits for a proper response on a reply destination. A JMS endpoint can access the requests internally and provide a proper response on the reply destination. So this adapter is very flexible to provide proper response messages.
This special adapter comes with the citrus-jms module. So you have to add the module and the special XML namespace for this module to your configuration files. The Maven module for citrus-jms goes to the Maven POM file as normal project dependency. The citrus-jms namespace goes to the Spring bean XML configuration file as follows:
| Note |
|---|---|
Citrus provides a "citrus-jms" configuration namespace and schema definition for JMS related components and features. Include this namespace into your Spring configuration in order to use the Citrus JMS configuration elements. The namespace URI and schema location are added to the Spring configuration XML file as follows. <beans xmlns="http://www.springframework.org/schema/beans" xmlns:xsi="http://www.w3.org/2001/XMLSchema-instance" xmlns:citrus-jms="http://www.citrusframework.org/schema/jms/config" xsi:schemaLocation=" http://www.springframework.org/schema/beans http://www.springframework.org/schema/beans/spring-beans.xsd http://www.citrusframework.org/schema/jms/config http://www.citrusframework.org/schema/jms/config/citrus-jms-config.xsd"> [...] </beans> After that you are able to use the adapter implementation in the Spring bean configuration. |
<citrus-jms:endpoint-adapter id="jmsEndpointAdapter" destination-name="JMS.Queue.Requests.In" reply-destination-name="JMS.Queue.Response.Out" connection-factory="jmsConnectionFactory" timeout="2500"/> <bean id="jmsConnectionFactory" class="org.apache.activemq.ActiveMQConnectionFactory"> <property name="brokerURL" value="tcp://localhost:61616" /> </bean>
The test framework will offer several functions that are useful throughout the test execution. The functions will always return a string value that is ready for use as variable value or directly inside a text message.
A set of functions is usually combined to a function library. The library has a prefix that will identify the functions inside the test case. The default test framework function library uses a default prefix (citrus). You can write your own function library using your own prefix in order to extend the test framework functionality whenever you want.
The library is built in the Spring configuration and contains a set of functions that are of public use.
<citrus:function-library id="testLibrary" prefix="foo:"> <citrus:function name="randomNumber"> class="com.consol.citrus.functions.RandomNumberFunction"/> <citrus:function name="randomString"> class="com.consol.citrus.functions.RandomStringFunction"/> <citrus:function name="customFunction"> ref="customFunctionBean"/> ... </citrus:function-library>
As you can see the library defines one to many functions either referenced as normal Spring bean or by its implementing Java class name. Citrus constructs the library and you are able to use the functions in your test case with the leading library prefix just like this:
foo:randomNumber()
foo:randomString()
foo:customFunction() | Tip |
|---|---|
| You can add custom function implementations and custom function libraries. Just use a custom prefix for your library. The default Citrus function library uses the citrus: prefix. |
In the next chapters the default functions offered by the framework will be described in detail.
The function will combine several string tokens to a single string value. This means that you can combine a static text value with a variable value for instance. A first example should clarify the usage:
<testcase name="concatFunctionTest"> <variables> <variable name="date" value="citrus:currentDate(yyyy-MM-dd)" /> <variable name="text" value="Hello Test Framework!" /> </variables> <actions> <echo> <message> citrus:concat('Today is: ', ${date}, ' right!?') </message> </echo> <echo> <message> citrus:concat('Text is: ', ${text}) </message> </echo> </actions> </testcase>
Please do not forget to mark static text with single quote signs. There is no limitation for string tokens to be combined.
citrus:concat('Text1', 'Text2', 'Text3', ${text}, 'Text5', … , 'TextN')
The function can be used wherever variables can be used. For instance when validating XML elements in the receive action.
<message> <validate path="//element/element" value="citrus:concat('Cx1x', ${generatedId})"/> </message>
The function will have three parameters.
1. String to work on
2. Starting index
3. End index (optional)
Let us have a look at a simple example for this function:
<echo> <message> citrus:substring('Hello Test Framework', 6) </message> </echo> <echo> <message> citrus:substring('Hello Test Framework', 0, 5) </message> </echo>
Function output:
Test Framework
Hello
The function will calculate the number of characters in a string representation and return the number.
<echo> <message>citrus:stringLength('Hello Test Framework')</message> </echo>
Function output:
20
This function will replace regular expression matching values inside a string representation with a specified replacement string.
<echo> <message> citrus:translate('H.llo Test Fr.mework', '\.', 'a') </message> </echo>
Note that the second parameter will be a regular expression. The third parameter will be a simple replacement string value.
Function output:
Hello Test Framework
The function will search for the first occurrence of a specified string and will return the substring before that occurrence. Let us have a closer look in a simple example:
<echo> <message> citrus:substringBefore('Test/Framework', '/') </message> </echo>
In the specific example the function will search for the ‘/’ character and return the string before that index.
Function output:
Test
The function will search for the first occurrence of a specified string and will return the substring after that occurrence. Let us clarify this with a simple example:
<echo> <message> citrus:substringAfter('Test/Framework', '/') </message> </echo>
Similar to the substringBefore function the ‘/’ character is found in the string. But now the remaining string is returned by the function meaning the substring after this character index.
Function output:
Framework
This is a simple mathematic function that will round decimal numbers representations to their nearest non decimal number.
<echo> <message>citrus:round('3.14')</message> </echo>
Function output:
3
This function will round down decimal number values.
<echo> <message>citrus:floor('3.14')</message> </echo>
Function output:
3.0
Similar to floor function, but now the function will round up the decimal number values.
<echo> <message>citrus:ceiling('3.14')</message> </echo>
Function output:
4.0
The random number function will provide you the opportunity to generate random number strings containing positive number letters. There is a singular Boolean parameter for that function describing whether the generated number should have exactly the amount of digits. Default value for this padding flag will be true.
Next example will show the function usage:
<variables> <variable name="rndNumber1" value="citrus:randomNumber(10)"/> <variable name="rndNumber2" value="citrus:randomNumber(10, true)"/> <variable name="rndNumber2" value="citrus:randomNumber(10, false)"/> <variable name="rndNumber3" value="citrus:randomNumber(3, false)"/> </variables>
Function output:
8954638765
5003485980
6387650
65
This function will generate a random string representation with a defined length. A second parameter for this function will define the case of the generated letters (UPPERCASE, LOWERCASE, MIXED). The last parameter allows also digit characters in the generated string. By default digit charaters are not allowed.
<variables> <variable name="rndString0" value="${citrus:randomString(10)}"/> <variable name="rndString1" value="citrus:randomString(10)"/> <variable name="rndString2" value="citrus:randomString(10, UPPERCASE)"/> <variable name="rndString3" value="citrus:randomString(10, LOWERCASE)"/> <variable name="rndString4" value="citrus:randomString(10, MIXED)"/> <variable name="rndString4" value="citrus:randomString(10, MIXED, true)"/> </variables>
Function output:
HrGHOdfAer
AgSSwedetG
JSDFUTTRKU
dtkhirtsuz
Vt567JkA32
This function returns one of its supplied arguments. Furthermore you can specify a custom function with a configured list of values (the enumeration). The function will randomly return an entry when called without arguments. This promotes code reuse and facilitates refactoring.
In the next sample the function is used to set a httpStatusCode variable to one of the given HTTP status codes (200, 401, 500)
<variable name="httpStatusCode" value="citrus:randomEnumValue('200', '401', '500')" />
As mentioned before you can define a custom function for your very specific needs in order to easily manage a list of predefined values like this:
<citrus:function-library id="myCustomFunctionLibrary" prefix="custom:"> <citrus-function name="randomHttpStatusCode" ref="randomHttpStatusCodeFunction"/> </citrus:function-library> <bean id="randomHttpStatusCodeFunction" class="com.consol.citrus.functions.core.RandomEnumValueFunction"> <property name="values"> <list> <value>200</value> <value>500</value> <value>401</value> </list> </property> </bean>
We have added a custom function library with a custom function definition. The custom function "randomHttpStatusCode" randomly chooses an HTTP status code each time it is called. Inside the test you can use the function like this:
<variable name="httpStatusCode" value="custom:randomHttpStatusCode()" />
This function will definitely help you when accessing the current date. Some examples will show the usage in detail:
<echo><message>citrus:currentDate()</message></echo> <echo><message>citrus:currentDate('yyyy-MM-dd')</message></echo> <echo><message>citrus:currentDate('yyyy-MM-dd HH:mm:ss')</message></echo> <echo><message>citrus:currentDate('yyyy-MM-dd'T'hh:mm:ss')</message></echo> <echo><message>citrus:currentDate('yyyy-MM-dd HH:mm:ss', '+1y')</message></echo> <echo><message>citrus:currentDate('yyyy-MM-dd HH:mm:ss', '+1M')</message></echo> <echo><message>citrus:currentDate('yyyy-MM-dd HH:mm:ss', '+1d')</message></echo> <echo><message>citrus:currentDate('yyyy-MM-dd HH:mm:ss', '+1h')</message></echo> <echo><message>citrus:currentDate('yyyy-MM-dd HH:mm:ss', '+1m')</message></echo> <echo><message>citrus:currentDate('yyyy-MM-dd HH:mm:ss', '+1s')</message></echo> <echo><message>citrus:currentDate('yyyy-MM-dd HH:mm:ss', '-1y')</message></echo>
Note that the currentDate function provides two parameters. First parameter describes the date format string. The second will define a date offset string containing year, month, days, hours, minutes or seconds that will be added or subtracted to or from the actual date value.
Function output:
01.09.2009
2009-09-01
2009-09-01 12:00:00
2009-09-01T12:00:00
This function converts any string to upper case letters.
<echo> <message>citrus:upperCase('Hello Test Framework')</message> </echo>
Function output:
HELLO TEST FRAMEWORK
This function converts any string to lower case letters.
<echo> <message>citrus:lowerCase('Hello Test Framework')</message> </echo>
Function output:
hello test framework
The function will sum up all specified number values and divide the result through the number of values.
<variable name="avg" value="citrus:average('3', '4', '5')"/>
avg = 4.0
This function returns the minimum value in a set of number values.
<variable name="min" value="citrus:minimum('3', '4', '5')"/>
min = 3.0
This function returns the maximum value in a set of number values.
<variable name="max" value="citrus:maximum('3', '4', '5')"/>
max = 5.0
The function will sum up all number values. The number values can also be negative.
<variable name="sum" value="citrus:sum('3', '4', '5')"/>
sum = 12.0
The function will return the absolute number value.
<variable name="abs" value="citrus:absolute('-3')"/>
abs = 3.0
This function implementation maps string keys to string values. This is very helpful when the used key is randomly chosen at runtime and the corresponding value is not defined during the design time.
The following function library defines a custom function for mapping HTTP status codes to the corresponding messages:
<citrus:function-library id="myCustomFunctionLibrary" prefix="custom:"> <citrus-function name="getHttpStatusMessage" ref="getHttpStatusMessageFunction"/> </citrus:function-library> <bean id="getHttpStatusMessageFunction" class="com.consol.citrus.functions.core.MapValueFunction"> <property name="values"> <map> <entry key="200" value="OK" /> <entry key="401" value="Unauthorized" /> <entry key="500" value="Internal Server Error" /> </map> </property> </bean>
In this example the function sets the variable httpStatusMessage to the 'Internal Server Error' string dynamically at runtime. The test only knows the HTTP status code and does not care about spelling and message locales.
<variable name="httpStatusCodeMessage" value="custom:getHttpStatusMessage('500')" />
The function will generate a random Java UUID.
<variable name="uuid" value="citrus:randomUUID()"/>
uuid = 98fbd7b0-832e-4b85-b9d2-e0113ee88356
The function will encode a string to binary data using base64 hexadecimal encoding.
<variable name="encoded" value="citrus:encodeBase64('Hallo Testframework')"/>
encoded = VGVzdCBGcmFtZXdvcms=
The function will decode binary data to a character sequence using base64 hexadecimal decoding.
<variable name="decoded" value="citrus:decodeBase64('VGVzdCBGcmFtZXdvcms=')"/>
decoded = Hallo Testframework
If you want to deal with escaped XML in your test case you may want to use this function. It automatically escapes all XML special characters.
<echo> <message> <![CDATA[ citrus:escapeXml('<Message>Hallo Test Framework</Message>') ]]> </message> </echo>
<Message>Hallo Test Framework</Message>
Usually we use CDATA sections to define message payload data inside a testcase. We might run into problems when the payload itself contains CDATA sections as nested CDATA sections are prohibited by XML nature. In this case the next function ships very usefull.
<variable name="cdata" value="citrus:cdataSection('payload')"/>
cdata = <![CDATA[payload]]>
Digest authentication is a commonly used security algorithm, especially in Http communication and SOAP WebServices. Citrus offers a function to generate a digest authentication principle used in the Http header section of a message.
<variable name="digest" value="citrus:digestAuthHeader('username', 'password', 'authRealm', 'acegi', 'POST', 'http://127.0.0.1:8080', 'citrus', 'md5')"/>
A possible digest authentication header value looks like this:
<Digest username=foo,realm=arealm,nonce=MTMzNT, uri=http://127.0.0.1:8080,response=51f98c,opaque=b29a30,algorithm=md5>
You can use these digest headers in messages sent by Citrus like this:
<header> <element name="citrus_http_Authorization" value="vflig:digestAuthHeader('${username}','${password}','${authRealm}', '${nonceKey}','POST','${uri}','${opaque}','${algorithm}')"/> </header>
This will set a Http Authorization header with the respective digest in the request message. So your test is ready for client digest authentication.
Test cases may use the local host address for some reason (e.g. used as authentication principle). As the tests may run on different machines at the same time we can not use static host addresses. The provided function localHostAddress() reads the local host name dynamically at runtime.
<variable name="address" value="citrus:localHostAddress()"/>
A possible value is either the host name as used in DNS entry or an IP address value:
address = <192.168.2.100>
This function works with date values and manipulates those at runtime by adding or removing a date value offset. You can manipulate several date fields such as: year, month, day, hour, minute or second.
Let us clarify this with a simple example for this function:
<echo> <message>citrus:changeDate('01.01.2000', '+1y+1M+1d')</message> </echo> <echo> <message>citrus:changeDate(citrus:currentDate(), '-1M')</message> </echo>
Function output:
02.02.2001
13.04.2013
As you can see the change date function works on static date values or dynamic variable values or functions like citrus:currentDate(). By default the change date function requires a date format such as the current date function ('dd.MM.yyyy'). You can also define a custom date format:
<echo> <message>citrus:changeDate('2000-01-10', '-1M-1d', 'yyyy-MM-dd')</message> </echo>
Function output:
1999-12-09
With this you are able to manipulate all date values of static or dynamic nature at test runtime.
The readFile function reads a file resource from given file path and loads the complete file content as function result. The file path can be a system file path as well as a classpath file resource. The file path can have test variables as part of the path or file name. In addition to that the file content can also have test variable values and other functions.
Let's see this function in action:
<echo> <message>citrus:readFile('classpath:some/path/to/file.txt')</message> </echo> <echo> <message>citrus:readFile(${filePath})</message> </echo>
The function reads the file content and places the content at the position where the function has been called. This means that you can also use this function as part of Strings and message payloads for instance. This is a very powerful way to extract large message parts to separate file resources. Just add the readFile function somewhere to the message content and Citrus will load the extra file content and place it right into the message payload for you.
Message validation in Citrus is essential. The framework offers several validation mechanisms for different message types and formats. With test variables we are able to check for simple value equality. We ensure that message entries are equal to predefined expected values. Validation matcher add powerful assertion functionality on top of that. You just can use the predefined validation matcher functionalities in order to perform more complex assertions like contains or isNumber in your validation statements.
The following sections describe the Citrus default validation matcher implementations that are ready for usage. The matcher implementations should cover the basic assertions on character sequences and numbers. Of course you can add custom validation matcher implementations in order to meet your very specific validation assertions, too.
First of all let us have a look at a validation matcher statement in action so we understand how to use them in a test case.
<message> <payload> <RequestMessage> <MessageBody> <Customer> <Id>@greaterThan(0)@</Id> <Name>@equalsIgnoreCase('foo')@</Name> </Customer> </MessageBody> </RequestMessage> </payload> </message>
The listing above describes a normal message validation block inside a receive test action. We use some inline message payload template as CDATA. As you know Citrus will compare the actual message payload to this expected template in DOM tree comparison. In addition to that you can simply include validation matcher statements. The message element Id is automatically validated to be a number greater than zero and the Name character sequence is supposed to match 'foo' ignoring case spelling considerations.
Please note the special validation matcher syntax. The statements are surrounded with '@' markers and are identified by some unique name. The optional parameters passed to the matcher implementation state the expected values to match.
| Tip |
|---|---|
You can use validation matcher with all validation mechanisms - not only with XML validation. Plaintext, JSON, SQL result set validation are also supported. |
A set of validation matcher implementations is usually combined to a validation matcher library. The library has a prefix that will identify the validation matcher inside the test case. The default test framework validation matcher library uses a default prefix (citrus). You can write your own validation matcher library using your own prefix in order to extend the test framework functionality whenever you want.
The library is built in the Spring configuration and contains a set of validation matcher that are of public use.
<citrus:validation matcher-library id="testMatcherLibrary" prefix="foo:"> <citrus:matcher name="isNumber"> class="com.consol.citrus.validation.matcher.core.IsNumberValidationMatcher"/> <citrus:matcher name="contains"> class="com.consol.citrus.validation.matcher.core.ContainsValidationMatcher"/> <citrus:matcher name="customMatcher"> ref="customMatcherBean"/> ... </citrus:validation matcher-library>
As you can see the library defines one to many validation matcher members either referenced as normal Spring bean or by its implementing Java class name. Citrus constructs the library and you are able to use the validation matcher in your test case with the leading library prefix just like this:
@foo:isNumber()@
@foo:contains()@
@foo:customMatcher()@ | Tip |
|---|---|
| You can add custom validation matcher implementations and custom validation matcher libraries. Just use a custom prefix for your library. The default Citrus validation matcher library uses no prefix. |
See now the following sections describing the default validation validation matcher in Citrus.
The XML validation matcher implementation is the possibly most exciting one, as we can validate nested XML with full validation power (e.g. ignoring elements, variable support). The matcher checks a nested XML fragment to compare against expected XML. For instance we receive following XML message payload for validation:
<GetCustomerMessage> <CustomerDetails> <Id>5</Id> <Name>Christoph</Name> <Configuration><![CDATA[ <config> <premium>true</premium> <last-login>2012-02-24T23:34:23</last-login> <link>http://www.citrusframework.org/customer/5</link> </config> ]]></Configuration> </CustomerDetails> </GetCustomerMessage>
As you can see the message payload contains some configuration as nested XML data in a CDATA section. We could validate this CDATA section as static character sequence comparison, true. But the <last-login> timestamp changes its value continuously. This breaks the static validation for CDATA elements in XML. Fortunately the new XML validation matcher provides a solution for us:
<message> <payload> <GetCustomerMessage> <CustomerDetails> <Id>5</Id> <Name>Christoph</Name> <Configuration>citrus:cdataSection('@matchesXml('<config> <premium>${isPremium}</premium> <last-login>@ignore@</last-login> <link>http://www.citrusframework.org/customer/5</link> </config>')@')</Configuration> </CustomerDetails> </GetCustomerMessage> </payload> </message>
With the validation matcher you are able to validate the nested XML with full validation power. Ignoring elements is possible and we can also use variables in our control XML.
| Note |
|---|---|
| Nested CDATA elements within other CDATA sections are not allowed by XML standard. This is why we create the nested CDATA section on the fly with the function cdataSection(). |
This matcher implementation checks for equality without any case spelling considerations. The matcher expects a single parameter as the expected character sequence to check for.
<value>@equalsIgnoreCase('foo')@</value>
This matcher searches for a character sequence inside the actual value. If the character sequence is not found somewhere the matcher starts complaining.
<value>@contains('foo')@</value>
The validation matcher also exist in a case insensitive variant.
<value>@containsIgnoreCase('foo')@</value>
The matcher implementation asserts that the given value starts with a character sequence otherwise the matcher will arise some error.
<value>@startsWith('foo')@</value>
Ends with matcher validates a value to end with a given character sequence.
<value>@endsWith('foo')@</value>
You can check a value to meet a regular expression with this validation matcher. This is for instance very useful for email address validation.
<value>@matches('[a-z0-9]')@</value>
Date values are always difficult to check for equality. Especially when you have millisecond timestamps to deal with. Therefore the date pattern validation matcher should have some improvement for you. You simply validate the date format pattern instead of checking for total equality.
<value>@matchesDatePattern('yyyy-MM-dd')@</value>
The example listing uses a date format pattern that is expected. The actual date value is parsed according to this pattern and may cause errors in case the value is no valid date matching the desired format.
Checking on values to be of numeric nature is essential. The actual value must be a numeric number otherwise the matcher raises errors. The matcher implementation does not evaluate any parameters.
<value>@isNumber()@</value>
This matcher checks a number to be lower than a given threshold value.
<value>@lowerThan(5)@</value>
The matcher implementation will check on numeric values to be greater than a minimum value.
<value>@greaterThan(5)@</value>
The matcher works on date values and checks that a given date evaluates to the expected day of the week. The user defines the expected day by its name in uppercase characters. The matcher fails in case the given date is another week day than expected.
<someDate>@isWeekday('MONDAY')@</someDate>
Possible values for the expected day of the week are: MONDAY, TUESDAY, WEDNESDAY, THURSDAY, FRIDAY, SATURDAY or SUNDAY.
The field value has to be a date value otherwise the matcher will fail to parse the date. The matcher requires a date format which is dd.MM.yyyy by default. You can change this date format as follows:
<someDate>@isWeekday('MONDAY('yyyy-MM-dd'))@</someDate>
Now the matcher uses the custom date format in order to parse the date value for evaluation. The validation matcher also works with date time values. In this case you have to give a valid date time format respectively (e.g. FRIDAY('yyyy-MM-dd'T'hh:mm:ss')).
This is a very special validation matcher. Instead of performing a validation logic you can save the actual value passed to the validation matcher as new test variable. This comes very handy as you can use the matcher wherever you want: JSON message payloads, XML message payloads, headers and so on.
<value>@variable('foo')@</value>
The validation matcher creates a new variable foo with the actual element value as variable value. When leaving out the control value the field name itself is used as variable name.
<date>@variable()@</date>
This creates a new variable date with the actual element value as variable value.
The matcher works on date values and checks that a given date is within the expected date range. The user defines the expected date range by specifying a from-date, a to-date and optionally a date format. The matcher fails when the given date lies outside the expected date range.
<someDate>@dateRange('01-12-2015', '31-12-2015', 'dd-MM-yyyy')@</someDate>
Possible valid values would be 'some date' >= '01-12-2015' and 'some date' <= '31-12-2015'
The date-format is optional and when omitted it is assumed that all dates match the default date format yyyy-MM-dd. When specifying a custom date format use java's date format as a reference for valid date formats. Only dates were used in the example above but we could just as easily used date and time as shown in the example below
<someDate>@dateRange('2015.12.01 07:00:00', '2015.12.01 19:00:00', 'yyyy.MM.dd HH:mm:ss')@</someDate>
Data dictionaries in Citrus provide a new way to manipulate message payload data before a message is sent or received. The dictionary defines a set of keys and respective values. Just like every other dictionary it is used to translate things. In our case we translate message data elements.
You can translate common message elements that are used widely throughout your domain model. As Citrus deals with different types of message data (e.g. XML, JSON) we have different dictionary implementations that are described in the next sections.
XML data dictionaries do apply to XML message format payloads, of course. In general we add a dictionary to the basic Citrus Spring application context in order to make the dictionary visible to all test cases:
<citrus:xml-data-dictionary id="nodeMappingDataDictionary"> <citrus:mappings> <citrus:mapping path="TestMessage.MessageId" value="${messageId}"/> <citrus:mapping path="TestMessage.CorrelationId" value="${correlationId}"/> <citrus:mapping path="TestMessage.User" value="Christoph"/> <citrus:mapping path="TestMessage.TimeStamp" value="citrus:currentDate()"/> </citrus:mappings> </citrus:xml-data-dictionary>
As you can see the dictionary is nothing but a normal Spring bean definition. The NodeMappingDataDictionary implementation receives a map of key value pairs where the key is a message element path expression. For XML payloads the message element tree is traversed so the path expression is built for an exact message element inside the payload. If matched the respective value is set accordingly through the dictionary.
Besides defining the dictionary key value mappings as property map inside the bean definition we can extract the mapping data to an external file.
<citrus:xml-data-dictionary id="nodeMappingDataDictionary"> <citrus:mapping-file path="classpath:com/consol/citrus/sample.dictionary"/> </citrus:xml-data-dictionary>
The mapping file content just looks like a normal property file in Java:
TestMessage.MessageId=${messageId}
TestMessage.CorrelationId=${correlationId}
TestMessage.User=Christoph
TestMessage.TimeStamp=citrus:currentDate()You can set any message element value inside the XML message payload. The path expression also supports XML attributes. Just use the attribute name as last part of the path expression. Let us have a closer look at a sample XML message payload with attributes:
<TestMessage> <User name="Christoph" age="18"/> </TestMessage>
With this sample XML payload given we can access the attributes in the data dictionary as follows:
<citrus:mapping path="TestMessage.User.name" value="${userName}"/> <citrus:mapping path="TestMessage.User.age" value="${userAge}"/>
The NodeMappingDataDictionary implementation is easy to use and fits the basic needs for XML data dictionaries. The message element path expressions are very simple and do fit basic needs. However when more complex XML payloads apply for translation we might reach the boundaries here.
For more complex XML message payloads XPath data dictionaries are very effective:
<citrus:xpath-data-dictionary id="xpathMappingDataDictionary"> <citrus:mappings> <citrus:mapping path="//TestMessage/MessageId" value="${messageId}"/> <citrus:mapping path="//TestMessage/CorrelationId" value="${correlationId}"/> <citrus:mapping path="//TestMessage/User" value="Christoph"/> <citrus:mapping path="//TestMessage/User/@id" value="123"/> <citrus:mapping path="//TestMessage/TimeStamp" value="citrus:currentDate()"/> </citrus:mappings> </citrus:xpath-data-dictionary>
As expected XPath mapping expressions are way more powerful and can also handle very complex scenarios with XML namespaces, attributes and node lists. Just like the node mapping dictionary the XPath mapping dictionary does also support variables, functions and an external mapping file.
XPath works fine with namespaces. In general it is good practice to define a namespace context where you map namespace URI values with prefix values. So your XPath expression is always exact and evaluation is strict. In Citrus the NamespaceContextBuilder which is also added as normal Spring bean to the application context manages namespaces used in your XPath expressions. See our XML and XPAth chapters in this documentation for detailed description how to accomplish fail safe XPath expressions with namespaces.
This completes the XML data dictionary usage in Citrus. Later on we will see some more advanced data dictionary scenarios where we will discuss the usage of dictionary scopes and mapping strategies. But before that let us have a look at other message formats like JSON messages.
JSON data dictionaries complement with XML data dictionaries. As usual we have to add the JSON data dictionary to the basic Spring application context first. Once this is done the data dictionary automatically applies for all JSON message payloads in Citrus. This means that all JSON messages sent and received get translated with the JSON data dictionary implementation.
Citrus uses message types in order to evaluate which data dictionary may fit to the message that is currently processed. As usual you can define the message type directly in your test case as attribute inside the sending and receiving message action.
Let us see a simple dictionary for JSON data:
<citrus:json-data-dictionary id="jsonMappingDataDictionary"> <citrus:mappings> <citrus:mapping path="TestMessage.MessageId" value="${messageId}"/> <citrus:mapping path="TestMessage.CorrelationId" value="${correlationId}"/> <citrus:mapping path="TestMessage.User" value="Christoph"/> <citrus:mapping path="TestMessage.TimeStamp" value="citrus:currentDate()"/> </citrus:mappings> </citrus:json-data-dictionary>
The message path expressions do look very similar to those used in XML data dictionaries. Here the path expression keys do apply to the JSON object graph. See the following sample JSON data which perfectly applies to the dictionary expressions above.
{"TestMessage": {
"MessageId": "1122334455",
"CorrelationId": "100000001",
"User": "Christoph",
"TimeStamp": 1234567890 }
}The path expressions will match a very specific message element inside the JSON object graph. The dictionary will automatically set the message element values then. The path expressions are easy to use as you can traverse the JSON object graph very easy.
Of course the data dictionary does also support test variables, functions. Also very interesting is the usage of JSON arrays. A JSON array element is referenced in a data dictionary like this:
<citrus:mapping path="TestMessage.Users[0]" value="Christoph"/> <citrus:mapping path="TestMessage.Users[1]" value="Julia"/>
The Users element is a JSON array, so we can access the elements with index. Nesting JSON objects and arrays is also supported so you can also handle more complex JSON data.
Now that we have learned how to add data dictionaries to Citrus we need to discuss some advanced topics. Data dictionary scopes do define the boundaries where the dictionary may apply. By default data dictionaries are global scope dictionaries. This means that the data dictionary applies to all messages sent and received with Citrus. Of course message types are considered so XML data dictionaries do only apply to XML message types. However global scope dictionaries will be activated throughout all test cases and actions.
You can overwrite the dictionary scope. For instance in order to use an explicit scope. When this is done the dictionary wil not apply automatically but the user has to explicitly set the data dictionary in sending or receiving test action. This way you can activate the dictionary to a very special set of test actions.
<citrus:xml-data-dictionary id="specialDataDictionary" global-scope="false"> <citrus:mapping-file path="classpath:com/consol/citrus/sample.dictionary"/> </citrus:xml-data-dictionary>
We set the global scope property to false so the dictionary is handled in explicit scope. This means that you have to set the data dictionary explicitly in your test actions:
XML DSL
<send endpoint="myEndpoint"> <message data-dictionary="specialDataDictionary"> <payload> <TestMessage>Hello Citrus"/TestMessage> </payload> </message> </send>
Java DSL designer and runner
@CitrusTest public void dictionaryTest() { send(myEndpoint) .payload("<TestMessage>Hello Citrus"/TestMessage>") .dictionary("specialDataDictionary"); }
The sample above is a sending test action with an explicit data dictionary reference set. Before sending the message the dictionary is asked for translation. So all matching message element values will be set by the dictionary accordingly. Other global data dictionaries do also apply for this message but the explicit dictionary will always overwrite the message element values.
Another advanced topic about data dictionaries is the path mapping strategy. When using simple path expressions the default strategy is always EXACT_MATCH. This means that the path expression has to evaluate exactly to a message element within the payload data. And only this exact message element is translated.
You can set your own path mapping strategy in order to change this behavior. For instance another mapping strategy would be STARS_WITH. All elements are translated that start with a certain path expression. Let us clarify this with an example:
<citrus:xml-data-dictionary id="nodeMappingDataDictionary" mapping-strategy="STARTS_WITH"> <citrus:mappings> <citrus:mapping path="TestMessage.Property" value="citrus:randomString()"/> </citrus:mappings> </citrus:xml-data-dictionary>
Now with the path mapping strategy set to STARS_WITH all message element path expressions starting with TestMessage.Property will find translation in this dictionary. Following sample message payload would be translated accordingly:
<TestMessage> <Property>XXX</Property> <PropertyName>XXX</PropertyName> <PropertyValue>XXX</PropertyValue> </TestMessage>
All child elements of TestMessage starting with Property will be translated with this data dictionary. In the resulting message payload Citrus will use a random string as value for these elements as we used the citrus:randomString() function in the dictionary mapping.
The next mapping strategy would be ENDS_WITH. No surprises here - this mapping strategy looks for message elements that end with a certain path expression. Again a simple example will clarify this for you.
<citrus:xml-data-dictionary id="nodeMappingDataDictionary" mapping-strategy="ENDS_WITH"> <citrus:mappings> <citrus:mapping path="Id" value="citrus:randomNumber()"/> </citrus:mappings> </citrus:xml-data-dictionary>
Again let us see some sample message payload for this dictionary usage:
<TestMessage> <RequestId>XXX</RequestId> <Properties> <Property> <PropertyId>XXX</PropertyId> <PropertyValue>XXX</PropertyValue> </Property> <Property> <PropertyId>XXX</PropertyId> <PropertyValue>XXX</PropertyValue> </Property> </Properties> </TestMessage>
In this sample all message elements ending with Id would be translated with a random number. No matter where in the message tree the elements are located. This is quite useful but also very powerful. So be careful to use this strategy in global data dictionaries as it may translate message elements that you would not expect in the first place.
The concept of test actors came to our mind when reusing Citrus test cases in end-to-end test scenarios. Usually Citrus simulates all interface partners within a test case which is great for continuous integration testing. In end-to-end integration test scenarios some of our interface partners may be real and alive. Some other interface partners still require Citrus simulation logic.
It would be great if we could reuse the Citrus integration tests in this test setup as we have the complete test flow of messages available in the Citrus tests. We only have to remove the simulated send/receive actions for those real interface partner applications which are available in our end-to-end test setup.
With test actors we have the opportunity to link test actions, in particular send/receive message actions, to a test actor. The test actor can be disabled in configuration very easy and following from that all linked send/receive actions are disabled, too. One Citrus test case is runnable with different test setup scenarios where different partner applications on the one hand are available as real life applications and on the other hand my require simulation.
First thing to do is to define one or more test actors in Citrus configuration. A test actor represents a participating party (e.g. interface partner, backend application). We write the test actors into the central Spring application context. We can use a special Citrus Spring XML schema so definitions are quite easy:
<citrus:actor id="travelagency" name="TRAVEL_AGENCY"/> <citrus:actor id="royalairline" name="ROYAL_AIRLINE"/> <citrus:actor id="smartariline" name="SMART_AIRLINE"/>
The listing above defines three test actors participating in our test scenario. A travel agency application which is simulated by Citrus as a calling client, the smart airline application and a royal airline application. Now we have the test actors defined we can link those to message sender/receiver instances and/or test actions within our test case.
We need to link the test actors to message send and receive actions in our test cases. We can do this in two different ways. First we can set a test actor reference on a message sender and message receiver.
<citrus-jms:sync-endpoint id="royalAirlineBookingEndpoint" destination-name="${royal.airline.request.queue}" actor="royalairline"/>
Now all test actions that are using these message receiver and message sender instances are linked to the test actor. In addition to that you can also explicitly link test actions to test actors in a test.
<receive endpoint="royalAirlineBookingEndpoint" actor="royalairline"> <message> [...] </message> </receive> <send endpoint="royalAirlineBookingEndpoint" actor="royalairline"> <message> [...] </message> </send>
This explicitly links test actors to test actions so you can decide which link should be set without having to rely on the message receiver and sender configuration.
Usually both airline applications are simulated in our integration tests. But this time we want to change this by introducing a royal airline application which is online as a real application instance. So we need to skip all simulated message interactions for the royal airline application in our Citrus tests. This is easy as we have linked all send/receive actions to one of our test actors. So wen can disable the royal airline test actor in our configuration:
<citrus:actor id="royalairline" name="ROYAL_AIRLINE" disabled="true"/>
Any test action linked to this test actor is now skipped. As we introduced a real royal airline application in our test scenario the requests get answered and the test should be successful within this end-to-end test scenario. The travel agency and the smart airline still get simulated by Citrus. This is a perfect way of reusing integration tests in different test scenarios where you enable and disable simulated participating parties in Citrus.
| Important |
|---|---|
Server ports may be of special interest when dealing with different test scenarios. You may have to also disable a Citrus embedded Jetty server instance in order to avoid port binding conflicts and you may have to wire endpoint URIs accordingly before executing a test. The real life application may not use the same port and ip as the Citrus embedded servers for simulation. |
A test framework should also provide the functionality to do some work before and after the test run. You could think of preparing/deleting the data in a database or starting/stopping a server in this section before/after a test run. These tasks fit best into the initialization and cleanup phases of Citrus. All you have to do is add some Spring bean definitions to the Citrus application context.
| Note |
|---|---|
It is important to notice that the Citrus configuration components that we are going to use in the next section belong to a separate XML namespace citrus-test. We have to add the namespace declaration to the XML root element of our XML configuration file accordingly. <spring:beans xmlns="http://www.citrusframework.org/schema/testcase" xmlns:spring="http://www.springframework.org/schema/beans" xmlns:xsi="http://www.w3.org/2001/XMLSchema-instance" xmlns:citrus-test="http://www.citrusframework.org/schema/testcase" xsi:schemaLocation=" http://www.springframework.org/schema/beans http://www.springframework.org/schema/beans/spring-beans.xsd http://www.citrusframework.org/schema/testcase http://www.citrusframework.org/schema/testcase/citrus-testcase.xsd"> [...] </beans> |
You can influence the behavior of a test run in the initialization phase actually before the tests are executed. See the next code example to find out how it works with actions that take place before the first test is executed:
<citrus:before-suite id="actionsBeforeSuite"> <citrus:actions> <!-- list of actions before suite --> </citrus:actions> </citrus:before-suite>
The Citrus configuration component holds a list of Citrus test actions that get executed before the test suite run. You can add all Citrus test actions here as you would do in a normal test case definition.
<citrus:before-suite id="actionsBeforeSuite"> <citrus:actions> <citrus-test:sql dataSource="testDataSource"/> <citrus-test:statement">CREATE TABLE PERSON (ID integer, NAME char(250))</citrus-test:statement> </citrus-test:sql> </citrus:actions> </citrus:before-suite>
Note that we must use the Citrus test case namespace for the nested test action definitions. We access the database and create a table PERSON which is obviously needed in our test cases. You can think of several actions here to prepare the database for instance.
| Tip |
|---|---|
Citrus offers special startup and shutdown actions that may start and stop server implementations automatically. This might be helpful when dealing with Http servers or WebService containers like Jetty. You can also think of starting/stopping a JMS broker before a test run. |
You can have many after-suite configuration components with different ids in a Citrus project. By default the containers are always executed. But you can restrict the after suite action container execution by defining a suite name or test group names that should match accordingly:
<citrus:before-suite id="actionsBeforeSuite" suites="databaseSuite" groups="e2e"> <citrus:actions> <citrus-test:sql dataSource="testDataSource"/> <citrus-test:statement">CREATE TABLE PERSON (ID integer, NAME char(250))</citrus-test:statement> </citrus-test:sql> </citrus:actions> </citrus:before-suite>
The above after suite container is only executed with the test suite called databaseSuite or when the test group e2e is defined. Test groups and suite names are only supported when using the TestNG unit test framework. Unfortunately JUnit does not allow to hook into suite execution as easily as TestNG does. This is why after suite action containers are not restricted in execution when using Citrus with the JUnit test framework.
You can define multiple suite names and test groups with comma delimited strings as attribute values.
A test run may require the test environment to be clean. Therefore it is a good idea to purge all JMS destinations or clean up the database after the test run in order to avoid errors in follow-up test runs. Just like we prepared some data in actions before suite we can clean up the test run in actions after the tests are finished. The Spring bean syntax here is not significantly different to those in before suite section:
<citrus:after-suite id="actionsAfterSuite"> <citrus:actions> <!-- list of actions after suite --> </citrus:actions> </citrus:after-suite>
Again we give the after suite configuration component a unique id within the configuration and put one to many test actions as nested configuration elements to the list of actions executed after the test suite run.
<citrus:after-suite id="actionsAfterSuite"> <citrus:actions> <citrus-test:sql dataSource="testDataSource"/> <citrus-test:statement">DELETE FROM TABLE PERSON</citrus-test:statement> </citrus-test:sql> </citrus:actions> </citrus:after-suite>
We have to use the Citrus test case XML namespace when defining nested test actions in after suite list. We just remove all data from the database so we do not influence follow-up tests. Quite simple isn't it!?
You can have many after-suite configuration components with different ids in a Citrus project. By default the containers are always executed. But you can restrict the after suite action container execution by defining a suite name or test group names that should match accordingly:
<citrus:after-suite id="actionsAfterSuite" suites="databaseSuite" groups="e2e"> <citrus:actions> <citrus-test:sql dataSource="testDataSource"/> <citrus-test:statement">DELETE FROM TABLE PERSON</citrus-test:statement> </citrus-test:sql> </citrus:actions> </citrus:after-suite>
The above after suite container is only executed with the test suite called databaseSuite or when the test group e2e is defined. Test groups and suite names are only supported when using the TestNG unit test framework. Unfortunately JUnit does not allow to hook into suite execution as easily as TestNG does. This is why after suite action containers are not restricted in execution when using Citrus with the JUnit test framework.
You can define multiple suite names and test groups with comma delimited strings as attribute values.
Before each test is executed it also might sound reasonable to purge all JMS queues for instance. In case a previous test fails some messages might be left in the JMS queues. Also the database might be in dirty state. The follow-up test then will be confronted with these invalid messages and data. Purging all JMS destinations before a test is therefore a good idea. Just like we prepared some data in actions before suite we can clean up the data before a test starts to execute.
<citrus:before-test id="defaultBeforeTest"> <citrus:actions> <!-- list of actions before test --> </citrus:actions> </citrus:before-test>
The before test configuration component receives a unique id and a list of test actions that get executed before a test case is started. The component receives usual test action definitions just like you would write them in a normal test case definition. See the example below how to add test actions.
<citrus:before-test id="defaultBeforeTest"> <citrus:actions> <citrus-test:echo> <citrus-test:message>This is executed before each test!</citrus-test:message> </citrus-test:echo> </citrus:actions> </citrus:before-test>
Note that we must use the Citrus test case XML namespace for the nested test action definitions. You have to declare the XML namespaces accordingly in your configuration root element. The echo test action is now executed before each test in our test suite run. Also notice that we can restrict the before test container execution. We can restrict execution based on the test name, package and test groups. See following example how this works:
<citrus:before-test id="defaultBeforeTest" test="*_Ok_Test" package="com.consol.citrus.longrunning.*"> <citrus:actions> <citrus-test:echo> <citrus-test:message>This is executed before each test!</citrus-test:message> </citrus-test:echo> </citrus:actions> </citrus:before-test>
The above before test component is only executed for test cases that match the name pattern *_Ok_Test and that match the package com.consol.citrus.longrunning.*. Also we could just use the test name pattern or the package name pattern exclusively. And the execution can be restricted based on the included test groups in our test suite run. This enables us to specify before test actions in various ways. Of course you can have multiple before test configuration components at the same time. Citrus will pick the right containers and put it to execution when necessary.
The same logic that applies to the before-test configuration component can be done after each test. The after-test configuration component defines test actions executed after each test. Just like we prepared some data in actions before a test we can clean up the data after a test has finished execution.
<citrus:after-test id="defaultAfterTest"> <citrus:actions> <!-- list of actions after test --> </citrus:actions> </citrus:after-test>
The after test configuration component receives a unique id and a list of test actions that get executed after a test case is finished. Notice that the after test actions are executed no matter what result success or failure the previous test case came up to. The component receives usual test action definitions just like you would write them in a normal test case definition. See the example below how to add test actions.
<citrus:after-test id="defaultAfterTest"> <citrus:actions> <citrus-test:echo> <citrus-test:message>This is executed after each test!</citrus-test:message> </citrus-test:echo> </citrus:actions> </citrus:after-test>
Please be aware of the fact that we must use the Citrus test case XML namespace for the nested test action definitions. You have to declare the XML namespaces accordingly in your configuration root element. The echo test action is now executed after each test in our test suite run. Of course we can restrict the after test container execution. Supported restrictions are based on the test name, package and test groups. See following example how this works:
<citrus:after-test id="defaultAfterTest" test="*_Error_Test" package="com.consol.citrus.error.*"> <citrus:actions> <citrus-test:echo> <citrus-test:message>This is executed after each test!</citrus-test:message> </citrus-test:echo> </citrus:actions> </citrus:after-test>
The above after test component is obviously only executed for test cases that match the name pattern *_Error_Test and that match the package com.consol.citrus.error.*. Also we could just use the test name pattern or the package name pattern exclusively. And the execution can be restricted based on the included test groups in our test suite run. This enables us to specify after test actions in various ways. Of course you can have multiple after test configuration components at the same time. Citrus will pick the right containers and put it to execution when necessary.
Test cases in Citrus are usually provided with some meta information like the author’s name or the date of creation. In Citrus you are able to extend this test case meta information with your own very specific criteria.
By default a test case comes shipped with meta information that looks like this:
<testcase name="PwdChange_OK_1_Test"> <meta-info> <author>Christoph</author> <creationdate>2010-01-18</creationdate> <status>FINAL</status> <last-updated-by>Christoph</last-updated-by> <last-updated-on>2010-01-18T15:00:00</last-updated-on> </meta-info> [...] </testcase>
You can quite easily add data to this section in order to meet your individual testing strategy. Let us have a simple example to show how it is done.
First of all we define a custom XSD schema describing the new elements:
<?xml version="1.0" encoding="UTF-8"?> <schema xmlns="http://www.w3.org/2001/XMLSchema" xmlns:tns="http://www.citrusframework.org/samples/my-testcase-info" targetNamespace="http://www.citrusframework.org/samples/my-testcase-info" elementFormDefault="qualified"> <element name="requirement" type="string"/> <element name="pre-condition" type="string"/> <element name="result" type="string"/> <element name="classification" type="string"/> </schema>
We have four simple elements (requirement, pre-condition, result and classification) all typed as string. These new elements later go into the test case meta information section.
After we added the new XML schema file to the classpath of our project we need to announce the schema to Spring. As you might know already a Citrus test case is nothing else but a simple Spring configuration file with customized XML schema support. If we add new elements to a test case Spring needs to know the XML schema for parsing the test case configuration file. See the spring.schemas file usually placed in the META-INF/spring.schemas in your project.
The file content for our example will look like follows:
http://www.citrusframework.org/samples/my-testcase-info/my-testcase-info.xsd=com/consol/citrus/schemas/my-testcase-info.xsd
So now we are finally ready to use the new meta-info elements inside the test case:
<?xml version="1.0" encoding="UTF-8"?> <spring:beans xmlns="http://www.citrusframework.org/schema/testcase" xmlns:spring="http://www.springframework.org/schema/beans" xmlns:custom="http://www.citrusframework.org/samples/my-testcase-info" xmlns:xsi="http://www.w3.org/2001/XMLSchema-instance" xsi:schemaLocation="http://www.springframework.org/schema/beans http://www.springframework.org/schema/beans/spring-beans.xsd http://www.citrusframework.org/schema/testcase http://www.citrusframework.org/schema/testcase/citrus-testcase.xsd http://www.citrusframework.org/samples/my-testcase-info http://www.citrusframework.org/samples/my-testcase-info/my-testcase-info.xsd"> <testcase name="PwdChange_OK_1_Test"> <meta-info> <author>Christoph</author> <creationdate>2010-01-18</creationdate> <status>FINAL</status> <last-updated-by>Christoph</last-updated-by> <last-updated-on>2010-01-18T15:00:00</last-updated-on> <custom:requirement>REQ10001</custom:requirement> <custom:pre-condition>Existing user, sufficient rights</custom:pre-condition> <custom:result>Password reset in database</custom:result> <custom:classification>PasswordChange</custom:classification> </meta-info> [...] </testcase> </spring:beans>
| Note |
|---|---|
| We use a separate namespace declaration with a custom namespace prefix “custom” in order to declare the new XML schema to our test case. Of course you can pick a namespace url and prefix that fits best for your project. |
As you see it is quite easy to add custom meta information to your Citrus test case. The customized elements may be precious for automatic reporting. XSL transformations for instance are able to read those meta information elements in order to generate automatic test reports and documentation.
You can also declare our new XML schema in the Eclipse preferences section as user specific XML catalog entry. Then even the schema code completion in your Eclipse XML editor will be available for our customized meta-info elements.
As we deal with message based interfaces Citrus will send and receive a lot of messages during a test run. Now we may want to see these messages in chronological order as they were processed by Citrus. We can enable message tracing in Citrus in order to save messages to the file system for further investigations.
Citrus offers an easy way to debug all received messages to the file system. You need to enable some specific loggers and interceptors in the Spring application context.
<bean class="com.consol.citrus.report.MessageTracingTestListener"/>
Just add this bean to the Spring configuration and Citrus will listen for sent and received messages for saving those to the file system. You will find files like these in the default test-output folder after the test run:
For example:
logs/trace/messages/MyTest.msgs
logs/trace/messages/FooTest.msgs
logs/trace/messages/SomeTest.msgs
Each Citrus test writes a .msgs file containing all messages that went over the wire during the test. By default the debug
directory is set to logs/trace/messages/ relative to the project test output directory. But you can set your own output directory
in the configuration
<bean class="com.consol.citrus.report.MessageTracingTestListener"> <property name="outputDirectory" value="file:/path/to/folder"/> </bean>
| Note |
|---|---|
As the file names do not change with each test run message tracing files may be overwritten. So you eventually need to save the generated message debug files before running another group of test cases. |
Lets see some sample output for a test case with message communication over SOAP Http:
Sending SOAP request: <?xml version="1.0" encoding="UTF-8"?><SOAP-ENV:Envelope xmlns:SOAP-ENV="http://schemas.xmlsoap.org/soap/envelope/"> <SOAP-ENV:Header> <Operation xmlns="http://citrusframework.org/test">sayHello</Operation> </SOAP-ENV:Header> <SOAP-ENV:Body> <ns0:HelloRequest xmlns:ns0="http://www.consol.de/schemas/samples/sayHello.xsd"> <ns0:MessageId>0857041782</ns0:MessageId> <ns0:CorrelationId>6915071793</ns0:CorrelationId> <ns0:User>Christoph</ns0:User> <ns0:Text>Hello WebServer</ns0:Text> </ns0:HelloRequest> </SOAP-ENV:Body> </SOAP-ENV:Envelope> ====================================================================== Received SOAP response: <?xml version="1.0" encoding="UTF-8"?><SOAP-ENV:Envelope xmlns:SOAP-ENV="http://schemas.xmlsoap.org/soap/envelope/"> <SOAP-ENV:Header/> <SOAP-ENV:Body> <ns0:HelloResponse xmlns:ns0="http://www.consol.de/schemas/samples/sayHello.xsd"> <ns0:MessageId>0857041782</ns0:MessageId> <ns0:CorrelationId>6915071793</ns0:CorrelationId> <ns0:User>WebServer</ns0:User> <ns0:Text>Hello Christoph</ns0:Text> </ns0:HelloResponse> </SOAP-ENV:Body> </SOAP-ENV:Envelope>
For this message tracing to work we need to add logging listeners to our sender and receiver components accordingly.
<citrus-ws:client id="webServiceClient" request-url="http://localhost:8071" message-factory="messageFactory" interceptors="clientInterceptors"/> <util:list id="clientInterceptors"> <bean class="com.consol.citrus.ws.interceptor.LoggingClientInterceptor"/> </util:list>
| Important |
|---|---|
Be aware of adding the Spring util XML namespace to the application context when using the util:list construct. |
The framework generates different reports and results after a test run for you. These report and result pages will help you to get an overview of the test cases that were executed and which one were failing.
During the test run the framework will provide a huge amount of information that is printed out to the console. This includes current test progress, validation results and error information. This enables the user to quickly supervise the test run progress. Failures in tests will be printed to the console just the time the error occurred. The detailed stack trace information and the detailed error messages are helpful to get the idea what went wrong.
As the console output might be limited to a defined buffer limit, the user may not be able to follow the output to the very beginning of the test run. Therefore the framework additionally prints all information to a log file according to the logging configuration.
The logging mechanism uses the SLF4J logging framework. SLF4J is independent of logging framework implementations on the market. So in case you use Log4J logging framework the specified log file path as well as logging levels can be freely configured in the respective log4j.xml file in your project. At the end of a test run the combined test results get printed to both console and log file. The overall test results look like following example:
CITRUS TEST RESULTS [...] HelloService_Ok_1 : SUCCESS HelloService_Ok_2 : SUCCESS EchoService_Ok_1 : SUCCESS EchoService_Ok_2 : SUCCESS EchoService_TempError_1 : SUCCESS EchoService_AutomacticRetry_1 : SUCCESS [...] Found 175 test cases to execute Skipped 0 test cases (0.0%) Executed 175 test cases Tests failed: 0 (0.0%) Tests successfully: 175 (100.0%)
Failed tests will be marked as failed in the result list. The framework will give a short description of the error cause while the detailed stack trace information can be found in the log messages that were made during the test run.
HelloService_Ok_3 : failed - Exception is Action timed out
As tests are executed as TestNG test cases, the framework will also generate JUnit compliant XML and HTML reports. JUnit test reports are very popular and find support in many build management and development tools. In general the Citrus test reports give you an overall picture of all tests and tell you which of them were failing.
Build management tools like Jenkins can easily import and display the generated JUnit XML results. Please have a look at the TestNG and JUnit documentation for more information about this topic as well as the build management tools (e.g. Jenkins) to find out how to integrate the tests results.
Citrus creates HTML reports after each test run. The report provides detailed information on the test run with a summary of all
test results. You can find the report after a test run in the target/test-output/citrus-reports directory.
The report consists of two parts. The test summary on top shows the total number executed tests. The main part lists all test cases with detailed information. With this report you immediately identify all tests that were failing. Each test case is marked in color according to its result outcome.
The failed tests give detailed error information with error messages and Java StackTrace information. In addition to that the report tries to find the test action inside the XML test part that failed in execution. With the failing code snippet you can see where the test stopped.
| Note |
|---|---|
JavaScript should be active in your web browser. This is to enable the detailed information which comes to you in form of tooltips like test author or description. If you want to access the tooltips JavaScript should be enabled in your browser. |
This part will show you some sample applications that are tested using Citrus integration tests. See below a list of all samples.
A simple project example should give you the idea how Citrus works. The system under test is a flight booking service that handles travel requests from a travel agency. A travel request consists of a complete travel route including several flights. The FlightBookingService application will split the complete travel booking into separate flight bookings that are sent to the respective airlines in charge. The booking and customer data is persisted in a database.
The airlines will confirm or deny the flight bookings. The FlightBookingService application consolidates all incoming flight confirmations and combines them to a complete travel confirmation or denial that is sent back to the travel agency. Next picture tries to put the architecture into graphics:
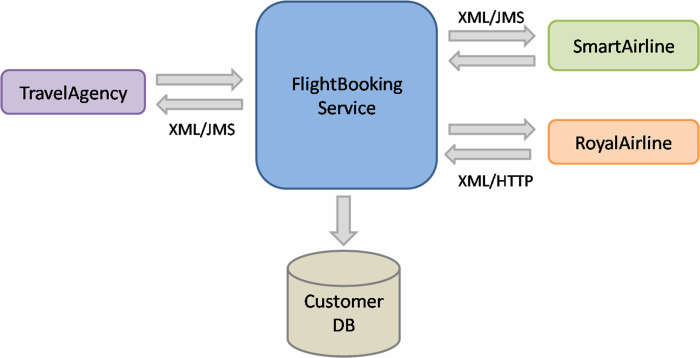
In our example two different airlines are connected to the FlightBookingService application: the SmartAriline over JMS and the RoyalAirline over Http.
The use case that we would like to test is quite simple. The test should handle a simple travel booking and expect a positive processing to the end. The test case neither simulates business errors nor technical problems. Next picture shows the use case as a sequence diagram.
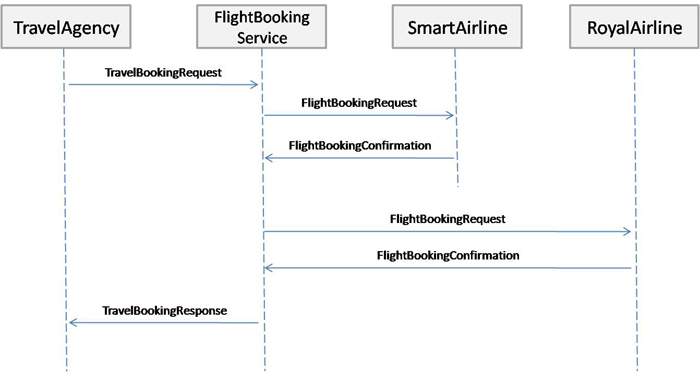
The travel agency puts a travel booking request towards the system. The travel booking contains two separate flights. The flight requests are published to the airlines (SmartAirline and RoyalAirline). Both airlines confirm the flight bookings with a positive answer. The consolidated travel booking response is then sent back to the travel agency.
Citrus simulates all surrounding applications in their behavior during the test. The simulated applications are: TravelAgency, SmartAirline and RoyalAirline. The simulated systems have to be configured in the Citrus configuration first. The configuration is done in Spring XML configuration files, as Citrus uses Spring to glue all its services together.
First of all we have a look at the TravelAgency configuration. The TravelAgency is using JMS to connect to our tested system, so we need to configure this JMS connection in Citrus.
<bean name="connectionFactory" class="org.apache.activemq.ActiveMQConnectionFactory"> <property name="brokerURL" value="tcp://localhost:61616" /> </bean> <citrus-jms:endpoint id="travelAgencyBookingRequestEndpoint" destination-name="${travel.agency.request.queue}"/> <citrus-jms:endpoint id="travelAgencyBookingResponseEndpoint" destination-name="${travel.agency.response.queue}"/>
This is all Citrus needs to send and receive messages over JMS in order to simulate the TravelAgency. By default all JMS message senders and receivers need a connection factory. Therefore Citrus is searching for a bean named "connectionFactory". In the example we connect to a ActiveMQ message broker. A connection to other JMS brokers like TIBCO EMS or Apache ActiveMQ is possible too by simply changing the connection factory implementation.
The identifiers of the message senders and receivers are very important. We should think of suitable ids that give the reader a first hint what the sender/receiver is used for. As we want to simulate the TravelAgency in combination with sending booking requests our id is "travelAgencyBookingRequestEndpoint" for example.
The sender and receivers do also need a JMS destination. Here the destination names are provided by property expressions. The Spring IoC container resolves the properties for us. All we need to do is publish the property file to the Spring container like this.
<bean name="propertyLoader" class="org.springframework.beans.factory.config.PropertyPlaceholderConfigurer"> <property name="locations"> <list> <value>citrus.properties</value> </list> </property> <property name="ignoreUnresolvablePlaceholders" value="true"/> </bean>
The citrus.properties file is located in our project's resources folder and defines the actual queue names besides other properties of course:
#JMS queues travel.agency.request.queue=Travel.Agency.Request.Queue travel.agency.response.queue=Travel.Agency.Response.Queue smart.airline.request.queue=Smart.Airline.Request.Queue smart.airline.response.queue=Smart.Airline.Response.Queue royal.airline.request.queue=Royal.Airline.Request.Queue
What else do we need in our Spring configuration? There are some basic beans that are commonly defined in a Citrus application but I do not want to bore you with these details. So if you want to have a look at the Spring application context file in the resources folder and see how things are defined there.
We continue with the first airline to be configured the SmartAirline. The SmartAirline is also using JMS to communicate with the FlightBookingService. So there is nothing new for us, we simply define additional JMS message senders and receivers.
<citrus-jms:endpoint id="smartAirlineBookingRequestEndpoint" destination-name="${smart.airline.request.queue}"/> <citrus-jms:endpoint id="smartAirlineBookingResponseEndpoint" destination-name="${smart.airline.response.queue}"/>
We do not define a new JMS connection factory because TravelAgency and SmartAirline are using the same message broker instance. In case you need to handle multiple connection factories simply define the connection factory with the attribute "connection-factory".
<citrus-jms:endpoint id="smartAirlineBookingRequestEndpoint" destination-name="${smart.airline.request.queue}" connection-factory="smartAirlineConnectionFactory"/> <citrus-jms:endpoint id="smartAirlineBookingResponseEndpoint" destination-name="${smart.airline.response.queue}" connection-factory="smartAirlineConnectionFactory"/>
The RoyalAirline is connected to our system using Http request/response communication. This means we have to simulate a Http server in the test that accepts client requests and provides proper responses. Citrus offers a Http server implementation that will listen on a port for client requests. The adapter forwards incoming request to the test engine over JMS and receives a proper response that is forwarded as a Http response to the client. The next picture shows this mechanism in detail.

The RoyalAirline adapter receives client requests over Http and sends them over JMS to a message receiver as we already know it. The test engine validates the received request and provides a proper response back to the adapter. The adapter will transform the response to Http again and publishes it to the calling client. Citrus offers these kind of adapters for Http and SOAP communication. By writing your own adapters like this you will be able to extend Citrus so it works with protocols that are not supported yet.
Let us define the Http adapter in the Spring configuration:
<citrus-http:server id="royalAirlineHttpServer" port="8091" uri="/flightbooking" endpoint-adapter="jmsEndpointAdapter"/> <citrus-jms:endpoint-adapter id="jmsEndpointAdapter destination-name="${royal.airline.request.queue}"/> connection-factory="connectionFactory" /> timeout="2000"/> <citrus-jms:sync-endpoint id="royalAirlineBookingEndpoint" destination-name="${royal.airline.request.queue}"/>
We need to configure a Http server instance with a port, a request URI and the endpoint adapter. We define the JMS endpoint adapter to handle request as described. In Addition to the endpoint adapter we also need synchronous JMS message sender and receiver instances. That's it! We are able to receive Http request in order to simulate the RoyalAirline application. What is missing now? The test case definition itself.
The test case definition is also a Spring configuration file. Citrus offers a customized XML syntax to define a test case. This XML test defining language is supposed to be easy to understand and more specific to the domain we are dealing with. Next listing shows the whole test case definition. Keep in mind that a test case defines every step in the use case. So we define sending and receiving actions of the use case as described in the sequence diagram we saw earlier.
<?xml version="1.0" encoding="UTF-8"?> <spring:beans xmlns="http://www.citrusframework.org/schema/testcase" xmlns:spring="http://www.springframework.org/schema/beans" xmlns:xsi="http://www.w3.org/2001/XMLSchema-instance" xsi:schemaLocation="http://www.springframework.org/schema/beans http://www.springframework.org/schema/beans/spring-beans.xsd http://www.citrusframework.org/schema/testcase http://www.citrusframework.org/schema/testcase/citrus-testcase.xsd"> <testcase name="FlightBookingTest"> <meta-info> <author>Christoph Deppisch</author> <creationdate>2009-04-15</creationdate> <status>FINAL</status> <last-updated-by>Christoph Deppisch</last-updated-by> <last-updated-on>2009-04-15T00:00:00</last-updated-on> </meta-info> <description> Test flight booking service. </description> <variables> <variable name="correlationId" value="citrus:concat('Lx1x', 'citrus:randomNumber(10)')"/> <variable name="customerId" value="citrus:concat('Mx1x', citrus:randomNumber(10))"/> </variables> <actions> <send endpoint="travelAgencyBookingRequestEndpoint"> <message> <data> <![CDATA[ <TravelBookingRequestMessage xmlns="http://www.consol.com/schemas/TravelAgency"> <correlationId>${correlationId}</correlationId> <customer> <id>${customerId}</id> <firstname>John</firstname> <lastname>Doe</lastname> </customer> <flights> <flight> <flightId>SM 1269</flightId> <airline>SmartAirline</airline> <fromAirport>MUC</fromAirport> <toAirport>FRA</toAirport> <date>2009-04-15</date> <scheduledDeparture>11:55:00</scheduledDeparture> <scheduledArrival>13:00:00</scheduledArrival> </flight> <flight> <flightId>RA 1780</flightId> <airline>RoyalAirline</airline> <fromAirport>FRA</fromAirport> <toAirport>HAM</toAirport> <date>2009-04-15</date> <scheduledDeparture>16:00:00</scheduledDeparture> <scheduledArrival>17:10:00</scheduledArrival> </flight> </flights> </TravelBookingRequestMessage> ]]> </data> </message> <header> <element name="correlationId" value="${correlationId}"/> </header> </send> <receive endpoint="smartAirlineBookingRequestEndpoint"> <message> <data> <![CDATA[ <FlightBookingRequestMessage xmlns="http://www.consol.com/schemas/AirlineSchema"> <correlationId>${correlationId}</correlationId> <bookingId>???</bookingId> <customer> <id>${customerId}</id> <firstname>John</firstname> <lastname>Doe</lastname> </customer> <flight> <flightId>SM 1269</flightId> <airline>SmartAirline</airline> <fromAirport>MUC</fromAirport> <toAirport>FRA</toAirport> <date>2009-04-15</date> <scheduledDeparture>11:55:00</scheduledDeparture> <scheduledArrival>13:00:00</scheduledArrival> </flight> </FlightBookingRequestMessage> ]]> </data> <ignore path="//:FlightBookingRequestMessage/:bookingId"/> </message> <header> <element name="correlationId" value="${correlationId}"/> </header> <extract> <message path="//:FlightBookingRequestMessage/:bookingId" variable="${smartAirlineBookingId}"/> </extract> </receive> <send endpoint="smartAirlineBookingResponseEndpoint"> <message> <data> <![CDATA[ <FlightBookingConfirmationMessage xmlns="http://www.consol.com/schemas/AirlineSchema"> <correlationId>${correlationId}</correlationId> <bookingId>${smartAirlineBookingId}</bookingId> <success>true</success> <flight> <flightId>SM 1269</flightId> <airline>SmartAirline</airline> <fromAirport>MUC</fromAirport> <toAirport>FRA</toAirport> <date>2009-04-15</date> <scheduledDeparture>11:55:00</scheduledDeparture> <scheduledArrival>13:00:00</scheduledArrival> </flight> </FlightBookingConfirmationMessage> ]]> </data> </message> <header> <element name="correlationId" value="${correlationId}"/> </header> </send> <receive endpoint="royalAirlineBookingEndpoint"> <message> <data> <![CDATA[ <FlightBookingRequestMessage xmlns="http://www.consol.com/schemas/FlightBooking/AirlineSchema"> <correlationId>${correlationId}</correlationId> <bookingId>???</bookingId> <customer> <id>${customerId}</id> <firstname>John</firstname> <lastname>Doe</lastname> </customer> <flight> <flightId>RA 1780</flightId> <airline>RoyalAirline</airline> <fromAirport>FRA</fromAirport> <toAirport>HAM</toAirport> <date>2009-04-15</date> <scheduledDeparture>16:00:00</scheduledDeparture> <scheduledArrival>17:10:00</scheduledArrival> </flight> </FlightBookingRequestMessage> ]]> </data> <ignore path="//:FlightBookingRequestMessage/:bookingId"/> </message> <header> <element name="correlationId" value="${correlationId}"/> </header> <extract> <message path="//:FlightBookingRequestMessage/:bookingId" variable="${royalAirlineBookingId}"/> </extract> </receive> <send endpoint="royalAirlineBookingEndpoint"> <message> <data> <![CDATA[ <FlightBookingConfirmationMessage xmlns="http://www.consol.com/schemas/AirlineSchema"> <correlationId>${correlationId}</correlationId> <bookingId>${royalAirlineBookingId}</bookingId> <success>true</success> <flight> <flightId>RA 1780</flightId> <airline>RoyalAirline</airline> <fromAirport>FRA</fromAirport> <toAirport>HAM</toAirport> <date>2009-04-15</date> <scheduledDeparture>16:00:00</scheduledDeparture> <scheduledArrival>17:10:00</scheduledArrival> </flight> </FlightBookingConfirmationMessage> ]]> </data> </message> <header> <element name="correlationid" value="${correlationId}"/> </header> </send> <receive endpoint="travelAgencyBookingResponseEndpoint"> <message> <data> <![CDATA[ <TravelBookingResponseMessage xmlns="http://www.consol.com/schemas/TravelAgency"> <correlationId>${correlationId}</correlationId> <success>true</success> <flights> <flight> <flightId>SM 1269</flightId> <airline>SmartAirline</airline> <fromAirport>MUC</fromAirport> <toAirport>FRA</toAirport> <date>2009-04-15</date> <scheduledDeparture>11:55:00</scheduledDeparture> <scheduledArrival>13:00:00</scheduledArrival> </flight> <flight> <flightId>RA 1780</flightId> <airline>RoyalAirline</airline> <fromAirport>FRA</fromAirport> <toAirport>HAM</toAirport> <date>2009-04-15</date> <scheduledDeparture>16:00:00</scheduledDeparture> <scheduledArrival>17:10:00</scheduledArrival> </flight> </flights> </TravelBookingResponseMessage> ]]> </data> </message> <header> <element name="correlationId" value="${correlationId}"/> </header> </receive> </actions> </testcase> </spring:beans>
Similar to a sequence diagram the test case describes every step of the use case. At the very beginning the test case gets name and its meta information. Following with the variable values that are used all over the test. Here it is the correlationId and the customerId that are used as test variables. Inside message templates header values the variables are referenced several times in the test
<correlationId>${correlationId}</correlationId>
<id>${customerId}</id>
The sending/receiving actions use a previously defined message sender/receiver. This is the link between test case and basic Spring configuration we have done before.
<send endpoint="travelAgencyBookingRequestEndpoint">
The sending action chooses a message sender to actually send the message using a message transport (JMS, Http, SOAP, etc.). After sending this first "TravelBookingRequestMessage" request the test case expects the first "FlightBookingRequestMessage" message on the SmartAirline JMS destination. In case this message is not arriving in time the test will fail with errors. In positive case our FlightBookingService works well and the message arrives in time. The received message is validated against a defined expected message template. Only in case all content validation steps are successful the test continues with the action chain. And so the test case proceeds and works through the use case until every message is sent respectively received and validated. The use case is done automatically without human interaction. Citrus simulates all surrounding applications and provides detailed validation possibilities of messages.
In the following sections we you will find out what has happened in the past Citrus releases.
Citrus 2.4 comes with a set of new features especially regarding Apache Camel and Docker integrations. Bugfixes of course are also part of the package. See the following overview on what has changed.
Docker and Microservices are frequent topics in software development recently. We have added interaction with Docker in Citrus so the user can manage Docker containers within a test case. Citrus now provides special Docker test actions for building, starting, stopping and inspecting Docker images and containers in a test. See Chapter 27, Docker support for details.
We have significantly improved the Http REST support in Citrus. The focus is on simplifying the Http REST usage in Citrus test cases. With new Http specific test actions on client and server we can send and receive Http REST messages very easy. See Chapter 17, HTTP REST support for details.
With the new wait test action we can explicitly wait for some remote condition to become true inside of a test case. The conditions supported at the moment are Http url requests and file based conditions. A user can invoke a Http server url and wait for it to return a success Http 200 OK response. This is an awesome feature when waiting for a server to start up before the test continues. We can also think of waiting for a Docker container to start up before continuing. Or you can wait until a file is present on the local file system. See Section 12.16, “Wait” for details.
Citrus has already had support for Apache Camel routes and Camel context loading. Now with 2.4 version we have added some special Apache Camel test actions for interacting with a Camel context and its routes. This enables the tester to create and use a new Camel route on the fly inside a test case. Also Citrus is now able to interact with the Camel control bus accessing route statistics and status information. Also possible are start, stop, suspend, resume operations on a Camel route. See Section 23.6, “Camel route actions” and Section 23.7, “Camel controlbus actions” for details.
Purging JMS queues and in memory channels at test runtime has become a widely used feature especially when aiming to make tests more stable in terms of independent tests. We have added a purge endpoint test action that works on any consumer endpoint. So you do not need to separate between endpoint implementations anymore and more important you can purge server in memory channel components very easy. See Section 12.19, “Purging endpoints” for details.
This is not a new feature but also worth to tell here as it is a significant improvement on the whole framework project. We can now release the Citrus artifacts to Maven central repository. So you do not need the additional labs.consol.de repository in your Maven POM anymore. The labs.consol.de repository will continue to exist though as we will release SNAPSHOT versions of Citrus here in future.
We want to give you a short overview of what has changed in Citrus 2.3. The release adds some new features and improvements to the box. Bugfixes of course are also part of the package. See the following overview on what has changed.
One of the biggest issues with the Citrus Java DSL is the fact that the Citrus Java DSL methods first build the whole test case together before the actual execution takes place. So calling a Java DSL method send for instance just prepares the sending test action. The actual sending of the message takes place to a later time when all test actions are setup and the test case is ready to run. This separation of design time and runtime of a test case leads to misunderstandings as a Java developer is used to work with statements and method calls that perform immediately. Based on that the mixture of Citrus Java DSL method calls and normal Java code logic in your test may have lead to unexpected behavior. Following from that we decided to refactor the Java DSL method execution. The result is a new TestRunner concept that executes all Java DSL method calls immediately. The old way of building the whole test case before execution is represented with TestDesigner concept. So both worlds are now available to you. See Chapter 4, Test cases for details.
The WebSocket message protocol builds on top of Http standard and brings bidirectional communication to the Http client-server world. With this release Citrus users are able to send and receive messages with WebSocket connections. The Http server implementation is now able to define multiple WebSocket endpoints. The new Citrus WebSocket client is able to publish messages to the server via bidirectional WebSocket protocol. See Chapter 18, WebSocket support for details.
Citrus is able to work with Xpath expressions in several fields within the testing domain (overwrite elements, ignore elements, extract values from payloads). Now this support of manipulating message payloads via expressions is extended with JSONPath. Similar to Xpath the JSONPath expression statements enable you to find elements and values within a message payload. Not very surprising the JSONPath expressions work with Json message payloads. With the new release you can overwrite, ignore and manipulate Json elements using JSONPath expressions. See Chapter 11, Using JSONPath for details.
The framework offers several message validator implementations for different message formats like XML, JSON, plaintext and so on. In addition to that Citrus has a set of Groovy script message validators. All these validator implementations are active by default so you are able to validate incoming messages accordingly in Citrus. Now with this release we added a more comfortable way of changing the framework validation functionality, particular when adding new customized message validator implementations. See Chapter 9, Message validation for details.
We have upgraded the versions of the major dependency libraries of Citrus. This includes TestNG, JUnit, Spring Framework, Spring WS, Spring Integration, Apache Camel, Arquillian, Jetty and more. So Citrus is now working with up-to-date versions of the whole messaging and middleware integration gang.
Along with new features and improvements we refactored and changed some parts of Citrus so you might have to set things straight when upgrading to 2.3. See the following list of things that might be brought up to you:
@CitrusTest annotation: We have moved the @CitrusTest annotation to a more common package. The old package was com.consol.citrus.dsl.annotations.CitrusTest. The new package is com.consol.citrus.annotations.CitrusTest. So you have to change the Java import statements in your Test classes when upgrading.
TestResult: We changed the TestResult instantiation when generating the test reports. The TestResult class now works with static instantiation methods for success, skipped and failed tests. This only affects your code when you have created custom test reporters.
CitrusTestBuilder deprecation: A major refactoring was done in the TestBuilder Java DSL code. com.consol.citrus.dsl.TestBuilder and all its subclasses were marked as deprecated and will disappear in next versions. So instead we now support com.consol.citrus.dsl.design.TestDesigner which basically offers the same functionality as former TestBuilder. In addition that refactoring brought a new way of executing the Java DSL test cases. Instead of building the whole test case before execution is done as a whole you can now use the com.consol.citrus.dsl.runner.TestRunner implementation in order to execute each test action in the Java DSL immediately. This is a more Java like way of writing Citrus test cases as you can mix Citrus test action execution with normal Java statements as usual. Read more about the new approach in Chapter 4, Test cases
Bugs are part of our software developers world and fixing them is part of your daily business, too. Finding and solving issues makes Citrus better every day. For a detailed listing of all bugfixes please refer to the complete changes log of each release in JIRA (http://www.citrusframework.org/changes-report.html).
Citrus 2.2 is a release mostly adding new features as well as improvements to given Citrus features. Bugfixes of course are also part of the package. See the following overview on what has changed.
Arquillian is a well known integration test framework that comes with a great feature set when it comes to Java EE testing inside of a full qualified application server. With Arquiliian you can deploy your Java EE services in a real application server of your choice and execute the tests inside the application server boundaries. This makes it very easy to test your Java EE services in scope with proper JNDI resource allocation and other resources provided by the application server. Citrus is able to connect with the Arquillian test case. Speaking in more detail your Arquillian test is able to use a Citrus extension in order to use the Citrus feature set inside the Arquillian boundaries. See Chapter 26, Arquillian support for details.
Citrus supports both major players in unit testing TestNG and JUnit. Unfortunately we did not offer the same feature support for JUnit as it was done for TestNG. Now with Citrus 2.2 we improved the JUnit support in Citrus so you are able to use all features with both frameworks. This is especially related to using the @CitrusTest and @CitrusXmlTest method annotations in test classes. See Section 6.2, “Run with JUnit” how it works.
Citrus was missing a dedicated test action to start and stop Citrus server components at tet runtime. With the newly added test actions you are able to start and stop server components as you like within your test case. See Section 12.23, “Start/Stop server instances” with a detailed description.
We discontinue to support the Citrus Ant tasks. The Ant tasks were not very stable an lacked full feature support when executing test cases with JUnit in Apache Ant. Instead we added a brief description on how to execute Citrus tests with the well documented and stable default JUnit and TestNG ant tasks. See Section 3.2, “Using Ant” how it works.
Bugs are part of our software developers world and fixing them is part of your daily business, too. Finding and solving issues makes Citrus better every day. For a detailed listing of all bugfixes please refer to the complete changes log of each release in JIRA (http://www.citrusframework.org/changes-report.html).
Citrus 2.1 adds some enhancements to the Citrus feature set as well as bugfixes and improvements. See the following overview on what has changed.
SOAP MTOM stands for Message Transmission Optimization Mechanism which allows you to send and receive large SOAP attachment contents streamed with optimized resource allocation on server and client. Many thanks to community contributions (github/stonator) that made this happen with Citrus SOAP client and server. As a user you can shoose to send and receive SOAP attachments with MTOM optimization. See Section 19.9.3, “SOAP MTOM support” for details.
In its default behavior Citrus will remove the SOAP envelope for incoming SOAP requests just providing the SOAP body as message payload. This is more straight forward in a test case to perform further validation steps. However it might be mandatory to see the whole SOAP envelope inside the test case for special validation. As a user you can now choose how to handle incoming SOAP envelope by definig the keep-soap-envelope setting on the Citrus SOAP server components. See Section 19.5, “SOAP Envelope handling” for details.
The Citrus SOAP server component was missing a setting for the SOAP message factory to use. The SOAP message factory implementation decides which SOAP version to use 1.1 or 1.2. Now you can set the message factory on the server component and define the SOAP version to use. See Section 19.6, “SOAP 1.2” for details.
We improved the TestNG data provider handling in Citrus. Now you can use the usual TestNG data provider annotations in your test methods. TestNG will call the Citrus test case several times with respective parameters provided as test variables. This replaces the old citrusDataProvider mechanism that tried to make things working in a kind of workaround. The new provider handling also supports multiple data providers in a test class. Section 6.1.1, “Using TestNG DataProviders” describes how this is working for you.
The Citrus mail components enable message exchange as mail client and server. For validation purpose the components offer a XML mail message representation. We have added a target namespace xmlns="http://www.citrusframework.org/schema/mail/message" and a XSD schema for this XML mail message representation. From now on you have to use the namespace accordingly in your mail message payloads when sending and receiving mail messages in Citrus. See Chapter 25, Mail support how to use the new XML mail message namespace.
When sending and receiving messages via ssh Citrus provides a XML representation for request and response data. These ssh messages follow a new target namespace xmlns="http://www.citrusframework.org/schema/ssh/message" and a XSD schema. This means you have to use the namespace accordingly in your ssh message payloads when sending and receiving ssh messages in Citrus. See Chapter 28, SSH support for further details.
Citrus 2.0 is a major version upgrade and therefore big things should be happening. In the following sections we shortly describe the Citrus evolution. We want you to get a quick overview of what has happened and all the new things in Citrus. So hopefully you can spot your favorite new feature.
In Citrus 1.4 we began to refactor the configuration components in Citrus. This refactoring was finalized in Citrus 2.0 which means that all deprecated classes and api are no longer supported. The classes were removed so you get compilation errors when using those old stuff. If you still use the old configuration see this migration-sheet in order to learn how to upgrade to the new configuration. It is worth to do so! In addition to that we did refactoring in following fields:
Reply message correlation In synchronous communication scenarios Citrus optionally correlated messages across send and receive test actions. In default setting the message correlation was disabled. With 2.0 release we changed this behavior to the opposite. Now message correlation is done by default with a default correlation algorithm. So in case you used the DefaultReplyMessageCorrelator in Citrus before you will not have to do so in future as this is done by default. The message correlation gives us more robust tests especially when executing tests in parallel. In the test case you do not have to do anything for proper message correlation.
Citrus message API We have refactored the Citrus message API to use custom message objects in endpoints, consumers and producers. This has no affect on your tests or configuration unless you have written endpoint extensions or custom endpoints on your own. You might have to refector your code accordingly. Have a look at the Citrus endpoint implementations in order to see how the new message API works for you.
Sleep time in milliseconds This is something that we definitely carry around since the beginning of Citrus. The time values in sleep test action were done in seconds, which is inconvenient when using time periods below one second or non natural numbers. Now you can choose to use milliseconds which is more likely how you should configure time periods anyway. See Section 12.4, “Sleep” for details
Auto sleep time in milliseconds We used seconds when using auto sleep in repeat on error container. This led to the fact that we were not able to sleep time periods below one second. Also it was not possible to specify non natural numbers such as 1.5 seconds auto sleep time. We changed to milliseconds which is more likely how you are used to configure time periods anyway. See Section 14.6, “Repeat on error until true” for details
Message handler vs. endpoint adapter In previous releases prior to 1.4 we had message handlers on server side that were able to forward in coming requests to message channels or jms destinations. The old message handler implementations were removed in 2.0. Instead you should use the endpoint-adapter implementations. See Chapter 32, Endpoint adapter how that works.
XML endpoint reference attribute In a XML test case you reference the message endpoint in the send and receive actions with a special attribute called with. This attribute is no longer supported and was removed. Instead you should use the endpoint attribute which was introduced in Citrus 1.4 and has the exact same functionality.
Removed citrus-adapter module The Maven module citrus-adapter was removed. Classes and API moved to citrus-core module. For endpoint adapters do use the new configuration components that were introduced in Citrus 1.4. See Chapter 32, Endpoint adapter for details.
WebServiceEndpoint class renamed In terms of package refactoring the com.consol.citrus.ws.WebServiceEndpoint was renamed to com.consol.citrus.ws.server.WebServiceEndpoint
In terms of upgrading the Citrus API dependencies we introduced Spring 4.x versions. This includes the core Spring framework libraries as well as the Spring Integration and Spring WebService project artifacts. So with the major version upgrade lots of API changes were also done in Citrus code in order to meet the new Spring 4.x API. So we recommend for you to also use Spring 4.x version in your Citrus projects.
New member of the Citrus family deals with FTP connectivity. The new citrus-ftp module provides a neat ftp server and client implementation so you can send and receive messages vie FTP message transport. Chapter 20, FTP support describes the new functionality in detail.
Functions are now able to access the test context. This enables you to access all test variables and other central test related components in a function implementation. Therefore the function Java interface has now an additional test context parameter. Refactor your custom written functions accordingly to meet the new interface rules. See how to write custom functions for details.
Just like functions now validation matchers are able to access the test context. This enables you to access all test variables and other central test related components in a validation matcher implementation. The validation matcher Java interface has changed accordingly with an additional test context parameter. Refactor your custom written matcher implementation accordingly to meet the new interface rules.
Message listeners do now also have access to the test context. This is more powerful as you can access test variables and other central components within the test context.
SOAP over JMS was supported in Citrus from the very beginning. Unfortunately you had to always specify the whole SOAP envelope in your test case. SOAP envelope handling is now done automatically by Citrus when using the new SoapJmsMessageConverter. The converter takes care on constructing a proper SOAP envelope message. See Section 16.5, “SOAP over JMS” for details.
When sending and receiving SOAP messages with Citrus as client or server you can add one to many attachments to the message. Before it was only possible to have one single attachment in a message. Now you have no limits in defining SOAP attachments. See Chapter 19, SOAP WebServices for details.
The SOAP header can hold multiple XML header fragments with different namespaces and content. With Citrus 2.0 you are able to construct such a SOAP message with multiple header contents. See Chapter 19, SOAP WebServices for details.
A new validation matcher implementation is able to create a new variable on the fly. The actual field name is used as variable name and the element value as variable value. The variable name can slo be customized with optional validation matcher parameter. This is a great alternative to the XPath expression evaluating variable extraction. Also very handsome to use this validation matcher in Json message payloads. See Section 34.12, “variable()” for details.
A major part of the Citrus configuration is done in a Spring bean application context. Central Citrus components and features are added as Spring beans to the application context. Now with Citrus 2.0 we have added special configuration components for almost all features. This means that you can easily add configuration using the new XML schema components. See which components are available:
Function library Custom function libraries with custom function implementations are now configured with the function-library XML schema components in the Spring application context configuration. See Chapter 33, Functions for details.
Validation matcher library Custom validation matcher implementations are now configured with the validation-matcher-library XML schema components in the Spring application context configuration. See Chapter 34, Validation matcher for details.
Data dictionary Data dictionaries apply to all messages send and received in test cases. You can define multiple dictionaries using the data-dictionary XML schema components in the Spring application context configuration. See Chapter 35, Data dictionaries for details.
Namespace context Configuration of a global namespace context is necessary for XML message payloads and XPath expressions used in the test cases. The namespace-context XML schema component is used in the Spring application context configuration and simplifies the configuration. See Chapter 10, Using XPath for details.
When executing test actions before the actual test run you can use the sequence before suite components. We have improved these components to use a special XML schema. This enables easy configuration of both before and after suite actions. In addition to that you can bind the suite actions to special packages, test names or suite names. So you can now have more than one sequence before suite at the same time. According to the environment settings the before suite actions are executed or left out. Last not least we have done the same improvement to the before test actions and we have introduced a after test sequence component for execution after each test. See how this is done in Chapter 37, Test suite actions.
JMS support has been a major part of Citrus from the very beginning. Up to now the JMS features were located in citrus-core Maven module. With Citrus 2.0 we introduced a separate citrus-jms Maven module. This means that you might have to add proper Maven dependency of this new module in your existing project when using JMS. See how this is done in Chapter 16, JMS support.
It was time for us to do some code refactoring in Citrus. Many users struggled with the configuration of the Citrus components and project setup was too verbose in some areas. This is why we tried to improve things with working over the basic concepts and components in Citrus.
The outcome is a new Citrus 1.4 which has new configuration components for sending and receiving messages. Also the client and server components for HTTP and SOAP have changed in terms of simplification. Unfortunately refactoring comes along with code deprecation. This is why you have to also change your project code and configuration in the future. This is especially when you have made code adjustments and extensions to the Citrus API.
The good news now is that with Citrus 1.4 both old and new configuration works fine, so you do not have to change your existing project configuration when coming from Citrus 1.3.x and earlier versions. But there is a lot of code marked as deprecated in Citrus 1.4. Have a look at what has been marked as deprecated and update your code to use the new API.
We have set up a migration sheet for users coming from Citrus 1.3.x and earlier versions in order to find a quick overview of what has changed and how to use the new configuration components: Citrus 1.4 migration-sheet
Data dictionaries define dynamic placeholders for message payload element values in general manner. In terms of setting the same message element across all test cases and all test actions the dictionary provides an easy key-value approach.
When dealing with any kind of message payload Citrus will ask the data dictionary for possible translation of the message elements contained. The dictionary keys do match to a specific message element defined by XPath expression or document path expression for instance. The respective value is then set on all messages in Citrus (inbound and outbound).
Dictionaries do apply to XML or JSON message data and can be defined in global or specific scope. Find out more detailed information about this topic in Chapter 35, Data dictionaries
With the new mail adapter you are able to both send and receive mail messages within a test case. The new Citrus mail client produces a mail mime part message with usual mail headers and a text body part. Optional attachment parts are supported, too.
On the server side Citrus provides a SMTP server to accept client mail messages. The incoming mail messages can have multiple text parts and attachment parts. As usual you can validate the incoming mail messages regarding headers and payload with the well known validation capabilities in Citrus.
Read more about the new mail module in Chapter 25, Mail support
Endpoint adapters help to customize the behavior of a Citrus server such as HTTP or SOAP web servers. The endpoint adapter is responsible of creating an endpoint that responds to inbound requests. You can customize the behavior so the Citrus server handles incoming requests as you like.
By default the Citrus server uses a channel endpoint adapter so incoming messages get forwarded to an in memory message channel. There are several other implementations available as endpoint adapter. Read more about that in Chapter 32, Endpoint adapter
We added a global variables XML configuration component for more comfortable usage in basic Spring application context configuration. The component is able to create new global variables that are valid across all Citrus test cases. This can also be done by loading a property file from an external file resource. Find out how to us it in ???
The Json text validator is now able to operate in two different modes. The strict mode is the default mode and validation includes also a strict check on all sub-objects and JSON array elements. So if there is an object missing the validation will fail immediately. Sometimes it may be accurate to only validate a subset of all JSON objects in the data structure. Therefore the non-strict mode does not check on object attribute counts. See more description in Section 9.3, “JSON message validation”
When sending and receiving HTTP messages on REST APIs you can now use interface specific options in the Java DSL. This refers to request uri, context path, query parameters and HTTP status codes for instance. With this enhancement you are now more comfortable in handling REST API calls in Citrus. Find out how to us it in Chapter 17, HTTP REST support
While receiving SOAP messages over HTTP we are now able to also verify the used HTTP uri, context-path and query parameters. You can expect clients to use those values in your receive action as you would do in normal HTTP communication within Citrus. This completes the HTTP server validation when using SOAP over HTTP. Read more about it in Chapter 19, SOAP WebServices
Apache Camel is a great enterprise integration platform that implements the enterprise integration patterns for building powerful mediation and routing rules for message based integration applications. With the new support for camel endpoints in Citrus you can interact with Apache Camel components for sending and receiving messages. Apache Camel offers a fine support for different message transports that now can be used in Citrus also. In addition to that you can put your Camel application to the test with loading of the Apache Camel context with all your route definitions. Citrus is able to interact with these routes in asynchronous and synchronous communication scenarios. Read about it in Chapter 23, Apache Camel support.
Vert.x is a very powerful application platform that provides scalable messaging for several message transports such as HTTP, WebSockets, TCP and more. Vert.x also has a distributed event bus that connects multiple Vert.x instances across the network. With Citrus 1.4 the Vert.x platform is integrated with Citrus event bus endpoints. So you can participate in communicating to the Vert.x event bus from Citrus test case. This enables you to add automated integration tests to the Vert.x platform. Read about that in Chapter 24, Vert.x event bus support.
Endpoints represent the base component in Citrus for sending and receiving messages. The endpoint usually is defined inside the Citrus Spring application context as Spring bean component. Now it is also possible to create dynamic endpoint definitions at test runtime. This comes in very handy when you just want to send or receive a message with Citrus as is. You do not need to add the complete endpoint configuration but only use a special endpoint uri pattern. Citrus will create the endpoint at runtime automatically. Learn how to use the dynamic endpoint pattern in Chapter 31, Dynamic endpoint components.
With the new Java DSL capabilities Citrus created new ways of executing test cases within a TestNG or JUnit test class. Now we even improved the usage here with two new annotations @CitrusTest and CitrusXmlTest. The integration into the unit test class has never been easier for you.
The new Citrus annotations go directly to your unit test methods. With this enhancement you can have multiple Citrus test cases in one single Java class and the Citrus tests now are able to coexist with other unit test methods. You can even mix Java DSL and XML Citrus test cases in a single Java class.
The XML Citrus tests can be grouped to a single Java class with multiple XML files loaded during execution. There is even a package scan for all Citrus XML files within a directory structure so you do not have to create a Java class for each test case anymore.
We have changed the documentation in this guide so you can see how to use the new annotations. For detailed overview see ???. Also see our Citrus blog where we continuously describe the many possibilities that you have with the new annotations.
Citrus is able to use the fabulous TestNG data provider capabilities in order to execute a test case several times with different data provided form external resources. The new @CitrusParameters annotation helps to set parameter names which are used as test variable names in the test case.
Defining schema repositories and schemas (xsd, wsdl) is common use in Citrus. We have added XML bean definition parsers so defining those components is less verbose. You can use the Citrus citrus:schema-repository and citrus:schema components in your Spring application context configuration. The components do receive several attributes for further configuration. XSD, WSDL and schema collections are supported here.
Checkout ??? for examples how to use the new configuration components.
We have added a new Citrus function citrus:changeDate() that is available for you by default. The function changes a given date value adding or removing a datetime offset (e.g. year, month, day, hour, minute, second). So you can manipulate each date value also those of dynamic nature coming with some message.
See Section 33.29, “citrus:changeDate()” for examples and detailed syntax usage of this function.
The new weekday validation matcher also works on date values. The matcher checks that a given date value evaluates to a expected day of the week. So the user can check that a date field is always a saturday for instance. This is very helpful when checking that a given date value is not a working day for example.
See Section 34.11, “isWeekday()” for some more detailed description of the matcher's capabilities.
Citrus users, in particular those with development experience, do often tell me about the nasty XML code they have to deal with for writing Citrus test definitions. Developers want to write Java code rather than XML. Although I personally do like the Citrus XML test syntax we have introduced a Java DSL language for writing Citrus tests with Java only.
We have introduced the Java DSL to all major test action features in Citrus so you can switch without having to worry about loosing functionality. Details can be seen in the test action section where we added Java DSL examples almost everywhere (Chapter 12, Test actions). The basic Java DSL setup is described in Chapter 4, Test cases.
Message validation for Html code was not really comfortable as Html does not confirm to be wellformed and valid XML syntax. XHTML tries to close this gap by automatically resolving all Html specific XML syntax rule violations. With Citrus 1.3 we introduced a XHTML message validator which does the magic for converting Html code to proper wellformed and valid XML. In a test case you can then use the full XML validation power in Citrus in order to validate incoming Html messages. Section Section 9.4, “XHTML message validation” deals with the new validation capabilities for Html.
SOAP fault messages can hold many SOAP fault detail elements. Citrus was able to handle a single SOAP fault detail on sending and receiving test actions from the very beginning but multiple SOAP fault detail elements were not supported. Fortunately things are getting better and you can send and receive as many fault detail elements as you like in Citrus 1.3. For each SOAP fault detail you can specify individual validation rules and expectations. See Section 19.7, “SOAP faults” for detailed description.
With our Jetty server component you can set up Http mock servers very easy. The server is automatically configured to accept Http client connections and to load a Spring application context on startup. Now you can also set some more details on this automatic server configuration (e.g. server context path, servlet names or servlet mappings). In addition to that you can access the security context of the web container. This enables you to set up security constraints such as basic authentication on server resources. Clients are then forced to authenticate properly when accessing the server. Unauthorized users will get 401 access denied errors immediately. See Section 17.7, “HTTP server basic authentication” for details. Of course this also applies to our SOAP WebService Jetty server components (Section 19.11, “SOAP server basic authentication”).
We introduced a new concept of test actors for sending and receiving test actions. This enables you to link a test actor (e.g. interface partner application, backend application) to a test action in your test. Following from that you can enable/disable test actors and all linked test actions very easy. This enables us to reuse Citrus test cases in end-to-end test scenarios where not all interface partners get simulated by Citrus. If you like to read more about this concept follow the detailed instruction in Chapter 36, Test actors.
Citrus provides SOAP WebServices server simulation with clients connecting to the server sending SOAP requests. As a server Citrus is now able to simulate Http error codes like 404 Not found and 500 Internal server error. Before that the Citrus SOAP server had to always respond with a proper SOAP response or SOAP fault. See Section 19.8, “Send HTTP error codes with SOAP” for details.
The Citrus family has raised a new member in adding SSH connectivity. With the new SSH module you are able to provide a full stack SSH server. The SSH server accepts client connections and you as a tester can simulate any SSH server functionality with proper validation as it is known to Citrus SOAP and HTTP modules. In addition to that you can also use the Citrus SSH client in order to connect to an external SSH server. You can execute SSH commands on the SSH server and validate the respective response data. The full description is provided in Chapter 28, SSH support.
With this new test action you can call ANT builds from your test case. The action executes one or more ANT build targets on a build.xml file. You can specify build properties that get passed to the ANT build and you can add a custom build listener. In case the ANT build run fails the test fails accordingly with the build exception. See Section 12.22, “Running Apache Ant build targets” for details.
With synchronous communication in Citrus we always have a combination of a synchronous message sender and a reply handler component. These two perform a handshake when passing synchronous reply messages to the test for further processing such as message validation. While the sender is waiting for the synchronous response to arrive the reply handler polls for the reply message. This polling for reply messages was done in a static way which often led to time delays according to long polling intervals. Now with Citrus 1.3 you can set the polling-interval for the reply handler as you like. This setting is valid for all reply handler components in Citrus (citrus-jms, citrus-http, citrus-ws, citrus-channel, citrus-shh, and so on).
If you are coming from Citrus 1.2 you may have to look at the following points in order to have a smooth upgrade to the new release version.
Jetty version upgrade We are using Jetty a lot for starting Http server mocks within Citrus. In order to stay up to date we upgraded to Jetty 8.1.7 version with this Citrus release. This implies that package names did change for Jetty API. In general there is no conflict for you as a Citrus user, but you may want to adjust your logging configuration according to new Jetty packages. Jetty package names did change from ord.mortbay to org.eclipse.jetty.
Spring version upgrade Staying up to date with the versions of 3rd library dependencies is quite important for us. So we upgrade our dependencies to newer versions with each release. As we did only upgrade minor versions there is no significant change or problems to be expected. However you may take care on versions and release changes in the Spring world for details and migration.
TIBCO module We decided to put the TIBCO module separately as it is a very special connectivity adapter for TIBCO software only. So you will not find the TIBCO module within the Citrus distribution anymore. We will maintain a TIBCO connectivity adapter separately in the future.
We have some major version upgrades in our Spring dependencies. We are now using Spring 3.1.1, Spring Integration 2.1.2 and SpringWS 2.1.0. This upgrade was overdue for some time and is definitely worth it. With these upgrades we had to apply some changes in our API, too. This is because we are using the Spring classes a lot in our code. See the upgrade guide in this chapter for all significant changes that might affect your project.
Citrus extended the possibilities to work with script languages like Groovy. You can use Groovy's MarkupBuilder to create XML message payloads. Your Groovy code goes right into the test case or comes from external file. With MarkupBuilder you do not need to care about XML message syntax and overhead. Just focus on the pure message content. You can read the details in Section 12.2.4, “Groovy MarkupBuilder”.
Further Groovy feature goes to the validation capabilities. Instead of working with XML DOM tree comparison and XPath expression validation you can use Groovy XMLSlurper. This is very useful for those of you who need to do complex message validation and do not like the XML/XPath syntax at all. With XMLSlurper you can access the XML DOM tree via named closure operations which feels great. This especially comes in handy for complex generic XML structures as you can search for elements, sort element list and use the powerful contains operation. This is all described in Section 9.1.4, “Groovy XML validation”.
Some other Groovy support extension comes in SQL result set validation (Section 12.3.3, “Groovy SQL result set validation”). When reading data from the database someone is able to validation the resulting data row set with Groovy script. The script code easily accesses the rows and columns with Groovy's out-of-the-box list and map handling. This adds very powerful validation to multi-row data sets from the database.
In this new Citrus version the tester can validate SQL Query results that have multiple rows. In the past Citrus could only handle a single row in the result set. Now this new release brings light into the dark. See also the new Groovy SQL result set validation which fits brilliant for complex multi-row SQL result set validation. The details can be found in Section 12.3.2, “SQL query”
In previous versions Citrus was primary designed to handle XML message payloads. With this new release Citrus is also able to work with other message formats such as JSON, CSV, PLAINTEXT. This applies to sending messages as well as receiving and particularly validating message payloads. The tester can specify several message validators in Citrus for different message formats. According to the expected message format the proper validator is chosen to perform the message validation.
We have implemented a JSON message validator capable of ignoring specific JSON entries and handling JSONArrays. We also provide a plain text message validator which is very basic to be honest. The framework is ready to receive new validator implementations so you can add custom validators for your specific needs.
XML namespace handling is tedious expecially if you have to deal with a lot of XPath expressions in your tests. Before you had need to specify a namespace context for the XPath expression every time you use them in your test - now you can have a central namespace context which declares namespaces you use in your project. These namespaces identified by some prefix are available throughout the test project which is much more maintainable and easy to use. See how it works in Section 10.4, “XML namespaces in XPath”.
WsAddressing standard is now supported in Citrus (Section 19.12, “WS-Addressing support”). This means you can declare the specific WsAddressing message headers on message sender level in order to send messages with WsAddressing feature. The header is constructed automatically for all SOAP messages that are sent over the message sender.
Dynamic SOAP endpoint uri resolver enables you to dynamically address SOAP endpoints during a test. Sometimes a message sender may dynamically have to change the SOAP url for each call (e.g. address different request uri parts). With a endpoint uri resolver set on the message sender you can handle this requirement very easy. The tip for dynamic endpoint resolving was added to ???
We also simplified the synchronous SOAP HTTP communication within test cases. In previous versions you had to build complex parallel and sequential container constructs in order to continue with test execution while the SOAP message sender is waiting for the synchronous response to arrive. Now you can simply fork the message sending action and continue with further test actions while synchronous SOAP communication takes place. See the Section 19.13, “SOAP client fork mode” for details
Some really small change introduced with this release is the fact that Citrus now logs SOAP messages in their pure nature. This means that you can see the complete SOAP envelope of messages in the Citrus log files. This is more than helpful when searching for errors inside your test case.
We have changed Http communication components for full support of RESTful WebServices on client and server side. The Http client now uses Spring's REST support for Http requests (GET, PUT, DELETE, POST, etc.). The server side has changed, too. The Http server now provides RESTful WebServices and is compliant to the existing SOAP Jetty server implementation in Citrus. If you want to upgrade existing projects to this version you may have to adjust the Spring application context configuration to some extent.
For details have a look at the upgrade guide (???) in this chapter or find detailed explanations to the new Http components in Chapter 17, HTTP REST support.
Citrus provides HTML reports after each test run with detailed information on the failed tests. You can immediately see which tests failed in execution and where the test stopped. Section 40.3, “HTML reports” provides details on this new feature.
The new validation matchers will put the message validation mechanisms to a new level. With validation matchers you are able to execute powerful assertions on each message content element. For instance you can use the isNumber validation matcher for checking that a message value is of numeric nature. We added several matcher implementations that are ready for usage in your test but you can also write your custom validation matchers. Have a look at Chapter 34, Validation matcher for details.
The new conditional test action container enables you to execute test actions only in case a boolean expression evaluates to true. So the nested test actions inside the container may be not executed at all in case a condition is not met. See Section 14.2, “Conditional” for details.
Spring Integration message channels do not support message selectors like JMS queues do for example. With Citrus 1.2 we implemented a solution for this issue with a special message channel implementation. So you can use the message selector feature also when using message channels. Go to Section 21.3, “Message selectors on channels” for details.
We introduced some completely new test actions in this release for you. The new actions are listed below:
- Purge message channel action (Section 12.18, “Purging message channels”)
See Chapter 12, Test actions for detailed instructions how to use the new actions.
We introduced some new default Citrus functions that will ease the testers life. This includes commonly used functions like encoding/decoding base64 bindary data, escaping XML and generating random Java UUID values. These are the new functions in this release:
- citrus:randomUUID()
- citrus:cdataSection()
- citrus:encodeBase64()
- citrus:decodeBase64()
- citrus:digestAuthHeader()
- citrus:localHostAddress()
See Chapter 33, Functions for detail descriptions of each function.
If you are coming from Citrus 1.1 final you may have to look at the following points.
Spring version update We did some major version upgrades on our Spring dependencies. We are now using Spring 3.1.1, Spring Integration 2.1.2 and SpringWS 2.1.0. These new major releases bring some code changes in our Citrus API which might affect your code and configuration, too. So please update your configuration, it is definitely worth it!
Spring Integration headers: With 2.0.x version Spring Integration has removed the internal header prefix ("springintegration_"). So in some cases you might use those internal header names in your test cases in order to synchronize synchronous communication with internal message ids. Your test case will fail as long as you use the old Spring internal header prefix in the test. Simply remove the header prefix wherever used and your test is up and running again.
Message validator: You need to specify at least one message validator in the Spring application context. Before this was internally a static XML message validator, but now we offer different validators for several message formats like XML and JSON. Please see the Java API doc on MessageValidator interface for available implementations. If you just like to keep it as it was before add this bean to the Spring application context:
<bean id="xmlMessageValidator" class="com.consol.citrus.validation.xml.DomXmlMessageValidator"/>
Test suite: We have eliminated/changed the Citrus test suite logic because it duplicates those test suites defined in TestNG or JUnit. In older versions the tester had to define a Citrus test suite in Spring application context in order to execute test actions before/after the test run. Now these tasks before and after the test run are decoupled from a test suite. You define test suites exclusively in TestNG or JUnit. The test actions before/after the test run are separately defined in Spring application context so you have to change this configuration in your Citrus project.
See Chapter 37, Test suite actions for details on this configuration changes.
JUnit vs. TestNG: We support both famous unit testing frameworks JUnit and TestNG. With this release you are free to choose your prefered one. In this manner you need to add either a JUnit dependency or a TestNG dependency to your project on your own. We do not have static dependencies in our Maven POM to neither of those two. On our side these dependencies are declared optional so you feel free to add the one you like best to your Maven POM. Just add a JUnit or TestNG dependency to your Maven project or add the respective jar file to your project if you use ANT instead.